cnspp-ch03-des-2
- 格式:ppt
- 大小:1.08 MB
- 文档页数:23
部分电视机CPU型号及简单代换部分电视机CPU型号及简单代换8879CPBNG6V38 海信CPU8873CPBNG6U73 创维CPUTOSHIBA-HAY-22、8873CSCNG6PR6 通用CPUTDA9373PS/N2/AI1115 SVA CPU13-TB73-TM1V001、LC863332A-5T25、LC863332A-5S97 夏华CPU88CS38N-3P48、TMP88PS38 夏华K2918、K2926,解码TB1251TDA9381PS/N3/2/1741 索尼CPUTDA9381PS/N2/3I0837 LG CPUTDA9381PS/N2/3I0975 三星CPUTDA9373PS/N2/AI0939(Haier9373-V2.0)Haier9373-V1.0 海尔CPU V1.0的可以换空白存储器,按遥控器数字8、V+ 进总线LC863324B-54M2、LC863324A-5W21、LC863324C-55M5 海信CPUOM8370-A-3NC、NOM8370-A-1NC 海信、西湖、夏华、彩星CP-2156TCL-M18V3PNICAN、TCL-M11V1P 王牌CPUH13V02-T0、8829CSNG5CJ2、H13V01-T0 TCL CPUTDA9370PS/N2/AI1429(4706-D93705-64)3P36、4P36 创维CPU 4706-D83702-64CH05T1501 长虹CHD2590M37210M3-551SP日立25M8C CPUTDA9373PS/N2/AI0911(A01V01-PH)TDA9373PS/N2/AI0996 TCL 2990UHD0401、S3F880AXZZ 创维(3S30/5S30/5S31)MN152811TJS 松下CPU 85元LC863524C-55L7、53P4、52Y7、TH-50J2 杂牌CPULC863524C-55L6、55Y5、55K8 杂牌CPU87CK38N-3647(TMP87CK38N-3675、1C48)澳柯玛、松王M37221M6-309S 厦华R2920 CPUTDA9380PS/N1/IS0380(TCL-UOC-V01)王牌CPU,用TDA9383PS代替要把60脚接地13-T00S23-03M01、8879CSBNG6K02 乐华25G6BCH08T2602(8873CSANG6JH8)长虹CPUOM8373PS/N3/2/1870(4706-D83732-64)创维短管机专用CPULC863328A-51J8 嘉华CPU8803CPAN-3PE8(8823CPNG4JR6)换存储器、39脚,C205换1UF,ST6378B1/FKF 4S02-3008 创维数码3008TMP47C434N-3526 通用王牌TCL M14VBC 王牌CPUST6367BB1/BFX 不详LC863324A-5N09 海信CPULC864512V-5C77 海信CPUM34300N4-565SPKY88C94 夏华CPUM34300N4-555SP 日立CPULC863328A-5S15 高路华、海信CPUMC8902A-5Y83 熊猫、高路华CPUMC8904A-5Z25 熊猫、高路华、海信、西湖CPUM37210M3-807SP 康力CPUT-P-16 8823CPNG5RH6 熊猫CPU SAA5647HL/M1 飞利蒲CPUOM8373PS/N3/A/1914(OM8373PS/N3/A/1854)康佳短管CPUTMP47C634AN RC18 厦华CPUHAIER1132S、HAIER1532S 海尔21T8D-S、21F9G-Shisense 8803-1(8803CPBNG3VG6)8823CPNG3PE8 海信TC2111A 换存储器、39脚,C205换1UF,OM8370PS/N3/1(HZ10V01)(TOUL 12-02M00)TCL CPUHAIER8829-V2.0(8829CPNG4PG3)海尔CPUCH0504、CH0503 长虹CPUM34302M8-612SP SONY CPUCH04T1306 长虹CPUNOM8370-A-11B 西湖CPUTCL-T00Y12-02M01(LA76931)、TOOY12-01M01 TCL CPUCKP1302S1(8829CPNG6FP6)CKP1302S 康佳CPUP88P8432N、S3C8849X13-AQB7 嘉华CPU OM8373-B-3NC 海信TF2507FLC863328C-55N6、5T45 康佳CPUTDA9373PS/N2/AI0889、4706-D93731-64 5P30 创维CPULC863328B-53P5、LC863328C-56M9、LC863328B-52E4、50J1 SVA CPUR2J10160G8-A12FP、R2J1016008-A06FP 数源S21A07 等13-TOOS13-08M01、8873CSBNG6N15 TCL CPU8873CPANG6HV9 数源TJ21A23 CPU87CM38N-1K45、87CM38N-1U87 夏华XT-259ATAVC139 三洋CPULC863320A-5N94、LC863320A-5N17(3Y01)创维CPUCH05T1604(TDA9370PS/N2/AI0848)长虹超级芯片CH05T1607(TDA9370PS/N2/AI1092)TDA9370PS 长虹超级芯片CH05T1606(TDA9373PS/N2/AI1087)TDA9373PS 长虹超级芯片CH05T1630、OM8373PS/N3/A/1842(CH05T1621)长虹,按键功能错乱,伴音失控。
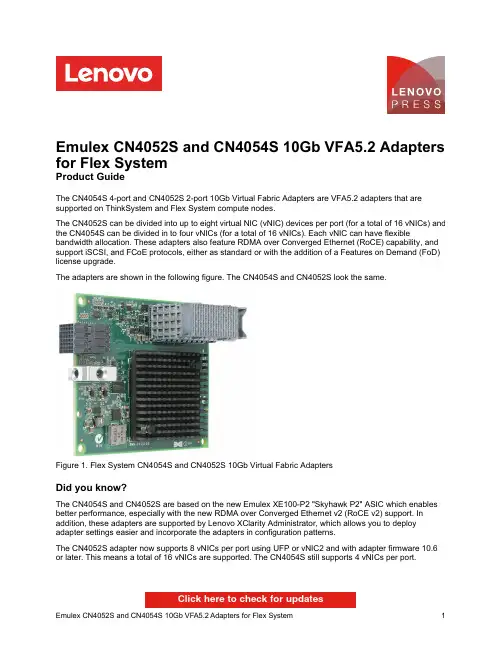
Emulex CN4052S and CN4054S 10Gb VFA5.2 Adapters for Flex SystemProduct GuideThe CN4054S 4-port and CN4052S 2-port 10Gb Virtual Fabric Adapters are VFA5.2 adapters that are supported on ThinkSystem and Flex System compute nodes.The CN4052S can be divided into up to eight virtual NIC (vNIC) devices per port (for a total of 16 vNICs) and the CN4054S can be divided in to four vNICs (for a total of 16 vNICs). Each vNIC can have flexible bandwidth allocation. These adapters also feature RDMA over Converged Ethernet (RoCE) capability, and support iSCSI, and FCoE protocols, either as standard or with the addition of a Features on Demand (FoD) license upgrade.The adapters are shown in the following figure. The CN4054S and CN4052S look the same.Figure 1. Flex System CN4054S and CN4052S 10Gb Virtual Fabric AdaptersDid you know?The CN4054S and CN4052S are based on the new Emulex XE100-P2 "Skyhawk P2" ASIC which enables better performance, especially with the new RDMA over Converged Ethernet v2 (RoCE v2) support. In addition, these adapters are supported by Lenovo XClarity Administrator, which allows you to deploy adapter settings easier and incorporate the adapters in configuration patterns.The CN4052S adapter now supports 8 vNICs per port using UFP or vNIC2 and with adapter firmware 10.6 or later. This means a total of 16 vNICs are supported. The CN4054S still supports 4 vNICs per port.Click here to check for updatesIn pNIC mode, an adapter with the FoD upgrade applied operates in traditional Converged Network Adapter (CNA) mode with four ports (CN4054S) or two ports (CN4052S) of Ethernet and four ports (CN4054S) or two ports (CN4052S) of iSCSI or FCoE available to the operating system.Server supportThe following table lists the ThinkSystem and Flex System compute nodes that support the adapters. Table 2. Support for Flex System compute nodesPartnumber DescriptionAdapters - ThinkSystem and Flex System compute nodes01CV780Flex System CN4052S 2-port 10Gb Virtual FabricAdapter AdvancedN N Y Y Y Y Y Y Y Y00AG540Flex System CN4052S 2-port 10Gb Virtual FabricAdapterN N Y Y Y N Y Y Y Y00AG590Flex System CN4054S 4-port 10Gb Virtual FabricAdapterY Y Y Y Y Y Y Y Y Y Features on Demand upgrades - Flex System compute nodes only00JY804Flex System CN4052 Virtual Fabric Adapter SWUpgrade (FoD)Y Y Y Y Y Y Y N N N00AG594Flex System CN4054S 4-port 10Gb Virtual Fabric Adapter SW Upgrade (FoD)Y Y Y Y Y Y Y N N N x24(8737,E5-26v2)x24(7162)x24M5(9532,E5-26v3)x24M5(9532,E5-26v4)x44(7167)x88/x48/x28X6(793)x28/x48/x88X6(7196)SN55(7X16)SN85(7X15)SN55V2(7Z69)I/O module supportThese adapters can be installed in any I/O adapter slot of a supported Flex System compute node. One or two compatible 1 Gb or 10 Gb I/O modules must be installed in the corresponding I/O bays in the chassis. The following table lists the switches that are supported. When connected to the 1 Gb switch, the adapter will operate at 1 Gb speeds. When connected to the 40 Gb switch, the adapter will operate at 10 Gb speeds.To maximize the number of adapter ports usable, you may also need to order switch upgrades to enable additional ports. Alternatively, for CN4093, EN4093R, and SI4093 switches, you can use Flexible Port Mapping (FPM), a feature of Networking OS 7.8 or later, that allows you to minimize the number of upgrades needed.See the Product Guides for the Flex System switches for more details about switch upgrades and FPM: https:///servers/blades/networkmoduleThe table below specifies how many ports the adapters contain. For the CN4054S, to enable all 4 adapter ports, either upgrade the switch or use Flexible Port Mapping. Switches should be installed in pairs to maximize the number of ports enabled and to provide redundant network connections.Table 3. I/O modules supportedPartnumber Description CN4052Sports†CN4054Sports†4SG7A08868Lenovo ThinkSystem NE2552E Flex Switch2400FM514Lenovo Flex System Fabric EN4093R 10Gb Scalable Switch24**00FM510Lenovo Flex System Fabric CN4093 10Gb Converged Scalable Switch24**00FE327Lenovo Flex System SI4091 10Gb System Interconnect Module2200FM518Lenovo Flex System Fabric SI4093 System Interconnect Module24**90Y9346Flex System EN6131 40Gb Ethernet Switch2288Y6043Flex System EN4091 10Gb Ethernet Pass-thru2249Y4294Flex System EN2092 1Gb Ethernet Scalable Switch24**94Y5350Cisco Nexus B22 Fabric Extender for Flex System2200D5823*Flex System Fabric CN4093 10Gb Converged Scalable Switch24**95Y3309*Flex System Fabric EN4093R 10Gb Scalable Switch24**49Y4270*Flex System Fabric EN4093 10Gb Scalable Switch24**95Y3313*Flex System Fabric SI4093 System Interconnect Module24**94Y5212*Flex System EN4023 10Gb Scalable Switch24*** Withdrawn from marketing† This is the number of adapter ports that will be enabled per adapter, and requires that two switches be installed in the chassis.** The use of 4 ports will require either a switch upgrade to enable additional ports or the use of Flexible Port Mapping to reconfigure the active portsThe following table shows the connections between adapters installed in the compute nodes and the switch bays in the chassis.Table 4. Adapter to I/O bay correspondenceI/O adapter slot in the server Port on the adapter Corresponding I/O module bayin the chassisSlot 1Port 1Module bay 1Port 2Module bay 2Port 3*Module bay 1Port 4*Module bay 2 Slot 2Port 1Module bay 3Port 2Module bay 4Port 3*Module bay 3Port 4*Module bay 4Slot 3(full-wide compute nodes only)Port 1Module bay 1 Port 2Module bay 2 Port 3*Module bay 1 Port 4*Module bay 2Slot 4(full-wide compute nodes only)Port 1Module bay 3 Port 2Module bay 4 Port 3*Module bay 3 Port 4*Module bay 4* Ports 3 and 4 (CN4054S only) require Upgrade 1 of the selected switch, where applicable. 14-port modules such as the EN4091 Pass-thru, SI4091 switch, and Cisco B22 only support ports 1 and 2 (and only when two I/O modules are installed).The following figure shows the internal layout of the CN4054S, with how the adapter ports are routed to the I/O module internal ports.Note: INTD1 is not available on any currently shipping Flex System I/O modules.Figure 2. Internal layout of the CN4054S adapter portsThe following figure shows the internal layout of the CN4052S, and how the adapter ports are routed to the I/O module internal ports.Note: INTD1 is not available on any currently shipping Flex System I/O modules.Figure 3. Internal layout of the CN4052S adapter portsThe connections between the adapters installed in the compute nodes to the switch bays in the chassis are shown diagrammatically in the following figure. The figure shows half-wide servers (such as the x240 M5 with two adapters) and full-wide servers (such as the x440 with four adapters).Figure 4. Logical layout of the interconnects between I/O adapters and I/O modulesSUSE Linux Enterprise Server 12 SP2N N N Y Y Y Y Y SUSE Linux Enterprise Server 12 SP2 with Xen N N N Y Y Y Y Y SUSE Linux Enterprise Server 12 SP3N N N Y Y Y Y Y SUSE Linux Enterprise Server 12 SP3 with Xen N N N Y Y Y Y Y SUSE Linux Enterprise Server 12 SP4N Y Y Y Y Y Y Y SUSE Linux Enterprise Server 12 SP4 with Xen N Y Y Y Y Y Y Y SUSE Linux Enterprise Server 12 SP5Y Y Y Y Y Y Y Y SUSE Linux Enterprise Server 12 SP5 with Xen Y Y Y Y Y Y Y Y SUSE Linux Enterprise Server 15N Y Y Y Y Y Y N SUSE Linux Enterprise Server 15 SP1N Y Y Y Y Y Y N SUSE Linux Enterprise Server 15 SP1 with Xen N Y Y Y Y Y Y N SUSE Linux Enterprise Server 15 SP2Y Y Y Y Y Y Y N SUSE Linux Enterprise Server 15 SP2 with Xen Y Y Y Y Y Y Y N SUSE Linux Enterprise Server 15 SP3Y Y Y Y Y N N N SUSE Linux Enterprise Server 15 SP3 with Xen Y Y Y Y Y N N N SUSE Linux Enterprise Server 15 SP4Y Y Y Y Y N N N SUSE Linux Enterprise Server 15 SP4 with Xen Y Y Y Y Y N N N SUSE Linux Enterprise Server 15 SP5Y Y Y Y Y N N N SUSE Linux Enterprise Server 15 SP5 with Xen Y Y Y Y Y N N N SUSE Linux Enterprise Server 15 with Xen N Y Y Y Y Y Y N Ubuntu 18.04.5 LTSY N N N N N N N VMware vSphere Hypervisor (ESXi) 5.5N N N N N Y N Y VMware vSphere Hypervisor (ESXi) 6.0 U3N N N Y Y Y N Y VMware vSphere Hypervisor (ESXi) 6.5N N N Y Y Y Y N VMware vSphere Hypervisor (ESXi) 6.5 U1N N N Y Y Y Y N VMware vSphere Hypervisor (ESXi) 6.5 U2N Y Y Y Y Y Y N VMware vSphere Hypervisor (ESXi) 6.5 U3N Y Y Y Y Y Y N VMware vSphere Hypervisor (ESXi) 6.7N N N Y Y Y N N VMware vSphere Hypervisor (ESXi) 6.7 U1N Y Y Y Y Y N N VMware vSphere Hypervisor (ESXi) 6.7 U2N Y Y Y Y Y N N VMware vSphere Hypervisor (ESXi) 6.7 U3Y Y Y Y Y Y N N VMware vSphere Hypervisor (ESXi) 7.0N Y Y Y Y N N N VMware vSphere Hypervisor (ESXi) 7.0 U1N Y Y Y Y N N N VMware vSphere Hypervisor (ESXi) 7.0 U2Y Y Y Y Y N N NOperating systemsS N 550 V 2S N 550 (X e o n G e n 2)S N 850 (X e o n G e n 2)S N 550 (X e o n G e n 1)S N 850 (X e o n G e n 1)x 240 M 5 (9532)x 280/x 480/x 880 X 6 (719x 440 (7167)VMware vSphere Hypervisor (ESXi) 7.0 U3Y Y Y Y Y N N NOperating systemsTable 6. Operating system support for Flex System CN4054S 4-port 10Gb Virtual Fabric Adapter, 00AG590Operating systemsMicrosoft Windows Server 2012N N N N N Y Y Y N Y Y Y Microsoft Windows Server 2012 R2N N N Y Y Y Y Y N Y Y Y Microsoft Windows Server 2016Y Y Y Y Y Y N Y N Y Y N Microsoft Windows Server 2019Y Y Y Y Y N N Y N N N N Microsoft Windows Server 2022Y Y Y Y Y N N N N N N N Microsoft Windows Server version 1709N N N Y Y N N Y Y N Y N Microsoft Windows Server version 1803N N N Y N N N N N N N N Red Hat Enterprise Linux 6.10N N N Y Y Y Y Y Y Y Y Y Red Hat Enterprise Linux 6.9N N N Y Y Y Y Y Y Y Y Y Red Hat Enterprise Linux 7.3N N N Y Y Y Y Y Y Y Y Y Red Hat Enterprise Linux 7.4N N N Y Y Y Y Y Y Y Y Y Red Hat Enterprise Linux 7.5N N N Y Y Y Y Y Y Y Y Y Red Hat Enterprise Linux 7.6N Y Y Y Y Y Y Y Y Y Y Y Red Hat Enterprise Linux 7.7N Y Y Y Y Y Y Y Y Y Y Y Red Hat Enterprise Linux 7.8N Y Y Y Y Y Y Y Y Y Y Y Red Hat Enterprise Linux 7.9Y Y Y Y Y Y Y Y Y Y Y Y Red Hat Enterprise Linux 8.0N Y Y Y Y N N N N N N N Red Hat Enterprise Linux 8.1N Y Y Y Y N N N N N N N Red Hat Enterprise Linux 8.2Y Y Y Y Y N N N N N N N Red Hat Enterprise Linux 8.3Y Y Y Y Y N N N N N N N Red Hat Enterprise Linux 8.4Y Y Y Y Y N N N N N N N Red Hat Enterprise Linux 8.5Y Y Y Y Y N N N N N N N Red Hat Enterprise Linux 8.6Y Y Y Y Y N N N N N N N Red Hat Enterprise Linux 8.7Y Y Y Y Y N N N N N N NS N 550 V 2S N 550 (X e o n G e n 2)S N 850 (X e o n G e n 2)S N 550 (X e o n G e n 1)S N 850 (X e o n G e n 1)x 240 M 5 (9532)x 280/x 480/x 880 X 6 (719x 440 (7167)S N 550 V 2S N 550 (X e o n G e n 2)S N 850 (X e o n G e n 2)S N 550 (X e o n G e n 1)S N 850 (X e o n G e n 1)x 240 (8737, E 5 v 2)x 240 (7162)x 240 M 5 (9532)x 280/x 480/x 880 X 6 (7196)x 280/x 480/x 880 X 6 (7903)x 440 (7167)x 440 (7917)SUSE Linux Enterprise Server 11 SP4N N N Y Y Y Y Y N Y Y Y SUSE Linux Enterprise Server 11 SP4 with Xen N N N Y Y Y Y Y N Y Y Y SUSE Linux Enterprise Server 11 for x86N N N N N N Y N N N Y N SUSE Linux Enterprise Server 12 SP2N N N Y Y Y Y Y Y Y Y Y SUSE Linux Enterprise Server 12 SP2 with Xen N N N Y Y Y Y Y Y Y Y Y SUSE Linux Enterprise Server 12 SP3N N N Y Y Y Y Y Y Y Y Y SUSE Linux Enterprise Server 12 SP3 with Xen N N N Y Y Y Y Y Y Y Y Y SUSE Linux Enterprise Server 12 SP4N Y Y Y Y Y Y Y Y Y Y Y SUSE Linux Enterprise Server 12 SP4 with Xen N Y Y Y Y Y Y Y Y Y Y Y SUSE Linux Enterprise Server 12 SP5Y Y Y Y Y Y Y Y Y Y Y Y SUSE Linux Enterprise Server 12 SP5 with Xen Y Y Y Y Y Y Y Y Y Y Y Y SUSE Linux Enterprise Server 15N Y Y Y Y N N Y Y N N N SUSE Linux Enterprise Server 15 SP1N Y Y Y Y N N Y Y N N N SUSE Linux Enterprise Server 15 SP1 with Xen N Y Y Y Y N N Y Y N N N SUSE Linux Enterprise Server 15 SP2Y Y Y Y Y N N Y Y N N N SUSE Linux Enterprise Server 15 SP2 with Xen Y Y Y Y Y N N Y Y N N N SUSE Linux Enterprise Server 15 SP3Y Y Y Y Y N N N N N N N SUSE Linux Enterprise Server 15 SP3 with Xen Y Y Y Y Y N N N N N N N SUSE Linux Enterprise Server 15 SP4Y Y Y Y Y N N N N N N N SUSE Linux Enterprise Server 15 SP4 with Xen Y Y Y Y Y N N N N N N N SUSE Linux Enterprise Server 15 SP5Y Y Y Y Y N N N N N N N SUSE Linux Enterprise Server 15 SP5 with Xen Y Y Y Y Y N N N N N N N SUSE Linux Enterprise Server 15 with Xen N Y Y Y Y N N Y Y N N N Ubuntu 18.04.5 LTSY N N N N N N N N N N N VMware vSphere Hypervisor (ESXi) 5.5N N N N N Y Y Y N Y Y Y VMware vSphere Hypervisor (ESXi) 6.0 U3N N N Y Y Y Y Y Y Y Y Y VMware vSphere Hypervisor (ESXi) 6.5N N N Y Y Y N Y Y Y N N VMware vSphere Hypervisor (ESXi) 6.5 U1N N N Y Y Y N Y Y Y N N VMware vSphere Hypervisor (ESXi) 6.5 U2N Y Y Y Y Y N Y Y Y N N VMware vSphere Hypervisor (ESXi) 6.5 U3N Y Y Y Y Y N Y Y Y N N VMware vSphere Hypervisor (ESXi) 6.7N N N Y Y N N Y N N N N VMware vSphere Hypervisor (ESXi) 6.7 U1N Y Y Y Y N N Y N N N N VMware vSphere Hypervisor (ESXi) 6.7 U2N Y Y Y Y N N Y N N N N VMware vSphere Hypervisor (ESXi) 6.7 U3Y Y Y Y Y N N Y N N N NOperating systemsS N 550 V 2S N 550 (X e o n G e n 2)S N 850 (X e o n G e n 2)S N 550 (X e o n G e n 1)S N 850 (X e o n G e n 1)x 240 (8737, E 5 v 2)x 240 (7162)x 240 M 5 (9532)x 280/x 480/x 880 X 6 (719x 280/x 480/x 880 X 6 (790x 440 (7167)x 440 (7917)VMware vSphere Hypervisor (ESXi) 7.0N Y Y Y Y N N N N N N N VMware vSphere Hypervisor (ESXi) 7.0 U1N Y Y Y Y N N N N N N N VMware vSphere Hypervisor (ESXi) 7.0 U2Y Y Y Y Y N N N N N N N VMware vSphere Hypervisor (ESXi) 7.0 U3Y Y Y Y Y N N N N N N NOperating systemsTable 7. Operating system support for Flex System CN4052S 2-port 10Gb Virtual Fabric Adapter Advanced,01CV780Operating systemsMicrosoft Windows Server 2012N N N N N Y Y Y Y Microsoft Windows Server 2012 R2N N N Y Y Y Y Y Y Microsoft Windows Server 2016Y Y Y Y Y Y Y Y N Microsoft Windows Server 2019Y Y Y Y Y Y N N N Microsoft Windows Server 2022Y Y Y Y Y N N N N Microsoft Windows Server version 1709N N N Y Y Y Y N N Microsoft Windows Server version 1803N N N Y N N N N N Red Hat Enterprise Linux 6.10N N N Y Y Y Y Y Y Red Hat Enterprise Linux 6.9N N N Y Y Y Y Y Y Red Hat Enterprise Linux 7.3N N N Y Y Y Y Y Y Red Hat Enterprise Linux 7.4N N N Y Y Y Y Y Y Red Hat Enterprise Linux 7.5N N N Y Y Y Y Y Y Red Hat Enterprise Linux 7.6N Y Y Y Y Y Y Y Y Red Hat Enterprise Linux 7.7N Y Y Y Y Y Y Y Y Red Hat Enterprise Linux 7.8N Y Y Y Y Y Y Y Y Red Hat Enterprise Linux 7.9Y Y Y Y Y Y Y Y Y Red Hat Enterprise Linux 8.0N Y Y Y Y N N N N Red Hat Enterprise Linux 8.1N Y Y Y Y N N N N Red Hat Enterprise Linux 8.2Y Y Y Y Y N N N N Red Hat Enterprise Linux 8.3Y Y Y Y Y N N N NS N 550 V 2S N 550 (X e o n G e n 2)S N 850 (X e o n G e n 2)S N 550 (X e o n G e n 1)S N 850 (X e o n G e n 1)x 240 (8737, E 5 v 2)x 240 (7162)x 240 M 5 (9532)x 280/x 480/x 880 X 6 (719x 280/x 480/x 880 X 6 (790x 440 (7167)x 440 (7917)S N 550 V 2S N 550 (X e o n G e n 2)S N 850 (X e o n G e n 2)S N 550 (X e o n G e n 1)S N 850 (X e o n G e n 1)x 240 M 5 (9532)x 280/x 480/x 880 X 6 (7196)x 280/x 480/x 880 X 6 (7903)x 440 (7917)Red Hat Enterprise Linux 8.4Y Y Y Y Y N N N N Red Hat Enterprise Linux 8.5Y Y Y Y Y N N N N Red Hat Enterprise Linux 8.6Y Y Y Y Y N N N N Red Hat Enterprise Linux 8.7Y Y Y Y Y N N N N SUSE Linux Enterprise Server 11 SP4N N N Y Y Y Y Y Y SUSE Linux Enterprise Server 11 SP4 with Xen N N N Y Y Y Y Y Y SUSE Linux Enterprise Server 11 for x86N N N N N N Y N N SUSE Linux Enterprise Server 12 SP2N N N Y Y Y Y Y Y SUSE Linux Enterprise Server 12 SP2 with Xen N N N Y Y N Y Y Y SUSE Linux Enterprise Server 12 SP3N N N Y Y Y Y Y Y SUSE Linux Enterprise Server 12 SP3 with Xen N N N Y Y N Y Y Y SUSE Linux Enterprise Server 12 SP4N Y Y Y Y Y Y Y Y SUSE Linux Enterprise Server 12 SP4 with Xen N Y Y Y Y N Y Y Y SUSE Linux Enterprise Server 12 SP5Y Y Y Y Y Y Y Y Y SUSE Linux Enterprise Server 12 SP5 with Xen Y Y Y Y Y N Y Y Y SUSE Linux Enterprise Server 15N Y Y Y Y Y Y N N SUSE Linux Enterprise Server 15 SP1N Y Y Y Y Y Y N N SUSE Linux Enterprise Server 15 SP1 with Xen N Y Y Y Y Y Y N N SUSE Linux Enterprise Server 15 SP2Y Y Y Y Y Y Y N N SUSE Linux Enterprise Server 15 SP2 with Xen Y Y Y Y Y Y Y N N SUSE Linux Enterprise Server 15 SP3Y Y Y Y Y N N N N SUSE Linux Enterprise Server 15 SP3 with Xen Y Y Y Y Y N N N N SUSE Linux Enterprise Server 15 SP4Y Y Y Y Y N N N N SUSE Linux Enterprise Server 15 SP4 with Xen Y Y Y Y Y N N N N SUSE Linux Enterprise Server 15 SP5Y Y Y Y Y N N N N SUSE Linux Enterprise Server 15 SP5 with Xen Y Y Y Y Y N N N N SUSE Linux Enterprise Server 15 with Xen N Y Y Y Y Y Y N N Ubuntu 18.04.5 LTSY N N N N N N N N VMware vSphere Hypervisor (ESXi) 5.5N N N N N Y Y Y Y VMware vSphere Hypervisor (ESXi) 6.0 U3N N N Y Y Y Y Y Y VMware vSphere Hypervisor (ESXi) 6.5N N N Y Y Y Y Y N VMware vSphere Hypervisor (ESXi) 6.5 U1N N N Y Y Y Y Y N VMware vSphere Hypervisor (ESXi) 6.5 U2N Y Y Y Y Y Y Y N VMware vSphere Hypervisor (ESXi) 6.5 U3N Y Y Y Y Y Y Y NOperating systems S N 550 V 2S N 550 (X e o n G e n 2)S N 850 (X e o n G e n 2)S N 550 (X e o n G e n 1)S N 850 (X e o n G e n 1)x 240 M 5 (9532)x 280/x 480/x 880 X 6 (719x 280/x 480/x 880 X 6 (790x 440 (7917)TrademarksLenovo and the Lenovo logo are trademarks or registered trademarks of Lenovo in the United States, other countries, or both. A current list of Lenovo trademarks is available on the Web athttps:///us/en/legal/copytrade/.The following terms are trademarks of Lenovo in the United States, other countries, or both:Lenovo®Flex SystemServerProven®System x®ThinkSystem®VMready®XClarity®The following terms are trademarks of other companies:Xeon® is a trademark of Intel Corporation or its subsidiaries.Linux® is the trademark of Linus Torvalds in the U.S. and other countries.Microsoft®, Hyper-V®, SQL Server®, SharePoint®, Windows Server®, and Windows® are trademarks of Microsoft Corporation in the United States, other countries, or both.Other company, product, or service names may be trademarks or service marks of others.Emulex CN4052S and CN4054S 10Gb VFA5.2 Adapters for Flex System21。
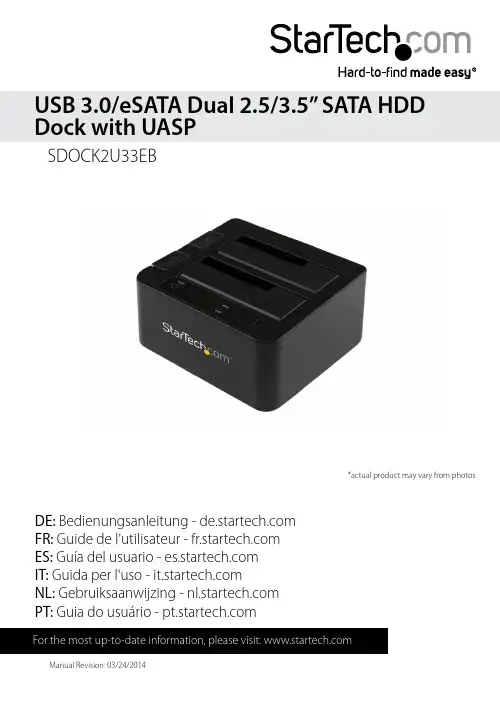
DE: Bedienungsanleitung - FR: Guide de l'utilisateur - ES: Guía del usuario - IT: Guida per l'uso - NL: Gebruiksaanwijzing - PT:Guia do usuário - SDOCK2U33EBUSB 3.0/eSATA Dual 2.5/3.5” SATA HDD Dock with UASP*actual product may vary from photosFCC Compliance StatementThis equipment has been tested and found to comply with the limits for a Class B digital device, pursuant to part 15 of the FCC Rules. These limits are designed to provide reasonable protection against harmful interference in a residential installation. This equipment generates, uses and can radiate radio frequency energy and, if not installed and used in accordance with the instructions, may cause harmful interference to radio communications. However, there is no guarantee that interference will not occur in a particular installation. If this equipment does cause harmful interference to radio or television reception, which can be determined by turning the equipment off and on, the user is encouraged to try to correct the interference by one or more of the following measures:• Reorient or relocate the receiving antenna.• Increase the separation between the equipment and receiver.• Connect the equipment into an outlet on a circuit different from that to which the receiver is connected.• Consult the dealer or an experienced radio/TV technician for help.Use of Trademarks, Registered Trademarks, and other Protected Names and Symbols This manual may make reference to trademarks, registered trademarks, and other protected names and/or symbols of third-party companies not related in any way to . Where they occur these references are for illustrative purposes only and do not represent an endorsement of a product or service by , or an endorsement of the product(s) to which this manual applies by the third-party company in question. Regardless of any direct acknowledgement elsewhere in the body of this document, hereby acknowledges that all trademarks, registered trademarks, service marks, and other protected names and/or symbols contained in this manual and related documents are the property of their respective holders.Table of ContentsProduct Overview (1)Front View (1)Rear View (1)Introduction (2)Packaging Contents (2)System Requirements (2)Installation (3)Docking Station Installation (3)Drive Installation (3)Drive Removal (4)Docking Station Operation (5)Drive Initialization (5)LED Indicator (6)Disconnecting the Hard Drive (6)Specifications (7)Technical Support (8)Warranty Information (8)Product OverviewFront ViewRear VieweSATA portPower adapter portPower buttonPower /Activity LEDsIntroductionPackaging Contents• 1 x USB 3.0/eSATA to Dual 2.5/3.5in SATA hard drive docking station• 1 x USB 3.0 Cable• 1 x eSATA cable• 1x Universal Power Adapter (NA/UK/EU)• 1x Instruction ManualSystem Requirements• Computer system with available USB or eSATA port• Up to two 2.5” or 3.5” SATA Hard Drives (HDD) or Solid State Drives (SSD)• Microsoft® Windows® 2000/XP/Server 2003/Vista/Server 2008 R2/7/8/8.1 (32/64-bit), Apple® Mac® OS 9.x/10, Chrome OS or Linux®InstallationWARNING! Hard drives and docking stations require careful handling. If you are not careful with your hard disk, lost data may result. Always handle your hard drive and docking station with caution. Be sure that you are properly grounded by wearing an anti-static strap when handling computer components or discharge yourself of any static electricity build-up by touching a large grounded metal surface (such as the computer case) for several seconds.Docking Station Installation1. Connect the Dock to an available power outlet, using the provided power adapter.2. Connect the Dock to your computer system, using the provided USB/eSATA cable.Drive Installation1. Carefully align and insert the2.5” or3.5” SATA drive(s) you wish to dock in the desired hard drive slot on the docking station, such that the SATA power and data connectors on the drive are properly aligned with the corresponding connectors inside the hard drive slot.2. Press the power button so the docking station is turned on.Note: The single power button operates both drive slots.3. Once the drives have been installed and the docking station has been powered on, the computer Operating System will automatically recognize the drive(s) and it will be accessible as though it were installed in the system internally.Note: If your computer fails to automatically recognize your drive it is likely your drive has not been initialized or formatted correctly. (See Drive Initialization in Software operation for further instructions.)Drive RemovalWARNING! Ensure your hard drive(s) has been disconnected from your computer operating system prior to attempting drive removal. Failure to properly disconnect your drive may result in lost data or drive damage. (See Disconnecting the Hard Drive in Docking Station Operation for further instructions.)1. Turn off the docking station by pressing the power button.2. Press the eject button that corresponds with the drive you wish to remove.3. Carefully grasp the ejected drive and lift it upwards until the bottom of the drive has completely risen above the hard drive slot.4. Safely and carefully store your drive in a secure location. (See your hard drive manual for proper storage instructions.)Note: We recommend ensuring the docking station is powered off before any drive is physically inserted or removed from the docking station. If two drives are docked simultaneously, and one drive is removed while the docking station is still powered on the other drive will momentarily disconnect from your computer which could cause drive damage or loss of data if other drive is still mounted.Docking Station OperationDrive InitializationPrior to using your installed drive, it will need to be initialized and formatted to the operating system requirements in order for your computer system to recognize it.1. From the main Windows desktop, right-click on “My Computer” (“Computer” in Vista/ 7 / 8/ 8.1), then select Manage. In the new Computer Management window, select Disk Management from the left window panel.2. A dialog window will automatically appear, asking you to initialize the drive. Depending on the version of Windows, it will give you the option of either creating an “MBR” or “GPT” disk.Note: GPT (GUID partition) is required for drives larger that 2TB but is not compatible with some older operating systems, while MBR is supported by newer and older operating systems.3. Once initialized, locate the Disk that says it is “Unallocated” (check the listed hard drive capacity to confirm it’s the correct hard drive) and then right-click in the section that says “Unallocated” and select “New Partition”.4. Follow the on screen prompts to initialize the drive in the format of your choice. LED IndicatorThe docking station offers an LED indicator for each drive, to enable you to monitor drive activity. When the docking station is powered on, the LED will illuminate. While the hard drive is being accessed, the LED will blink. Do not remove your drive from the docking station while the LED is flashing, as it could damage to your drive, resulting in data loss.Disconnecting the Hard DriveWindows1. Select the “Safely remove Hardware and Eject Media” icon, located in the task bar.2. Select the storage device from the list that appears.3. Wait for the message indicating that it is now safe to remove the device.Note: Removing the connected drive prior to receiving notification that it is safe to do so, could result in losing or corrupting data stored on the drive. Once the Safe to Remove Hardware message appears, please remove the drive from the docking station. (See Drive Removal.)Mac OS XTo safely disconnect the attached drive from the host computer, close any windows listing the contents of the removable drive. Once all windows are closed, click on the USB storage icon on the desktop, and drag it to the Trash Can icon on the desktop. Allow 5 seconds before physically removing the drive from the docking station.SpecificationsTechnical Support’s lifetime technical support is an integral part of our commitment to provide industry-leading solutions. If you ever need help with your product, visit /support and access our comprehensive selection of online tools, documentation, and downloads.For the latest drivers/software, please visit /downloads Warranty InformationThis product is backed by a two year warranty.In addition, warrants its products against defects in materials and workmanship for the periods noted, following the initial date of purchase. During this period, the products may be returned for repair, or replacement with equivalent products at our discretion. The warranty covers parts and labor costs only. does not warrant its products from defects or damages arising from misuse, abuse, alteration, or normal wear and tear.Limitation of LiabilityIn no event shall the liability of Ltd. and USA LLP (or their officers, directors, employees or agents) for any damages (whether direct or indirect, special, punitive, incidental, consequential, or otherwise), loss of profits, loss of business, or any pecuniary loss, arising out of or related to the use of the product exceed the actual price paid for the product. Some states do not allow the exclusion or limitation of incidental or consequential damages. If such laws apply, the limitations or exclusions contained in this statement may not apply to you.Instruction Manual8Hard-to-find made easy. At , that isn’t a slogan. It’s a promise. is your one-stop source for every connectivity part you need. From the latest technology to legacy products — and all the parts that bridge the old and new — we can help you find the parts that connect your solutions.We make it easy to locate the parts, and we quickly deliver them wherever they need to go. Just talk to one of our tech advisors or visit our website. You’ll be connected to the products you need in no time.Visit for complete information on all products and to access exclusive resources and time-saving tools. is an ISO 9001 Registered manufacturer of connectivity and technology parts. was founded in 1985 and has operations in the United States, Canada, the United Kingdom and Taiwan servicing a worldwide market.。
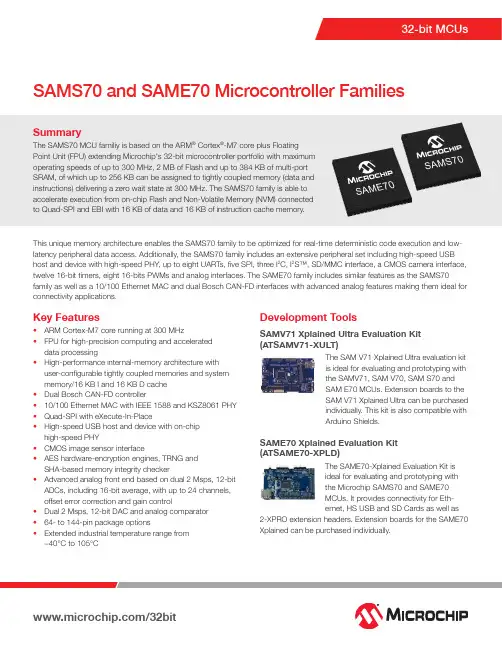
SAMS70 and SAME70 Microcontroller FamiliesSummaryThe SAMS70 MCU familiy is based on the ARM ® Cortex ®-M7 core plus FloatingPoint Unit (FPU) extending Microchip's 32-bit microcontroller portfolio with maximum operating speeds of up to 300 MHz, 2 MB of Flash and up to 384 KB of multi-port SRAM, of which up to 256 KB can be assigned to tightly coupled memory (data and instructions) delivering a zero wait state at 300 MHz. The SAMS70 family is able to accelerate execution from on-chip Flash and Non-Volatile Memory (NVM) connectedto Quad-SPI and EBI with 16 KB of data and 16 KB of instruction cache memory.This unique memory architecture enables the SAMS70 family to be optimized for real-time deterministic code execution and low-latency peripheral data access. Additionally, the SAMS70 family includes an extensive peripheral set including high-speed USB host and device with high-speed PHY , up to eight UARTs, five SPI, three I 2C, I 2S™, SD/MMC interface, a CMOS camera interface, twelve 16-bit timers, eight 16-bits PWMs and analog interfaces. The SAME70 family includes similar features as the SAMS70family as well as a 10/100 Ethernet MAC and dual Bosch CAN-FD interfaces with advanced analog features making them ideal forconnectivity applications.Key Features• ARM Cortex-M7 core running at 300 MHz• FPU for high-precision computing and accelerated data processing• High-performance internal-memory architecture with user-configurable tightly coupled memories and system memory/16 KB I and 16 KB D cache • Dual Bosch CAN-FD controller• 10/100 Ethernet MAC with IEEE 1588 and KSZ8061 PHY • Quad-SPI with eXecute-In-Place• High-speed USB host and device with on-chip high-speed PHY• CMOS image sensor interface• AES hardware-encryption engines, TRNG and SHA-based memory integrity checker• Advanced analog front end based on dual 2 Msps, 12-bit ADCs, including 16-bit average, with up to 24 channels, offset error correction and gain control• Dual 2 Msps, 12-bit DAC and analog comparator • 64- to 144-pin package options• Extended industrial temperature range from −40°C to 105°CDevelopment ToolsSAMV71 Xplained Ultra Evaluation Kit (ATSAMV71-XULT)The SAM V71 Xplained Ultra evaluation kit is ideal for evaluating and prototyping with the SAMV71, SAM V70, SAM S70 and SAM E70 MCUs. Extension boards to the SAM V71 Xplained Ultra can be purchased individually. This kit is also compatible with Arduino Shields.SAME70 Xplained Evaluation Kit (ATSAME70-XPLD)The SAME70-Xplained Evaluation Kit is ideal for evaluating and prototyping with the Microchip SAMS70 and SAME70 MCUs. It provides connectivity for Eth-ernet, HS USB and SD Cards as well as2-XPRO extension headers. Extension boards for the SAME70Xplained can be purchased individually.The Microchip name and logo and the Microchip logo are registered trademarks of Microchip Technology Incorporated in the U.S.A. and other countries. All other trademarks mentioned herein are property of their respective companies. © 2017, Microchip Technology Incorporated. All Rights Reserved. Printed in the U.S.A. 6/17DS60001427CPackage Options*QFN with wettable Flanks。

脱机烧录器使用手册V3.1名称:南京沁恒微电子股份有限公司地址:南京市宁双路18号•沁恒科技园邮编:210012总机:************网址:/技术支持电话:************技术论坛:https:///bbs/thread-73750-1.html目录一、产品功能与参数 (1)1.1产品功能 (1)1.2产品参数 (1)二、烧录器硬件说明 (2)2.1、烧录器模式切换 (2)2.2、DIP转接板设计注意事项 (2)三、烧录器软件功能说明 (3)3.1烧录流程 (3)3.2、DlPubTool_N_V2.X软件生成烧录器专用文件 (3)3.3、【可选】DlPubTool_N_V2.X软件可选功能项 (5)3.4、使用McuUpdTool.EXE软件将专用文件加载到脱机烧录器内 (7)四、烧录用户固件 (9)4.1、USB下载 (9)4.2、串口下载 (10)4.3、SWD方式下载(CH32系列) (10)五、校验功能 (11)六、机台控制烧录器 (11)七、烧录器主控升级【3种方法】 (13)7.1、用WCHISPTool的USB方式 (13)7.2、用WCHISPTool的串口方式 (14)7.3、脱机烧录器自身更新 (16)八、滚码功能&&自定义信息 (16)8.1、联机烧录-串口自定义 (17)8.2、滚码功能 (18)九、FAQ (18)9.1、为什么脱机烧录器下载不成功? (18)9.1.1、供电方面: (18)9.1.2、选型&&连线: (19)9.1.3、烧录芯片的板子或座子: (19)9.1.4、脱机烧录器硬件: (19)9.2、脱机烧录器如何供电? (19)9.3、脱机下载是否一定要使用密钥? (19)9.4、如何检测脱机烧录器硬件好与坏? (19)9.5、如何判断连接脱机烧录器和PC的type-c线是可通信线? (19)9.6、脱机烧录器S2按键的作用是? (20)9.7、如何生成随机密钥? (20)9.8、如何手动下载固件? (20)9.9、DlPubTool_N_V1.X.EXE软件在PC打开有问题? (20)9.10、ISP配置说明详解 (21)一、产品功能与参数脱机烧录器是一款脱机离线、批量烧录沁恒系列芯片工具。
D i s c l a im er : T h i s d o c u m e n t a t i o n i s n o t i n t e n d e d a s a s u b s t i t u t e f o r a n d i s n o t t o b e u s e d f o r d e t e r m i n i n g s u i t a b i l i t y o r r e l i a b i l i t y o f t h e s e p r o d u c t s f o r s p e c i f i c u s e r a p p l i c a t i o n sProduct data sheetCharacteristics140DDO35300discrete output module Modicon Quantum - 32 O solid stateMainRange of productModicon Quantum automation platform Product or component type Dc discrete output module Discrete output number32ComplementaryGroup of channels 4 groups of 8Discrete output logic Positive logic (source)Addressing requirement 2 output words Discrete output voltage 24 V DC Output voltage limits 19.2...30 VAbsolute maximum output 56 V for 1.3 s decaying pulse Voltage drop0.4 V 0.5 A Maximum load current16 A per module 16 A per module 4 A per group 4 A per group Surge current <= 5 A for 0.0005 s Response time <= 1 ms at state 0 to state 1<= 1 ms at state 1 to state 0Leakage current 0.4 mA 30 VLoad inductance Inductance(H) = 0.5/((current(A))² x (switching frequency(Hz))) 50 Hz Fault indication Blown fuseLoss of field power Associated fuse rating3 A each point 3 A each point 5 A per group 5 A per groupIsolation between channels and bus 1780 Vrms DC for 1 minute Isolation between group 500 Vrms DC for 1 minuteProtection typeInternal output protection by 5 A fuse per groupPower dissipation 1.75 W + (0.4 V x total module load current)Marking CELocal signalling1 LED green bus communication is present (Active)1 LED red external fault detected (F)32 LEDs green input status Bus current requirement 330 mA 330 mA Module format Standard Product weight0.45 kgEnvironmentProduct certificationsABS BV C-Tick DNVFM Class 1 Division 2GL GOST RINA RMRSSafety certification non interfering StandardsCSA C22.2 No 142UL 508Resistance to electrostatic discharge 4 kV contact conforming to IEC 801-28 kV on air conforming to IEC 801-2Resistance to electromagnetic fields 10 V/m 80...2000 MHz conforming to IEC 801-3Ambient air temperature for operation 0...60 °C Ambient air temperature for storage -40...85 °CRelative humidity 95 % without condensation Operating altitude<= 5000 mOffer SustainabilitySustainable offer status Green Premium productRoHS (date code: YYWW)Compliant - since 0848 - Schneider Electric declaration of conformity Schneider Electric declaration of conformity REAChReference not containing SVHC above the threshold Reference not containing SVHC above the threshold Product environmental profileAvailableProduct environmental Product end of life instructionsAvailableEnd of life manualContractual warrantyWarranty period18 monthsDimensions DrawingsRacks for Modules MountingDimensions of Modules and Racks(1) 2 slots (2) 3 slots (3) 4 slots (4) 6 slots (5)10 slots (6)16 slotsConnections and Schema24 Vdc Discrete Output Source Module Wiring Diagram。
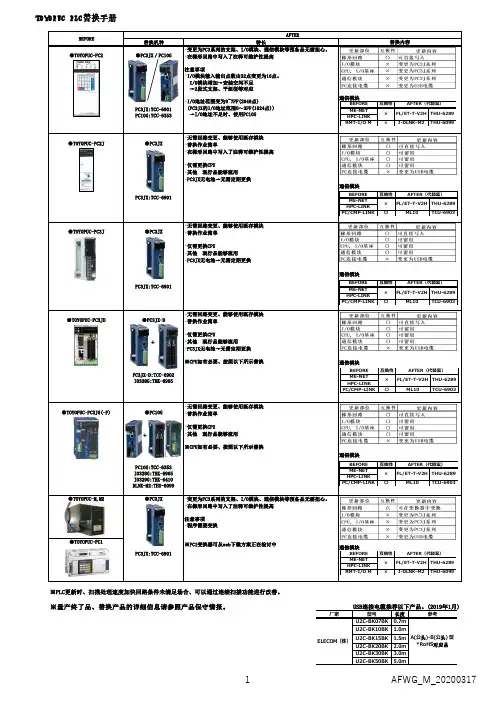
替换机种特长替换内容●TOYOPUC-PC2●PC3JX/PC10GPC3JX:TCC-6901PC10G:TCC-6353・变更为PC3系列的支架、I/O模块、通信模块等预备品无需担心。
・在梯形回路中写入了注释可维护性提高注意事项・I/O模块输入输出点数由32点变更为16点。
I/O模块增加→安装空间不足 →2段式支架、平坦型等对应・I/O地址范围变为0~7FF(2048点)(PC3JX的I/O地址范围0~3FF(1024点)) →I/O地址不足时、使用PC10G通信模块●TOYOPUC-PC2J ●PC3JXPC3JX:TCC-6901・无需回路变更、能够使用既存模块・替换作业简单・在梯形回路中写入了注释可维护性提高・仅需更换CPU・其他 现行品能够流用・PC3JX无电池→无需定期更换通信模块●TOYOPUC-PC3J ●PC3JXPC3JX:TCC-6901・无需回路变更、能够使用既存模块・替换作业简单・仅需更换CPU・其他 现行品能够流用・PC3JX无电池→无需定期更换通信模块●TOYOPUC-PC3JD ●PC3JX-DPC3JX-D:TCC-6902IO328G:THK-6905・无需回路变更、能够使用既存模块・替换作业简单・仅需更换CPU・其他 现行品能够流用・PC3JX无电池→无需定期更换※CPU如有必要、按照以下所示替换通信模块●TOYOPUC-PC3JG(-P)●PC10GPC10G:TCC-6353IO328G:THK-6905IO329G:THK-6410DLNK-M2:THU-6099・无需回路变更、能够使用既存模块・替换作业简单・仅需更换CPU・其他 现行品能够流用※CPU如有必要、按照以下所示替换通信模块●TOYOPUC-M,M2●TOYOPUC-PC1※量产终了品、替换产品的详细信息请参照产品保守情报。
USB连接电缆推荐以下产品。
(2019年1月)※PLC更新时、扫描处理速度加快回路条件未满足场合、可以通过连续扫描功能进行改善。

Features•1-of-8 bidirectional translating multiplexer•I2C-bus interface logic•Operating power supply voltage from 1.65V to5.5V•Allows voltage level translation between 1.2V,1.8V,2.5 V,3.3 V and 5 V buses•Low standby current•Low Ron switches•Active LOW reset input•Channel selection via I2C bus• Power-up with one channel on•Capacitance isolation when channel disabled •No glitch on power-up•Supports hot insertion• 5 V tolerant inputs•0 Hz to 400 kHz clock frequency•ESD protection exceeds 8000 V HBM per JESD22-A114, and 1000 V CDM per JESD22-C101 •Latch-up testing is done to JEDEC StandardJESD78 which exceeds 100 mA• Packages offered: TSSOP-24L,TQFN-24ZDPin Configuration DescriptionThe PI4MSD5V9547 is an octal bidirectional translating multiplexer controlled by the I2C-bus. The SCL/SDA upstream pair fans out to eight downstream pairs, or channels.Only one SCx/SDx channel can be selected at a time, determined by the contents of the programmable control register. The device powers up with Channel 0 connected, allowing immediate communication between the master and downstream devices on that channel.An active LOW reset input allows the PI4MSD5V9547 to recover from a situation where one of the downstream I2C-buses is stuck in a LOW state. Pulling the RESET pin LOW resets the I2C-bus state machine and causes all the channels to be deselected as does the internal Power-On Reset (POR) function.The pass gates of the switches are constructed such that the VCC pin can be used to limit the maximum high voltage which is passed by the PI4MSD5V9547. This allows the use of different bus voltages on each pair, so that1.2V, 1.8 V or 2.5 V or 3.3 V parts can communicate with 5 V parts without any additional protection. External pull-up resistors pull the bus up to the desired voltage level for each channel. All I/O pins are 5 V tolerant.TSSOPTQFNFigure 1: Block DiagramMaximum RatingsStorage Temperature .................................................–55°C to +125°C Supply Voltage port B .................................................–0.5V to +6.0V Supply Voltage port A ................................................–0.5V to +6.0V DC Input Voltage ....................................................... –0.5V to +6.0V Control Input Voltage (EN)… .................................. –0.5V to +6.0V Total power dissipation (1).......................................................100mW Input current(EN,VCC,GND).....................................50mAESD: HBM Mode (8000V)Note:Stresses greater than those listed under MAXIMUM RATINGS may cause permanent damage to the device. This is a stress rating only and functional operation of the device at these or any other condi-tions above those indicated in the operational sec-tions of this specification is not implied. Exposure to absolute maximum rating conditions for extended periods may affect reliability.≤85°C, 1.1V≤Vcc≤3.6VUnless otherwise specified, -40°C≤T[1] VCC must be lowered to 0.2 V for at least 5 us in order to reset part.Tamb = - 40 ºC to +85 ºC; unless otherwise specified.[1]Pass gate propagation delay is calculated from the 20Ω typical Ron and the 15 pF load capacitance.I2C Interface Timing RequirementsNotes:[1] A device internally must provide a hold time of at least 300 ns for the SDA signal (referred to as the VIH min of the SCL signal), in order to bridge the undefined region of the falling edge of SCL.[2] Data taken using a 1-kΩ pul l up resistor and 50-pF load Notes8 Channel I2C bus Multiplexer with Reset |||||||||||||||||||||||||||||||||||||||||||||||||||||||||||||||||||||||||||||||||||||||||||||||||||||||||||||||||||||||||||||||||||||||||||||||||||||||||||||||||||||||||||||||||||||||||||||||||||||||||||||||||||||||||||||||||||||||||||||||||||||||||||||||||||||||||||||||||||||||||||||||||||||||||||||||||||||||||||||||||||||||Figure 2. Definition of timing on the I2C-busApplicationFigure 3. Typical ApplicationRecommended application voltage condition8 Channel I2C bus Multiplexer with Reset ||||||||||||||||||||||||||||||||||||||||||||||||||||||||||||||||||||||||||||||||||||||||||||||||||||||||||||||||||||||||||||||||||||||||||||||||||||||||||||||||||||||||||||||||||||||||||||||||||||||||||||||||||||||||||||||||||||||||||||||||||||||||||||||||||||||||||||||||||||||||||||||||||||||||||||||||||||||||||||||||||||||| Device addressingFollowing a START condition the bus master must output the address of the slave it is accessing. The address of the PI4MSD5V9547 is shown in Figure 4.The last bit of the slave address defines the operation to be performed. When set to logic 1 a read is selected, while a logic 0 selects a write operation.Figure 4:Device addressControl registerFollowing the successful acknowledgement of the slave address, the bus master sends a byte to the PI4MSD5V9547 which is stored in the Control register. If multiple bytes are received by the PI4MSD5V9547, it saves the last byte received. This register can be written and read via the I2C-bus.Figure 5: Control registerControl register definitionA SCx/SDx downstream pair, or channel, is selected by the contents of the control register. This register is written after the PI4MSD5V9547 has been addressed. The 4 LSBs of the control byte are used to determine which channel is to be selected. When a channel is selected, the channel will become active after a STOP condition has been placed on the I2C-bus. This ensures that all SCx/SDx lines will be in a HIGH state when the channel is made active, so that no false conditions are generated at the time of connection.8 Channel I2C bus Multiplexer with Reset |||||||||||||||||||||||||||||||||||||||||||||||||||||||||||||||||||||||||||||||||||||||||||||||||||||||||||||||||||||||||||||||||||||||||||||||||||||||||||||||||||||||||||||||||||||||||||||||||||||||||||||||||||||||||||||||||||||||||||||||||||||||||||||||||||||||||||||||||||||||||||||||||||||||||||||||||||||||||||||||||||||||Control register: Write — channel selection; Read — channel statusPower-on resetWhen power is applied to VCC, an internal Power-On Reset (POR) holds the PI4MSD5V9547 in a reset condition until VCC has reached VPOR. At this point, the reset condition is released and the PI4MSD5V9547 registers and I2C-bus state machine are initialized to their default states (all zeroes), causing all the channels to be deselected. Thereafter, VCC must be lowered below 0.2 V for at least 5 us in order to reset the device.The Reset inputThe RESET input is an active LOW signal which may be used to recover from a bus fault condition. By asserting this signal LOW for a minimum of tw(rst)L, the PI4MSD5V9547 will reset its register and I2C-bus state machine and will deselect all channels. The RESET input must be connected to VCC through a pull-up resistor.8 Channel I2C bus Multiplexer with Reset ||||||||||||||||||||||||||||||||||||||||||||||||||||||||||||||||||||||||||||||||||||||||||||||||||||||||||||||||||||||||||||||||||||||||||||||||||||||||||||||||||||||||||||||||||||||||||||||||||||||||||||||||||||||||||||||||||||||||||||||||||||||||||||||||||||||||||||||||||||||||||||||||||||||||||||||||||||||||||||||||||||||| Voltage translationThe pass gate transistors of the PI4MSD5V9547 are constructed such that the VCC voltage can be used to limit the maximum voltage that is passed from one I2C-bus to another.Figure 6:Vpass voltage VS VccFigure 6 shows the voltage characteristics of the pass gate transistors (note that the graph was generated using the data specified in Section “DC Electrical characteristics” of this data sheet).In order for the PI4MSD5V9547 to act as a voltage translator, the Vpass voltage should be equal to, or lower than the lowest bus voltage. For example, if the main bus was running at 5 V, and the downstream buses were 3.3 V and 2.7 V, then Vpass should be equal to or below 2.7 V to clamp the downstream bus voltages effectively.Looking at Figure 6, we see that Vpass (max) is at 2.7 V when the PI4MSD5V9547 supply voltage is 3.5 V or lower so the PI4MSD5V9547 supply voltage could be set to 3.3 V. Pull-up resistors can then be used to bring the bus voltages to their appropriate levelsI2C BUSThe I2C-bus is for 2-way, 2-line communication between different ICs or modules. The two lines are a serial data line (SDA) and a serial clock line (SCL). Both lines must be connected to a positive supply via a pull-up resistor when connected to the output stages of a device. Data transfer may be initiated only when the bus is not busy.One data bit is transferred during each clock pulse. The data on the SDA line must remain stable during the HIGH period of the clock pulse as changes in the data line at this time are interpreted as control signalsFigure 7: Bit Transfer8 Channel I2C bus Multiplexer with Reset ||||||||||||||||||||||||||||||||||||||||||||||||||||||||||||||||||||||||||||||||||||||||||||||||||||||||||||||||||||||||||||||||||||||||||||||||||||||||||||||||||||||||||||||||||||||||||||||||||||||||||||||||||||||||||||||||||||||||||||||||||||||||||||||||||||||||||||||||||||||||||||||||||||||||||||||||||||||||||||||||||||||| Both data and clock lines remain HIGH when the bus is not busy. A HIGH-to-LOW transition of the data line while the clock is HIGH is defined as the START condition (S). A LOW-to-HIGH transition of the data line while the clock is HIGH is defined as the STOP condition (P)Figure 8. Definition of Start and Stop ConditionsA device generating a message is a ‘transmitter’, a device receiving is the ‘receiver’. The device that controls the message is the ‘master’ and the devices which are controlled by the master are the ‘slaves’Figure 9. System ConfigurationThe number of data bytes transferred between the START and the STOP conditions from transmitter to receiver is not limited. Each byte of 8 bits is followed by one acknowledge bit. The acknowledge bit is a HIGH level put on the bus by the transmitter, whereas the master generates an extra acknowledge related clock pulse.A slave receiver which is addressed must generate an acknowledge after the reception of each byte. Also, a master must generate an acknowledge after the reception of each byte that has been clocked out of the slave transmitter. The device that acknowledges has to pull down the SDA line during the acknowledge clock pulse so that the SDA line is stable LOW during the HIGH period of the acknowledge related clock pulse; set-up and hold times must be taken into account.A master receiver must signal an end of data to the transmitter by not generating an acknowledge on the last byte that has been clocked out of the slave. In this event, the transmitter must leave the data line HIGH to enable the master to generate a STOP condition.Figure 10. Acknowledgment on I2C Bus8 Channel I2C bus Multiplexer with Reset ||||||||||||||||||||||||||||||||||||||||||||||||||||||||||||||||||||||||||||||||||||||||||||||||||||||||||||||||||||||||||||||||||||||||||||||||||||||||||||||||||||||||||||||||||||||||||||||||||||||||||||||||||||||||||||||||||||||||||||||||||||||||||||||||||||||||||||||||||||||||||||||||||||||||||||||||||||||||||||||||||||||| Data is transmitted to the PI4MSD5V9547 control register using the write mode shown in bellowFigure 11. Write Control RegisterData is transmitted to the PI4MSD5V9547 control register using the write mode shown in bellowFigure 12. Read Control Register8 Channel I2C bus Multiplexer with Reset ||||||||||||||||||||||||||||||||||||||||||||||||||||||||||||||||||||||||||||||||||||||||||||||||||||||||||||||||||||||||||||||||||||||||||||||||||||||||||||||||||||||||||||||||||||||||||||||||||||||||||||||||||||||||||||||||||||||||||||||||||||||||||||||||||||||||||||||||||||||||||||||||||||||||||||||||||||||||||||||||||||||| Mechanical InformationTSSOP-24(L)8 Channel I2C bus Multiplexer with Reset ||||||||||||||||||||||||||||||||||||||||||||||||||||||||||||||||||||||||||||||||||||||||||||||||||||||||||||||||||||||||||||||||||||||||||||||||||||||||||||||||||||||||||||||||||||||||||||||||||||||||||||||||||||||||||||||||||||||||||||||||||||||||||||||||||||||||||||||||||||||||||||||||||||||||||||||||||||||||||||||||||||||| TQFN-24(ZD)Ordering Information● E = Pb-free and Green●Adding X Suffix= Tape/ReelPericom Semiconductor Corporation • 1-800-435-2336 •Pericom reserves the right to make changes to its products or specifications at any time, without notice, in order to improve design or performance and to supply the best possible product. Pericom does not assume any responsibility for use of any circuitry described other than the circuitry embodied in Pericom product. The company makes no representations that circuitry described herein is free from patent infringement or other rights, of Pericom.。
一种基于SPC584CE70芯片的车载以太网网关控制器的设计
与应用
明杰婷;杨杰君;文健峰;彭兴宇;刘逸群;张利新
【期刊名称】《客车技术与研究》
【年(卷),期】2024(46)2
【摘要】针对车载以太网与传统CAN网络不能直接通讯的问题,设计一款基于SPC584CE70 MCU主芯片的车载以太网网关控制器。
该控制器具有4路以太网和3路CAN网络同时通讯的功能,可较好地实现以太网与以太网、CAN网络与以太网、CAN网络与CAN网络之间的信息交互。
【总页数】6页(P26-31)
【作者】明杰婷;杨杰君;文健峰;彭兴宇;刘逸群;张利新
【作者单位】中车时代电动汽车股份有限公司
【正文语种】中文
【中图分类】U463.67
【相关文献】
1.基于MPC850型通信控制器的以太网与Lon总线间网关的设计与实现
2.车载以太网网关的设计和应用
3.基于Z8523L协议芯片的多路HDLC转以太网网关设计
4.车载以太网网关的设计和应用
5.基于LPC1768的车载以太网网关设计
因版权原因,仅展示原文概要,查看原文内容请购买。
智原科技协助客户取得USB3.0主端控制器认证
佚名
【期刊名称】《《中国集成电路》》
【年(卷),期】2010(19)7
【摘要】智原科技于近日宣布其客户睿思科技(FrescoLogic)的USB3.0主端控制器已通过USB—IF的所有测试,取得xHCI控制器的认证。
此控制器是采用智原科技的物理层IP所开发,是中国台湾地区第一、世界第二通过认证的
USB3.0主端控制器。
因应USB3.0未来的庞大商机,此控制器的通过认证,也为智原在计算机外设与多媒体高速传输接口的布局上,立下一个具重大意义的里程碑。
【总页数】1页(P9-9)
【正文语种】中文
【中图分类】TP273
【相关文献】
1.智原科技与银灿科技合作推出USBFlashDisk控制器单芯片 [J],
2.祥硕科技自行研发之USB3.0 ASM1042主控端芯片正式获得微软认证 [J],
3.智原科技USB 3.0装置端控制器通过USB-IF协会验证 [J],
4.Tektronix SuperSpeecl测试解决方案协助NEC Electronics通过世界首度USB3.0认证 [J],
5.美商睿思科技于IIC-China展出全球最快的USB3.0主端控制器解决方案 [J],因版权原因,仅展示原文概要,查看原文内容请购买。