nginx安装实施
- 格式:doc
- 大小:140.89 KB
- 文档页数:12

Linux下安装配置nginx详解⼀、Linux下安装配置nginx第⼀次安装nginx,中间出现的问题⼀步步解决。
⽤到的⼯具secureCRT,连接并登录服务器。
1.1 rz命令,会弹出会话框,选择要上传的nginx压缩包。
#rz1.2 解压[root@vw010********* ~]# cd /usr/local/[root@vw010********* local]# tar -zvxf nginx-1.10.2.tar.gz1.3 进⼊nginx⽂件夹,执⾏./configure命令[root@vw010********* local]# cd nginx-1.10.2[*****************************.2]#./configure报错如下:checking for OS+ Linux 2.6.32-431.el6.x86_64 x86_64checking for C compiler ... not found./configure: error: C compiler cc is not found出现这个错误。
那么就是gcc 包没有安装。
1.3.1 安装gcc查看gcc[*****************************.2]#whereisgccgcc:安装gcc[*****************************.2]#yum-yinstallgcc安装成功后再次查看[*****************************.2]#whereisgccgcc: /usr/bin/gcc /usr/lib/gcc /usr/libexec/gcc /usr/share/man/man1/gcc.1.gzgcc安装好了。
1.3.2 继续执⾏./configure[*****************************.2]#./configurechecking for OS+ Linux 2.6.32-431.el6.x86_64 x86_64checking for C compiler ... found......checking for PCRE library ... not foundchecking for PCRE library in /usr/local/ ... not foundchecking for PCRE library in /usr/include/pcre/ ... not foundchecking for PCRE library in /usr/pkg/ ... not foundchecking for PCRE library in /opt/local/ ... not found./configure: error: the HTTP rewrite module requires the PCRE library.You can either disable the module by using --without-http_rewrite_moduleoption, or install the PCRE library into the system, or build the PCRE librarystatically from the source with nginx by using --with-pcre=<path> option.出现如上错误。

1.安装编译工具、依赖包yum -y install gcc gcc-c++ autoconf automakeyum -y install zlib zlib-devel openssl openssl-devel pcre-devel以上安装的是一些主要的依赖包,具体可根据自己情况或者报错信息提示安装或修改。
2.创建nginx用户和用户组新建的用户组和用户主要是在编译配置的时候指定nginx运行的用户和用户组,这样指定后以后配置使用也方便。
groupadd -r nginxuseradd -s /sbin/nologin -g nginx -r nginx3.Nginx编译安装我一般从官网下载wget /download/nginx-1.10.0.tar.gz解压tar -zxvf nginx-1.10.0.tar.gzmv nginx-1.10.0 /usr/local/nginx配置并添加https支持模块./configure --prefix=/usr/local/nginx --conf-path=/etc/nginx/nginx.conf --user=nginx --group=nginx --with-http_stub_status_module --with-http_ssl_module配置没错的话可以看到这些信息Configuration summary+ using system PCRE library+ OpenSSL library is not used+ md5: using system crypto library+ sha1: using system crypto library+ using system zlib librarynginx path prefix: "/usr/local/nginx"nginx binary file: "/usr/local/nginx/sbin/nginx"nginx modules path: "/usr/local/nginx/modules"nginx configuration prefix: "/etc/nginx"nginx configuration file: "/etc/nginx/nginx.conf"nginx pid file: "/usr/local/nginx/logs/nginx.pid"nginx error log file: "/usr/local/nginx/logs/error.log"nginx http access log file: "/usr/local/nginx/logs/access.log"nginx http client request body temporary files: "client_body_temp"nginx http proxy temporary files: "proxy_temp"nginx http fastcgi temporary files: "fastcgi_temp"nginx http uwsgi temporary files: "uwsgi_temp"nginx http scgi temporary files: "scgi_temp"以上编译参数只是配置了主要的东西,全部配置参数说明你可以通过这个命令查看./configure --help5.编译并安装make && make install6.nginx用配置文件启动/usr/local/nginx/sbin/nginx -c /usr/local/nginx/conf/nginx.confsystemctl start nginx.service //centOS7.0启动systemctl restart nginx.servicesystemctl stop nginx.service7.停止:/usr/local/nginx/sbin/nginx -s stop8.测试并重启:/usr/local/nginx/sbin/nginx -t/usr/local/nginx/sbin/nginx -s reload。

在安装nginx之前,需要安装pcre、zlib、openssl等工具库。
pcre:用来处理rewrite的正则表达式zlib:提供压缩功能openssl:处理ssl协议\如有必要先安装gcc: yum -y install gcc-c++一、安装pcre库cd /home/work/opt(下载路径可以随意,rd一般都用work账号,且程序安装在work目录下)wget ftp:///pub/software/programming/pcre/pcre-8.21.tar.gztar -zxvf pcre-8.21.tar.gzcd pcre-8.21./configuremakesudo make install(需要申请临时root权限)二、安装zlib库cd /home/work/optwget /zlib-1.2.8.tar.gztar -zxvf zlib-1.2.8.tar.gzcd zlib-1.2.8./configuremakesudo make install三、安装openssl库cd /home/work/optwget /source/openssl-1.0.1j.tar.gztar -zxvf openssl-1.0.1j.tar.gz./configmakesudo make install四、安装nginxcd /home/work/optwget /download/nginx-1.2.8.tar.gztar -zxvf nginx-1.2.8.tar.gzcd nginx-1.2.8(可参考绿字连续亲测版本)./configure --prefix=/home/work/nginx \#Nginx安装路径--pid-path=/home/work/nginx/run/nginx.pid \ #默认的nginx.pid的路径--lock-path=/home/work/nginx/run/lock \ #nginx.lock文件的路径--error-log-path=/home/work/nginx/logs/error/error.log \#默认的错误日志的路径--http-log-path=/home/work/nginx/logs/access/access.log \#默认的access日志的路径--http-client-body-temp-path=/home/work/nginx/client \#指定http客户端请求缓存文件存放目录的路径--http-proxy-temp-path=/home/work/nginx/tmp/proxy \#指定http反向代理缓存文件存放目录的路径--http-fastcgi-temp-path=/home/work/nginx/tmp/fastcgi \#指定http FastCGI缓存文件存放目录的路径--http-uwsgi-temp-path=/home/work/nginx/tmp/uwsgi \--http-scgi-temp-path=/home/work/nginx/tmp/scgi \--with-http_ssl_module \#开启HTTPS模块--with-http_dav_module \#启用 ngx_http_dav_module--with-http_realip_module \#启用 ngx_http_realip_module--with-http_gzip_static_module \#启用http_gzip_static_module--with-http_stub_status_module \--with-http_addition_module \#启用ngx_http_addition_module--with-pcre=/home/work/opt/pcre-8.33 \#配置pcre库路径--with-zlib=/home/work/opt/zlib-1.2.8 \ #配置zlib库路径--with-openssl=/home/work/opt/openssl-1.0.1j #配置openssl库路径合并(亲测可用)./configure--prefix=/home/work/nginx--conf-path=/home/work/nginx/conf/nginx.conf--pid-path=/home/work/nginx/run/nginx.pid--lock-path=/home/work/nginx/run/lock--error-log-path=/home/work/nginx/logs/error.log--http-log-path=/home/work/nginx/logs/access.log--http-client-body-temp-path=/home/work/nginx/client--http-proxy-temp-path=/home/work/nginx/tmp/proxy--http-fastcgi-temp-path=/home/work/nginx/tmp/fastcgi--http-uwsgi-temp-path=/home/work/nginx/tmp/uwsgi--http-scgi-temp-path=/home/work/nginx/tmp/scgi --with-http_ssl_module--with-http_dav_module --with-http_realip_module--with-http_gzip_static_module --with-http_stub_status_module--with-http_addition_module --with-pcre=/home/work/opt/pcre-8.21--with-zlib=/home/work/opt/zlib-1.2.8--with-openssl=/home/work/opt/openssl-1.0.1jmakemake install五.设置开机自启动。

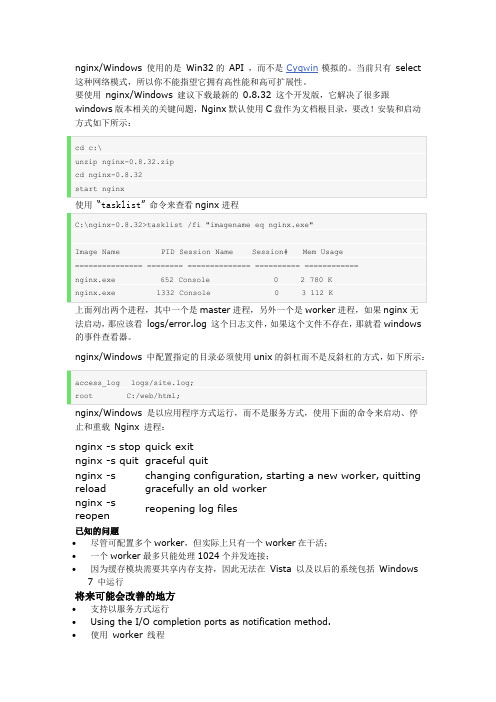
nginx/Windows 使用的是Win32的API ,而不是Cygwin模拟的。
当前只有select 这种网络模式,所以你不能指望它拥有高性能和高可扩展性。
要使用nginx/Windows 建议下载最新的0.8.32 这个开发版,它解决了很多跟windows版本相关的关键问题,Nginx默认使用C盘作为文档根目录,要改!安装和启动方式如下所示:使用“” 命令来查看nginx进程上面列出两个进程,其中一个是master进程,另外一个是worker进程,如果nginx无法启动,那应该看logs/error.log 这个日志文件,如果这个文件不存在,那就看windows 的事件查看器。
nginx/Windows 中配置指定的目录必须使用unix的斜杠而不是反斜杠的方式,如下所示:nginx/Windows 是以应用程序方式运行,而不是服务方式,使用下面的命令来启动、停止和重载Nginx 进程:nginx -s stop quick exitnginx -s quit graceful quitnginx -s reload changing configuration, starting a new worker, quitting gracefully an old workernginx -sreopenreopening log files已知的问题∙尽管可配置多个worker,但实际上只有一个worker在干活;∙一个worker最多只能处理1024个并发连接;∙因为缓存模块需要共享内存支持,因此无法在Vista 以及以后的系统包括Windows7 中运行将来可能会改善的地方∙支持以服务方式运行∙ Using the I/O completion ports as notification method.∙使用worker 线程。

前言:选择Nginx的优点:Nginx 可以在大多数 Unix like OS 上编译运行,并有 Windows 移植版。
Nginx 的1.4.0稳定版已经于2013年4月24日发布,一般情况下,对于新建站点,建议使用最新稳定版作为生产版本,已有站点的升级急迫性不高。
Nginx 的源代码使用 2-clause BSD-like license。
Nginx 是一个很强大的高性能Web和反向代理服务器,它具有很多非常优越的特性:在高连接并发的情况下,Nginx是Apache服务器不错的替代品:Nginx在美国是做虚拟主机生意的老板们经常选择的软件平台之一。
能够支持高达 50,000 个并发连接数的响应,感谢Nginx为我们选择了 epoll and kqueue作为开发模型。
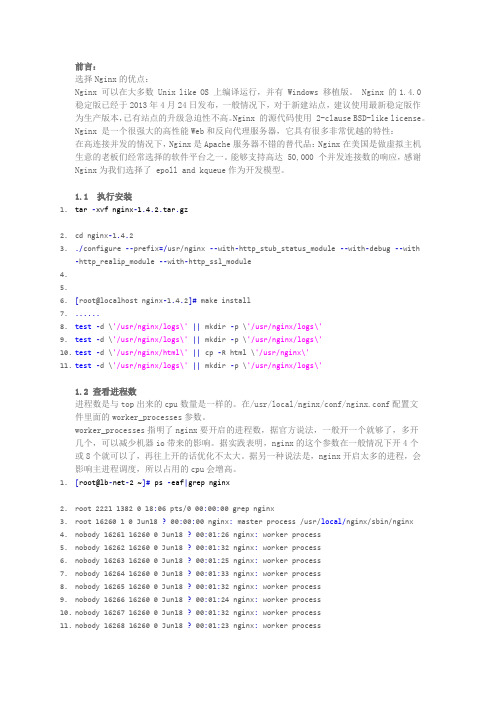
1.1 执行安装1.tar -xvf nginx-1.4.2.tar.gz2.cd nginx-1.4.23../configure --prefix=/usr/nginx --with-http_stub_status_module --with-debug --with-http_realip_module --with-http_ssl_module4.5.6.[root@localhost nginx-1.4.2]# make install7.......8.test-d \'/usr/nginx/logs\'|| mkdir -p \'/usr/nginx/logs\'9.test-d \'/usr/nginx/logs\'|| mkdir -p \'/usr/nginx/logs\'10.test-d \'/usr/nginx/html\'|| cp -R html \'/usr/nginx\'11.test-d \'/usr/nginx/logs\'|| mkdir -p \'/usr/nginx/logs\'1.2 查看进程数进程数是与top出来的cpu数量是一样的。

nginx从安装到配置详细说明(安装,安全配置,防盗链,动静分离,配置 HTTPS,性能优化)⼀、服务器基础配置远程链接服务器ssh ⽤户名@公⽹ip默认的⽤户名是root,假如公⽹ ip 是 a.b.c.d, 那链接命名就是ssh root@a.b.c.d下载安装基础库yum -y install gcc gcc-c++ autoconf pcre pcre-devel make automakeyum -y install wget httpd-tools vim关闭 iptables查看iptables规则iptables -L或iptables -t nat -L关闭 iptables 规则iptables -F或iptables -t nat -F关闭 SELinux查看是否打开getenforce关闭setenforce 0⼆、Nginx 简介及安装Nginx 是⼀个开源且⾼性能、⾼可靠的 HTTP 中间件、代理服务。
安装Nginx打开官⽹To set up the yum repository for RHEL/CentOS, create the file named /etc/yum.repos.d/nginx.repo with the following contents:[nginx]name=nginx repobaseurl=/packages/OS/OSRELEASE/$basearch/gpgcheck=0enabled=1Replace “OS” with “rhel” or “centos”, depending on the distribution used, and “OSRELEASE” with “6” or “7”, for 6.x or 7.x versions, respectively.三、安装⽬录及配置讲解3.1 安装⽬录讲解查看nginx的所有安装⽬录rpm -ql nginx然后得到如下配置[root@ ~]# rpm -ql nginxnginx⽇志轮转,⽤于logrotate服务的⽇志切割/etc/logrotate.d/nginxnginx主配置⽂件/etc/nginx/nginx.conf/etc/nginx/etc/nginx/conf.d/etc/nginx/conf.d/default.confcgi配置相关,fastcgi配置/etc/nginx/fastcgi_params/etc/nginx/scgi_params/etc/nginx/uwsgi_params编码转换映射转化⽂件/etc/nginx/koi-utf/etc/nginx/koi-win/etc/nginx/win-utf设置http协议的 Content-Type 与扩展名对应关系/etc/nginx/mime.types⽤于配置出系统守护进程管理器管理⽅式/etc/sysconfig/nginx/etc/sysconfig/nginx-debug/usr/lib/systemd/system/nginx-debug.service/usr/lib/systemd/system/nginx.servicenginx模块⽬录/etc/nginx/modules/usr/lib64/nginx/modules/usr/lib64/nginx/usr/libexec/initscripts/legacy-actions/nginx/usr/libexec/initscripts/legacy-actions/nginx/check-reload/usr/libexec/initscripts/legacy-actions/nginx/upgradenginx服务的启动管理的终端命令/usr/sbin/nginx/usr/sbin/nginx-debugnginx的⼿册和帮助⽂件/usr/share/doc/nginx-1.14.0/usr/share/doc/nginx-1.14.0/COPYRIGHT/usr/share/man/man8/nginx.8.gz/usr/share/nginx/usr/share/nginx/html/usr/share/nginx/html/50x.html/usr/share/nginx/html/index.htmlnginx 的缓存⽬录/var/cache/nginxnginx⽇志⽬录/var/log/nginx3.2 安装编译参数命令nginx -V查看所有编译参数3.3 Nginx 默认配置语法参数说明user设置nginx服务的系统使⽤⽤户worker_processes⼯作进程数(⼀般与服务器核数保持⼀致)rror_log nginx的错误⽇志pid nginx服务启动时候pidevents -> worker_connections每个进程允许最⼤连接数events -> use⼯作进程数nginx 的默认配置⽂件⽂件路径/etc/nginx/conf.d/default.confserver {listen 80;server_name localhost;#charset koi8-r;#access_log /var/log/nginx/host.access.log main;location / {root /usr/share/nginx/html;index index.html index.htm;}#error_page 404 /404.html;# redirect server error pages to the static page /50x.html#error_page 500 502 503 504 /50x.html;location = /50x.html {root /usr/share/nginx/html;}# proxy the PHP scripts to Apache listening on 127.0.0.1:80##location ~ \.php$ {# proxy_pass http://127.0.0.1;#}# pass the PHP scripts to FastCGI server listening on 127.0.0.1:9000##location ~ \.php$ {# root html;# fastcgi_pass 127.0.0.1:9000;# fastcgi_index index.php;# fastcgi_param SCRIPT_FILENAME /scripts$fastcgi_script_name;# include fastcgi_params;#}# deny access to .htaccess files, if Apache's document root# concurs with nginx's one##location ~ /\.ht {# deny all;#}}可以去/usr/share/nginx/html/index.html修改默认的展⽰页⾯,也可以去/usr/share/nginx/html/50x.html修改错误页⾯。

Nginx安装与配置1、OS环境linux系统Redhat 6.52、安装准备下载pcre:/本次实测使用版本为:pcre-8.38.tar.gz,nginx-1.9.12.tar.gz 3、安装1)、root用户登录,当前目录如:/root2)、上传文件pcre-8.38.tar.gz,nginx-1.9.12.tar.gz3)、安装pcre-8.38.tar.gz:$ tar -zxf pcre-8.38.tar.gz$ cd pcre-8.38$ ./configure$ make$ make install4)、安装nginx-1.9.12.tar.gztar –xzfnginx-1.9.12.tar.gzcdnginx-1.9.12./configureMake&&make install5)、安装成功后nginx的安装目录应该是/usr/local/nginx配置文件目录:/usr/local/nginx/conf/启动脚本目录:/usr/local/nginx/sbin/Cd/usr/local/nginx/sbin/./nginx --启动报错:./nginx: error while loading shared libraries: libpcre.so.1: cannot open shared object file: No such file or directory从错误看出是缺少lib文件导致进入/lib64目录中手动链接下[root@localhost/]# cd/lib64/[root@localhostlib64]# ln -s libpcre.so.0.0.1libpcre.so.1安装完成4、启停1)脚本:Cd/usr/local/nginx/sbin/./nginx --启动Ps –ef|grepnginxKill pid2)把nginx添加到系统服务chmod +x nginx/sbin/chkconfig --level 345 nginx on任何位置都能运行service nginx start 可选start | stop | restart | reload | status | help 5、配置配置文件目录:/usr/local/nginx/conf/配置文件为nginx.confVinginx.conf修改默认端口:找到server {listen 80;修改80为想要的端口即可详细配置属性说明:/sayou/p/3319635.html反向代理和负载均衡配置:1)、反向代理配置示例:location / {#设置主机头和客户端真实地址,以便服务器获取客户端真实IPproxy_set_header Host $host;proxy_set_header X-Real-IP $remote_addr;proxy_set_header X-Forwarded-For $proxy_add_x_forwarded_for;#禁用缓存proxy_buffering off;#设置反向代理的地址proxy_pass http://192.168.180.12;}代理地址根据实际情况修改。

nginx 在win7的安装与运行本来想在windows7上安装Nginx,然后部署thinkphp的,过程中遇到了一些小问题,所以都记录下来!供以后查阅!几个细节的东西,有必要写清楚!官网上下载地址:/en/download.html就那最新的版本做实验吧。
我下了windows原生版本 1.3.5,整个文件就是一个zip压缩文件。
下载到F 盘的根目录下,解压缩。
出来的文件夹是nginx-1.3.5,顺便改成了nginx,方便使用(其实改不改都没有关系,改了,是因为重启nginx的时候,少打点字母罢了)。
然后冲动的进入文件夹,双击启动文件nginx.exe,弹出了一个doc窗口,就在眨眼的功夫里,消失了,没有看清提示什么内容;不管三七二十一,我在浏览器了,打开127.0.0.1,提示无法显示页面。
我们没有安装IIS7,如果是无法显示页面,说明nginx启动失败了。
但是到底是什么原因让nginx无法启动呢?我想个办法,放doc的提示显示出来,结果提示是:[emerg]:bind() to 0.0.0.0:80 failed <10013: An attempt was made to access a socket in a way forbidden by its access permissions>看提示信息,是因为windows 的80 端口被占用了,所以又想办法把80端口释放了。
开始–运行–cmd 进入命令提示符输入netstat -ano 即可看到所有连接的PID 之后在任务管理器中找到这个PID所对应的程序如果任务管理器中没有PID这一项,可以在任务管理器中选”查看”-”选择列”经常,我们在启动应用的时候发现系统需要的端口被别的程序占用,如何知道谁占有了我们需要的端口,很多人都比较头疼,下面就介绍一种非常简单的方法,希望对大家有用。
我们需要确定谁占用了我们的80端口在windows命令行窗口下执行:C:>netstat -aon|findstr “80″TCP 0.0.0.0:19780 0.0.0.0:0 LISTENING 2044TCP 10.72.224.5:2558 96.17.109.8:80 ESTABLISHED 2044TCP 10.72.224.5:2757 60.210.176.209:80 TIME_WAIT 0TCP 10.72.224.5:3956 125.46.1.234:80 ESTABLISHED 2044TCP 10.72.224.5:3959 125.46.1.234:80 ESTABLISHED 2044UDP 0.0.0.0:2280 *:* 3700看到了吗,端口被进程号为2044的进程占用,继续执行下面命令:C:>tasklist|findstr “2044″360se.exe 2044 Console 0 37,680 K很清楚吧,360浏览器占用80端口,赶紧关闭。

Nginx简要安装配置说明一.N ginx简介Nginx是一款高性能的HTTP和反向代理服务器软件,可以运行在UNIX、GNU/Linux、BSD、Mac OS X、Solaris 以及Microsoft Windows等操作系统中。
其优点是占用系统资源少,支持大并发连接(官方声称最大支持5万并发连接响应而只占2.5M内存);因其部署简单,配置灵活、高效、稳定的特点已被广泛应用于各大型网站架构中。
二.安装1).安装所需环境gcc-c++ 、openssl-devel 、pcre-devel 、zlib-devel 、libtool2).安装pcre,使Nginx支持rewrite模块tar zxvf pcre-8.30.tar.gzcd pcre-8.30make && make install3).安装Nginxtar zxvf nginx-1.2.3.tar.gzcd nginx-1.2.3./configure --user=www --group=www --prefix=/usr/local/nginx --with-http_gzip_static_module --with-http_ssl_module编译时可根据实际需要进行编译所需要的模块,用./configure –help查看可编译的模块三.常用命令1).检查配置文件是否正确/usr/local/nginx/sbin/nginx -t -c /usr/local/nginx/conf/nginx.conf2).启动/usr/local/nginx/sbin/nginx3). 平滑重启/usr/local/nginx/sbin/nginx -s reload四.配置1).配置文件结构Nginx的配置文件是一个纯文本文件,它一般位于Nginx安装目录的conf目录下,整个配置文件是以block的形式组织的。
每个block一般以一个大括号“{}”来表示,block可以分为几个层次,整个配置文件中main指令位于最高层,在main层下面可以有Events、HTTP 等层级,而在HTTP层中又包含有server层,即server block,server block中又可分为location 层,并且一个server block中可以包含多个location block。

Nginx实战篇安装部署与配置全解析目录1 写在正文之前 (3)2 部署步骤 (3)2.1 下载介质 (3)2.2 编译部署介质 (4)2.2.1 部署zlib库 (4)2.2.2 部署pcre库 (4)2.2.3 部署nginx (4)2.2.4 启动和停止nginx (5)2.3 配置nginx (5)2.3.1 配置gzip压缩 (6)2.3.2 高性能配置 (6)2.3.3 配置nginx状态监控 (7)2.3.4 反向代理实现动静结合(NgInx + Tomcat / WebLogic / WebSphere ) (7)2.3.5 配置虚拟主机 (8)2.3.6 配置静态文件超时时间 (9)2.3.7 配置日志格式与按天轮换 (9)2.4 其它配置 (10)2.4.1 禁止出错时泄露服务器的版本 (10)2.4.2 限制客户端POST提交的数据大小 (10)2.4.3 静态目录root和alias的区别 (11)2.4.4 4.限制并发数和下载速率 (11)2.4.5 指定nginx提供服务的用户: (11)2.4.6 指定错误页 (11)2.5 高级配置 (11)2.5.1 利用Nginx实现开源负载均衡的分发 (11)2.5.2 利用Nginx实现静态文件的权限控制 (12)1写在正文之前最近质保在计划做Portal的性能测试,考虑到在国家统计局项目前期规划到2000多并发的PV情况下面,静态文件的压力会超过10000。
根据对Nginx的介绍,Nginx的性能和Apache相比,会有100%的提升。
原因:得益于Nginx使用了最新的epoll(Linux 2.6内核)和kqueue(freebsd)网络I/O模型,而Apache则使用的是传统的select模型。
目前Linux下能够承受高并发访问的Squid、Memcached都采用的是epoll网络I/O模型。
所以计划对主流的Web Server进行对比性能测试,特引入Nginx进行配置,在测试环境中现场实战了一次,特将过程记录总结如下。

1、安装过程a.# yum install -y pcrepcre-devel# yum install -y opensslopenssl-develb.# tar xzf nginx-1.7.3.tar.gz# cd nginx-1.7.3c.# ./configure(默认安装路径为/usr/local/nginx)d.# make# make installf.启动:nginx# /usr/local/nginx/sbin/nginxe.添加到系统服务将nginx文件直接复制到以下路径/etc/init.d/nginxh.# chmoda+x /etc/init.d/nginx设置权限设置开机启动配置文件rc.local# vim /etc/rc.local添加一行/etc/init.d/nginx start# /etc/init.d/nginx restart 重启测试g.添加用户# useraddnginxI.新建文件夹(对照nginx.cof文件中相关参数路径)[root@localhost/]# cd /opt/[root@localhost/]#mkdir local[root@localhostopt]# cd local[root@localhostlocal]#mkdirtmp[root@localhostlocal]#mkdir cache[root@localhostlocal]#mkdirvar[root@localhostlocal]# cd var/[root@localhostvar]#mkdir log[root@localhostvar]# cd logs/[root@localhostlogs]#mkdirnginx[root@localhostvar]# cd ..[root@localhostlocal]# cd tmp/[root@localhosttmp]#mkdirnginx[root@localhostnginx]# cd nginx[root@localhostnginx]#mkdirproxy_temp注:路径/opt/local/cache主要用来存放直播缓存,大约需要30-100G的存储大小(实时改变),因此建议把路径设置到/opt下2、配置a、替换正向代理配置文件nginx.conf路径/usr/local/nginx/confb、重启nginx# /usr/local/nginx/sbin/nginx -s reload另外相关命令1、查看状态使用ps -ef|grepnginx查看nginx的进程2、停止nginx所有进程[root@linuxidcsbin]#pkill -9 nginx。


nginx快速入门,使用多种方式部署nginx(mac/windows/docker/docker-compose)一、nginx简介对nginx的定义,它可以是一个HTTP反向代理服务,可以是邮箱代理服务,也可以是一个纯粹的tcp/udp代理服务。
我们经常可以在超高负载的网站中看到nginx的身影。
根据Netcraft统计,截至2023年12月全网最火、流量最多的网站服务中有20.72%是通过nginx提供服务的。
Nginx具有非常强大的配置功能,可以实现各种高级功能,例如负载均衡、动静分离、缓存等。
本文将介绍几种快速部署nginx的方法并提供详细的部署配置。
二、nginx配置实际生产中,我们接触最多的就是nginx的配置文件。
我们可以通过调整配置文件使ng适应绝大多数应用场景。
在部署之前,先简单了解下nginx的配置的构成。
1.基本配置Nginx的核心配置文件是nginx.conf,通常位于/etc/nginx目录下。
打开该文件,可以看到Nginx的各种配置选项。
最基本的配置包括监听端口、根目录路径、日志文件路径等。
例如,以下配置表示Nginx将监听80端口,并将根目录设置为/var/www/html,日志文件设置为/var/log/nginx/access.log和error.log。
worker_processes 1;events {worker_connections 1024;}http {include mime.types;default_type application/octet-stream;access_log /var/log/nginx/access.log;error_log /var/log/nginx/error.log;server {listen 80;server_name example;root /var/www/html;index index.html index.htm;}}2.负载均衡配置Nginx提供了强大的负载均衡功能,可以轻松地实现后端服务器的负载均衡。

centos7安装nginx的两种⽅法介绍centos7安装nginx第⼀种⽅式:通过yum安装直接通过 yum install nginx 肯定是不⾏的,因为yum没有nginx,所以⾸先把 nginx 的源加⼊ yum 中。
运⾏下⾯的命令:1.将nginx放到yum repro库中复制代码代码如下:[root@localhost ~]# rpm -ivh /packages/centos/7/noarch/RPMS/nginx-release-centos-7-0.el7.ngx.noarch.rpm 2.查看nginx信息[root@localhost ~]# yum info nginx3.使⽤yum安装ngnix[root@localhost ~]# yum install nginx效果如下:[root@localhost ~]# yum install nginx已加载插件:fastestmirror, langpacksLoading mirror speeds from cached hostfile* base: * extras: * updates: 正在解决依赖关系--> 正在检查事务---> 软件包 nginx.x86_64.1.1.10.1-1.el7.ngx 将被安装············正在安装 : 1:nginx-1.10.1-1.el7.ngx.x86_64Thanks for using nginx!Please find the official documentation for nginx here:Commercial subscriptions for nginx are available on:----------------------------------------------------------------------验证中 : 1:nginx-1.10.1-1.el7.ngx.x86_64 1/1已安装:nginx.x86_64 1:1.10.1-1.el7.ngx完毕!4.启动nginx[root@localhost ~]# service nginx start5.查看nginx版本[root@localhost ~]# nginx -v6.访问nginx,现在你可以通过公⽹ip (本地可以通过 localhost /或 127.0.0.1 ) 查看nginx 服务返回的信息。

nginx安装及简单使⽤Nginx("engine x")是⼀款是由俄罗斯的程序设计师Igor Sysoev所开发⾼性能的 Web和反向代理服务器,也是⼀个 IMAP/POP3/SMTP 代理服务器。
在⾼连接并发的情况下,Nginx是Apache服务器不错的替代品。
安装 Nginxnginx常⽤命令start nginx #启动nginxnginx -s quit #优雅停⽌nginx,有连接时会等连接请求完成再杀死worker进程nginx -s reload #优雅重启,并重新载⼊配置⽂件nginx.confnginx -s reopen # 重启 Nginx 重新打开⽇志⽂件,⼀般⽤于切割⽇志nginx -v #查看版本nginx -t #检查nginx的配置⽂件nginx -h #查看帮助信息nginx -V #详细版本信息,包括编译参数nginx -c filename #指定配置⽂件1.windows下直接安装(如有IIS,要关闭IIS),使⽤cmd找到安装路径,执⾏start nginx,通过浏览器访问localhost可以显⽰nginx主页2.配置:找到conf/nginx.conf,参考以下内容作修改,修改完后使⽤cmd 执⾏nginx -s reload重启nginx即可# 1.下载安装后打开nginx安装⽬录,找到conf/nginx.conf,使⽤⽂本/编辑器打开#user nobody;worker_processes 1; #设置值和CPU核⼼数⼀致#error_log logs/error.log; #⽇志位置和⽇志级别#error_log logs/error.log notice;#error_log logs/error.log info;#pid logs/nginx.pid;events {worker_connections 1024;}http {include mime.types;default_type application/octet-stream;#log_format main '$remote_addr - $remote_user [$time_local] "$request" '# '$status $body_bytes_sent "$http_referer" '# '"$http_user_agent" "$http_x_forwarded_for"';#access_log logs/access.log main;sendfile on;#tcp_nopush on;#keepalive_timeout 0;keepalive_timeout 65;#gzip on;server_names_hash_bucket_size 64;proxy_buffer_size 128k; # default: 4k|8kproxy_buffering on; # default: onproxy_buffers 64 64k; # default: 8 4k|8kproxy_busy_buffers_size 256k; # default: 8k|16kproxy_max_temp_file_size 1024m; # default: 1024mproxy_temp_file_write_size 256k; # default: 8k|16kproxy_set_header Host $host;proxy_set_header X-Real-IP $remote_addr;proxy_set_header X-Forwarded-For $proxy_add_x_forwarded_for;#下⾯是server虚拟主机的配置server {listen 80;server_name localhost;#charset koi8-r;#access_log logs/host.access.log main;location / {root html;index index.html index.htm;}#error_page 404 /404.html;# redirect server error pages to the static page /50x.htmlerror_page 500 502 503 504 /50x.html;location = /50x.html {root html;}}server {listen 80;server_name ******.com; #*修改为域名return 301 http://www.******.com$request_uri; #*修改为域名}# 解析server {listen 80; #监听端⼝server_name ; #*修改为域名 #域名# index index.html index.htm index.php; #站点⽬录下默认访问的⽂件 /nginx/html/index# root /usr/local/webserver/nginx/html;#站点⽬录location / { //⽂件路由root path; #⽂件路径⽰例:C:/testtry_files $uri $uri/ /index.html;}location /view/ {root path; #⽂件路径⽰例:C:/testrewrite .* /index.html break;}}}Nginx默认的配置⽂件主要有 main、events、http、server、location 五个块组成。

Nginx离线安装与在线(yum)安装一、NGINX版本简介:nginx的版本分为开发版、稳定版和过期版,nginx可以作为http服务器,也可以作为反向代理服务器或者邮件服务器,能够快速的响应静态网页的请求,支持FastCGI/SSL/Virtual Host/URL Rwrite/Gzip/HTTP Basic Auth等功能,并且支持第三方的功能扩展。
二、NGINX安装方式:nginx安装可以使用yum(在线安装)或源码安装,推荐使用源码,一是yum的版本比较旧,二是使用源码可以自定义功能,方便业务的上的使用,源码安装需要提前准备标准的编译器三、离线安装:nginx-1.8.1.tar.gzopenssl-1.0.1c.tar.gz(传输通道加密使用)pcre-8.37.zip(正则表达式使用)1、环境准备:先安装准备环境yum install gcc gcc-c++ automake pcre pcre-devel zlip zlib-devel openssl openssl-devel或下载响应包自己安装。
此处不做过的介绍2、上传nginx压缩包并安装:[root@sdn ~]# tar xvf nginx-1.8.1.tar.gz[root@sdn ~]# cd nginx-1.8.1[root@sdn nginx-1.8.1]$ lsauto CHANGES CHANGES.ru conf configure contrib html LICENSE man README src3、编译nginx:make编译是为了检查系统环境是否符合编译安装的要求,比如是否有gcc编译工具,是否支持编译参数当中的模块,并根据开启的参数等生成Makefile文件为下一步做准备:[root@sdn nginx-1.8.1]# ./configure --prefix=/usr/local/nginx --sbin-path=/usr/local/nginx/sbin/nginx --conf-path=/usr/local/nginx/conf/nginx.conf --error-log-path=/var/log/nginx/error.log --http-log-path=/var/log/nginx/access.log --pid-path=/var/run/nginx/nginx.pid --lock-path=/var/lock/nginx.lock --user=nginx --group=nginx --with-http_ssl_module --with-http_stub_status_module --with-http_gzip_static_module --http-client-body-temp-path=/var/tmp/nginx/client/ --http-proxy-temp-path=/var/tmp/nginx/proxy/ --http-fastcgi-temp-path=/var/tmp/nginx/fcgi/ --http-uwsgi-temp-path=/var/tmp/nginx/uwsgi --http-scgi-temp-path=/var/tmp/nginx/scgi --with-pcre结果如下:4、生成脚本及配置文件:make编译步骤,根据Makefile文件生成相应的模块5、安装:make install 通过执行后无报错信息即安装成功安装后生产目录备注说明:nginx完成安装以后,有四个主要的目录:conf:保存nginx所有的配置文件,其中nginx.conf是nginx服务器的最核心最主要的配置文件,其他的.conf则是用来配置nginx相关的功能的,例如fastcgi功能使用的是fastcgi.conf 和fastcgi_params两个文件,配置文件一般都有个样板配置文件,是文件名.default结尾,使用的使用将其复制为并将default去掉即可。

教辅:Nginx的安装1Linux安装登录root账号执行yum install yum-utils运行vim /etc/yum.repos.d/nginx.repo输入:[nginx-stable]name=nginx stable repobaseurl=/packages/centos/7/$basearch/ gpgcheck=1enabled=1gpgkey=https:///keys/nginx_signing.keymodule_hotfixes=true[nginx-mainline]name=nginx mainline repobaseurl=/packages/mainline/centos/7/$basearch/ gpgcheck=1enabled=0gpgkey=https:///keys/nginx_signing.keymodule_hotfixes=true然后查看源yum list | grep nginx看到存在稳定版的源,确认无误。
运行安装命令yum install nginx 1:1.16.1-1.el7.ngx过程中输入y,确认查看版本,若出现版本号,则安装成功nginx -v用whereis nginx可以查看到目录:nginx: /usr/sbin/nginx /usr/lib64/nginx /etc/nginx /usr/share/nginx /usr/share/man/man8/nginx.8.gz2MacOS的安装安装homebrew,然后nginx使用安装brew:$ brew install nginx笔记:nginx的配置文件位于中/usr/local/etc/nginx/nginx.conf。
要编辑配置文件或运行nginx,您需要使用sudo:sudo nano /usr/local/etc/nginx/nginx.conf和sudo nginx ...3Windows下的安装不推荐,nginx不适合运行在Windows上,功能不完整,我们尽量运行在linux 上。
nginx安装实施目录一.什么是Nginx? (2)二.Nginx的安装 (2)1.下载Nginx相关软件包 (2)2.nginx安装 (3)(1).安装openssl-fips-2.0.9.tar.gz (3)(2).安装zlib-1.2.7.tar.gz (3)(3).安装pcre-8.21.tar.gz (4)(4).安装 nginx-1.2.6.tar.gz (4)三:检测是否安装成功 (4)四.Nignx tcp模块安装 (5)1. nginx_tcp_proxy_module特性 (5)2. nginx-tcp-module安装 (6)3、tcp配制负载均衡访问mysql集群服务 (7)五、Nignx 健康检测模块安装 (9)1. 为何需要健康检测 (9)2.参数配制说明 (10)六.Nginx常用操作和问题解决 (10)1.nginx常用操作命令 (10)2.版本冲突 (11)3. 编译安装权限不够 (12)一.什么是Nginx?Nginx是一个高性能的HTTP和反向代理服务器,也是一个IMAP/POP3/SMTP 代理服务器,在高连接并发的情况下Nginx是Apache服务器不错的替代品.其特点是占有内存少,并发能力强,事实上nginx的并发能力确实在同类型的网页服务器中表现较好.目前中国大陆使用nginx网站用户有:新浪、网易、腾讯,另外知名的微网志Plurk也使用nginx。
Nginx作为负载均衡服务器,既可以在内部直接支持Rails和PHP 程序对外进行服务,也可以支持作为HTTP 代理服务器对外进行服务。
Nginx采用C进行编写,不论是系统资源开销还是CPU使用效率都比Perlbal要好很多。
Nginx 是一个安装简单,配置文件非常简洁(还能够支持perl语法),Bugs非常少的服务器,Nginx启动特别容易,并且几乎可以做到7*24 不间断运行,即使运行数个月也不需要重新启动。
你还能够不间断服务的情况下进行软件版本的升级。
二.Nginx的安装1.下载Nginx相关软件包(1)gzip模块需要zlib 库(下载:/)(2)rewrite模块需要pcre库(下载:/)(3)ssl功能需要openssl库(下载:/)(4).Nginx包下载: /en/download.html软件如下:openssl-fips-2.0.2.tar.gzzlib-1.2.7.tar.gzpcre-8.21.tar.gznginx-1.4.7.tar.gz2.nginx安装依赖包安装顺序依次为:openssl、zlib、pcre, 然后安装Nginx包. (1).安装openssl-fips-2.0.9.tar.gz[root@vm-vmw5023-was vm]# tar -zxvf openssl-fips-2.0.9.tar.gz[root@vm-vmw5023-was vm]# cd openssl-fips-2.0.2[root@vm-vmw5023-was openssl-fips-2.0.2]# ./config[root@vm-vmw5023-was openssl-fips-2.0.2]# make[root@vm-vmw5023-was openssl-fips-2.0.2]# make install注:如果系统本身安装有openssl-fips可以不另行安装,本例操作中我用的就是系统本身的OpenSSL0.9.8e-fips-rhel5版本,用openssl version命令可查看系统是否已安装此依赖库(2).安装zlib-1.2.7.tar.gz[root@vm-vmw5023-was vm]# tar -zxvf zlib-1.2.7.tar.gz [root@vm-vmw5023-was vm]# cd zlib-1.2.7[root@vm-vmw5023-was zlib-1.2.7]# ./configure[root@vm-vmw5023-was zlib-1.2.7]# make[root@vm-vmw5023-was zlib-1.2.7]# make install(3).安装pcre-8.21.tar.gz[root@vm-vmw5023-was vm]# tar -zxvf pcre-8.21.tar.gz [root@vm-vmw5023-was vm]# cd pcre-8.21[root@vm-vmw5023-was pcre-8.21]# ./configure[root@vm-vmw5023-was pcre-8.21]# make[root@vm-vmw5023-was pcre-8.21]# make install(4).安装 nginx-1.2.6.tar.gz[root@vm-vmw5023-was vm]# tar -zxvf nginx-1.2.6.tar.gz [root@vm-vmw5023-was vm]# cd nginx-1.2.6[root@vm-vmw5023-was nginx-1.2.6]# ./configure --with-pcre=../pcre-8.21 --with-zlib=../zlib-1.2.7 --with-openssl=../openssl-fips-2.0.2 [root@vm-vmw5023-was nginx-1.2.6]# make[root@vm-vmw5023-was nginx-1.2.6]# make install至此Nginx的安装完成!三.检测是否安装成功安装完nginx后,此时如果不修改安装目录的情况下,在/usr/local/nginx/conf目录下会有一个nginx.conf文件,此文件就是nginx的核心配制文件,默认文件监听的是本机的80端口,启动服务操作:[root@vm-vmw5023-was nginx-1.2.6]# cd/usr/local/nginx/sbin[root@vm-vmw5023-was sbin]# ./nginx -t出现如下所示提示,表示安装成功启动nginx,访问本机80端口就会出现欢迎页面[root@vm-vmw5023-was sbin]# ./nginx四.Nignx tcp模块安装1. nginx_tcp_proxy_module特性由于nginx本身是不具备tcp模块的,默认只支持http协议,然而mysql是通过tcp进行连接的,因此为了实现此功能必须添加nginx-tcp模块2. nginx-tcp-module安装(1)下载nginx_tcp_proxy_module-master.zip软件包。
(2)查看原本nginx安装参数命令:nginx -Vconfigure arguments: --add-module=nginx_tcp_proxy_module-master --with-pcre=prc/pcre-8.21 --with-zlib=zlib-1.2.7 (3)安装:进入到nginx安装包目录,将nginx_tcp_proxy_module-master拷贝到此目录下结构如:在命令行执行如下操作:(主要是用add将tcp模块添加到已安装的nginx中)[root@vm-vmw5023-was nginx-1.4.7]# ./configure --add-module=nginx_tcp_proxy_module-master --with-pcre=prc/pcre-8.21 --with-zlib=zlib-1.2.7 --add-module=nginx_tcp_proxy_module-master[root@vm-vmw5023-was nginx-1.4.7]# make只要make 就可以了,千万别make install,否则就覆盖安装了make完之后在objs目录下就多了个nginx,这个就是新版本的程序了备份旧的nginx程序:cp/usr/local/nginx/sbin/nginx/usr/local/nginx/sbin/nginx.bak 把新的nginx程序覆盖旧的cp objs/nginx/usr/local/nginx/sbin/nginx3.tcp配制负载均衡访问mysql集群服务命令./nginx -t测试新的nginx程序是否正确,如果没有问题则配制nginx.conf将tcp模块加入进行测试,本处结合上文中mysql集群进行配制,配制文件如下:#user nobody;worker_processes 1;#error_log logs/error.log;#error_log logs/error.log notice;#error_log logs/error.log info;#pid logs/nginx.pid;events {worker_connections 1024;}tcp {upstream mssql {server 10.6.154.42:3306;(mysql集群服务器)server 10.6.154.43:3306; (mysql集群服务器)check interval=3000 rise=2 fall=5 timeout=1000;}server {listen 80;(监听本机80端口)server_name 10.6.154.42;(对外访问地址)proxy_pass mssql;(转向负载实际服务)}}配制完毕后,重新启动nginx,如果启动成功,就说明服务已成功部署,本机测试:利用mysql客户端访问10.6.154.42 的80端口,经测试成功实现mysql集群的访问,并且可以实现10.6.154.42和10.6.154.43mysql的均衡调用。
五.Nignx 健康检测模块安装1. 为何需要健康检测大家都知道, nginx做反代,如果后端服务器宕掉的话,nginx是不能把这台realserver提出upstream的,所以还会有请求转发到后端的这台realserver上面去,虽然nginx可以在localtion中启用proxy_next_upstream来解决返回给用户的错误页面,但这个还是会把请求转发给这台服务器的,然后再转发给别的服务器,这样就浪费了一次转发,这次借助与淘宝技术团队开发的nginx模快nginx_upstream_check_module来检测后方realserver的健康状态,如果后端服务器不可用,则所有的请求不转发到这台服务器。