382喷头喷绘机手册2部分英文
- 格式:pdf
- 大小:760.12 KB
- 文档页数:25
广告行业喷绘机使用说明书注意:以下是根据题目所提供的格式要求,写的广告行业喷绘机使用说明书。
广告行业喷绘机使用说明书注意事项1. 在使用喷绘机前,请仔细阅读本使用说明书,并确保按照说明进行操作。
2. 请确保在操作喷绘机时,保持周围环境通风良好。
3. 本喷绘机适用于广告行业的室内外喷绘工作,不适用于其他领域。
4. 请勿将喷绘机置于高温、潮湿或多尘区域,以免影响使用效果和寿命。
5. 长时间未使用喷绘机时,请将电源开关关闭,并拔出电源插头。
器材准备1. 打开喷绘机包装箱,确认所有配件齐全,并检查是否有损坏。
2. 将喷绘机放置在平稳的工作台上,并确保周围没有堆积物。
3. 连接导电线,将电源插头插入适配器插座。
4. 将适配器插头连接到喷绘机的电源插孔。
操作步骤1. 打开喷绘机的电源开关,并等待几秒钟,直到喷绘机显示屏上显示正常。
2. 通过喷枪上的按钮调整喷绘机的喷头位置,确保喷头与材料表面的距离适当。
3. 打开喷绘机的墨盒盖,并检查墨盒中的墨水量是否充足。
4. 根据需求选择喷绘机的喷绘模式,比如单色、双色或多色。
5. 将待喷绘的材料固定在喷绘机工作台上,并按下喷绘按钮进行喷绘。
6. 在喷绘过程中,确保平稳移动喷绘机,以免出现喷绘不均匀或模糊的情况。
7. 喷绘完成后,关闭喷绘机的电源开关,并擦拭喷绘机表面及喷枪。
维护保养1. 每次使用喷绘机后,及时清理喷枪和墨盒,避免堵塞。
2. 定期清洁喷绘机的喷头和打印机头,以确保喷绘质量。
3. 请勿随意拆卸喷绘机内部零部件,如需维修,请联系专业人员。
4. 定期检查喷绘机的喷头和墨盒是否需要更换,避免使用老化零件造成影响。
故障排除1. 如果喷绘机无法正常开机,请检查电源插头是否插紧,并确保电源供应正常。
2. 若喷绘质量不佳,可以尝试调整喷头位置、更换墨盒或清洁喷头。
3. 如果喷绘机出现异常噪音或异味,请立即关闭电源开关,并联系售后服务。
免责声明本喷绘机使用说明书所提供的全部信息仅供参考,具体操作请根据实际情况进行,并请自行承担使用喷绘机所带来的风险和责任。
喷绘机操作规程一、操作前检查1、喷绘机的电源是否接好,传输线是否接好。
2、喷绘机的是否装有打印纸,是否安装正确。
二、操作流程1、打开电源,轻按喷绘背后的《ON/OFF》,开启喷绘机。
2、喷绘机开启后,要进行自动检测,要等待几分钟,小屏幕上显示100%之后,可以进入操作界面,说明正常。
如果不能进入操作界面,按照喷绘机使用说明,关闭喷绘机,将打印纸取出,开启喷绘机,检测完成后(如果不能完成,请专业的人员进行维修),在操作界面,对喷绘机进行手动检修。
3、检测完成之后,手动检查喷头是否正常(总共有8个喷头,小屏幕上显示的8个喷头的信息全部显示OK,表示一切正常)4、一切正常就可以进行喷绘。
三、注意事项1、严格按照使用说明进行操作,严禁非法操作。
2、喷绘机在喷绘时,工作人员不得离开。
3、使用结束后,关闭电源。
四、设备维护方法1、避免阳光直射2、请注意保持喷绘机的干净,使用喷绘机专用清洁工具进行清洁。
3、使用者请不要维护,保养与替换喷绘机的任何部分。
喷绘机简明操作手册及日常维护9.1日常维护为保证喷绘机的正常工作,日常的维护是非常重要的,下面将作详细的说明:9.1.1喷印单幅图完成后●用清洗液清洗喷头表面,去除表面干燥的墨水;●在开始喷下一块之前,要使失效的喷嘴恢复正常。
9.1.2日检●检查废墨瓶,必要时进行清理;●检查打印起始位的散喷槽,看废墨是否满出,必要时将废墨倒掉;●检查保湿盖板的海棉,必要时进行清洗和更换;●用PM醋酸盐对布料进辊、压轮进行清洗●每天保持机器的清洗卫生。
9.1.3周检●将烘干台板上风扇清除表面的灰尘,确认风扇叶子干净后再装好。
●检查气压系统的管路,看是否有松开。
9.1.4月检●清洗副墨瓶里的沉淀物;●清洗墨水及清洗液的过滤器;●观察正压清洗的三通电磁阀,看有无墨水进入,必要时用清洗液清洗;●检查皮带的张长;●去掉电源箱内的灰尘。
●清晰光栅条。
9.1.5年检●用压缩空气吹去电源箱和伺服器上的灰尘;●清洗主墨瓶;●清洗供墨系统的管路;●清洗供墨的液体泵;●为收放卷电机的齿轮加机油;●对整体电路进行检查,看是否有松开或断开,并及时修理;●检查拖链里的管路和电线的磨损程度,必要时进行更换。
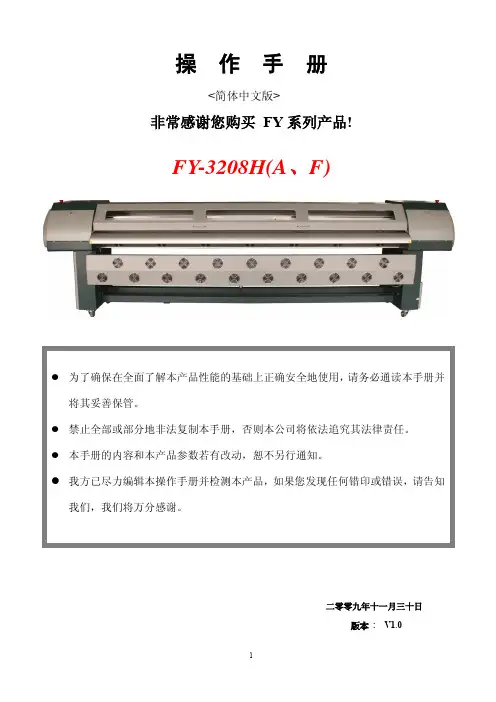
操 作 手 册<简体中文版>非常感谢您购买 FY 系列产品!二零零九年十一月三十日版本 : V1.0● 为了确保在全面了解本产品性能的基础上正确安全地使用,请务必通读本手册并将其妥善保管。
● 禁止全部或部分地非法复制本手册,否则本公司将依法追究其法律责任。
● 本手册的内容和本产品参数若有改动,恕不另行通知。
● 我方已尽力编辑本操作手册并检测本产品,如果您发现任何错印或错误,请告知我们,我们将万分感谢。
FY-3208H(A 、F)目录第一章:安全指导 (3)第二章:准备工作与安装流程 (5)第三章:机器结构与附件 (8)第四章:基本操作 (13)第五章:维护指南 (31)第六章:常见问题的解决 (35)第七章:技术参数 (37)附件:安装4个SPT510-35pl喷头操作步骤 (38)1.1 重要的安全指导请在使用您的打印机之前阅读以下指导,遵守标注在打印机上的警告和指导:1)不要堵塞该打印机外壳上的开口。
2)不要将任何物品插入到打印机的槽中,注意不要将液体溅到打印机中。
3)仅能使用在打印机的标签中标识的电源类型。
根据国家和地区的不同,注意使用220V交流电源。
4)将所有的设备连接到一个适当的接地插座上,避免所使用的插座与复印机或空调系统这些规则地在开和关之间切换的设备在同一回路中。
5)避免使用由墙上开关或自动定时器控制的插座。
6)将您的计算机系统远离潜在的电磁干扰源,例如:扬声器或无绳电话机座。
7)不要使用损坏或磨损的电源线。
8)如果使用附加的电源线,切记插入该附加电源线的设备的总安培数不要超过电源的额定安培数,另外,切记插入墙上的所有设备的总安培数不要超过墙上插座的额定安培数。
9)不要试图自己修理打印机。
在遇到下列情况时,切断电源后请有经验的维修人员来维护:1)如果电源线或插头损坏;2)如果液体溅入打印机中;3)如果打印机摔下来或机壳破损;4)如果打印机不能正常操作或在性能上有明显的变化;1.2 使用打印机时注意事项1)不要在未切断电源的情况下用手移动打印头,否则可能会损坏打印机。
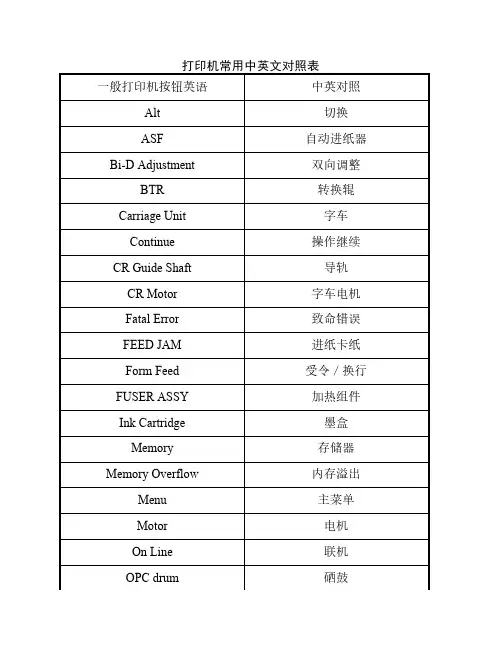
打印机常用中英文对照表一般打印机按钮英语中英对照Alt切换ASF自动进纸器Bi-D Adjustment双向调整BTR转换辊Carriage Unit字车Continue操作继续CR Guide Shaft导轨CR Motor字车电机Fatal Error致命错误FEED JAM进纸卡纸Form Feed受令/换行FUSER ASSY加热组件Ink Cartridge墨盒Memory存储器Memory Overflow内存溢出Menu主菜单Motor电机On Line联机OPC drum硒鼓Paper Jam卡纸Paper Out缺纸Parallel Interface并口PE Sensor缺纸传感器PF Motor走纸电机Printer Open机盖打开Printhea d打印头PSB电源板Pump Unit泵组件Reset复位(清除打印机内打印数据)Ribbon Cartridge色带Sensor传感器Status Sheet状态页Timing Belt皮带Toner Low碳粉少Toner Out碳粉用尽Toner碳粉Toner Save Mode省碳粉状态Warming-up正在加热HP Officejet 4255/4256一体机面板按钮介绍和菜单中英文对照列表1、Automatic Reports Setup(自动打印传真报告)[*]Send Error(只有发送传真出错时打印错误报告)[*]Receive Error(只有接收传真出错时打印错误报告)[*]Every Fax(每次传真后都打印传真报告)[*]Send Only(每次发送传真后都打印传真报告)[*]Off(关闭传真报告)2、Last Transaction(打印最近一次传真日志报告)3、Fax log(打印传真日志)4、Speed Daial List(打印快速拨号列表)5、Self-Test report(打印自检报告)[*][b]Speed Dial Setup(快速拨号设置)1、Individual Speed Dial(独立快速拨号)2、Group Speed Dial (群组拨号)- 只能选择“Individual Speed Dial”中设置的号码3、Delete Speed Dial(删除快速拨号)- 清除个人快速拨号或组快速拨号[*][b]Basic Fax Setup(基本传真设置)[/b]1、Date and Time(设定日期和时间)[list][*]日期格式:年- 月- 日(依次输入年月日)[*]时间格式:12:00(输入时间 24 小时制)[/list]2、Fax Header(设定传真标题) - 设置传真抬头的内容,包括公司名称和传真电话。
喷绘机操作流程及规章制度一、喷绘机操作流程1. 开机准备(1)确认喷绘机电源已接通,传输线是否连接正常。
(2)检查喷绘机是否装有打印纸,是否安装正确。
(3)确保喷绘机工作环境整洁,无杂物影响操作。
2. 开机操作(1)打开电源,轻按喷绘背后的《ON/OFF》按钮,开启喷绘机。
(2)喷绘机开启后,进行自动检测,等待几分钟,直至小屏幕显示100%后,进入操作界面。
(3)如无法进入操作界面,按照喷绘机使用说明,关闭喷绘机,取出打印纸,重新开启喷绘机,等待检测完成后进行操作。
3. 喷头检查(1)检测完成后,手动检查喷头是否正常。
若小屏幕上显示8个喷头的信息全部为OK,表示一切正常。
(2)如喷头出现问题,按下PAUS键暂停喷绘作业,清洗喷头,清洗完毕后继续打印。
4. 喷绘操作(1)在操作界面中,设置打印参数。
(2)确认参数无误后,启动喷绘作业。
(3)随时观察画面效果,确保喷绘质量。
5. 关机操作(1)喷绘作业完成后,保存打印设置。
(2)关闭加热开关、平台吸风开关、风干开关、送料电机开关。
(3)按下急停按钮(3秒以上)。
(4)最后关闭设施电源开关,再关闭电脑。
二、喷绘机规章制度1. 操作规范(1)严格按照使用说明进行操作,严禁非法操作。
(2)喷绘机在喷绘时,工作人员不得离开。
(3)使用结束后,及时关闭电源。
2. 设备维护(1)避免阳光直射。
(2)保持喷绘机干净,使用专用清洁工具进行清洁。
(3)使用者不得随意维护、保养或替换喷绘机的任何部分。
3. 安全事项(1)开机时应保证喷头已从保温底座上取下,且机器工作平台表面无异物。
(2)保证机器上全部开关按钮处于闭合状态。
(3)确保主墨盒内的墨水充足,吸尘器内的废墨已清除。
(4)保持室内温度与湿度在规定范围内。
(5)开机时要先开电脑再开设施电源。
4. 异常处理(1)如喷头堵塞,按下PAUS键暂停喷绘作业,清洗喷头。
(2)如设备出现故障,及时按下急停按钮,并通知专业人员进行维修。
喷绘机的使用操作流程1. 检查设备和准备工作在使用喷绘机之前,需要先进行一些准备工作以确保设备正常工作。
以下是喷绘机使用前的检查和准备事项:•检查设备电源和线缆:确保设备的电源线和其他连接线完好无损,并正确连接到电源插座和其他设备上。
•检查墨盒和墨水:确认墨盒已正确安装在喷绘机上,并且墨水盒的墨水充足。
•准备打印媒介:根据打印需求准备好适合的打印媒介,如纸张、布料等。
保证媒介的质量和平整度,避免对打印质量造成影响。
•清洁喷头和喷嘴:使用喷头清洗液或清洁纸巾清洁喷头和喷嘴,以确保畅通和准确的喷印。
2. 打开喷绘软件并设置打印参数接下来,需要打开喷绘机的控制软件,并根据打印需求进行相关的设置操作。
以下是设置打印参数的步骤:•选择打印机型号:从软件的设备列表中选择正确的喷绘机型号,以确保软件和设备的兼容性。
•选择打印模式:根据打印需求选择适合的打印模式,如高质量、普通、快速等。
不同的打印模式会影响打印速度和打印质量。
•设置图像尺寸和分辨率:根据打印媒介的尺寸和所需打印质量,设置图像的尺寸和分辨率。
通常情况下,较大的图像尺寸和较高的分辨率会导致较慢的打印速度和更高的打印质量。
•调整颜色和亮度:根据打印需求,设置图像的颜色、亮度、对比度等参数,以获得所需的视觉效果。
•选择打印边界:根据打印媒介的尺寸和所需打印效果,选择打印边界,包括全边框、无边框等选项。
3. 导入图像和编辑设计在设置打印参数之后,可以开始导入要打印的图像,并对设计进行编辑。
以下是导入图像和编辑设计的步骤:•导入图像:使用软件提供的导入功能,将要打印的图像文件导入到软件中。
可导入的图像格式通常包括JPEG、PNG、BMP等。
•调整图像布局和大小:根据打印需求,调整图像的布局和大小,可以通过缩放、旋转、翻转等操作来达到所需的效果。
•添加文本和图形:根据需要,在图像上添加文本、图形和其他元素,以实现更丰富的设计效果。
软件通常提供文字编辑器、形状绘制工具等功能。
ET切割喷墨绘图机ET INKJET CUTTING-PLOTTER使用说明书(USER MANUAL)深圳市布易科技有限公司出品2011●1前言感谢您选用ET切割喷墨绘图机!ET LHC系列ET切割喷墨绘图机是以滚轴摩擦驱动纸张的集切割与喷墨绘图功能于一体的综合系统,可以用来喷绘制并切割复杂的图形和文字,所用材料包括电脑纸、麦架纸、牛皮纸等,厚度可从30g-350g不等。
ETLHC系列系列切割喷墨绘图机不但造型美观雅致,而且精度高、速度快、性能稳定、兼容性强(与HPGL服装CAD切绘软件均可适用!在你使用本切割喷墨绘图机之前,请仔细阅读本《使用手册》,以确保你能高效、顺利地工作。
如有不明之处,请与当地销售商联系,以寻求进一步的帮助!(本切割喷墨绘图机及输出软件可以升级的空间很大,对客户提出的个性化的要求,我们会增加和改善机器和软件的功能,本手册如有更改,恕不另行通知。
即时详情请来电咨询本公司)目录第一章:安全须知第二章:使用注意事项2.1机器的使用环境2.2其他注意事项第三章:简介3.1基本介绍3.2系统要求3.3选件及耗材第四章:机器安装4.1安装前的物品检查4.2安装支架及主机4.3安装纸4.4安装墨盒4.5安装刀4.6连接电源及电脑4.7安装输出软件到电脑第五章:机器的基本操作5.1操作面板按键功能说明5.2设置功能菜单操作说明第六章:输出软件6.1输出软件界面说明6.2参数设置的后台设定6.3参数设置的纸宽设定6.4参数设置的打印参数6.5参数设置的切割参数6.6参数设置的校正第七章:常见故障及解决办法7.1开机没有反应:7.2开机后小车一直往右边跑,不能停车:7.3 切割喷墨绘图机出现乱喷切现象:7.4切割喷墨绘图机在工作时喷不出墨:7.5切割喷墨绘图机在工作时喷出来的线条不理想:7.6切割喷墨绘图机在工作时切割不下刀:7.7切割喷墨绘图机在工作时切割的效果不好7.8切割喷墨绘图机在工作时纸张走偏7.9前面的收纸杆不收纸:第一章:安全须知安全须知:请您在使用ET切割喷墨绘图机前仔细阅读以下所有指导;1.将切割喷墨绘图机水平安装在地面上,地面倾斜时,绘图机将不能正常工作;2.将安装好后,调节支架上的脚杯高度,直到整机达到水平状态;不要将切割喷墨绘图机放在震动或不稳定的地面上;3.请按本机器的额定电压要求联接电源,不要将切割喷墨绘图机连接到无稳定电压的插座上,电源不稳定会导致绘图机性能下降,甚至会烧毁电源板;电源不稳定时请安装稳压器;4.电源插头应插到带接地线的电源板上,不要将插头顶端的插针去掉,以保证设备接地。
操作手册目录第一章注册事项1.1关于手册1.2注意事项1.3使用打印机时注意事项1.4墨盒使用注意事项1.5关于PC系统1.6警告、告诫和注意第二章产品概况2.1 技术参数2.2 部件名称:2.2.1 机器前面图示2.2.2 机器背面图示2.2.3 操作面板图示2.3 打印机状态显示第三章安装打印机3.1 机器的安装3.2 喷头的使用与保养3.3 接通电源3.4 打印机的接口3.5 自动放卷第四章关于菜单4.1 菜单说明4.1.1 联机模式4.1.2 脱机模式4.2 详细说明第五章软件的基本操作5.1 软件的安装5.1.1 系统配置要求5.1.2 安装过程5.1.3 PGM Plot的卸载5.1.4 运行设定5.2 界面的功能介绍5.2.1 PGM Plot启动推出5.2.2 系统工具条5.2.3 状态栏5.3 菜单功能介绍5.3.1 “文件”菜单5.3.2 “显示”菜单5.3.3 “工具”菜单5.3.4 “窗口”菜单第一章注意事项1.1关于手册此手册适用于PGM-SUPER/POWER-160/180型喷绘机的用户或操作此机器的技术工程师。
手册旨在说明用前准备工作和操作过程。
在使用打印机前,请务必熟悉本手册中的内容并对部分章节作重点了解。
在使用机器过程中请遵照手册所示进行操作。
请遵守标注在打印机上的警告和指导。
如有疑问,欢迎与我们的技术支持部门接洽。
1.2注意事项:1. 要将机器放置在以下地点:(1) 不牢固的表面(2) 倾斜的地方(3) 容易振动或晃动的地方(4) 温度和湿度容易发生剧烈变换的地方(5) 受到阳光、强光或热源的直射(6) 潮湿或多尘的地方(7) 电话线或照明线路的接地端2. 在打印机周围留出足够的空间以保障打印机的通风正常。
3. 将打印机放置在靠近墙上的插座的地方以使插头容易插拔。
4. 不要堵塞该打印机外壳上的开口。
5. 不要将任何物品插入到打印机的槽中,注意不要将液体溅到打印机中。
EMARK-382L高清解像喷码机 用 户 手 册上 海 仿 云 实 业 有 限 公 司 SHANGHAI FANGYUN Industry CO.,LTD版权所有 翻版必究上海仿云实业有限公司保留更新产品性能及参数的权利,若有更改恕不另行通知。
All is for you目录一 二 三 四 五 六 七喷码机介绍………………………………………………………………………………………………… 3 喷码机安装………………………………………………………………………………………………… 3 喷码机机器界面…………………………………………………………………………………………… 7 开机显示预览主菜单……………………………………………………………………………………… 9 信息编辑及选择…………………………………………………………………………………………… 10 喷印………………………………………………………………………………………………………… 14 油墨选择…………………………………………………………………………………………………… 20八 挤压油墨盒的方法…………………………………………………………………………………………… 21 九 十 十一 十二 日常维护与维修…………………………………………………………………………………………… 22 图片传输软件概述………………………………………………………………………………………… 24 编辑软件安装与卸载……………………………………………………………………………………… 24 编辑软件界面介绍………………………………………………………………………………………… 25附录一:EMARK-382L高清解像型喷码机必须注意事项……………………………………………………… 27EMARK-382L高清解像喷码机 操作使用手册2All is for you一喷码机介绍EMARK-382L高清解像喷码机是用于喷印文字、图形、流水号、生产日期和有效期等的高解像喷墨 打印机,喷印字高1mm -53.7mm。
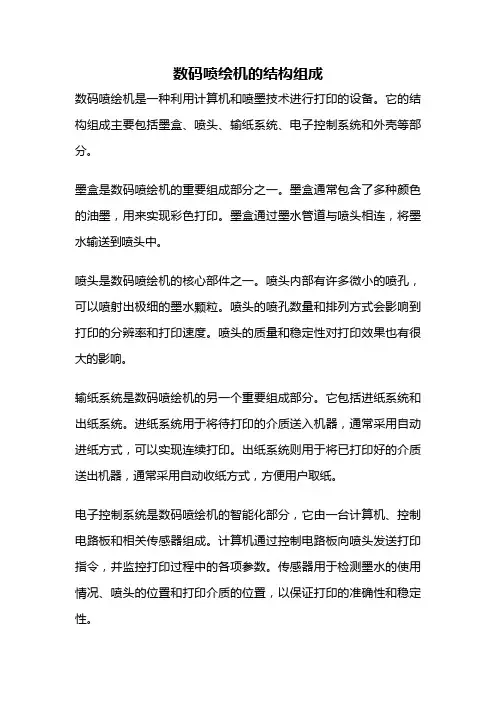
数码喷绘机的结构组成数码喷绘机是一种利用计算机和喷墨技术进行打印的设备。
它的结构组成主要包括墨盒、喷头、输纸系统、电子控制系统和外壳等部分。
墨盒是数码喷绘机的重要组成部分之一。
墨盒通常包含了多种颜色的油墨,用来实现彩色打印。
墨盒通过墨水管道与喷头相连,将墨水输送到喷头中。
喷头是数码喷绘机的核心部件之一。
喷头内部有许多微小的喷孔,可以喷射出极细的墨水颗粒。
喷头的喷孔数量和排列方式会影响到打印的分辨率和打印速度。
喷头的质量和稳定性对打印效果也有很大的影响。
输纸系统是数码喷绘机的另一个重要组成部分。
它包括进纸系统和出纸系统。
进纸系统用于将待打印的介质送入机器,通常采用自动进纸方式,可以实现连续打印。
出纸系统则用于将已打印好的介质送出机器,通常采用自动收纸方式,方便用户取纸。
电子控制系统是数码喷绘机的智能化部分,它由一台计算机、控制电路板和相关传感器组成。
计算机通过控制电路板向喷头发送打印指令,并监控打印过程中的各项参数。
传感器用于检测墨水的使用情况、喷头的位置和打印介质的位置,以保证打印的准确性和稳定性。
外壳是数码喷绘机的外部保护结构。
外壳通常由金属或塑料材料制成,可以保护机器内部的核心部件不受外界环境的干扰。
外壳还具有良好的散热性能,以保证机器长时间工作时的稳定性。
数码喷绘机的结构组成主要包括墨盒、喷头、输纸系统、电子控制系统和外壳等部分。
这些部分相互配合,共同实现了数码喷绘机的高质量打印功能。
随着科技的不断进步和应用领域的扩大,数码喷绘机在广告、装饰、纺织、艺术创作等领域中的应用也越来越广泛。

喷绘机喷头的保养技巧
喷绘机喷头是喷绘设备中非常重要的部件,如何正确保养和管理喷头已经成为了喷绘设备的重要问题之一。
因此,下面将介绍一些喷头的保养技巧,希望能对用户有所帮助。
1. 定期清洗喷头
使用喷绘机一段时间后,喷头可能会被污垢和沉淀物堵塞。
因此,建议用户定期清洗喷头,以确保其正常工作。
清洗时,使用的清洗液应该是喷绘设备制造商推荐的,否则会导致喷头被腐蚀。
2. 避免使用过高的温度
有些用户可能会试图使用高温来清洗喷头,但这是错的。
如果使用过高的温度,喷头可能会被损坏。
因此,应该避免使用过高的温度和过强的水压清洗喷头。
3. 定期更换喷头
即使喷头表面看起来干净,也有可能内部已经起火或者磨损。
因此,建议用户定期更换喷头,以确保喷头工作正常。
当然,喷头更换的频率取决于每个用户的使用情况。
4. 遵守使用规范
喷绘设备制造商为用户提供了一些使用规范,用户应遵守这些规范。
这些规范包括如何安装,如何清洗和保养喷头等内容。
用户应尽量遵守制造商提供的操作规程,以确保设备正常工作。
5. 使用优质喷头
喷头质量是保证喷绘机质量的一项关键因素。
因此,建议用户使用优质喷头。
优质喷头可保证喷绘机的性能和颜色输出质量不受影响。
喷头是保证喷绘机正常工作的重要件。
根据上述保养技巧,护理喷头不仅可以延长其使用寿命,更可以提升喷绘设备的色彩输出质量及工作效率,为用户带来更优质的印刷产品。
Alt 切换 ASF 自动进纸器Bi-D Adjustment 双向调整 BTR 转换辊Carriage Unit 字车 Continue 操作继续CR Guide Shaft 导轨 CR Motor 字车电机Fatal Error 致命错误 FEED JAM 进纸卡纸Form Feed 受令/换行 FUSER ASSY. 加热组件Ink Cartridge 墨盒 Memory 存储器Memory Overflow 内存溢出 Motor 电机On Line 联机 OPC drum 硒鼓Paper Jam 卡纸 Paper Out 缺纸Parallel Interface 并口 PE Sensor 缺纸传感器PF Motor 走纸电机 Printer Open 机盖打开Printhead 打印头 PSB 电源板Pump Unit 泵组件 Reset 复位(清除打印机内打印数据) Ribbon Cartridge 色带Sensor 传感器 Status Sheet 状态页Timing Belt 皮带 Toner Low 碳粉少Toner Out 碳粉用尽 Toner 碳粉Toner Save Mode 省碳粉状态Warming-up 正在加热1 sided 单面2 sided 双面20-bin sorter stapler 20格分页装订机 20-bin staplersorter 20格装订分页器 2nd generaion 二次影印access code 接入码 acknowledge 收到action 执行、动作+B405 activity journal 活动日志actuator 传动装置 add 添加adding or inserting sheets 增加或插入纸张 adding the cover 增加封页ADF mixed size mode ADF混合尺寸模式 advanced copy 高级复印after recalling your settings 调用设定值后 air vent 通风口alarm 报警器、报警音 alarm lamp 报警指示灯alarm light 报警指示灯 alarm silent 报警器静音alarm&key volume 报警器和按键的音量 aligning roller 定位辊altitude 高度 anode 阳极/正极ans/fax ready 答录/传真已准备好 area editing 区域编辑area image overlay 局部影像覆盖 assigned number 分配号audible alarm 声音报警 auger 螺旋钻auto color select 自动选择颜 auto doc size detection 原稿尺寸自动探测 auto duplex tray 自动双面纸匣auto feed 自动进纸 auto feed indicator 自动进纸指示灯Auto Image Density 自动调节影像浓度auto original type 自动判断原稿类型auto paper select 自动选择影印纸类型auto power off mode 自动断电模式 auto print 自动打印auto reduce/enlarge 自动缩小/放大auto separation sensitivity level 自动分离灵敏度级别auto staple 自动装订auto start 自动启动 auto text/photo mode 自动判断文字/照片模式autodialer 自动拨号器 automatic duplex copying 自动双面复印back fence 后挡板 background density 背景浓度background print 后台打印 background, dirty 背景,脏batch box 批邮箱,合并邮箱 batch box no. 批邮箱号,合并邮箱号batch tx 批发送,合并发送 black & white 黑白black copy 黑白影印 blade 刮板blank slip sheet 空白薄衬纸 block junk fax 阻止垃圾传真blocked number list 阻止号码表 bold 粗体book 书本 book origianls 书本原稿border erase 消除边框阴影 both 两者bound(book) original 装订原稿 box in use 邮箱在使用中box list 邮箱列表 box name 邮箱名称box No 邮箱号 breaker 断路器brightness 亮度 broadcast 广播bulletin box 公告邮箱 bus reset 总线复位bushi 层数 bushing 轴衬bypass feed copying 手送台影印 bypass tray 手送台bypass tray 旁路输纸盘 c+A57opy 副本cable clamp 电缆夹具 calibration 标定call request 通话请求 call reserve 通话预定caller 主叫人、来电人 caller ID 来电者身份carbon backed 带复写面 cardboard 硬纸板 carriage 托架Carrier Sheet 纸垫cassette cover 色带盒盖 cassette size label 纸盒尺寸标签cathode 阴极 caution 小心center erase 消除中间阴影 center line 中心线center paper guide 打印纸中央导杆center/border erase 消除中间/边框阴影 centering 居中changing the machine's settings 改变机器设定值charger 充墨器 chassis ground 底板接地check 复选;选中 check # of document 检查文件数,检查文件页数check box 复选框 claw 卡爪clearance 间隙 clutch 离合器coarse 粗糙 code key 代码键collate copies 逐份打印 color adjustment 颜色调节color adjustment/memory 颜色调节/记忆 color background 颜色背景color balance 颜色平衡 color balance ajustment 颜色平衡调节color balance program 颜色平衡程式color balance sample 颜色平衡样本 color conversion 颜色转换color creation 颜色创造 color erase 颜色消除color mode 颜色模式 color to convert to 转换色color to be converted 被转换色 colored area 带色区域column adjust knob 列调节旋钮 column scale 列刻度com No 任务号 combination chart 功能合并使用表combine 连接 combine 2 original 连接2份原稿combine 4 original 连接4份原稿 commands full 任务已满communication light 通信指示灯 complementary color 补色confidential 保密 connector 端子console 控制台式 console type 台式continuous polling operation 连续查询工作、 contrast 对比度copies 复印份数 Copy 晒制copy counter 影印计数器 copy density 复印浓度copy exit 复印出纸口 copy from paper tray 由纸匣影印copy media 副本媒质 copy panel reset 复印面板设定copy panel reset 复印画面重设 copy tray 影印件托盘copying 复印 copying do's & don'ts 关于复印应做和不应做的事项cord 软线 correction fluid 修正液cover page 封面 cover sheet 封页/封页纸张crooking image(skewed) 影像歪斜 curl corrector 卷曲矫正器current page 当前页 custom paper size 自定义纸张尺寸custom paper size 自定义影印纸尺寸custom size original 常规尺寸原稿 cut 切割daily maintenance 日常维护 daishi 台纸、底纸damp heater 除湿加热器 dark copies, making 深色副本,复印dark copies, problem 深色副本,问题 dash 横杠data bit 数据位 data overrun/underrun 数据传输过量/不足data spooling 数据假脱机 default settings 缺省设定delayed commands 定时任务 delayed tx 定时发送delete area 区域删除 density 浓度detail 详细 developer material 显影剂developing system 显影系统 dialing pause 拨号延迟dialog box 对话框 die cut 冲切digital plain paper copier 普通纸数码复印机directionalmagnification 偏倍 directional size magnification 偏倍dirty background 脏背景 display color 显示颜色dither matrix 抖动显示阵 do not 请勿document 原稿、文件 document feeder 输稿器document feeder (ADF) 自动送稿机、送稿机document file 文档文件 document guide 原稿导板document jam 原稿卡纸 document list 文件表document number 文件号 document tray 原稿托盘do's & don'ts 应做和不应做的事项 dot matrix 点阵Double Rod 双夹纸杆 dropout/color dropout 脱落/颜色脱落drum cartridge 显影滚筒 drum cover 鼓盖duplex 双面影印 duplex paper 双层纸duplex thick paper 双层厚纸 duplex unit 双面装置duplex/series/combine copying 双面/连续/连接影印easydial 简易拨号 easydial directory 简易拨号簿ECM 纠错模式,自动纠错模式 editor pen 编辑笔electric cotact 电触点 endless tape ribbon 环形循环色带energy saver indicator 节能指示灯 enlarge tx 放大发送environment 环境 erase 消除erase box 删除邮箱 erase parts of the copy image 消除部分影印影像erase tx doc 删除已发送文件 error code 误码error dispersion method 误差分散方法example display 实例显示 exit 出纸口exit tray 出纸盘 explosure glass 曝光玻璃extender 延伸板 facing 相对页facing pages 相对页面 favorite key 常用键fax call 传真信号 fax document 传真原稿fax exit 传真出纸口 fax forwording 传真转发fax number 传真号码 fax tone 传真音fax©传真并复印 Fcode list F代码箱列表Fcode name F代码箱名 Fcode number F代码箱号Fcode polling F代码查询 F-code tx F代码发送feature 功能 feed direction 输稿方向feed direction 进纸方向 feeder, roll 供纸器,纸卷feeding hole 送纸孔 fence lever 护栏手柄file No 文档号 film 薄膜纸film projector unit 软片投影单元 fine 精细finishing 整理 firmware 固件 first copy 首份复first copy speed 首张复印速度 flash 闪断flatbed scanner 、 FBS 平面扫描仪 form length 页长frame ground 机架地线 free space 剩余空间friction coefficient 摩擦系数 friction plate 摩擦板front & back cover 封面和封底 front cover 前盖front cover 封面 front panel 前面板fulcrum 枢轴 full color 全色full color copy 全色影印 full image overlay 全影像覆盖Full Size 全尺寸 fullbleed copy 出血版影印 function menu 功能目录function menu display 功能目录显示 fuse 定影fuser 定影器 fusing system 定影系统fusing tempreture 定影温度 Fusing Unit 定影装置gamma 灰度系数 glassine 玻璃纸glossy photo 光滑照片 gray scan 灰度扫描grayscale 灰度级 grid voltage 栅极电压group 分组 group No. 分组号,分组号码guide arm 导向臂 guides, original 导向板,原稿guides, paper 导向板,纸页 halftone 半色调halftone 灰度 halogen lamp 卤素灯hammer pin 打印针销 hassyoku gata 显色型high quality printing 高级打印 highlight 加亮hold 保留 hold time 保留时host adapter 主机适配器 hub 中转站 humidity 湿度ID code 标识代码,身份代码 ID code 身份代码identifier code 标识码if your machine dose not operate as you want 机器不按使用者指令操作时 image adjustment 影像调节image creation 影像创造 image overlay 影像覆盖image transfer 图像转印 impact paper 压敏纸index scale 索引刻度indirect electrographic process 间接电子照相方式 ink ribbon 色带input capacity 输入容量 insert original indicator 插入原稿指示灯installation 安装 interface cable 接口电缆interface port 接口端口 interrupt copying 急件插入影印interrupt(ion) 中断 interrupted copying 插入复印introduction 序言 invalid numnber 无效号码jack 插孔、插座 Jam 卡纸/夹纸jammed staple 卡住的订书钉 jams, frequent 夹纸,经常jams, original 夹纸,原稿 jams, roll paper 夹纸,卷筒纸jams, sheet paper 夹纸,单页复印纸 job memory label 工作记录标签key buzzer silent 键蜂鸣器静音,按键静音key copy counter 主复印计数器 key operator code 主操作员密码label 标签 label paper 标签纸landscape printing 横向打印 large capacity tray (LCT) 大容量纸匣latent image 隐像 layout 布局LCD 液晶显示器 Leading Margin 前缘空白LED LED指示灯 LED eraser array LED清除阵列letterhead 公司信纸 level 纸位、余量leveler 水平仪 light 照明light 清淡 light copies, making 淡色副本,复印light copies, problem 淡色复印,问题 limit mark 限制标记line 线条 line counter 行数计数器line printer 行式打印机 line space 行距list 清单 list exit 列表出纸口load numnber 负载号码 loading a roll 纸卷的装入local communication mode 本地通信模式 location 位置location ID 地点标识 lock 闭锁装置lock support 锁定支架 logo 标志long edge binding 长边装订 lower case 小写lower right cover 右下盖 machine setting 本机设定macro key 组合功能键,预设多重操作键macro program 组合功能程序,预设多重操作程序magnetic bridge circuit system 磁桥路系统magnetic screwdriver 磁性起子main power indicator 主电源指示灯 main power switch 主电源开关main unit 主机 mainframe 主机maintenance, daily 维护,日常making combine copies 连接影印making duplex copies 制作双面影印本making series copies 制作连续影印本making single copies 制作单面影印件manual feed 手动供纸 manual feed knob 手动进给旋钮manual staple 手动装订 margin 空白margin adjustment 页边调节 mark 标记master making 制版 master roll 版纸卷media, copy 媒质,复印 memory 内存、剩余存储空间,存储器memory receive light 储存接收指示灯memory transmit 储存发送 memory, program 记忆体,编程menu 目录 message reject 信息拒收mirotoning 微调色 mirror 反光镜mirror carriage 反光镜滑架 mirror image 镜面影像mishin me 页缝线 mode 模式 monitor volume 监听器音量monitor/call 免提/通话 motor 电机move cursor and enter value 移动光标并输入数值multi 多面 multi access 多通道multi paper tray 多纸托盘 multicopying 连续复印量multiple copy 多份复印 multiple copying 多份复印multi-position staple sorter 多角度装订分页器Natural Tracing Paper 天然描图纸 next doc 下一份原稿no command stored 未存储任务 nonsort 不分页non-standard size paper 非标准尺寸影印纸normal paper mode 普通纸模式 not stored 未存储 note 注意nukikasu 打孔纸屑 number of pages 页数number of stored pages 已存储的页数numeric key 数字键off line 脱机 OHP 透明胶片 okuri hole 送纸孔on indicator 开指示灯 on line 联机one touch key 单触键 one-sided copy 单面复印one-touch label 单触标签open &check blinking cover 打开并检查闪烁的盖子open collector 集电极开路 Opening 原稿出口operate standalone 单机工作operation panel 操作面板 operation switch 操作开关operator's manual pocket 操作手册袋optical fan 光风扇 option 选件 option 选购 option/optional 选用件organic reagent 有机药剂 orientation 打印方向original feeding tray 输稿盘 original guide 原稿导板original table 原稿台 original tray 原稿托盘originals 原稿 originals jams 原稿夹纸oritatami 折页、折叠 outline image 轮廓影像output shifting 分头输出output stage 输出架 override 越过override 跳越 overwrite doc 改写文件page counter 页计数器 page image 页图像page number 页码 page numbering 页面计数page quantity 页量 paint 上色paper cassette 纸匣 paper clip 回形针paper cutting rail 裁纸板paper do's & don'ts 关于纸页应做和不应做的事项paper feed unit 输纸装置 paper for list 列表用纸张paper guide 影印纸导板 paper guide 导纸板paper jam alarm 卡纸报警 paper jams, roll 夹纸,纸卷paper jams, sheet 夹纸,单张纸 paper press holder 压纸架paper selection 影印纸选择 paper size 纸张尺寸paper size select 选择纸张尺寸paper thickness adjust lever 纸厚调节杆paper tray 纸匣 paper tray 纸盘paper, roll 纸页,纸卷 paper, thick and thin 纸页,厚的和薄的parity error 奇偶校验错误 partial copy 部分复印passcode 密码 password 口令pasteboard 厚纸 pastel 淡色 pause character 暂停字符PDL(page description language+A16) 页描述语言pedestal 供纸台 pedestal 底座periodic maintenance 定期保养 personal computer 电脑phase sequence 相序photo 相片,图片 photo conductor 光电导体photo type selection 照片类型选择photosensitive drum 感光鼓 pick roller 拾取滚子pin 针脚 PIN 个人识别号platen 打印辊 platen cover 原稿盖platen glass 稿台玻璃 polling 查询,遥索polygon mirror 多面镜 portrait printing 纵向打印positive/negative 正/负向 poster mode 海报模式power connection 电源连接 power consumption 耗电量、电力消耗power consumption 功耗 power cord 电源线power lamp 电源指示灯 power stacker 动力收纸器power switch 电源开关precaution 预防措施 Preset Cut 预定幅宽preset R/E 预置缩小/放大 preset ratio 预置比例press print 印刷品 pre-transfer 预转印pre-transfer discharge 预转印放电primary contrast 原始灰度primary resolution 原始精度 print 打印print cylinder(drum) 滚筒 print density 打印浓度print engine 打印引擎 print head 打印头print job 打印作业 print orientation 打印方向printdoc 打印原稿,打印文件printer 打印机 printer client machine 打印客户机printer cover 打印机盖 printer driver 打印机驱动程序printer server machine 打印服务机printer unit 打印装置 printing hammer 打印锤、打印头problems, troubleshooting 问题,故障排除program 程式 program setting 程式设定值program user color 用户选用色编程programming 编程 proof tray 试印托盘protect passcode 保护密码 radio button 单选按钮ratio 比率、率 Rear Table 后台板rear table 后板 recall 调用receipt number 接收编号 receive reduction print 接收缩小打印recording paper 记录纸 redial 重拨reduce/enlarge 缩小/放大reducing and enlarging 缩小和放大reduction margin 减小边距 reference mark 参考标记reference point 基准点 reflector 反光罩regular polling 常规遥索 regulator 稳压器relay box 中转邮箱 release 开启钮remark 注意事项 remote communication mode 远程通信模式remote fax 远端传真机 remote location 远端地点repeat image 重复影像 report 报告reproduction ratio 复制比例 reserved 预定ribbon brake lever 色带阻滞器杆 ribbon cassette 色带盒ribbon feed knob 色带进给旋钮ribbon guide 色带导向板 ribbon separator 色带掩膜ribbon subcassette 副色带盒 Roll of Paper 纸卷roll paper 卷筒纸 roller close botton 色带轮关闭按钮roller lever 色带轮杆 roller open lever 色带轮开/合杆rubber roller 橡皮滚筒 same original 同原稿sample cover page 封面样例 sample display 样本显示save area 区域保留 scale 比例尺scan area 扫描区域 scan size 扫描尺寸scanned color 扫描色 scanner unit 扫描装置scanning area 扫描区域 scraper solenoid 鼓分离爪螺线管screen contrast knob 屏幕对比旋钮screened letter 网点字母 screw shaft 螺丝轴secchyoku zai 粘合剂 sectional view 截面图securemail 保密邮件 security 保密接收security box 保密邮箱 security feature 保密功能security reception 保密接收 select a color mode 选择一种颜色模式selected area, copying 选择部分,复印 selecting the color 选择颜色selenlum drum 硒鼓 semi synchro cutting 半同步切纸sender 发件人 sense data 感测数据separator line 分隔线 series copy 连续影印Service Indicator 维修指示灯 service indicators 维修指示灯service representative 维修服务人员 set arm 色带盒装卸臂setbox 设定邮箱 setting 设定值settings, default 设定,缺省 shadow image 阴影影像Sheet 单张纸 shift 移位shift home position 移位起始位置 shift tray 移位纸盘shift/book 移位/书本 shifting the image 影像移位short edge binding 短边装订 showall 显示全部side cover 侧盖 signal ground 信号地线silent operation 静音操作 silicone oil 硅酮油simplex 单面影印 single color 单色 single color copy 单色影印size magnification 尺寸缩放skewed image 影像歪斜 slanted image 倾斜影像 slash 斜杠slider sheet 滑板 slit exposure type 狭缝曝光方式 smooth 修匀soft/sharp 柔和/清晰 softkey 简易操作sort 分页 sort 分页 sorter 分页器sorting into sets 分页成组sorting mode 分页模式 speakerphone 扬声器电话special mode 特殊模式 specification 技术指标specification 规格 spiral shaft 螺旋轴 Spool 卷轴spooling 假脱机 stack 堆积 stack 叠放stack 分类 stack bypass feeding 旁路供纸stacker 收纸器 stacker panel 收纸器面板stamp 确认印记 standard size paper 标准尺寸影印纸staple 装订 staple 订书钉 staple cartridge 装订盒staple unit 装订装置 starting the machine 启动机器status light 状态指示灯 sticker 粘签sticky note 粘条 stiff originals 质地坚硬的原稿stopper 制动器中间设备 intermediate equipment调制解调器 modem调制器 modulator解调器 demodulator 执行 execute资源分配 resource allocation 周围时间turnaround time吞吐量 through put 交错 interleave联址 bind 处理 process 作业 job分派 to dispatch 调度 schedule 运行 run命令语言 command lanuage 装入模块 load module批处理 batch processing 交互方式 interactive mode联机的 inline 脱机的 offline仿真 to emulate目录 calalog 迁出 roll out 迁入 roll in交换 swapping分页技术 paging technique 通道 channel控制面板 control panel插接板 plugboard 指示器 indicator监视器 monitor计时器 timer 时钟寄存器 clock register检验器 verifier 数据转换器 data converter编码器 encoder译码器 decoder串并行转换器 staticizer 并串行转换器 serializer输入输出设备 input-output device终端 terminal登录器 logger扫描器 scanner 光扫描器optical scanner字符阅读器 character reader 曲线阅读器curve follower绘图仪 plotter显示器 display device计数器 countor累加器 accumulator算术部件 arithmetic unit加法器 adder串行加法器 serial adder 并行加法器 parallel adder半加器 half-adder全加器 full adder减法器 subtracter 加减器 adder-subtracter补码器 complementer 存储器 storage device存入 storage 存入 to store存储单元 storage location 存储单位 storage cell磁心 core 磁鼓 drum 磁盘 disk盒式磁带 cassette卡式磁带 cartridge磁卡 magnetic card抹除 erase 区 band 扇段 sector柱面 cylinder字符识别 character recognition 缓冲存储器buffer storage辅助存储器 auxiliary storage寄存器 register盘驱动器 disk drive 击打式打印机 impact printer点阵打印机 matrix printer喷墨打印机 ink jet printer置位 set 复位 reset直接存取 direct access只读存储器 read-only storage 存取时间 access time平均无故障工作时间 mean time between failures(MTBF)错误 mistake 故障 fault失效 failure故障停机时间 down time标识符 identifier关键字 keyword 文字 literal缺省的 default引用 reference 生命期 life time数组 array变量 variable 常量 constant聚集 aggregate 参数 parameter间接引用 indirect referencing赋值 assignment初始化 to initialize 表达式 expression标号 label副作用 side effect 异常 exception优先 precedence激活 activation`鼓Drum:是个圆筒形物。
Operation manualThank you for purchasing ZY-XRH!(XRH=XAAR382)In order to safely operate ZY-XRH(XR382), and know more about the printer, please read the manual carefully.This manual includes printer structure, description, technical parameter, operation instruction, safety information, software application, etc.The manual is subject to changes without notice.Contents herein contained are believed to be correct, however, please contact us if you find any error or something not clear enough.Copyright ZhongYe 11/22/08 all rights reserved.2008/11/25 version2.0Table of contentsChapter one technical specification 3Chapter two safe precaution 7Chapter three preparation and procedures for assembling 9Chapter four machine structure and accessories 12Chapter five basic operation 15Chapter six m aintenance guide 25Chapter oneTechnical specification1.1 Zy-3206XRH/zy-3204XRHProduct type Zy-3306XRH/zy-3304XRHPrinting technology XR382 4 or 6 printheadsResolution X direction:720dpi360dpi240dpi180dpiY direction: 1440dpi720dpi540dpi360dpi180dpiPattern quality Photo realistic quality (basic, high quality)Max. Media width 3200mmOutput (m2/h) Print mode Output (m2/h)240x540 3 pass 48.5.240x720 4 pass 37.8.240x540 6 pass 26.1.360x540 3 pass 35.9.360x720 4 pass 27.1.360x540 6 pass 18.6.720x720 8 pass 14.4.Ink type Solvent-base,c, m, y, k, (lc, lm optional)Ink supply system Auto pumpingInk inspection system Insufficient ink detectorRip software Photoprint or maintopMedia type Pvc, vinyl, coating film, polyester, etcMedia transfer RollMedia feeding system Auto feeding and take-up, weight less than 120kgPrinthead height Adjustable distance range from 2mm-4mm, from media Heating system Front and rear temperature control, 3 digit led display,adjustable from 30-80℃Cooling system External cooling fanClamp Manual adjustmentPrinthead cleaning system Auto cleaning device with anti-clogged flash function and positive pressure cleaning and capping systemPackage size and L x w x h 4600x750x1500,600kgweightInput voltage Ac 220v,50hzPower ac220v Control≤3aHeating≤7aFeading cleaning≤1aCooling≤2aSoftware platform WindowxpWorking environment Temperature18-32℃,humidity:40-60%1.2 Zy-2506XRH zy-2504XRHProduct type Zy-2506XRH zy-2504XRHPrinting technology XR382 4 or 6 printheadsResolution X direction:720dpi360dpi240dpi180dpiY direction: 1440dip720dpi540dpi360dpi180dpiPhoto realistic quality (basic, high quality) Max. Media width 2500mmOutput (m2/h) Print mode Output (m2/h)240x540 3 pass 44.2.240x720 4 pass 34.2.240x540 6 pass 23.8.360x540 3 pass 33.1.360x720 4 pass 24.9.360x540 6 pass 17.2.720x720 8 pass 13.2.Ink type Solvent-base,c, m, y, k, (lc, lm optional)Ink supply system Auto pumpingInk inspection system Insufficient ink detectorRip software Photoprint or maintopMedia type Pvc, vinyl, coating film, polyester, etcMedia transfer RollMedia feeding system Auto feeding and take-up, weight less than 120kgPrinthead height Adjustable distance range from 2mm-4mm, from media Heating system Front and rear temperature control, 3 digit led display,adjustable from 0-100℃Cooling system External cooling fanClamp Manual adjustmentPrinthead cleaning system Auto cleaning device with anti-clogged flash function and positive pressure cleaning and capping systemPackage size andweightL x w x h 3800mmx750mmx1500mm,560kg Input voltage Ac 220v,50hzPower ac220v Control≤3aHeating≤5.5aFeading cleaning≤1aCooling≤1.5aSoftware platform Window2000,xpWorking environment Temperature20-30℃,humidity:40-60%1.3 zy-2006XRH/zy-2004XRHProduct type Zy-2006XRH/zy-2004XRHPrinting technology XR382 4 or 6 printheadsResolution X direction:720dpi360dpi240dpi180dpiY direction: 1440dpi720dpi540dpi360dpi180dpi Pattern quality Photo realistic quality (basic, high quality)Max. Media width 2000mmOutput (m2/h) Print mode Output (m2/h)240x540 3 pass 41.2.240x720 4 pass 32.6.240x540 6 pass 22.5.360x540 3 pass 31.2.360x720 4 pass 24.1.360x540 6 pass 16.7.720x720 8 pass 12.6.Ink type Solvent-base,c, m, y, k, (lc, lm optional)Ink supply system Auto pumpingInk inspection system Insufficient ink detectorRip software Photoprint or maintopMedia type Pvc, vinyl, coating film, polyester, etcMedia transfer RollMedia feeding system Auto feeding and take-up, weight less than 80kgPrinthead height Adjustable distance range from 2mm-4mm, from media Heating system Front and rear temperature control, 3 digit led display,adjustable from 30-80℃Cooling system External cooling fanClamp Manual adjustmentPrinthead cleaning system Auto cleaning device with anti-clogged flash function and positive pressure cleaning and capping systemSpecification size andweightL x w x h 3300mmx700mmx1300mm,400kg Input voltage Ac 220v,50hzPower ac220v Control≤3aHeating≤4.5aFeading cleaning≤1aCooling≤1aSoftware platform WindowxpWorking environment Temperature18-32℃,humidity:40-60%Chapter twoSafe precaution2.1 important safety measuresPlease read the following instructions before using the printer. Follow cautions and instructions which are marked on the printer.Do not block the opening on the top of the printer.Do not insert any object into the slot of the printer .prevent splitting liquid onto the printer..Only apply the voltage which is indicated. according to different counties or area, ac110v or 220v can be chosen.Connect all the power cord to a single socket extent ion. avoid sharing the socket with the devices which will be on and off frequently.Do not use the socket with self-timer control and with the switch on the wall.Keep a distance between any device which will release electro-mega tic field,, such as wireless phones.Do not use damaged power cord.If using an extra power cord ,keep in mind that the total ampere of this device does n o t exceed the assigned ampere of the power. And also, the total ampere of all the device which connect to single socket con not exceed the assigned ampere.Do not try to repair the printer.When encounter the inextricable circumstance, disconnect the power and contact your local distributor for support:Power cord or plug is damagedLiquid is spilled onto the printerThe printer fells down or the surface is brokenThe printer does not run normally2.2 operation caution:Don't move the carriage when the power is onAlways use the power switch to turn on or off the printer. Don't try to remove the data cable or the power cord when the power is on.Make sure the carriage stay in the origin position during transport.2.3 handling ink tank caution:Please store ink tanks at the place where children cannot reach. Keep away from children.If ink is spilled into eyes, wash with water or go to a doctor at once..Don't shake the ink tank, this may lead to leakage..2.4 printer installation sitePlace the printer on a level floor otherwise it will not operate normallyAvoid placing the printer in the area with huge change of temperature and humidity.Don't expose the printer to direct sunlight or heat.Don't place the printer in any possible shaking or vibrating area.Leave enough space around the printer to ensure normal ventilation.Place the printer closer to the power supply and the power cord can be removed or unplugged easily.Chapter three Preparation and procedure ofassembling3.1 preparation3.1.1 space requirement (takezy-3206and zy-2506 for example)3306XRH: l, w and h is 4400,700 and 1250,weight :400kg (fig.3-1)。
喷绘机操作规程第一章概述1.1 目的和适用范围喷绘机操作规程的目的是为了确保喷绘机的安全运行,提高操作人员的技术水平,并规范喷绘机的使用和维护。
本规程适用于所有使用喷绘机的操作人员。
1.2 定义和缩写1.2.1 喷绘机:指用于将图像或文字喷涂到物体表面的设备。
1.2.2 操作人员:指使用喷绘机进行作业的工作人员。
1.2.3 环境:指喷绘机所处的周围环境。
1.2.4 作业区域:指喷绘机所在的区域。
第二章喷绘机操作要求2.1 操作人员要求2.1.1 操作人员必须熟悉喷绘机的基本原理和结构,并掌握其操作技术。
2.1.2 操作人员必须具备正确的操作态度和安全意识,严禁酒后、药后、疲劳和生病情况下操作喷绘机。
2.1.3 操作人员必须穿戴防护服和防护装备,并遵守作业区域的安全规定。
2.2 喷绘机操作要求2.2.1 操作人员必须事先检查喷绘机的工作状态,确保其安全运行。
2.2.2 在开始操作之前,操作人员必须对喷绘机进行预热和标定,确保其工作效果。
2.2.3 操作人员必须根据作业要求调整喷绘机的参数,包括喷涂速度、喷涂厚度等。
2.2.4 操作人员在使用喷绘机时应注意保持均匀的喷涂厚度,避免出现过厚或过薄的情况。
2.2.5 操作人员必须坚持定期保养喷绘机,清洁、检查和更换喷嘴、墨盒等配件。
2.2.6 操作人员在操作喷绘机时必须保持清洁环境,避免灰尘和杂物进入喷绘机。
第三章喷绘机安全措施3.1 作业区域安全措施3.1.1 喷绘机的作业区域必须保持整洁,防止杂物堆积和滑倒。
3.1.2 喷绘机的作业区域必须具备良好的通风条件,防止有害气体积聚。
3.1.3 在作业区域内必须设置明显的安全警示标识,提醒人员注意安全。
3.1.4 作业区域必须保持干燥,防止发生火灾或其他事故。
3.2 设备安全措施3.2.1 喷绘机必须定期检查安全状态,包括电源线、喷嘴、墨盒等部件的磨损程度和工作状态。
3.2.2 喷绘机必须安装并使用漏电保护装置,防止发生漏电事故。
喷绘机操作规程一、操作员准备工作1. 操作员应穿戴好劳动保护用品,如防护眼镜、防护手套和工作服。
2. 确认喷绘机的工作区域干净整洁,并清除杂物和堆放物。
3. 检查喷绘机的电源和喷头连接是否牢固,电源是否正常。
4. 准备好喷绘机所需要的耗材,如墨盒、喷墨纸等。
二、喷绘机开机操作1. 将电源线插入电源插座,并确保连接牢固。
2. 按下开机按钮,开启喷绘机电源。
3. 启动喷绘机的自动清洗程序,确保喷头处于清洁状态。
4. 检查喷绘机显示屏上的各项参数是否正常,如喷头温度、墨盒墨水剩余量等。
三、打印文件准备1. 连接电脑与喷绘机,确保正确识别喷绘机设备。
2. 打开喷绘机所需的打印文件,并进行必要的调整和编辑。
3. 检查文件的尺寸、分辨率和颜色模式是否与实际需求一致。
4. 设置打印参数,如打印速度、打印质量和打印模式。
四、加载耗材1. 打开喷绘机的墨盒仓门,将新的墨盒插入对应的插槽中。
2. 确保墨盒插入位置正确,插入至底部,并确保与喷头连接良好。
3. 关闭墨盒仓门,确保仓门紧闭。
4. 检查墨水供给系统是否正常工作,确保墨水能顺利供给到喷头。
五、开始打印1. 在电脑上点击打印命令,等待喷绘机开始打印。
2. 观察打印过程中的情况,确保打印质量良好,没有异味或异常噪声。
3. 如发现打印质量不理想,停机检查并及时调整打印参数。
4. 打印完成后,喷绘机会自动切纸,将打印物切割成所需尺寸。
六、打印结束后的处理1. 关闭喷绘机的电源。
2. 清理喷绘机的工作区域,清除墨水溅洒或纸屑等杂物。
3. 将喷绘机的耗材,如墨盒和喷墨纸,妥善存放至指定位置。
4. 关闭电脑上的打印文件和喷绘机的驱动程序。
七、维护保养1. 定期清洁喷绘机的喷头和墨盒插槽,确保墨水供给通畅。
2. 检查喷绘机的各个部件是否正常运转,如皮带、滚筒等。
3. 及时更换耗损部件,如喷头、皮带等,以保证喷绘机的正常使用。
4. 遵循喷绘机的保养手册,按时进行维护保养工作。
1.安全说明本章对热升华显色系统的安装、操作人员需了解的警告用语以及粘贴在热升华显色系统上的注意事项和警告标签做出说明* 在热升华显色系统的安装和操作过程中,请务必遵从本手册的指导和警告1.1警告、注意和参考本操作手册中的警报显示内容和热升华显色系统粘贴的警告标签按照其危险程度(事故等级)的优先顺序分为以下三级。
请理解以下警告用语的含义并遵从本手册的内容(指示)警告含义用于如不避免则有可能导致死亡或严重伤害等危险的情况用于如不避免则有可能导致轻度或中度疾病、或造成本产品完全或部分损坏等危险的情况○参○考用于特定注意事项以及需要强调的信息1.2重要的安全说明为了保证热升华显色系统的安全使用,以下是必须遵从的通用注意事项。
◎不要将热升华显色系统安装在以下可能导致绘图仪损坏或者可能造成热升华显色系统跌落或可能被意外碰落的地方:- 1 -不稳固的地面倾斜的地方可传导其它机械振动的地方◎不要踩踏热升华显色系统,且勿将重物放在热升华显色系统之上。
否则可能导致热升华显色系统损坏、跌落或被意外碰落。
◎不要用毯子或桌布等遮盖热升华显色系统,且勿封闭通风孔。
如果封闭通风孔,热升华显色系统内部可能会聚积热量并可能导致火灾。
◎不要将热升华显色系统安装在湿度大、灰尘多的场所,则可能会导致触电和火灾。
◎不要使用破损的电源线,否则可能会导致触电和火灾。
◎不要用湿手插拔电源插头,可能会导致触电。
◎不要将地线连接到下列地方:燃气管线存在起火和爆炸的危险。
电话线和避雷针的地线被闪电击中时可能会有强电流通过。
水管和水龙头如果金属管线中间接有塑料管,则可能导致接地不起作用。
- 2 -◎若有异物或水等液体进入热升华显色系统,此时请勿使用热升华显色系统。
否则可能会导致触电和火灾。
应立即关闭,将电源线与电源插座分离,并联系当地的经销商。
◎要按照操作手册中的指示连接各种电线。
错误的接线可能会导致火灾。
◎要直接从电源插座向打印机供电。
不要在同一插座上使用复杂的多个插头。
4.1 motor gear jumps test (fig.2-5-2)figure.5-5-2Follow the instruction in the function box, if the gear jumps seriously during the test and back to the origin point, then it will stop automatically and back to origin position. and the function box will tell you what to do to solve this problem●printer parameter setting (figure.5-5-1)Figure.5-5-11.Printer setupUsed to set parameters for printer (figure.5-5-2)Figure.5-5-21.1. V ertical motor speed setting, figure.5-5-3there are three speeds for printer, from low to high, the bigger the number, the faster the printer. when printing at 360dpi, the print speed is half of that for 180dpi.as for the same printing frequency, 360dpi needs 2 times of inks as for 180dpi, so the print speed for 360dpi is slower than that for 180 dpi printing.Figure.5-5-31.2. vertical motor speed set upthere are three speeds for vertical motor, "low" to "high", the bigger the value, the faster the speed, it has nothing to do with the print resolution.figure.5-5-4Figure.5-5-41.3. starting print position, figure.5-5-5Figure.5-5-5There will be a normal speed up area about 6-10 cm when printing (different for different types of printers), when it is set to 0, print unit will start printing after speed up, if it is reset, the print unit will start from the farest away from cartridge origin position and calculated the relevant distance to start printing and move back to origin position after the printing job is finished. The shortest distance for printing is the speed up distance, the set up unit is mm.1.4. print mode (figure.5-5-6)Figure.5-5-6There are two options for print mode, they are:single print and double printsingle print can overcome some problems from the hardware and make good printings, double print may increase the productivity with adjusted satisfied printing quality.1.5. solution adjusting modefigure.5-5-7figure.5-5-7As shown in figure.5-5-7, this is for printer adjusting, we recommend the new users to use 180dpi for resolution to start with.After finishing adjusting and if you need higher resolution printing, you can adjust it to the relevant resolution mode, under same color and all color setup menu, click autoadjusting to 180dpi-save, then the system will generate a new value for the actual printing. Please refer to the settings for same color and all color (when in actual printing, minor adjustment will be needed according to different printers)Caution :this parameter only takes effects after being adjusted. When printing the software will automatically give relevant resolution parameter, you don't need to select the printing resolution.1.6. nozzle selection , figure.5-5-8Nozzles selection "start" means nozzles outwards, "ends" means nozzles inwards, the direction towards the printer crossbar. figures in the drawdown box is the numbers for nozzles 0-7.select this option when the nozzles at the two sides of printer heads are not working properly.figure.5-5-81.7. media setting after printing, figure.5-5-9set this according to your own demand. After printing you can set to moving up or moving down of the media and also the moving distance, unit is mm.figure.5-5-91.8. flash printing, cleaning and colour bar parameter settingfigure.5-5-10Figure.5-5-101.8.1. flash printing frequencyFlash printing frequency includes three options, "normal" means the printingheads while on the origin position without printing jobs (save before changing this parameter, then click "origin position" in the tool menu bar to generate new parameter)"cleaning frequency" and "flash time" only take effect when "cleaning parameter setup" and "flash in printing" is selected. "cleaning frequency" means the flash frequency of the printhead when cleaning. "flash printing time" means the time for flash print while cleaning (unit s)1.8.2. cleaning parameterCleaning parameter includes two options, users can choose "cleaning option" to decide whether to clean or not during the printing process, there are three choice in this option: "auto cleaning ","non-auto cleaning", "ink pump cleaning", "flash print cleaning", the "cleaning frequency" only takes effect after "auto cleaning" is selected. cleaning frequency is set up on pass, ranging form 0-255.1.9. color bar setting parameterDuring the printing process, the color bar is for protecting printer heads, avoid temperature, dryness and different colors from affecting the printing quality. there are three parts of color bar parameter, separately for print color bar, the printing position and the width of color bar and distance from the images. there are four choices in "position" selection, they are: "don't print color bar", "left print" and "right print", "two sides color bar", the other two choice will not take effect when "don't print color bar" in not selected. "width of the color" can define the printed width of the color bars, the system will automatically assign 4 colors or 6 colors evenly. "distance" determines the distance between the image and the color bar, this is convenient for customers requirements on different white margins. the set width and distance are all in mm.(will introduce some functions on white jumping after selecting color bar.1.10. number of printhead group setting figure 5-5-11Figure.5-5-11This option applies to the policy of compatible from high version to low version.I.e. The system is for 2 groups , 8 print heads, if you choose 8 heads, you can use 1-2 groups. Suppose you use system of 1 group of heads and work with 2 groups of heads, something unexpected will happen. when the selected group number is less than the actual printer heads, one group or more groups of printer heads closer to the printer crossbar will not function properly. we suggest that users use the correct numbers of group of printer heads this will be good for the system and maintenance.1.11. eclosion (羽化)figure.5-5-12Eclosion choice: you can set eclosion or non-eclosion for the printing you can select the dots number for eclosion in order to make the pass indistinct.Figure.5-5-121.12. print color setting (figure.5-5-13)Figure.5-5-13if one of the color is not to be printed, just select this color by clicking the box in front of it and save. when black selected, it will not print (figure.5-5-14)Figure.5-5-141.13. save the settings:Settings only take effects after "save the setting" is selected, otherwise the system will use the parameters for the last printing.1.14. return to default setting when there are too much parameters and cause confusion, just click "default setting" and the system will read the last saved parameter.1.15 voltage of printer head setting(For printer with Xaar382 heads,the voltage is unchangeable, and no need to do anything about it)figure.5-5-15●printhead testThe chart of printehead shows the status of blocking nozzles, each line indicates each hole of the nozzle. as shown in fig.2-6fig.2-6printer heads vertical testing chartthis is to check if the printer heads are installed vertically correct, adjust to the test printed pictures and make sure it will print on the same position..fig.2-5-7Fig.2-7Figure 2-8adjusting method for vertical printer heads. as shown in test pictures fig.2-8, the black and red heads closer to the crossbar need to be moved to the right.●parameter for all color printheads (figure.5-9-1)Figure.5-9-1Adjusting different colors to make sure that each color will be printed at the same horizontal position to produce perfect pictures. as shown below ( the adjusting for 4 or 6 colors are :adjust kc, adjust km, adjust ky,adjust klc, adjust klm):Figure.5-9-2After printing, it will show the above contents as adjusting chart, different values for different printers, please add the value of the kc which is in the closest alignment with the color with the values in the red box for the printings from left to right, and add the value from right to left with the values in blue box, and save them all.1.auto adjusting 180dpi function will be used to adjust 180dpi mode, and will automaticallygenerate the reference value for 360dpi and 720dpi, this will be very close to the best printing resolution, make necessary amendment for different printers.2. save parameter:Settings only take effects after "save the setting" is selected, otherwise the system will use the parameters for the last printing.3.resume parameter:When there are too many parameters and cause confusion, just clik "default parameter", the system will find the last saved parameter.●double alignment(figure.5-10-1)Figure.5-10-1Double alignment setting will ensure best printing quality while printing from different directions at different speed. when there is some change in speed, double alignment setting needed to make good pictures. printing at same speed for a long time, double alignment setting also needed according to different printers at certain period of time intervals. alignment figure.5-10-2Figure.5-10-2figure.5-10-3After finish printing, the pictures will show two charts of same contents, the upper value might be different from the lower ones due to different types of printers. add all values which is closest to the vertical line with the values in the parameter box, there are all three color alignment setting chart for kcm, the best case should be each color value is the same as others, if there is any difference, please ask help from experts to adjust the printer heads and maintain the printers. if printed out is like fig.2-10-3, only double direction value need to plus 12, the unit for the parameter is dpi.1. save parameter:settings only take effects after "save the setting" is selected, otherwise the system willuse the parameters for the last printing.2. resume parameter:when there are too many parameters and cause confusion, just clik"defaut parameter", the system will find the last saved parameter.●step alignment(figure.5-11-1)Figure.5-11-11.step in setting is very important for printing a picture, accurate setting may ensure the actual size of the pictures to be printed out and also the good quality. but due to the use of printer heads, the minor lines printed out from the nozzles may deviate a little bit from its original place, users need to do some adjusting according to the actual printings. Step alignment figure 5-11-2figure.5-11-2figure.5-11-32. after finish printing, the pictures will show two charts of same contents, the upper value might be different from the lower ones due to different types of printers. add all values which is closest to the vertical line with the values in the parameter box. if the alignment is as in figure.5-11-3, minus 4 from the original value. passnum: is the numbers of pass for setting,datum is for media setting,it can have more than 13 groups of step in values for the future use according to the media setting.3. vertical motor movement option( mm)。