Revolve产品知识
- 格式:pdf
- 大小:175.98 KB
- 文档页数:2
产品电源状态表根据能源相关产品的生态设计要求指令(2009/125/EC)和 2020 年能源相关产品和能源信息(修订)(欧盟出口)生态设计条例,本产品符合下列规范或文件:条例 (EC) 1275/2008 号(根据条例 (EU) 801/2013 号修订)。
必要的电源状态信息电源模式待机网络待机在 230V/50Hz 输入的情况下,指定电源模式下的功耗≤ 0.5 W Bluetooth® ≤ 2.0 W 设备等待多长时间自动切换入模式≤ 20 分钟≤5 分钟在 230V/50Hz 输入的情况下,若所有有线网络端口已连接且所有无线网络端口已激活,网络待机的功耗N/A≤ 2.0 W网络端口取消激活/激活流程。
取消激活所有网络将启用待机模式。
Bluetooth:按住Bluetooth按钮 10 秒,清空配对列表后即可取消激活。
与Bluetooth音频源配对可激活。
外部电源技术信息根据能源相关产品的生态设计要求指令(2009/125/EC),本产品随附的外部电源符合下列规范或文件:委员会条例 (EU) 2019/1782。
制造商Bose Products B.V.工商注册号36037901地址Gorslaan 60 1441 RG Purmerend The Netherlands型号标识符F5V-1.6C-1U-WW 输入电压100 V-240 V输入交流频率50 Hz/60 Hz输出电压5V DC输出电流 1.6A输出功率8W平均有效效率78.8%低负载效率 (10%)73.4%无负载功耗0.07W制造商Bose Products B.V. 工商注册号36037901地址Gorslaan 60 1441 RG Purmerend The Netherlands型号标识符S008AIM0500160输入电压100 V-240 V输入交流频率50 Hz/60 Hz输出电压5V DC输出电流 1.6A输出功率8W平均有效效率78.5%低负载效率 (10%)74.5%无负载功耗0.06W请填写以下内容,留作记录序列号和型号位于扬声器的底部。
超低溫冷凍櫃Revco RLE 系列、Forma 89000 系列、HERAfreeze HLE 系列、Thermo Scientific TLE 系列安裝和操作328398H10版本B2019 年 4 月重要請詳閱本說明手冊。
若未遵循本手冊中的說明,會導致裝置損壞、操作人員受傷,以及設備表現不佳。
注意必須由合格的服務人員進行所有內部調整及維護。
本手冊中的資料僅供參考。
手冊所述內容及產品若有變更,恕不另行通知。
Thermo Fisher Scientific 並未對本手冊做出任何表示或擔保。
對於因使用本手冊而導致或與使用本手冊相關的任何直接或意外損壞,Thermo 概不負責。
© 2019 Thermo Fisher Scientific Inc. 著作權所有,保留⼀切權利。
目錄目錄型號 (1)安全注意事項 (2)拆封 (4)包裝清單 (5)⼀般建議 (6)溫度監測 (6)⼀般使用 (6)初始裝載 (6)電池門開啟/關閉 (7)運作標準 (8)電氣規格 (8)安裝 (9)位置 (9)接線 (9)調平 (9)備用系統(選配) (10)超絕緣櫃結構 (10)櫃門操作 (10)壓力均衡埠 (11)安裝遠端警報連接器 (12)預定用途 (12)啟動 (13)連線要求 (13)初始啟動 (14)待機模式 (26)操作 (27)操作概述 (27)主畫面 (27)設定 (28)事件紀錄 (39)警報 (41)使用者 (41)報告 (44)圖表 (45)健全狀態和警報管理 (49)健全狀態概述 (49)通知/注意 (51)警報/警告 (52)目錄備用系統(選配) (53)CO2 和 LN2 注意事項 (53)安裝 (54)啟動 (55)操作 (55)圖表記錄器(選配) (56)設定和操作 (56)更換圖表紙 (57)校正調整 (57)維護 (58)清潔冷凝器 (58)清潔冷凝器濾網 (58)門封維護 (58)對冷凍櫃進行除霜 (59)電池維護 (59)維護時程 (60)故障排除指南 (61)保固 (64)保固(國際) (65)附錄 A:警報總覽 (66)附錄 B:事件紀錄詳細資訊 (72)附錄 C:城市時區 (74)型號Thermo Fisher Scientific 超低溫冷凍櫃 安裝和操作11 型號* 備註: Energy Star 不適用於尺寸為 300 / 400 的型號以及電壓為「V 」的型號。

用户指南SOUNDLINK®REVOL VE +2 - 简体中文重要安全说明请阅读并保留所有安全、安全性和使用说明。
B ose Corporation 在此声明,本产品严格遵守 2014/53/EU 指令和其他所有适用的欧盟指令要求中的基本要求和其他相关规定。
符合声明全文载于:/compliance重要安全说明1. 请阅读这些说明。
2. 请保留这些说明。
3. 请注意所有警告。
4. 请遵守所有说明。
5. 请勿安装在任何热源旁,例如暖气片、热调节装置、火炉或可产生热量的其他设备(包括扩音器)。
6. 只能使用制造商指定的附件/配件。
7. 在雷雨天或长时间不用时,请切断本设备电源。
8. 任何维修事宜均请向合格的人员咨询。
如果设备有任何损坏,应进行维修,例如电源线或插头受损、物体落入设备内、不能正常工作或跌落。
警告/小心:此符号表示产品外壳内存在未绝缘的危险电压,可能造成触电危险。
此符号表示产品指南中提供了重要的操作和维护说明。
本产品含有磁性材料。
关于是否会影响可植入医疗设备的情况,请咨询医生。
• 请将本产品放置到远离火源和热源的地方。
请勿将明火火源(如点燃的蜡烛)置于本产品上或靠近本产品。
• 未经授权切勿改装本产品。
• 请勿将本产品与逆变器配合使用。
• 产品仅使用随附的电源。
• 如果将电源插头或设备耦合器作为断路设备,那么此类断路设备应当保持可以随时恢复工作的状态。
• 请勿使含有电池的产品过热(例如请避免阳光直射并远离火源等)。
• 本产品的标签位于产品底部。
简体中文 - 3监管信息注意: 本设备已经过测试,符合 FCC 规则第 15 部分有关 B 类数字设备的各项限制。
这些限制性规定旨在防范安装在住宅中的设备产生有害干扰。
本设备产生、使用并可能辐射无线射频能量,如果不按照指示安装和使用,则可能会对无线电通讯造成有害干扰。
然而,按照指示安装也不能保证某些安装不会发生干扰。
如果本设备确实对无线电或电视接收造成有害干扰(可通过关闭和打开本设备来确定),用户可尝试采取以下一种或多种措施来纠正干扰:• 调整接收天线的方向或位置。

2019年时尚电商行业Revolve分析报告2019年8月目录一、十年网红路,一朝登榜时 (3)二、专注潮人潮品,高品质服务聚焦时尚消费 (6)1、快速上新,紧跟潮流 (6)2、个性化购物体验,深度社区参与感 (7)3、免费配送及退换货解决网购核心痛点 (7)三、科技驱动业务数字化,确保管理精细化 (9)四、KOL低成本引流,注重自身平台形象打造 (12)1、Revolve线上KOL以图片、视频等形式发布时尚穿搭理念增加曝光度,提高网站流量 (12)2、线下活动强化品牌影响力,构建流量闭环 (12)3、社交营销策略为Revolve注入低成本流量来源,加之后端持续快速上新,高用户粘性创造了较高的营销ROI (13)网红电商鼻祖Revolve Group成立于2003年,聚焦年轻一代时尚消费,2009年便开始大量与时尚博主合作推广。
截至1Q19,Revolve合作的时尚博主超过3500名,其中不乏粉丝量过百万的流量大户Camila Coelho(Instagram粉丝810万), Aimee Song(Instagram粉丝530万)等知名网红。
总结Revolve崛起之路,我们认为三大战略助力公司突围美国电商市场:1)专注潮人潮品。
高品质服务聚焦时尚消费,高客单、高毛利、高LTV提高盈利空间;2)技术驱动业务流程。
从产品开发、库存管理到客户管理,全业务流程技术驱动,精细管理;3)KOL引流。
借助KOL社交传播,低成本引流并凸显Revolve本身品牌塑造。
国内如涵(RUHN.O)和蘑菇街(MOGU.N)等主打时尚消费的垂直电商平台均尝试依靠网红引流,登陆资本市场后发展并不顺利。
我们认为中美电商格局差异之外,Revolve的成功值得借鉴:前端将网红/KOL作为推广和引流方式,但时刻注重电商平台自身品牌传播;后端注重产品开发,全流程数字化运营,确保平台紧跟乃至引领时尚潮流——垂直电商成功的关键,在于打造行业“深度”而非“宽度”壁垒,将自身真正打造为垂直领域的专家平台。
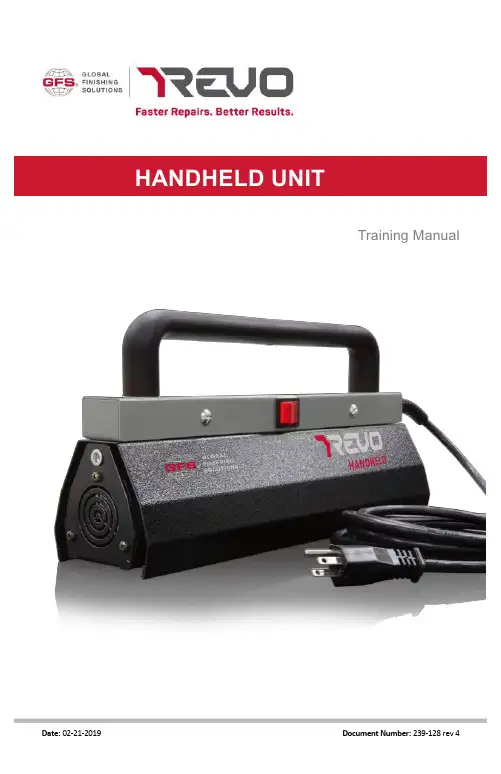
CONTENTSHow it Works. . . . . . . . . . . . . . . . . . . . . . . . . . . . . . . . . . . . . . . . . . . . . . . . . . . . . .3 Handheld Unit Diagram & Specifications. . . . . . . . . . . . . . . . . . . . . . . . . . . . . .. 4-5 Powering On . . . . . . . . . . . . . . . . . . . . . . . . . . . . . . . . . . . . . . . . . . . . . . . . . . . . . .6 Overview . . . . . . . . . . . . . . . . . . . . . . . . . . . . . . . . . . . . . . . . . . . . . . . . . . . . . . . . .7 Using REVO Handheld Unit:Body Filler . . . . . . . . . . . . . . . . . . . . . . . . . . . . . . . . . . . . . . . . . . . . . . . . . . . .8 Primer Surfacer. . . . . . . . . . . . . . . . . . . . . . . . . . . . . . . . . . . . . . . . . . . . . . . .9 Basecoat . . . . . . . . . . . . . . . . . . . . . . . . . . . . . . . . . . . . . . . . . . . . . . . . . . . . .10 Clearcoat . . . . . . . . . . . . . . . . . . . . . . . . . . . . . . . . . . . . . . . . . . . . . . . . . . . .11 Single Stage Paint . . . . . . . . . . . . . . . . . . . . . . . . . . . . . . . . . . . . . . . . . . . . .12 Plastic Repair . . . . . . . . . . . . . . . . . . . . . . . . . . . . . . . . . . . . . . . . . . . . . . . . 13 Other Uses . . . . . . . . . . . . . . . . . . . . . . . . . . . . . . . . . . . . . . . . . . . . . . . . . . .14 Maintenance . . . . . . . . . . . . . . . . . . . . . . . . . . . . . . . . . . . . . . . . . . . . . . . . . . . . .15 Parts Breakout . . . . . . . . . . . . . . . . . . . . . . . . . . . . . . . . . . . . . . . . . . . . . . . . . . . 16HOW IT WORKSREVO Systems use short wave infrared light to cure coatings from the inside out. Traditional methods of curing use medium or long wave infrared. Medium and long wave infrared light cures from the outside in —which can trap solvents or only cure the surface —leaving coatings wet on the inside. Short wave differs from these other methods by penetrating the applied coating and heating the substrate beneath, forcing all of the solvents out and resulting in a uniform and complete cure. Since it works from the inside out, REVO can cure up to three full coats of a product in one curing cycle with no need to cure between coats. Additionally, the infrared technology works on nearly all substrates including steel, aluminum, fiberglass, plastic, carbon fiber, etc.HANDHELD UNIT DIAGRAMHeat ShieldMain Power Switch Parameters DecalInfrared BulbHandle10 Amp at 110 VoltHANDHELD UNITSPECIFICATIONSPlug the unit into a 110V outlet rated for at least 10 amps.Flip the power switch to the on position. The indicator light willIf any of these things aren’t working, contact GFS or your local distributor for support.Using the REVO Handheld Unit for Body Filler:1.Mix and apply the body filler.•Be sure to mix your body filler properly! Many people put too much hardener in the filler. Follow the directions on the can. Too much hardener can cause pinholes or bubbling.•Automix filler systems are recommended to ensure mixing accuracy.•Always use two part fillers and putties. One part glazing putties and fillers are not compatible with REVO.2.Turn on the Handheld and wave the unit back and forth over the repair area at a distance of 2 inches from the surface until target temperature is achieved (140⁰ F).3.Move unit 2-3 feet away from the surface and continueto wave back and forth to maintain the target temperature for the recommended amount of time.4.The temperature should be constantly monitored with an infrared thermometer.5.The target time and temperatures are listed on the decal on the machine (picture 2).6.When the panel has returned to ambient temperature you can begin sanding the body filler.•Cooling can be accelerated by using a blow gun to force air over the panel.BODY FILLERUsing the REVO Handheld Unit for Primer Surfacer:1.Mix and apply the Primer Surfacer.•Always use slow or medium hardener and reducers. Do not use fast products.•Mix primer on the scale to ensure proper mixing.•You can use the REVO between coats to speed up flash time.2.Turn on the Handheld and wave the unit back and forth over the repair area at a distance of 2 inches from the surface until target temperature is achieved (185⁰ F).3.Move unit 2-3 feet away from the surface and continue to wave back and forth to maintain target temperature for the recommended amount of time.4.The temperature should be constantly monitored with an infrared thermometer.5.The target time and temperatures are listed on the decal on the machine (picture 2).6.When the panel has returned to ambient temperature you can begin sanding the primer.•Cooling can be accelerated by using a blow gun to force air over the panel.6.If re-priming is needed after sanding, primer can be reapplied immediately and the same curing procedure should be followed.PRIMER SURFACERUsing the REVO Handheld Unit for Basecoat:1.Apply all coats of basecoat per manufacturer’s recommendations.•Drying with REVO between coats is not required, but can be done to speed up flash times.•For tri-coats: Dry with REVO after last coat of basecoat, and again after last coat of midcoat.2.Turn on the Handheld and wave the unit back and forth over the repair area at a distance of 2 inches from the surface until target temperature is achieved (140⁰ F).3.Move unit 2-3 feet away from the surface and continueto wave back and forth to maintain target temperature for the recommended amount of time.4.The temperature should be constantly monitoredwith an infrared thermometer.5.The target time and temperatures are listed on the decal on the machine (picture 2).6.When the panel has returned to ambient temperature you can begin applying clearcoat.•Cooling can be accelerated by using a blow gun to force air over the panel.•If nibbing or any additional coats of base are needed, reapply basecoat and follow the same drying procedure.BASECOATCLEARCOATUsing the REVO Handheld Unit for Clearcoat:1.Mix and apply all coats of clearcoat per manufacturers recommendations.•There is no need to cure with REVO between coats.•Only use slow or medium hardeners and reducers!•Be sure to use a “Baking Clearcoat.” Air dry clears are not designed to handle heat and curing them with REVO could result in solvent popping or bubbling.2.Turn on the Handheld and wave the unit back and forth over the repair area at a distance of2 inches from the surface until target temperature is achieved (200⁰ F).3.Move unit 2-3 feet away from the surface and continue towave back and forth to maintain target temperature for therecommended amount of time.4.The temperature should be constantly monitored withan infrared thermometer.5.The target time and temperatures are listed on the decalon the machine (picture 2).6.When the panel has returned to ambient temperature youcan begin assembling parts or start the buffing process.Cooling should not be accelerated, let it cool naturally.Using the REVO Handheld Unit for Single Stage Paint:1.Mix and apply all coats of the single stage paint per manufacturers recommendations.•There is no need to cure with REVO between coats.•Only use slow or medium hardeners and reducers!2.Turn on the Handheld and wave the unit back and forth over the repair area at a distance of 2 inches from the surface until target temperature is achieved (185-200⁰ F).3.Move unit 2-3 feet away from the surface and continueto wave back and forth to maintain target temperature for the recommended amount of time.4.The temperature should be constantly monitored withan infrared thermometer.5.Treat single stage paint like clearcoat. The target timeand temperatures are listed on the decal on the machine (picture 2).6.When the panel has returned to ambient temperatureyou can begin assembling parts or start the buffing process. Cooling should not be accelerated, let it cool naturally.SINGLE STAGE PAINTUsing the REVO Handheld Unit for Plastic Repair:1.Turn on the Handheld and wave the unit back and forth over the repair area at a distance of2 inches from the surface until target temperature is achieved (200-225 degrees Fahrenheit).Plastic parts become very malleable at this temperature.2.Push out any major dents and continue to warm theplastic to relive any stressed areas.3.The temperature should be constantly monitoredwith an infrared thermometer.4.Overheating of the plastic can warp, damage or meltit beyond repair.5.Follow all the curing and cooling procedures listed forthe other products used to finish the plastic repair.PLASTIC REPAIROTHER USESUsing the REVO Handheld Unit for Other uses:1.There are several other uses for the Handheld unit. (Contact GFS for product specific recommendations)• A second type of clearcoat or primer•Plastic repair material•Seam sealers•Rock or chip guard•Decal removal•Emblem removal•Soft set glass removal•PPF removal•Panel bond adhesive2. A safe temperature to be used over any already cured paint is around 200 degrees Fahrenheit.This is a good starting point for any of the procedures listed on this page. Temperature can be gradually increased from there if needed.HANDHELDPosition Code Description18109266SWITCH ON/OFF28172363CABLE CLAMP38172108CABLE SJT 3CAWG16。
MINI三维扫描仪用户手册2022.6⚠本产品工作环境为0℃至40℃,根据电子元器件适用温度等级划分,不满足需要更高适应条件的军工级(-55℃至125℃)要求。
请在满足使用场景的环境下合理使用该产品。
目录产品概况 (3)产品介绍 (3)产品规格 (4)装箱清单 (5)硬件连接 (6)电脑连接 (6)手机无线连接方式 (6)指示灯状态 (7)软件安装 (7)系统要求 (7)软件安装 (7)Revo Scan- 用户界面介绍 (8)1. 主面板 (8)2. 新建扫描 (9)3. 扫描界面 (9)4. 模型列表 (11)Revo Scan – 扫描流程 (12)确认设备已连接 (13)点击“新建扫描” 选择扫描精度、模式和纹理贴图 (13)确认扫描距离为“最佳” (13)调节RGB相机和深度相机的亮度 (14)开始或暂停扫描 (15)完成/重新扫描 (16)构网 (18)贴图 (19)导出 (19)扫描技巧 (21)跟踪丢失 (21)点云较少 (21)检测到平面 (22)回退/恢复 (22)继续扫描 (23)批量操作 (24)快捷键 (25)帮助中心 (27)联系我们 (27)此说明书最终解释权归革点科技所有2产品概况产品介绍Revopoint MINI 是一款高精度蓝光三维扫描仪,机身小,性能好,单帧重复精度达到0.02mm,点距可达0.05mm,能够清晰呈现物体细节,媲美专业扫描仪。
MINI 的扫描速度达10帧/秒,加上优异的算法,无论是在电脑还是在手机上都能流畅扫描。
在牙模扫描、珠宝设计、逆向工程、工业检测、手办和微缩模型制作等建模精度要求较高的领域,MINI可为三维建模节省80%的时间与成本,深受设计师、工程师、创客、医疗和科研工作者们的喜爱。
3此说明书最终解释权归革点科技所有产品规格产品名称3D 扫描仪产品型号MINI采用技术双目蓝光单帧重复精度*0.02 mm单帧精度0.05 mm单帧扫描范围118 x 64 (mm)工作距离100 ~ 200 (mm)最小扫描尺寸10×10×10 (mm)帧率/扫描速度10 fps点距0.05 mm光源一级蓝光拼接模式特征拼接,标记点拼接是否有开关按钮有可输出格式PLY, OBJ, STL是否支持彩色扫描支持特殊物体扫描注意事项扫描透明物体,高反物体时,请使用扫描用显影剂或其他粉状物。
Revcovi® (elapegademase-lvlr)(Intramuscular)Document Number: IC-0400 Last Review Date: 02/02/2023Date of Origin: 10/30/2018Dates Reviewed: 11/2018, 02/2019, 02/2020, 02/2021, 02/2022, 02/2023I.Length of AuthorizationCoverage will be provided for 12 months and may be renewed.II.Dosing LimitsA.Quantity Limit (max daily dose) [NDC Unit]:•Revcovi 2.4 mg/1.5 mL single-dose vial: 20 vials per 7 daysB.Max Units (per dose and over time) [HCPCS Unit]:•23 mg twice weeklyIII.Initial Approval CriteriaCoverage is provided in the following conditions:Universal Criteria 1•Will not be used in combination with pegademase-bovine; AND•Patient does not have severe thrombocytopenia (i.e., platelet count <50,000/microL); AND Adenosine Deaminase (ADA) Deficiency †Ф1,2,5•Patient has adenosine deaminase severe combined immunodeficiency (ADA-SCID) disease as determined by one of the following:o Deficient ADA catalytic activity (<1% of normal) in hemolysates (in untransfused individuals) or in extracts of other cells (e.g., blood mononuclear cells, fibroblasts); ORo Detection of biallelic pathogenic mutations in the ADA gene by molecular genetic testing; AND•Patient has elevated deoxyadenosine triphosphate (dATP) or total deoxyadenosine nucleotides (dAXP) in erythrocytes; AND•Patient is not a candidate for or has failed bone marrow transplantation (BMT); AND•Patient has baseline values for trough plasma ADA activity, red blood cell dATP, trough dAXP and/or total lymphocyte counts† FDA approved indication(s); ‡ Compendia recommended indication(s); Ф Orphan Drug IV.Renewal Criteria 1,2,5Coverage may be renewed based on the following criteria:•Patient continues to meet the universal and other indication-specific relevant criteria such as concomitant therapy requirements (not including prerequisite therapy), performancestatus, etc.identified in section III; AND•Absence of unacceptable toxicity from the drug. Examples of unacceptable toxicity include: injection site bleeding in patients with thrombocytopenia, severe thrombocytopenia, delayin improvement of immune function, etc.; AND•Documentation of disease stability and/or improvement as indicated by one or more of the following:o Increase in plasma ADA activity (target trough level ≥ 15 mmol/hr/L)o Decrease in red blood cell dATP level (target ≤ 0.005 to 0.015 mmol/L)o Improvement in immune function with diminished frequency/complications of infection as evidenced in improvement in the ability to produce antibodieso Decrease in red blood cell dAXP level (target trough level ≤ 0.02 mmol/L)V.Dosage/Administration 1Adenosine Deaminase (ADA) Deficiency Patients transitioning from Adagen to Revcovi:•Weekly Adagen dose is unknown or weekly Adagen dose ≤30 U/kg−The recommended minimum starting dose of Revcovi is 0.2 mg/kg,intramuscularly (IM), once a week•Weekly Adagen dose >30 U/kg−An equivalent weekly Revcovi dose (mg/kg) should be calculated using thefollowing conversion formula:Revcovi dose in mg/kg = Adagen dose in U/kg ÷ 150•Subsequent doses may be increased by increments of 0.033 mg/kg weekly if trough ADA activity <30 mmol/hr/L, trough deoxyadenosine nucleotides (dAXP) >0.02mmol/L, and/or the immune reconstitution is inadequate based on the clinicalassessment of the patient. The total weekly dose may be divided into multiple IM administrations during a week.Adagen-naïve patients:•The starting weekly dose of Revcovi is 0.4 mg/kg based on ideal body weight§ or actual weight (whichever is greater), divided into two doses (0.2 mg/kg twice a week),intramuscularly, for a minimum of 12 to 24 weeks until immune reconstitution isachieved.•The dose may be gradually adjusted down to maintain trough ADA activity >30mmol/hr/L, trough dAXP level <0.02 mmol/L, and/or to maintain adequate immunereconstitution based on clinical assessment of the patient.§The Devine formula for ideal body weight:•Ideal body weight (men) = 50 kg + 2.3 kg x ( height, in - 60 )•Ideal body weight (women) = 45.5 kg + 2.3 kg x ( height, in - 60 )•Note: this formula is only an approximation, and is generally only applicable for people 60 inches (5 foot) tall or greater. For patients under 5 feet, one commonly-used modification is to subtract 2-5 lbs for each inch below 60 inches (Devine BJ. Gentamicin therapy. Drug Intell Clin Pharm. 1974;8:650–655.)VI.Billing Code/Availability InformationHCPCS Code(s):•J3590 – Unclassified biologics•C9399 − Unclassified drugs or biologicals (Hospital Outpatient Use ONLY)NDC:•Revcovi 2.4 mg/1.5 mL single-dose vial: 10122-0502-xxVII.References1.Revcovi [package insert]. Cary, NC; Chiesi USA, Inc.; December 2020. Accessed January2023.2.Hershfield, M. Adenosine Deaminase Deficiency. GeneReviews./books/NBK1483/. Initial Posting: October 3, 2006; Last Update:March 16, 2017. Accessed January 2023.3.Gaspar HB, Aiuti A, Porta F, et al. How I treat ADA deficiency. Blood. 2009 October 22;114(17): 3524–3532.4.Adenosine Deaminase Deficiency-genetic and Rare Diseases Information Center. USDepartment of health and human services-NIH. Available at:https:///diseases/5748/adenosine-deaminase-deficiency5.Flinn AM, Gennery AR. Adenosine deaminase deficiency: a review. Orphanet Journal ofRare Diseases 2018. https:///10.1186/s13023-018-0807-5Appendix 1 – Covered Diagnosis CodesD81.31 Adenosine deaminase (ADA) deficiency with severe combined immunodeficiencyAppendix 2 – Centers for Medicare and Medicaid Services (CMS)Medicare coverage for outpatient (Part B) drugs is outlined in the Medicare Benefit Policy Manual (Pub. 100-2), Chapter 15, §50 Drugs and Biologicals. In addition, National Coverage Determination (NCD), Local Coverage Determinations (LCDs), and Local Coverage Articles (LCAs) may exist and compliance with these policies is required where applicable. They can be found at: https:///medicare-coverage-database/search.aspx. Additional indications may be covered at the discretion of the health plan.Medicare Part B Covered Diagnosis Codes (applicable to existing NCD/LCD/LCA): N/AJurisdiction Applicable State/US Territory ContractorE (1) CA, HI, NV, AS, GU, CNMI Noridian Healthcare Solutions, LLCF (2 & 3) AK, WA, OR, ID, ND, SD, MT, WY, UT, AZ Noridian Healthcare Solutions, LLC5 KS, NE, IA, MO Wisconsin Physicians Service Insurance Corp (WPS)6 MN, WI, IL National Government Services, Inc. (NGS)H (4 & 7) LA, AR, MS, TX, OK, CO, NM Novitas Solutions, Inc.8 MI, IN Wisconsin Physicians Service Insurance Corp (WPS) N (9) FL, PR, VI First Coast Service Options, Inc.J (10) TN, GA, AL Palmetto GBA, LLCM (11) NC, SC, WV, VA (excluding below) Palmetto GBA, LLCL (12) DE, MD, PA, NJ, DC (includes Arlington &Novitas Solutions, Inc.Fairfax counties and the city of Alexandria in VA)K (13 & 14) NY, CT, MA, RI, VT, ME, NH National Government Services, Inc. (NGS)15 KY, OH CGS Administrators, LLC。
Rhinoceros3D产品模型制作范例-----Author:SAM Email: rhino_design@Rhinoceros3D介绍Rhinoceros3D是美国Rebort McNeel和Association公司开发的NURBS专用三维建模工具,适用于产品造型设计,CAD/CAM、Revrse Engineeering、Sheet-unfolding和动画领域。
在这些领域中,精密的建模技术是成败的关键。
因此,需要使用具备NURBS技术的强大的建模工具,而Rhino3D具备了精密,强大的技术支持等优点,所以在上述领域中被广泛应用。
它由最初的1.x版本升级到2.x版本,在2002年12月20发布了最新的3.0版本,从中多次推出beta版本。
Rhino这次的版本升级主要任务是更换自己开发的新内核,原来1.x和2.x所使用的内核与alias和solidthinking一样,在不断的加入新的功能之后,程序变得庞大,执行效率也是越来越低下,并且由于核心过于陈旧的原因,新功能的加入也是越来越困难。
3.0版本的目标就是开发出一个全新的更为先进的速度更快的核心,并且全面的移植2.0的所有功能到新的核心,同时提供了一个更高级别的平台,能够扩展更多新的功能的高速平台,所以更多的新功能会在3.x版本和后续版本中陆续加入进来。
3.0版本的新功能虽然加入不是很多,但是和2.0比起来,由于内核是从新开发的,其运算速度和建模功能上大有突破,操作界面进行了大幅度的改进,显得更为亲切。
不足的是3.0还存在不少bug,但是官方已经先后通过三次升级更新来解决存在于3.0中bug,最新的修正升级版本是2003年7月28日公布的SR3。
对于3.0更多的新功能详细介绍请/new-features-1.htm 在渲染方面,火烈鸟也为3.0的推出从新开发出新的1.1版本,其渲染效果和原先的1.0并无多大区别,但是在渲染速度方面相对于1.0有惊人的提高,其速度至少提高6倍,所以,我个人认为,结合现在的情况,我们在设计产品时可以在2.0里面进行模型的制作,完成之后将模型文件导入到3.0里面用Flamingo1.1渲染,这样会为我们的产品设计提高不少效率,节省很多宝贵时间。

How To Use RevolutionApplication Rates and Frequencies1273 Imperial Way • Paulsboro, NJ 08066 • USA • 1-800-257-7797 • 1-856-537-6003 • Fax 1-856-537-6018 • Thousands of golf course superintendents now use Revolution to achieve exceptionally uniform rootzone moisture levels within ranges that allow for drier, firmer putting surfaces while reducing moisture stress on their turfgrass. These superintendents have also helped us gain valuable additional experience about how to get the most out of this unique surfactant chemistry. This User's Guide is a compilation of what has been learned so y ou can experience all of the water management and plant health benefits of a Revolution program.Initial ApplicationRevolution must be applied at least one month prior to the anticipated onset of stress conditions in your area.Ongoing Monthly ProgramRevolution must be used as part of an ongoing management program beginning prior to and continuing through stress periods. If this does not match your agronomic philosophy, inclination or budget, Revolution may not be the product for your turf management program. Ask your Aquatrols representative about other product and program options.Watering In• Revolution is safe for turfgrass and does not need to be watered in immediately after ap-plication. However, since Revolution’s area of activity includes both the thatch/mat layer and the soil, it must be watered in sufficiently to deliver the Revolution molecules to a depth of at least four inches. • This requires about one third of an inch of wa-ter on high sand rootzones or other soils with a sand top-dressing layer of four inches or more. On non-sand soils or “push-up” greens with less than a four inch sand topdressing layer, apply up to one half inch of water. • Revolution should be watered in thoroughly the evening following application.Monthly ApplicationApply Revolution at 6 oz/1000 ft 2 (190 mL/100 m 2).Biweekly ApplicationFollowing an initial application of 6oz/1000ft 2 (190mL/100 m 2), Revolution can be applied bi-weekly at 3 oz/1000 ft 2 (95 mL/100m 2).1273 Imperial Way • Paulsboro, NJ 08066 • USA • 1-800-257-7797 • 1-856-537-6003 • Fax 1-856-537-6018 • Reorder# 136Irrigation tips when using Revolution •To achieve the best turfgrass quality and play-ability on putting greens under a Revolution program, apply enough water with each irriga-tion to bring the active rootzone (depth of soil where roots are present) up to field capacity and then let it dry down until the turfgrass just begins to show moisture stress before irrigat-ing again. Actual irrigation frequencies will change throughout the year, depending on factors such as the water holding capacity of the soil, changing depth of turfgrass rooting, and weather conditions which influence ET rates and turfgrass water demand.•The reduced irrigation frequencies and in-creased irrigation run times possible under a Revolution program also helps to even out soilmoisture incon s istencies that often develop when short, frequent irrigation runs times or hand watering is used exclusively.•Deep irrigations or “flushings” periodically during dry or drought conditions will also help leach salts which accumulate near the surface and are an additional stress factor during the heat of summer.•It’s a good idea to monitor soil moisture levels and uniformity. This can be done quickly and accurately with a hand held TDR probe like the Dynamax TH300. For more information on this useful tool visit: and enter the Irrigation Control & Soil Moisture Sensors area.Tank Mixing RevolutionIrrigation Under a Revolution Program•Revolution has been shown to be compatible with many soil targeted products. It can help place soil targeted chemicals and fertilizers more uniformly in the soil and can maximize the effectiveness of these materials.•A report of tank mix compatibility and turf-grass safety for many commonly used turfgrass products is available in the Revolution research section at . As always, itClearly, growing quality turfgrass requires consistent access to water and nutrients in the rootzone. Irrigation strategies for putting greens that use light, daily irrigation aim to achieve this without creating surface wet-ness. Unfortunately various factors from inconsistent irrigation coverage to non-uniform soil wetting can actu-ally cause this strategy to result in some areas of the rootzone becoming excessively dry while other areas can still become too wet. Turf quality and consistency suffer as a result.Most superintendents who have made Revolution part of their turfgrass management program have found they can reduce irrigation frequency and increase run times. Because Revolution allows excess moisture to drain more quickly and completely through the rootzone, superintendents are able to produce drier, firmer putting surfaces while reducing moisture stress on their turfgrass. This is one of the most unique and benefi-cial features about Revolution compared to other surfactant chemistries. is recommended that a jar test be done to confirm the chemical compatibility of the tank mix, and a strip test be done to confirm turfgrass safety of the tank mix under your conditions.•Revolution should not be tank mixed with iprodione or propiconazole or any product that specifies not to mix with wetting agents or non-ionic surfactants.In California, Revolution has only been registered for use as an auxiliary soil and plant substance and therefore is not approved or intended to be used in California with a pesticide product or pesticide spray mixture.。
EnglishTECHNICAL SUPPORTShould you encounter problems using this product, please refer to the troubleshooting section on page 10 of this owner’s guide.Alternatively, call Revo technical support on :UK 01555 666161From outside the UK + 44 1555 666161 Alternatively, e-mail ***************.uk or visit the troubleshooting section of our website at: /support ENVIRONMENTAL INFOPRODUCT DISPOSAL INSTRUCTIONS (WEEE DIRECTIVE)The symbol shown here and on the product means that it is classedas Electrical or Electronic Equipment and should not be disposed with other household or commercial waste at the end of its working life.The Waste of Electrical and Electronic Equipment (WEEE) Directive(2002/96/EC) has been put in place to recycle products using bestavailable recovery and recycling techniques to minimise the impact on the environment, treat any hazardous substances and avoid the increasing landfi ll.For more information please contact your local authority or the retailer where the product was purchased.RoHS COMPLIANT & CE MARKThis product has been designed to comply with internationaldirectives on the Restriction of Hazardous Substances (RoHS) and has been designed and type-tested to comply with EUrequirements and carries a CE mark.SAFETY WARNINGS• Do not operate this product near water• Do not remove screws or casing parts• Use only the power supply unit supplied• Avoid small objects and liquids from entering the product02WARRANTYRevo Technologies Ltd warrants to the end user that this product will be free from defects in materials and workmanship in the course of normal use for a period of one year from the date of purchase.This guarantee covers breakdowns due to manufacturing faults and does not apply in cases such as accidental damage, general wear and tear, user negligence, modifi cation or repair not authorised by Revo Technologies Ltd.To register your purchase please visit /register COPYRIGHTS AND ACKNOWLEDGEMENTS Copyright 2018 Revo Technologies Ltd. All rights reserved.No part of this publication may be copied, distributed, transmitted or transcribed without the permission of Revo Technologies Limited.REVO and SUPERTONE are trademarks or registeredtrademarks of Revo Technologies Ltd.The Bluetooth® word mark and logos are registered trademarks owned by Bluetooth SIG, Inc. and any use of such marks is under license. aptX® is a trademark of Qualcomm®.Revo Technologies LtdThe Inox Building, Caldwellside, Lanark,Scotland, United Kingdom, ML11 7SRTel: +44 (0) 1555 66 61 61 Email:*****************.ukDISCLAIMERRevo Technologies Limited makes no representation orwarranties with respect to the content of this publication, andspecifi cally disclaims any implied warranties of merchantability orfi tness for any particular purpose. Further, Revo Technologies Limited reserves the right to make changes to this publication from time to time, without notifi cation to any person or organisation.CONTENTS02 TechnicalSupport02 EnvironmentalInfo02 Warranty02 CopyrightsandAcknowledgements02 Disclaimer03 Welcome03 Unpacking04 Anatomy05 PowerSupply05 Set-Up06 ControllingSUPERTONE06USB Device Charging07 - 08 BluetoothMode09 Additional Input Modes10 - 11 Troubleshooting WELCOMEThank you for purchasing the Revo SUPERTONE wireless speakersystem, we are sure that it will provide you with many years ofenjoyment and reliable service.In a plastic world of endless and seemingly semi-disposableBluetooth® speakers, SUPERTONE is an oasis, delivering a timelessmix of authenticity, quality materials and acclaimed acoustic engineering.Beating at the acoustic heart of the system is an 80 watt Class-Damplifi er, twin 3.5” BMR fl at-panel speakers and a 6” portedsubwoofer. Acoustically engineered to provide the soundtrack inspaces large and small, SUPERTONE creates rich digital audio, tight controlled bass and an extended listening sweet-spot. Alongsidewireless Bluetooth® connectivity with Qualcomm® aptX™,SUPERTONE is equipped with a large array of physical connectors, allowing interaction with a variety of devices including CD playersand Sonos equipment. SUPERTONE even includes a USB connector to allow simultaneous charging of your smartphone or tablet device.This guide has been designed to quickly get you up-and-runningwith your device, offer guidance on the more complex features ofthis product and provide information on safety, warranty details and troubleshooting.UNPACKINGThe SUPERTONE box should include the following items:• SUPERTONE music system• Power supply with multi-country adaptors• Cleaning Cloth• Warranty card• Owner’s guideShould any item be missing or damaged, please contact your pointof purchase or call Revo directly on +44 (0) 1555 66 61 61Note: All packaging should be saved for possible future use, it is the safest way to transport your SUPERTONE should it be neccessary.03ANATOMY OF SUPERTONE04DC Power Socket Aux-In Digital Optical InStereo RCA In Software Update Port Kensington Lock Slot TelescopicAntennaPOWER SUPPLY (PSU)SUPERTONE is supplied with a multi-region power supply, meaning that it can be operated in a number of countries around the world.Select the correct plug for your country then connect it to the transformer block.Transformer BlockPress the POWER button once to turn SUPERTONE on.2SET-UPUsing the PSU supplied, connect one end to the DC power socket found on therear of SUPERTONE, then plug the opposite end into the mains socket on the wall.105SUPERTONE has a very simple and easy-to-use control panel, several buttons are all that are required to use SUPERTONE to its full potential.POWER BUTTONWhilst in stand-by, the power indicator will be RED. To turn the SUPERTONE on, simply press the power button once. The power indicator will now be WHITE.MODE SELECTIONUse the BT, INPUT 1, INPUT 2 and OPTICAL buttons to select your desired playback mode.BLUETOOTH PAIRING BUTTONUse this button to pairinformation.CONTROLLING SUPERTONE06USB DEVICE CHARGINGSUPERTONE provides standard USB charging (5V , up to 1000mA) for a range of USB devices such as iPhones, Android smartphones - as well as tablets.The USB socket is positioned on SUPERTONE’s front panel.AUDIO CONTROLSThe BASS and TREBLE controls allow fi ne tuning of the sound to suit your personal listening preferences.The master volume dial is located on the top of SUPERTONE.Note: The playback volume can be controlled by both the master volume dial on SUPERTONE and the volume control of your device.Wirelessly stream music from your Bluetooth smartphone, tablet, laptop or otherBluetooth enabled device directly to SUPERTONE, without the need for physicaldocking or connection.PAIRING WITH BLUETOOTH DEVICES‘Pairing’ occurs when two Bluetooth devices talk to each other and establish aconnection. This connection is stored in the memory of both devices, meaningthat once you ‘pair’ a particular device with SUPERTONE, you shouldn’t have to gothrough the pairing process again.HOW TO PAIR A BLUETOOTH DEVICE WITH SUPERTONETo enter Bluetooth mode, press the Bluetooth Pairing button. SUPERTONE will nowenter pairing mode, signifi ed by a single tone and the mode indicator fl ashingBLUE.On your Bluetooth device, ensure that Bluetooth is enabled then initiate a ‘Search’for a new device. When the search process has been completed, your device willlist all the available Bluetooth devices in your close proximity.Now select SUPERTONE from the list.Your Bluetooth device will confi rm when pairing has been completed by a doubletone and the mode indicator turning WHITE.STREAMING MUSICSelect, browse and control music playback directly from the source device, themusic will playback through SUPERTONE.07MANAGEMENT OF MULTIPLE BLUETOOTH DEVICESIf you have paired only one Bluetooth device, on entering Bluetooth mode,SUPERTONE will automatically seek to connect with this device.Should you wish to pair another device, press the Bluetooth Pairing button.SUPERTONE will now disconnect its current Bluetooth device and enter pairing mode again. This will allow you to repeat the pairing procedure.SUPERTONE will remember up to 8 individual Bluetooth devices. When you reach the point of having a 9th device you wish to pair, SUPERTONE will pair with the 9th device and automatically erase the oldest-paired device from its memory.You can continue to pair new devices and SUPERTONE will always remember the most recent 8 devices it has paired with.To disconnect, and remove all Bluetooth devices from the memory, push andhold the Bluetooth Pairing button until you hear a confi rmation tone. After this, to reconnect a previous device, you may have to forget the previous pairing in your device and search for SUPERTONE again.aptX®SUPERTONE’s Bluetooth solution is equipped with CSR’s patented aptX®technology, meaning that when it is used in conjunction with a device that also supports aptX®, the streamed audio will be of CD quality rather than the MP3 quality of a standard Bluetooth stream.08ADDITIONAL INPUT MODESIn addition to Bluetooth, you can connect a variety of external audiodevices to SUPERTONE.Once you have the device connected and the correct modeselected, you can browse and control music playback directly fromwhichever source device you are currently connected to, with theaudio played through SUPERTONE.Press the desired mode button. A white indicator light will bedisplayed above the currently selected playback mode button.INPUT 1 - AUX-INAllows you to play from an external source (such as an MP3 player)through SUPERTONE.Connect your external audio source to the 3.5mm AUX-IN connectoron the rear of SUPERTONE.Before connecting, turn the volume down low on both SUPERTONEand, if adjustable, the external source. Once connected and playing,you can adjust the volume to suit.INPUT 2 - RCAThis mode allows you to play audio from an external source (such as aradio tuner or CD player) through SUPERTONE using RCA cables.Connect your external audio source to the RCA connectors on therear of SUPERTONE.OPTICALThis mode allows you to play audio from a digital audio source (suchas a television) through SUPERTONE.Connect your external audio source to the OPTICAL connector on therear of SUPERTONE. You will require a ‘TOSLINK’ cable to do this.09TROUBLESHOOTING10TROUBLESHOOTING11TECHNICAL SUPPORT TEL - + 44 (0) 1555 666161E-MAIL - ***************.uk WEB - /support。
REVO 3D SCANNER Revo Studio - User Manual2022.4 V.2.0.0ContentIntroduction (3)System Requirements (3)Main Menu Panel (3)Process Model (4)1. Edit (4)2. Point (4)3. Mesh (5)4. Alignment (6)5. View (6)6. Help (7)Warning (8)Support & Help (9)Contact Us (9)IntroductionRevo Studio is a post-processing application released by the Revopoint team to edit individual 3D models created by Revo Scan and to align multiple 3D models so that they can be merged into a new 3D model. In this instruction manual, we will introduce the details about the application and how to adjust parameters in it.System RequirementsMain Menu Panel① Studio Icon:Includes Import , Export , Recent Files and Exit . ② Undo & Redo: Click the Undo icon to reverse the action of the previous step(s) as many times as necessary. Asneeded, click Redo to move forward to the desired step.③ Function Buttons: Includes Edit , Point , Mesh , Alignment , View and Help .④ Toolbar: Includes shortcuts to Set Center , Orthogonal , Show/Hide Bounding Box , Show/Hide Track Ball ,Box Selection and Lasso Selection . These functions are described in their sections later.⑤ Center Window: Displays the name of the model being processed.⑥ Information of the 3D model: Provides details of the model (such as name & number of points) to verify identity. ⑦ Mouse Command Prompt: Displays the mouse’s function commands.⑧ Parameter Settings: Adjust the parameters for any function allowing custom configurations. Mac with Intel × 86 chip: Mac OS 10.15 and models after ; Mac with Apple M1 chip: Mac OS 11.0 and models after ; Memory: ≥ 8GWindows: Win 8/Win 10 (64 bit ) Memory :≥ 8G *The Windows 7 is not supported.Process Model1. EditIn the Edit module, the available commands are: Box Selection, Lasso Selection and Set Center.(Note: The words or phrases on the following UI will be improved.)Box Selection: Select features of a model by drawing a rectangle around them.Lasso Selection: Create a completely free-form selection around the desired features by drawing a lasso.Set Center:Change the center coordinate of the 3D model. The object is re-positioned so that the selected center is in the middle of the work screen. Any rotations will be around this center point.2. PointIn the Point module, the available commands are: Clip, Smooth, Isolation, Simplify, Overlap Detection and Meshing to edit the point cloud of a 3D model.Clip: Clip the model plane. Use this function to remove unnecessary parts of the scan. Click the right mouse button and drag; the clipping plane will appear as a line (the plane is seen on-edge). The portion of the model in thedirection of the arrow will be saved. Click Apply to finish. If needed, click the right mouse button again to cancel the operation.Smooth: Smooth flat or curved surfaces; this function can be applied repeatedly as needed. Adjust the Parameters:There are two smoothing methods: Geometry and Normal.Geometry refers to the features in the scanned object.Normal refers to the calculated directions of each facet.In the BASIC and ADV ANCED parameters, set the amount of smoothing as needed. In ADV ANCED, highervalues for Radius and Iteration result in smoother surfaces.Isolation: Automatically remove point cloud data that is isolated from the main body of the object (for example, a portion of the arm when scanning a person’s head). For parameters in ADV ANCED, higher values for Radius, Angleand Isolation Rate remove more of the point cloud data.Simplify: Simplify the point cloud (remove data points that do not improve the accuracy of the scan).Overlap Detection: Detect and delete overlapping, and unnecessary, data points in the point cloud.Meshing: Convert the point cloud into a meshed 3D model.3. MeshIn the Mesh module, the available commands are Clip, Smooth, Isolation, Simplify, Enhance, Fill Hole and Convert to Point cloud.Clip: Clip the model plane. If there are unnecessary surfaces or meshed data that would not be excised by the Isolation command, use this function to manually remove it.Smooth: Smooth flat or curved surfaces; this function can be applied repeatedly as needed.In the parameters for BASIC and ADV ANCED, set the amount of smoothing as needed.There are two smoothing options for ADV ANCED: Geometry and Denoise.Isolation: Remove extraneous meshed data that is separated or only loosely connected to the main body.Simplify: Simplify the mesh file (reduce the number of polygons in the model while retaining as much detail as possible). Enhance: Sharpen the details of the 3D model.Fill Holes: Fill the missing part(s) on the model’s surface. Currently, this function only works when filling small holes because gross distortions typically result when filling holes that are a significant portion of the object’s volume. Convert to Point Cloud: Convert the meshed 3D model into a point cloud.4. AlignmentIn the Alignment module, multiple scans can be combined and merged into one object, two at a time.Select Add Float File to import every new scan that is to be merged with the current model. Merge Type allows for automatic (By Feature) and manual (By Mark Points) alignment. Automated alignment needs a minimum amount of overlapping areas with the same, unique features; 20% in common is a good starting point for most projects. Both point clouds and mesh objects can be aligned. Manual alignment requires a minimum of 3 pairs of corresponding points on the two scans.5. ViewIn the View module, the available commands support visual aids for reviewing the model.Icon: Switch between Perspective and Orthogonal.Icon: Display or hide the bounding box.Icon: Display or hide the track ball.6. HelpThe Help section contains the About information and Feedback popup.The About popup includes the Revo Studio version and links to the official website & user forum.The Feedback popup supports bug reporting and general feedback to our developers.WarningThe product cannot be returned if the "Warranty Void If Seal Is Broken" label is damagedor removed.Follow Revopoint 3D TechnologiesThis content is subject to change.Download the latest version from https:///downloadIf you have any questions about this document, please contact ***********************Support & HelpIf you need any help, please visit our official website or official Forum:Contact UsTel (US): Toll-free +1 (888) 807-3339Tel(China):+86181****6779Email:************************ Skype: +1 323 892 0859Our customer service team provides 24-hour o n li n e services support . If you have any questions and feedback, please don’t hesitate to contact us!/support/https:///。
WELCOMECongratulations & welcome to the Revv family! Thank you for trusting Revv Amplification with such an important part of your musical endeavors. Enjoy tone, durability, & ease of usedesigned to inspire.This is an addendum to the D20 manual designed to get you up & running with your G20 quickly. All technical information (such as bias instruction) can be found in the D20 manual & you will find extra information here primarily relating to 2 areas:1)High Gain & Channel Switching Features2)MIDI & Virtual Cabinet ControlsPlease refer to the D20 manual on this website for all s afety info Please refer to the D20 manual on this website for all warranty & compliance infoControlsGain Knob - T his knob only controls the amount of gain on Channel 2. The G20 is designed to be usable throughout the full range of this knob & its position also alters frequency response, particularly in the low end & mids. Be sure to experiment!Wide Switch -Wide is an overall voicing change which affects both channels. Channel 1 will receive more push as well as chimier highs & fat lows. Channel 2 will predominantly experience an extension in the low end. Use your ears to find what’s best for you. Many of our employees & artists have noted that in their opinion the Wide switch makes the G20 sound like a larger amplifier.Channel Switch -This switch cycles between Channel 1 & 2 which will be indicated by the amplifier’s LED color.Aggression Switch -The Aggression Switch controls the G20’s signature Aggression voicings. These 3 (off, Blue, & Red) settings affect overall level of gain as well as the frequency response of your gain channel. Like 3 channels in one! These can sound very different & could be cycled through as crunch, rhythm, & lead tones for one example.Store Button -The Store Button is used to set various presets to be recalled in different manners related to Virtual Cabinets, MIDI, & more discussed later in this manual.Please note that the G20 features a Foot Switch jack on the rear of the amplifier. This is for our optional Foot Switch used to control the amplifier. However, we do anticipate most users that require floor switching to utilize the versatile MIDI control the G20 contains.Saving Virtual CabinetsYou may choose to have each channel & Aggression setting recall a different Two notes Virtual Cabinet! This will allow you to radically change the direct out sound of each “channel” through not only cabinet & mic settings but also different amounts of EQ, reverb, & more.In order to save a Virtual Cabinet to a channel or Aggression setting:1)Select the channel and/or Aggression setting you want to save a specific Virtual Cabinetto.2)Select the Virtual Cabinet you would like saved with the 6 position rotary switch.3)Press & hold the Store button until the LED flashes.Now every time you switch to that channel or Aggression setting, the Virtual Cabinet you have saved will be loaded by the embedded Two notes Torpedo regardless of the position of the Virtual Cabinet rotary switch.Disabling Virtual Cabinet SavingTo disable this recall system & have all channels default to the Virtual Cabinet’s rotary switch position (outside of any MIDI commands):1)Press & Hold the Aggression button, then power on the amplifier.2)If the Aggression LED flashes blue, the Virtual Cabinet Saving option is disabled. If theAggression LED flashes RED, the cab save feature is enabled.Amp Startup SettingsBy default, G20 will power up with Channel 1 loaded & all options turned off. However, any combination of channels, Aggression settings & functions can be saved so that the amplifier will always power up with your favorite settings.In order to perform this:1)Set the G20 how you would like it to power up.2)Press the store button.3)The Store LED will now flash4)Press the Channel button. The Store LED will quickly flash on & off.Your preferred setting will now be loaded when the amplifier is powered up, until changed.MIDIVersatile & optional MIDI control helps Revv amps seamlessly integrate into any rig. The amplifier will store up to 128 programs for Program Change commands as well as accept Continuous Controller (CC) commands to control functions directly. The amplifier also features OMNI mode to allow control options on 16 channels, & phantom power to power controlling devices.What does that mean?1)You can set up “presets” of switch settings on the amp to recall quickly.2)You can simply control anything’s on/off state (Wide setting for example)3)You can do a combination of both of those things.4)You can do this with a computer for automatic changes during songs, a MIDI floorcontrol unit instead of our footswitch, a loop switcher with midi to control pedals as part of the “presets,” a multi-effects unit with MIDI control, & more.5)You can do this with just our footswitch, or not at all, if you choose. External equipmentjust becomes more beneficial when integrating your Revv with additional pieces of a rig such as effects units.OMNI ModeOMNI mode off will allow the amplifier to be controlled via a designated channel (1-16), & OMNI mode on will allow the amplifier to respond to commands on any channel. If other equipment is being used in a MIDI system, it is desirable to set each piece of equipment to separate channels. However when the amplifier is the only piece of gear being controlled via MIDI, then setting it to a specific channel is not really required & setting the OMNI mode on becomes preferable.In order to toggle OMNI mode on or off:1)Make sure the power switch is in the off position.2)Press & hold “Pre/Post” push button.3)With the “Pre/Post” push button being held, turn on the power switch.4)Release the “Pre/Post” push button once the Channel LED begins to flash. Once the“channels” LED has stopped flashing, it has accepted the command to adjust OMNImode. The amplifier will adjust OMNI mode & then reset itself by completing its startup sequence. Once the startup sequence is done (3 seconds), you are ready to go.Note: The channel LED will flash blue when it turns OMNI mode ON, & RED when it turns OMNI mode off.MIDI Channel SettingThis amplifier can either automatically or manually change the 16 MIDI channels you would like it to respond to. The channel change is stored in memory & only needs to be done when you need the amp to respond on a certain channel.1)In order to set the MIDI channel: With the power off, press & hold the Store button thenturn on the power switch. The amp will power up & begin to flash 4 LEDs. Once thishappens it is awaiting the channel data to be received from the external equipment(automatic) or to be set manually.2)(Automatic, recommended)With your external equipment ready (pedals, computers,etc.) & set to the channel you want the amplifier to be controlled from via MIDI, send acommand to the amplifier by pressing a program change button or CC command on your external equipment. Once the amplifier receives the data, it will verify the channel itreceived & save it to memory. Easy!3)(Manual)Once step 1 has been completed above & the LEDs are flashing, press thechannel push button. The channel LED will flash & the other LEDs will turn off, thissignifies that MIDI channel 1 has been selected. Simply continue to press the channelpush button to get to the channel you desire. As you press the switch you will notice the LEDs turn on as you increase the MIDI channel number. Once you reach the channelyou desire, press the Store switch to save it to memory.MIDI Program ChangeThis amplifier can remember up to 128 Program settings of the MIDI controllable functions. In order to set a program (i.e. amplifier configuration) to be controlled via MIDI:1)Set the amplifier to the configuration you intend to save to a program number. (Ex: Ch: 2,Aggression level: 2, Wide: ON)2)Once the amplifier is configured as you would like, press the Store push button. TheStore LED will flash & the amplifier will wait now for a command through its MIDI IN jack.3)Send a Program Change command from your MIDI Pedal or other equipment with thecorrect channel & program number you intend to have the amplifier save the currentconfiguration to.4)Once the command is received, the amplifier will save the current amp configuration tothat program number. The Store LED will flash 3 times & turn off verifying that thecommand has been received & saved. Now, anytime you send that program number to the amplifier from your MIDI pedal or other external equipment, the amplifier will switchto that saved configuration. This will allow for any configuration of your settings to berecalled with any MIDI device!MIDI Programs & Virtual CabinetsOne thing to keep in mind is that whenever you use a Program patch number, the G20 will also recall the Virtual Cabinet that is saved in the Two notes Torpedo & associated with that number.Program numbers 1 - 6 will recall the Virtual Cabinet associated with the rotary switch on the front of the amplifier. So if you have a Virtual Cabinet that you want to use with a certain amplifier setting, you will need to save the Virtual Cabinet to the program number first, then save the amplifier settings.For example, if we wanted to save a Virtual Cabinet & certain amplifier settings to program patch number 10, we would want to add the speaker cabinet to the tenth cabinet position in Two notes remote first.Once the Virtual Cabinet is saved there with your preferred settings (with or without reverb for example), you can now set the amplifier to your favorite setting & proceed to use the MIDI program patch change procedure above. Now every time you recall program patch number 10, the correct Virtual Cabinet & amplifier setting will be recalled. You can do this 128 times as there are 128 program positions that can be recalled for some serious versatility!MIDI Controllable FunctionsThe amplifier functions that can be controlled via MIDI are as follows:●Channel Selection● 3 Aggression Levels●Wide Function●4-20 Watts●Pre/Post●Two notes ReverbThese functions can be set & controlled by a MIDI Program Change, where one program change command will recall a configuration of the above settings, or by Continuous Controller commands, where a CC command will switch any one of the functions listed above, independent from any of the others. The CC command functions are great for things like instant access buttons on foot pedals.CC CommandsIn order to use CC commands, the Generator functions have all been given a designated number & on or off setting. When using & selecting a function the number associated with the function must be used & then the setting of the function (on or off) must also be sent. Most MIDI equipment (pedals etc) allows you to select a CC number & then designate whether it be turned on or off. (Consult the external equipments’ instruction manual). The following commands & their CC numbers need only be sent an on command (0-63) as they are used to switch between channels & Aggression levels which cannot be turned off, only changed to a different channel or level, on & off commands sent will produce the same result.Function + CC Number (Hex Value)●Channel 1 - 16 - (0x10)●Channel 2 low Aggression - 18 - (0x12)●Channel 2 medium Aggression - 19 - (0x13)●Channel 2 high Aggression 20 - (0x14)The following command will switch to Channel 2 & then toggle through the Aggression levels with each use of the command.This command will also respond to an on & off command with the same result:●Channel 2 plus Aggression toggle: 24 – (0x18)The following commands control functions that are turned on & off. These functions require an off (0-63) & on (64-127) command (byte) to be sent with the CC number to either turn them on or off. If you are trying to use them & are not getting them to respond, chances are you are sending the wrong command byte ( 0-63 is OFF & 64-127 is ON). (Consult the peripheral’s instruction manual)●Two notes Reverb: 26 – (0x1A)●4W/20W: 27 – (0x1B)●Wide: 28 – (0x1C)●Pre/Post: 29 – (0x1D)。
XPF revolver保养手顺一.准备工作梅花扳手M2*1,M3*1存放pin及piston的容器棉花棒擦拭纸或抹布AFC T&D Three Bone二.Revolver parts 认知图片三.拆除1.拆除所有nozzle,注意piston里面的弹簧也一并取出.(cover拆除后,下图红色圆圈内的pusher会因为弹簧弹力而翘起,故在拆除前用橡皮条将所有的piston pusher扎住,防止意外状况发生)2.使用梅花扳手拆除revolver下表面和上表面的cover,扳手使用时注意完全卡住后再用力,防止螺丝滑牙.在拆除下表面cover时,切记不要松动黄色圆圈内的三颗螺丝.Top cover拆除后,将revolver认知图片中的felt ring(prats NO.12)取出.Bottom plate拆除后,将revolver认知图片中的felt ring(prats NO.18)取出.3.将vacuum pin及vacuum break pin拆除,并一组一组的放在事先准备好的容器中,以T&D 浸泡,拆除时注意每只上面都有一个小弹簧和两个stopper.过程中不要碰到橡皮条.4.拆除piston,注意其压杆下面的小钢珠,lever下方的塑料垫片也一起拿出.5.将拆除的pin及piston存放在有记号的容器中,保证在安装回去的时候一一对应.(容器中的每个小格都注以少许T&D,使所有的部件都浸泡完全.)四.清洁保养拆除的部件在浸泡T&D 一定时间后,进行清洁保养并安装回去. 将vacuum pin 及vacuum break pin 上的脏污擦拭干净,涂以薄薄一层AFC .清洁完成后的pin 保持清洁前的分组,Piston 外层也涂以薄薄一层AFC ,卡吸嘴的凹槽液涂抹少许均均匀的AFC ,保证nozzle 及piston 的活动顺畅.在保养中,如下图所示的红色区域保持清洁,不要涂有AFC .2.vacuum pin 、vacuum break pin 上的stopper.整个revolver 浸泡T&D 一段时间后,使用棉棒清洁通孔,配合气枪吹干净.再使用.所有的spring ,spring guide 以及steel ball 均先擦干净后再以AFC 润滑. .Felt ring 使用脱脂清洗剂(three bone )进行清洁后风干.安装小felt ring 的通孔使用.Bottom plate 上的2D-MARK 用较软的擦拭纸清洁,不要使用溶剂类清洗剂清洁. 及小弹簧清洁干净,小弹簧涂上少许AFC . 3Three Bone 清洁.反复上述步骤直至revolver 完全干净. 45棉棒清洁干净,确保没有杂物以使通气顺畅。
产品名称BOSE SoundLink Revolve 产地墨西哥颜色灰/银
产品尺寸/重量
152×82×82mm/660g 续航时间
12小时
充电时间4小时
供电方式锂电池
音频接口 3.5mm/ USB接口(只限电脑音源)单元尺寸3英寸
NFC功能是
防水级别IPX4防水
通话功能是
语音提示是
APP 是
保修期一年(注册微信会员赠送延保6个月)
包装清单音箱本机x1
USB电源x1USB连接线 x1
交流电源适配器 x1
技术特点1360度全向发声:一个向下发声的全音域单元配合BOSE专利的声波导向技术,可以向四周发出均匀,无死角的声音
技术特点2独特优势:体积小巧 低音震撼
技术特点3优雅的设计:采用高品质阳极氧化铝金属材质配合全新的无缝连接一体成型工艺,是产品更为高雅,耐用
技术特点4蓝牙无线连接:方便,易用,可连接几乎是所有常规的智能手机,平板电脑的蓝牙设
备,可支持与蓝牙设备10米距离的无线连接。
技术特点5内置锂电池:更好的便携性,4小时充满电可在正常音量下约12小时的使用时间。
技术特点6IPX4级防水:可以使您在室外环境中放心使用。
技术特点7BOSE Connect APP :轻松实现“派对模式”与“立体声模式”的切换,可以满足您更多声音需求。
技术特点8支持有线连接:3.5mm与USB接口可以满足你有线音源的连接,连接更多的设备。
技术特点9可选配充电底座:充电方便,同时为扬声器在家中使用时提供了一个放置的地方。
技术特点10
远程操作:可通过配对的蓝牙设备控制扬声器的各项功能(如音量等)不需要携带其他产品说明
音效表现
Feature令人惊艳的宏亮气势,超乎想象的小巧体积。
Benefit体积小巧 低音震撼
Advantage 精巧的外壳下装载了众多技术,展现出扬声器超乎想象的的低音效能,让人深深的沉醉在饱满的动人音色中。
Evidence X先生经常会带着家中的小朋友到户外和同事们野餐,因为有小孩子每次外出都需要随身带很多东西。
聚会时大家喜欢拿出手机播放孩子们喜欢的音乐增加气氛,偶尔路过门店体验到我们的产品,十分满意。
不仅可以满足了他外出携带需要,还提供了完美的音质
360°音效
Feature 可以向四周发出均匀的,无死角的声音。
实现零死角的环绕音效。
Benefit随意摆放,一样可以体验到全方位的声音。
Advantage 一个向下发声的全音域单元配合BOSE专利的声波导向器,营造出全方位,无死角的震撼
Evidence X女士三口之家,每天晚上喜欢在客厅给孩子放放音乐,孩子太小总是跑来跑去,之前的音响固定的放在一个位置声音太大影响邻居,声音太小孩子跑来跑去还听不见。
选择了我们产品后放在家里中间的位置不管孩子
精致设计
Feature 一体成型的采用高品质阳极氧化铝金属材质配合全新的无缝连接一体成型工艺。
Benefit使产品更为高雅,耐用。
Advantage 精密的设计,一体成型的阳极氧化铝材质,可以提供全方位的音效,不留一丝缝隙,外
Evidence X小姐喜欢游泳,喜欢做SPA ,喜欢泡温泉,更喜欢听音乐。
自从购买了产品,她可以随意带着音响到她喜欢的地方,再也没有任何的顾虑。
无论什么环境,我们的产品都可以。