Labview2012入门教程
- 格式:pdf
- 大小:1.27 MB
- 文档页数:76

实验一虚拟仪器技术的构成与程序设计一、实验目的1、掌握基于虚拟仪器技术的测试系统组成及信号分析方法2、掌握LabVIEW的数据采集编程方法,熟悉LabVIEW程序设计、调试的基本方法。
二、实验设备Labview2011软件、NI USB-6009数据采集卡、普通计算机、,实验用可调直流电源,导线若干。
三、实验原理Labview的数据采集(Data Acquisition)程序库包括了许多NI 公司数据采集(DAQ)卡的驱动控制程序。
通常,一块卡可以完成多种功能—模/数转换,数/模转换,数字量输入/输出,以及计数器/定时器操作等。
用户在使用之前必须DAQ卡的硬件进行配置。
这些控制程序用到了许多低层的DAQ驱动程序。
本项实验内容需要一块安装好的DAQ卡以及LabVIEW开发系统3.1 数据采集系统的组成DAQ系统的基本任务是物理信号的产生或测量。
但是要使计算机系统能够测量物理信号,必须要使用传感器把物理信号转换成电信号(电压或者电流信号)。
有时不能把被测信号直接连接到DAQ卡,而必须使用信号调理辅助电路,先将信号进行一定的处理。
总之,数据采集是借助软件来控制整个DAQ系统。
包括采集原始数据、分析数据、给出结果等。
图1-1中描述了插入式DAQ卡。
另一种方式是外接式DAQ 系统。
这样,就不需要在计算机内部插槽中插入板卡,这时,计算机与DAQ系统之间的通讯可以采用各种不同的总线,如并行口或者PCMCIA等完成。
这种结构适用于远程数据采集和控制系统。
图1-1 插入式数据采集系统示意图当采用DAQ卡测量模拟信号时,必须考虑下列因素:输入模式(单端输入或者差分输入)、分辨率、输入范围、采样速率,精度和噪声等。
单端输入以一个共同接地点为参考点。
这种方式适用于输入信号为高电平(大于一伏),信号源与采集端之间的距离较短(小于5米),并且所有输入信号有一个公共接地端。
如果不能满足上述条件,则需要使用差分输入。
差分输入方式下,每个输入可以有不同的接地参考点。

第一讲:认识Labview1.1 Labview 简介在开始菜单里找Labview点击打开,会出现如下界面:从File>>New VI 或者从右半部分中的New>>Blank VI 都可以打开如下界面:上图中前图是虚拟仪器的前面板,是用户使用的人机界面,后面的是程序框图界面(即后面板)。
在LabVIEW的用户界面上,应特别注意它提供的操作模板,包括工具(Tools)模板、控制(Controls)模板和函数(Functions)模板。
这些模板集中反映了该软件的功能与特征。
下面我们来大致浏览一下。
工具模板(Tools Palette)该模板提供了各种用于创建、修改和调试VI程序的工具。
如果该模板没有出现,则可以在Windows菜单下选择Show Tools Palette命令以显示该模板。
当从模板内选择了任一种工具后,鼠标箭头就会变成该工具相应的形状。
当从Windows菜单下选择了Show Help Window功能后,把工具模板内选定的任一种工具光标放在流程图程序的子程序(Sub VI)或图标上,就会显示相应的帮助信息。
工具图标有如下几种:图标名称功能1Operate Value(操作值)用于操作前面板的控制和显示。
使用它向数字或字符串控制中键入值时,工具会变成标签工具2Position/Size/Select (选择)用于选择、移动或改变对象的大小。
当它用于改变对象的连框大小时,会变成相应形状。
3Edit Text(编辑文本)用于输入标签文本或者创建自由标签。
当创建自由标签时它会变成相应形状。
4Connect Wire(连线)用于在流程图程序上连接对象。
如果联机帮助的窗口被打开时,把该工具放在任一条连线上,就会显示相应的数据类型。
5ObjectShortcut Menu(对象菜单)用鼠标左键可以弹出对象的弹出式菜单。
6ScrollWindows(窗口漫游)使用该工具就可以不需要使用滚动条而在窗口中漫游。
LabVIEW 2012 基本介绍一.LabVIEW环境基础知识LabVIEW程序又称虚拟仪器,或VI,其外观和操作模拟真实的物理仪器,例如示波器和万用表。
LabVIEW拥有一整套工具用于采集、分析、显示和存储数据,以及解决用户编写代码过程中可能出现的问题。
当您创建一个新的VI时,您可以看到两个窗口—前面板窗口和程序框图。
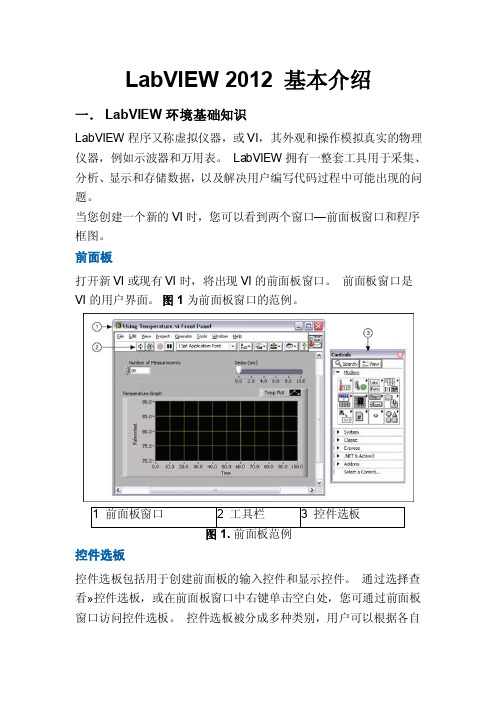
前面板打开新VI或现有VI时,将出现VI的前面板窗口。
前面板窗口是VI的用户界面。
图1为前面板窗口的范例。
控件选板控件选板包括用于创建前面板的输入控件和显示控件。
通过选择查看»控件选板,或在前面板窗口中右键单击空白处,您可通过前面板窗口访问控件选板。
控件选板被分成多种类别,用户可以根据各自需要显示部分或者全部类别。
图2显示了所有控件选板类别,并展开了新式类别。
图2.控件选板显示或隐藏类别(子选板),点击―自定义‖按钮,并选择更改可见选板。
输入控件和显示控件每个VI都包含一个前面板,您可以将它视为用户界面进行设计。
当您从别的程序框图调用VI时,您也可以使用前面板,传输输入、接收输出。
将输出控件和显示控件放置在VI前面板上,创建一个VI 的用户界面。
当您将前面板作为用户界面交互时,您可以通过修改控件提供输入,并在显示控件中查看结果。
输入控件决定输入,显示控件显示输出。
输入控件通常是旋钮、按钮、转盘、滑块和字符串。
输入控件仿真仪器的输入装置,为VI的程序框图提供数据。
显示控件通常是图形、图表、LED灯和状态字符串。
显示控件仿真仪器的输出装置,显示程序框图获取或生成的数据。
图1中有两个控件:测量次数和延迟(秒)。
有一个显示控件:XY 坐标图,称为温度图。
用户可以为测量次数和延迟(秒)控件改变输入值。
还可在温度图上看到VI生成的值。
VI基于程序框图中的代码生成显示控件值。
每个输入控件和显示控件都有与其相关的数据类型。
例如,水平滑动杆延迟(秒)是数值型数据类型。
最常用的数据类型为数值型、布尔型和字符串型。

推力器工作状态单元系统使用说明一PC机系统所用的软件安装及使用说明本监控系统所用的安装软件及安装步骤:1、labview2012,其中安装软件包括:labview安装软件2012LV-WinChn.exe[1],安装是需要将其进行解压缩,可以新建解压文件,也可以默认安装文件,之后就可以进行安装了,安装过程中需要破解序列号,在NI License Activator.exe[2]在选项里面选择产生序列号,来进行破解,更新过程暂时跳过即可。
2、labview2012所需要的工具包,为了能够产生数据报表,需要安装下面的工具包2012RGT.exe [3]. 安装过程和上述类似。
3、要将数据存储到数据库中,需要安装2012DCT.exe,本系统中暂时没有用到这个工具包,用的另外一个labSQL工具包,只需要将lab文件夹放到labview安装文件夹里即可,路径为安装盘---程序文件-----National Instruments-----labVIEW2012----user.lib.放入到这个文件夹里面。
4、本系统和实时控制器相连,所以需要安装2012RealTime-eng.exe[4].同时需要安装RT驱动软件NI-rio Device Drivers,一般会有驱动光盘。
5、实时控制器内部需要FPGA编程,安装2012FPGA-eng.exe[5].同时需要编译工具包XiLinx101和XiLinx134.[6]6、需要进行模拟数据采集时,要用到DAQ助手,所以可以进行安装NIDAQ970f0.exe[7]7、本系统需要和触摸屏进行相连,必须安装触摸屏工具包2012sp1TouchPanel.exe[8]8、安装所需要的数据库SQLserver2005所有的工具包示意图如下推力器工作状态指示操作说明:一般情况下。
运行程序会生成可执行文件即EXE文件,点击桌面上的快捷键,即可运行程序,主面板主要是对实时数据的原始数据和修正数据进行显示,同时将数据曲线显示在波形图中,主面板中有个在主面板中主要操作按钮有:如图所以依次为:运行、连续运行、停止、暂停,通过上面四个按钮来控制程序的停止和运行。
LabVIEW入门从零基础到快速上手LabVIEW是一种图形化编程语言和开发环境,用于控制和测量系统应用的快速原型设计、数据采集和分析。
本文将引导读者从零基础开始,逐步学习LabVIEW的基本概念和使用技巧,以帮助读者快速掌握LabVIEW的入门知识。
一、LabVIEW简介LabVIEW(Laboratory Virtual Instrument Engineering Workbench)是由美国国家仪器公司(National Instruments)开发的一种图形化编程语言和开发环境。
LabVIEW广泛应用于控制和测量系统领域,其独特的可视化编程方式使其成为工程师和科学家的首选工具。
二、LabVIEW安装和配置1. 下载LabVIEW安装程序并运行;2. 根据提示选择安装选项和目标文件夹;3. 完成安装后,启动LabVIEW,并进行基本配置,如选择界面语言、设置默认文件夹等。
三、LabVIEW界面介绍LabVIEW的界面由工具栏、项目资源、控制面板和主编辑区组成。
工具栏提供了常用的控件和工具,项目资源用于管理程序文件,控制面板用于运行程序,主编辑区用于编写和调试程序。
四、LabVIEW基本元素1. 控件:LabVIEW提供了丰富的控件,如按钮、滑动条、图形显示等,用于构建用户界面;2. 连接线:用于连接程序中的各个元素,形成数据流;3. 图标和面板:图标表示程序的功能,面板显示用户界面;4. 节点:用于执行具体的功能操作,如数学运算、控制结构等。
五、LabVIEW编程基础1. 数据流图:LabVIEW的编程模型基于数据流图,程序通过连续的数据流传递来实现功能;2. 程序结构:LabVIEW提供了各种结构化编程元素,如循环结构、条件结构等,用于控制程序流程和实现条件判断;3. 变量和数据类型:LabVIEW支持多种数据类型,如数值、字符串、数组等,变量用于存储和处理数据;4. VI(Virtual Instrument):VI是LabVIEW程序的基本单元,包含了一个完整的功能模块。

手把手教你学labview编程项目一 labview正版软件安装一、下载软件。
可以在官网下载,也可以购买正版的U盘和光盘。
二、安装软件。
1、找到安装软件所在位置。
双击安装文件打开安装文件,按图示进行下一步操作。
查看自己电脑的版本:鼠标选中桌面上的计算机图标,右键点击属性。
查看自己的电脑是32位系统还是64位系统。
我的电脑是32位操作系统所以选择的是labview中文版,32位。
点击下一步进行下一步操作。
等待安装完成,安装文件较多,可能要等待的时间较久。
点击下一步重启电脑完成安装。
三、labview软件注册1、点击电脑开始菜单,再点击所有程序,找到NI许可证管理器。
2、单击打开许可证管理器,点击激活软件3、在弹出的窗口输入账号密码登录,没有账号点击创建账号注册NI用户账号。
4、登录后在相应的地方输入产品的序列号进行激活。
软件激活后便可以正常使用。
项目二 labview破解版软件安装一、下载数据包。
在网上搜索labview 2018破解版,下载相应的安装数据包,下载后进行解压。
二、软件安装。
1、双击运行2018LV-WinChn进行安装。
2、选择数据保存位置,建议选择默认,点击Unzip。
3、进入安装向导,点击“下一步”。
安装过程弹出安装Labview硬件支持,点击不需要支持,破解版暂时没办法解决硬件支持问题。
如果需要使用硬件请下载正版激活。
这里可以重启,也可以稍后重启,安装完后先不要打开软件。
三、软件破解。
1、回到刚才下载的数据包中,运行破解程序“NI License Activator 1.2”右键选择所有需要激活的地方,点activate进行激活。
2、当全部变为绿色表示破解成功。
3、运行软件即可正常使用。
项目三两个数值相加一、新建VI。
双击打开Labview软件。
在弹出的窗口点击创建项目,按以下图示进行下一步操作完成VI创建。
创建完成后会有前面板和程序框图两个窗口。
前面板主要用来放置控件,程序框图用来编写程序。
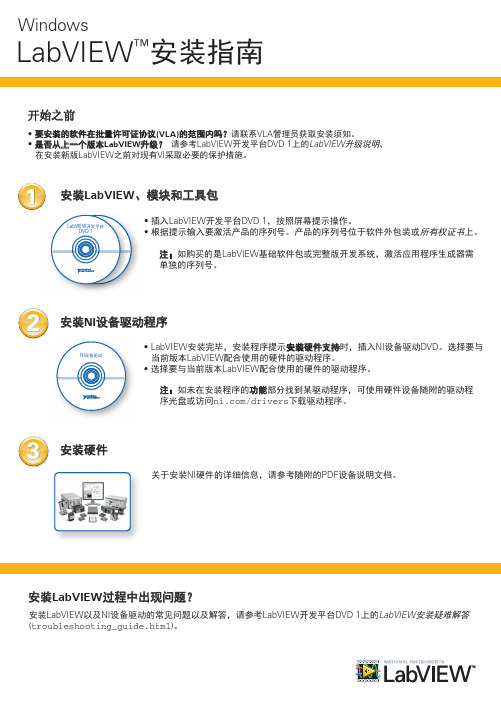
WindowsLabVIEW ™安装指南LabVIEWDVD 1开发平台DVD 1,按照屏幕提示操作。
所有权证书上。
1、模块和工具包• 要安装的软件在批量许可证协议(VLA)的范围内吗?请联系VLA 管理员获取安装须知。
• 是否从上一个版本LabVIEW 升级? 请参考LabVIEW 开发平台DVD 1上的LabVIEW 升级说明,之前对现有VI 采取必要的保护措施。
开始之前安装完毕,安装程序提示安装硬件支持时,插入NI 设备驱动DVD 。
选择要与LabVIEW 配合使用的硬件的驱动程序。
LabVIEW 配合使用的硬件的驱动程序。
NI 䇴 傧2安装NI 设备驱动程序安装LabVIEW 过程中出现问题?安装LabVIEW 以及NI 设备驱动的常见问题以及解答,请参考LabVIEW 开发平台DVD 1上的LabVIEW 安装疑难解答(troubleshooting_guide.html )。
关于安装NI 硬件的详细信息,请参考随附的PDF 设备说明文档。
3安装硬件LabVIEW 基础软件包或完整版开发系统,激活应用程序生成器需注:如未在安装程序的功能部分找到某驱动程序,可使用硬件设备随附的驱动程/drivers 下载驱动程序。
375842A-0118 2012年6月LabVIEW 模块和工具包可能有额外的系统要求。
找到LabVIEW 开发平台DVD 1上的LabVIEW 开发平台自述文件(readme_platform.html ),找到相应的模块或工具包的部分,可查看特定模块或工具包的最小安装需求。
LabVIEW 模块和工具包的附加系统要求LabVIEW 基础软件包、完整版和专业版的系统要求如下。
WindowsLabVIEW 2012系统要求©2012 National Instruments 版权所有。
Printed in Ireland.LabVIEW ,National Instruments ,NI , ,National Instruments 公司标识,以及鹰形标识均为National Instruments Corporation 的商标。

Labview2012-web发布工具0.发布LabVIEW Web 程序的设置打开与设置Web服务器的方法是使用菜单命令“工具”,在弹出的选项对话框下拉列表中选择有关Web Server 设置的选项,如图1 所示。
图1 Web 服务器设置选项启用远程前面板服务器。
Web服务器存放HTML文件的位置Web服务器使用的TCP/IP 端口,默认值为80。
Web服务器等待请求的时间。
LabVIEW保存Web连接信息文件的位置设置完成后单击OK 按钮,Web 服务器启动。
图2 Web浏览器访问设置图2对话框左边是浏览器访问列表Browser Access List,这里列出经过设置的计算机。
删除表中条目的方法是选中它,然后单击删除Remove按钮,添加表中条目的方法是单击添加Add按钮,然后在表右侧上方的空格中填写计算机IP地址或计算机名称,这里也可以使用通配符和域名,例如填写一个*号表示网络中所有计算机。
修改某个计算机访问权限时,选中它以后再选中以下3个选项之一:Allow Viewing and Controlling——允许查看及控制。
被设置为这个权限的远程计算机可以在远程面板链接或浏览网页时控制程序运行,在访问列表中计算机标识左边有两个绿颜色的对号。
Allow Viewing——允许查看。
被设置为这种权限的远程计算机只能对程序面板查看,在访问列表中计算机标识左边有一个绿颜色的对号。
Deny Access——拒绝访问。
访问列表中计算机标识左边有一个红颜色的叉号。
Web Sever Visible VIs—程序可见设置,与Web浏览器访问设置相似。
1.发布程序的前面板这是在Web 上发布程序的最简单的方式。
在发布程序的计算机上打开Web 服务器以后,网络上的任何计算机不管是否安装了LabVIEW,只要按规定的格式在Web 浏览器中输入正确的URL,就可以查看Web 服务器所在计算机内存中程序的前面板。

第1章 LabVIEW入门向导本章从LabVIEW 7 Express的安装开始,引导读者创建自己的第一个VI,并了解LabVIEW的编程环境,帮助初学LabVIEW的读者建立对于LabVIEW的感性认识,同时也可以让使用过以前版本LabVIEW的读者了解LabVIEW 7 Express的新特点。
1-1 安装LabVIEW 7 ExpressLabVIEW 7 Express商品软件共两张光盘,第一张为LabVIEW 7 Express开发环境,第二张为设备驱动程序。
将第一张光盘放入光驱后出现图1-1所示的对话框。
图1-1 LabVIEW 7 Express安装程序界面选择Install LabVIEW后,出现安装初始化的画面,初始化以后弹出图1-2所示的用户信息对话框。
其中序列号是购买软件时NI公司授予合法用户的标识。
图1-2 LabVIEW 7 Express用户信息在这个对话框输入所需要的全部信息后,出现发行协议对话框。
选择接受协议后出现图1-3所示的安装路径对话框。
图1-3 LabVIEW 7 Express安装路径图中是默认的安装路径,可以点击Browse按钮选择其它安装路径。
然后进入图1-4所示的安装方式选项对话框。
图1-4 LabVIEW 7 Express安装方式选择安装方式以后,接下来会提示所安装的组件。
然后出现安装进度条,提示安装过程。
安装完Express开发环境后会弹出图1-5所示的对话框,提示安装设备驱动程序。
图1-5 设备驱动程序安装提示把LabVIEW 7 Express商品软件第二张光盘换入光驱。
经过安装初始化以后,出现图1-6所示的对话框,可以根据自己计算机所使用的数据采集设备选择所需要安装的驱动程序。
图1-6 设备驱动程序安装选项以下的安装过程和LabVIEW开发环境的安装过程类似。
全部安装以后需要重新启动计算机。
1-2 创建一个VI在本节中请读者跟随我们的引导创建自己的第一个LabVIEW程序,以后为了简便我们按照NI公司的约定叫它“VI”。

RELEASE AND UPGRADE NOTES LabVIEW Datalogging and™Supervisory Control Module Version 2012This document describes the system requirements and the process of installing the LabVIEW2012 Datalogging and Supervisory Control (DSC) Module and the DSC Module Run-Time System. This document also describes the new features available with version2012 and compatibility and upgrade issues you might encounter when you use version2012. ContentsSystem Requirements (1)Supported Operating Systems (2)Installing the DSC Module (2)Activating the DSC Module (3)DSC Module 2012 Features and Changes (3)OPC UA VIs (3)Variable Web Service (4)Improved Examples (4)Upgrade and Compatibility Issues (4)Upgrading from the DSC Module 8.2 (4)Upgrading from the DSC Module 7.x (5)DSC Module Run-Time System (5)Installing the DSC Module Run-Time System (5)Configuring the Microsoft SQL Server (6)Where to Go from Here (7)Known Issues (7)System RequirementsTo use the DSC Module, the computer must meet the following minimum system requirements:•800MB free disk space.•512MB of RAM. National Instruments recommends 1GB of RAM.•LabVIEW2012 Base, Full, or Professional Development System (32-bit). Refer to the LabVIEW Help for information about the LabVIEW development system.•Internet Explorer6 Service Pack 1 or later.2| |LabVIEW DSC Module Release and Upgrade NotesSupported Operating SystemsThe DSC Module supports the following operating systems:•Windows 7 (32-bit and 64-bit)•Windows Vista (32-bit and 64-bit)•Windows XP Service Pack 3 or later •Windows Server 2003 R2 (32-bit)•Windows Server 2008 R2 (64-bit)The DSC Module does not support Windows NT/Me/2000/98/95 or the Windows Server non-R2 editions.NoteSupport for Windows Server 2003 R2 may require disabling physical addressextensions (PAE). To learn how this might affect your use of Windows Server 2003 and what actions you might have to take, visit /info and enter the InfoCode PAESupport .Installing the DSC ModuleThis section includes information about installing the DSC Module on a development plete the following steps to install the DSC Module.1.Log in to the computer as an administrator or as a user with administrative privileges.2.Disable any automatic virus detection programs before you install. Some virus detection programs interfere with installation.3.Insert the LabVIEW Platform DVD Disc 1.Tip You also can double-click setup.exe from the media to launch the installer.4.Follow the instructions for installing software.5.When the Product List page appears, select Datalogging and Supervisory Control Module in the Industrial Monitoring folder. 6.Select Install to minimize user interaction. Selecting Custom install opens additional dialog boxes that require your input.7.Follow the instructions to finish installing and activating the DSC Module.8.After installation, enable any virus detection programs you disabled.9.Refer to the Where to Go from Here section of this document for more information aboutgetting started with and using the DSC Module.NoteBy default, the NI Keyboard Filter Driver is not installed. The NI KeyboardFilter Driver activates special security features, including the ability to restrict users from switching between applications by pressing the <Alt-Tab> keys. This driverdoes not work on laptop computers or on computers with hibernation enabled.Activating the DSC ModuleThe DSC Module relies on licensing activation. You have a temporary license for a 7-day evaluation period. When the evaluation period expires, you must activate a valid DSC Module license to continue using the DSC Module.The NI OPC Servers application installed with the DSC Module provides a temporary license for a two-hour evaluation period. You must activate a valid license to continue using theNI OPC Servers application after the evaluation period expires.You can use the NI License Manager, available by selecting Start»All Programs»National Instruments»NI License Manager, to activate National Instruments products. Refer to the National Instruments License Manager Help, available by selecting Help»Contents in theNI License Manager, for information about activating NI products.Refer to /support if you encounter errors during installation.DSC Module 2012 Features and ChangesThe following sections describe the new features and changes in the DSC Module.OPC UA VIsUse the OPC UA VIs to create OPC UA server and client applications and to exchange data between OPC UA servers and clients. The Functions palette includes the new OPC UA palette with the following new VIs.•Create Certificate•Node Name Array To Node Path•Node Path To Node Name ArrayThe OPC UA palette includes the new OPC UA Client palette with the following new VIs.•Add Monitored Nodes•Browse•Connect•Create Subscription•Delete Monitored Nodes•Delete Subscriptions•Disconnect•Get Node Attribute•Read•WriteThe OPC UA palette includes the new OPC UA Server palette with the following new VIs.•Add Folder•Add ItemLabVIEW DSC Module Release and Upgrade Notes|© National Instruments|3•Add Property•Add Trusted Clients•Clear All Trusted Clients•Close•Create•Delete Node•Read•Start•Stop•WriteRefer to the OPC Foundation website at to learn more about OPC UA.Variable Web ServiceLabVIEW Web services allow HTTP-capable clients to interact with VIs to exchange data. You use URLs and HTTP methods to transmit data to the Web service. LabVIEW includes a built-in Web service that enables you to access shared variables. The variable Web service, nivariable, uses the Open Data Protocol (OData). Refer to the OData website at for information about OData. You can use the variable Web service to interact with and monitor shared variables that you create using LabVIEW and the DSC Module. Refer to the LabVIEW Help for more information about the variable Web service.Improved ExamplesRefer to the Toolkits and Modules»Datalogging and Supervisory Control folder on the Browse tab of the NI Example Finder to view descriptions for and launch new and improved examples for the DSC Module. Examples, including examples prior to the current version of the DSC Module, also are in the labview\examples\lvdsc directory.Upgrade and Compatibility IssuesRefer to the following section for upgrade and compatibility issues specific to different versions of the DSC Module.Upgrading from the DSC Module 8.2If you open a VI saved in the DSC Module8.2 or earlier, the VI might be broken if the VI contains an indicator, constant, or control created from the shared variable value change notification output of the following VIs.•Cancel Value Change Notifications•Enable Value Change Notifications•Request Value Change Notifications4||LabVIEW DSC Module Release and Upgrade NotesLabVIEW DSC Module Release and Upgrade Notes |© National Instruments |5To fix the broken VI, delete the indicator, constant, or control. Then create a new indicator, constant, or control from the shared variable value change notification output and wire it to the appropriate parameter.Upgrading from the DSC Module 7.xIf you are upgrading from the DSC Module 7.x or earlier, refer to the Upgrading from the LabVIEW DSC Module 7.x section of the LabVIEW 8.2 Datalogging and Supervisory Control Module Release and Upgrade Notes for important upgrade information. Refer to the National Instruments website at /info and enter the Info Code dsc820 to access the LabVIEW 8.2 Datalogging and Supervisory Control Module Release and Upgrade Notes .DSC Module Run-Time SystemTo run applications built with LabVIEW, the DSC Module, and the LabVIEW Application Builder on a computer without the DSC Module installed, you must install the DSC Module Run-Time System on that computer. The DSC Module Run-Time System contains components that enable the DSC Module features in the built applications. Refer to the National Instruments website at /info and enter the Info Code dscrts for information about the DSC Module Run-Time System.To use the DSC Module Run-Time System, the computer must meet the following minimum system requirements:•Depending on the components you choose to install, the computer must have the followingamount of free disk space:–1.0GB free disk space if you install all components of the DSC Module Run-Time System except the Shared Variable Logging Support component –1.3GB free disk space if you install all components of the DSC Module Run-Time System •512MB of RAMThe DSC Module Run-Time System supports the same operating systems as the DSC Module. Refer to the Supported Operating Systems section of this document for information about operating systems that the DSC Module Run-Time System supports.Installing the DSC Module Run-Time SystemComplete the following steps to install the DSC Module Run-Time System.1.Log in to the computer as an administrator or as a user with administrative privileges.2.Install the DSC Module Run-Time System from the LabVIEW 2012 DSC Module Run-Time System installation media.3.Follow the instructions that appear on the screen.NoteIf you install the DSC Module Run-Time System on a Touch Panel computer,National Instruments recommends that you do not install the Shared VariableLogging Supportcomponent unless you need to log data to the Touch Panelcomputer. Logging data consumes resources, such as memory and disk space, thatyou may want to reserve for other uses. If you do not install the Shared VariableLogging Support component, you still can use the Touch Panel computer to viewlogged data on other computers.4.Restart the computer.Configuring the Microsoft SQL ServerThe DSC Module requires the Microsoft SQL Server 2005 Express Edition (SQL Express). This component is installed by default when you install the DSC Module. During the installation process, the DSC Module installer creates an instance of SQL Express named CITADEL. To prevent unauthorized access to SQL Express, the installer also generates a password for the default SQL Express administrator sa. The default password is the computer ID.Complete the following steps to find the computer ID using the NI License Manager.unch the NI License Manager by selecting Start»All Programs»National Instruments»NI License Manager.2.Click the Display Computer Information button on the toolbar.The DSC Module installer enables a mixed security mode on existing SQL Servers. If the target computer does not have an SQL Server installed, the DSC Module installer installs SQL Express in the mixed security mode.Use the following command line prompt to change the default password for the sa user: Sqlcmd -S"localhost\CITADEL" -U"sa" -P"COMPUTER_ID" -Q"sp_password 'COMPUTER_ID', 'NEW_PASSWORD', 'sa'"If the mixed security mode is not acceptable, change both the SQL Express and Citadel login modes. You must set the registry DWORD values HKEY_LOCAL_MACHINE\SOFTWARE\ Microsoft\MSSQLServer\MSSQLServer\LoginMode and HKEY_LOCAL_MACHINE\ SOFTWARE\National Instruments\Citadel\5.0\IntegratedSecurity to 1. National Instruments recommends that you change the login mode immediately after you install the DSC Module. Otherwise, you must relink all existing Citadel databases. Restart theSQL Express and Citadel services in order for changes to take effect. If you use integrated NT security, you might need to configure the server machine and all clients explicitly.(MSDE2000), not SQL Express. If you are upgrading from the DSC Module 8.2, anyexisting databases continue to use MSDE 2000 for alarm logging, but new databasesyou create use SQL Express. If you detach an existing database from the DSCModule and then reattach the database, the DSC Module migrates the database toSQL Express.6||LabVIEW DSC Module Release and Upgrade NotesYou might want to uninstall MSDE 2000 after installing the DSC Module2012. Complete the following steps to uninstall MSDE 2000.1.Stop all running processes in the NI Distributed System Manager.2.Open Measurement & Automation Explorer (MAX) and select My System»HistoricalData»Citadel 5 Universe from the Configuration tree.3.On the Databases page, detach all databases from the local computer.4.Open the Windows Control Panel and uninstall MSDE 2000.5.Restart the computer.6.Open MAX and reattach all databases.Where to Go from HereNational Instruments provides many resources to help you succeed with your NI products. Use the following resources as you start exploring the DSC Module.•Getting Started with the LabVIEW Datalogging and Supervisory Control Module—Use this manual, located in the labview\manuals directory, to familiarize yourself with some of the features that the DSC Module adds to LabVIEW.•DSC Module Examples—Refer to the DSC Module examples, located in the labview\ examples\lvdsc directory, for examples that demonstrate common tasks using the DSC Module. You also can access these examples in the NI Example Finder by selectingHelp»Find Examples from LabVIEW and browsing or searching for the DSC Module examples.•LabVIEW Help—Available by selecting Help»LabVIEW Help in LabVIEW. Browse the DSC Module book on the Contents tab for an overview of the DSC Module.•Visit /dsc for the latest NI Developer Zone articles, examples, and support information for the DSC Module.•DSC Module Training—Refer to /info and enter the Info Code dsctrn to access online training for the DSC Module.Known IssuesYou can access the software and documentation known issues list online. Refer to the National Instruments website at /info and enter the Info Code LVDSC2012KI for anup-to-date list of known issues in the DSC Module and the DSC Module Run-Time System.LabVIEW DSC Module Release and Upgrade Notes|© National Instruments|7LabVIEW, National Instruments, NI, , the National Instruments corporate logo, and the Eagle logo are trademarks of National Instruments Corporation. Refer to the Trademark Information at /trademarks for other National Instruments trademarks. Other product and company names mentioned herein are trademarks or trade names of their respective companies. For patents covering National Instruments products/technology, refer to the appropriate location: Help»Patents in your software, the patents.txt file on your media, or the National Instruments Patents Notice at /patents. You can find information about end-user license agreements (EULAs) and third-party legal notices in the LabVIEW Datalogging and Supervisory Control Module Readme. Refer to the Export Compliance Information at /legal/ export-compliance for the National Instruments global trade compliance policy and how to obtain relevant HTS codes, ECCNs, and other import/export data.© 2012 National Instruments. All rights reserved.374128H-01Jun12。

LabVIEW入门指南从零开始学习LabVIEW基础知识LabVIEW入门指南:从零开始学习LabVIEW基础知识LabVIEW(Laboratory Virtual Instrument Engineering Workbench)是一种图形化编程语言和开发环境,用于数据采集、仪器控制和实验室自动化。
本篇文章将为您提供一个关于LabVIEW入门的指南,从零开始学习LabVIEW的基础知识。
以下是LabVIEW的一些基本概念和使用技巧:一、LabVIEW的介绍LabVIEW是一套强大而灵活的工具,通过它可以轻松地实现各种实验室测量与控制任务。
它采用了一种称为G语言的图形化编程语言,使得开发者能够通过拖放和连接图标来创建程序。
由于图形化的特性,使得编程变得更加直观和易于理解,无论是对于初学者还是有经验的开发者来说都非常友好。
二、LabVIEW的安装与配置在开始使用LabVIEW之前,您需要先进行软件的安装和配置。
您可以从National Instruments官方网站上下载并安装适合您操作系统的版本。
在安装完成后,您需要按照向导进行设置和配置,包括选择语言、设置控制面板等。
完成以上步骤后,您就可以开始编写和运行LabVIEW程序了。
三、LabVIEW的基本元素在LabVIEW中,程序由一系列称为"虚拟仪器"(Virtual Instruments,简称VI)的模块组成。
每个VI都包含了一组输入和输出信号,类似于真实世界中的仪器。
通过连接各个VI,您可以构建一个完整的LabVIEW程序。
在VI中,有几个常见的基本元素需要了解:1. 控件:用于接收用户输入或显示程序输出。
例如,按钮、开关、图表等。
2. 指示灯:用于显示程序的状态或结果。
例如,LED灯、数字显示器等。
3. 结构化图标:用于控制程序的流程和结构。
例如,循环结构、选择结构等。
4. 数据线:用于连接不同的元素,传递数据和信号。
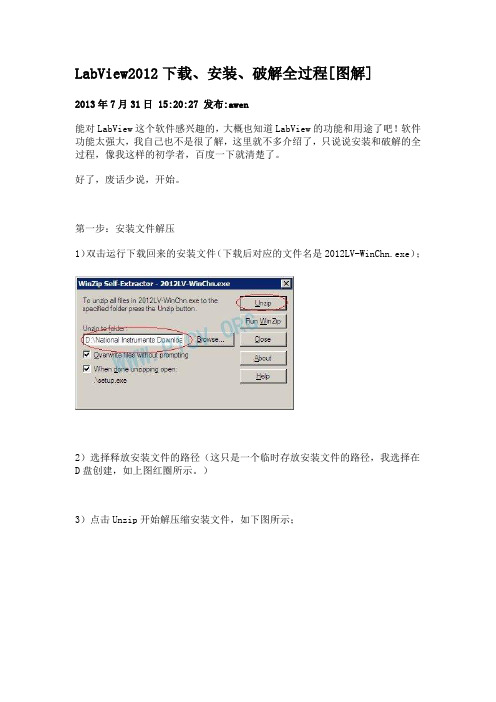
LabView2012下载、安装、破解全过程[图解]2013年7月31日 15:20:27 发布:awen能对LabView这个软件感兴趣的,大概也知道LabView的功能和用途了吧!软件功能太强大,我自己也不是很了解,这里就不多介绍了,只说说安装和破解的全过程,像我这样的初学者,百度一下就清楚了。
好了,废话少说,开始。
第一步:安装文件解压1)双击运行下载回来的安装文件(下载后对应的文件名是2012LV-WinChn.exe);2)选择释放安装文件的路径(这只是一个临时存放安装文件的路径,我选择在D盘创建,如上图红圈所示。
)3)点击Unzip开始解压缩安装文件,如下图所示;第二步:安装.NET 4.01)解压完成后,安装程序会自动运行,如果本机没有安装.net4框架,就会自动提示安装,选择“确定”进行安装;2)按下图红圈的选择进行安装;3)下图为.NET4安装过程,请耐心等待;4).NET4安装完毕,点击“完成”按钮;第三步:安装LabView20121).NET4安装完成后,LabView2012安装程序会自动运行,如下图;2)点击“下一步”继续安装;3)输入用户信息后点击“ 下一步”继续安装;4)此时会要求输入序列号,如下图;5)运行NI License Activato,如下图;6)在NI License Activato菜单中依次选择Options→Generate Serial Number…7)复制弹出窗口中的序列号8)回到LabView安装程序中,在序列号输入页面的第一个框中填入刚才复制的序列号,第二个框留空,点击“下一步”继续安装;9)选择安装目录(我选择安装到D盘,如下图所示),点击“下一步”继续安装;10)按需要选择安装组件,没特别要求的,默认就好,点击“下一步”继续安装;11)为节省安装时间,把下图红圈中的选中状态去掉,点“下一步”继续;12)一如既往的选择接受协议,然后点击“下一步”继续;13)点击“下一步”开始安装;14)这个时间比较漫长,找点零食啃啃消磨时间;15)好了,经过耐心的等待,终于安装完成了,点击“不需要支持”;16)点击“下一步”正式完成安装;17)选择“取消”18)选择“否”19)完成,重新启动电脑。

labview教程LabVIEW是一款强大的图形化编程软件,用于实时数据采集、仪器控制、测量设备、数据处理和分析等应用。
本教程将带你快速入门LabVIEW,介绍一些基本操作和常用功能。
1. 下载和安装LabVIEW软件- 前往官方网站下载最新版本的LabVIEW软件,并按照提示进行安装。
2. 打开LabVIEW并创建一个新的VI(Virtual Instrument)- 打开LabVIEW软件后,点击菜单栏上的"File",选择"New VI"。
- 这将在编辑器中创建一个新的虚拟仪器。
3. LabVIEW界面介绍- LabVIEW的界面主要由菜单栏、工具栏、面板和编辑区组成。
- 菜单栏提供各种功能和选项,例如文件操作、编辑、调试和运行。
- 工具栏包含了常用的操作工具,例如选择、连线和调节大小等。
- 面板是VI的前端界面,用于显示和操作数据。
- 编辑区是VI的主要工作区域,用于构建程序逻辑和连接各种功能模块。
4. 基本操作和函数- 拖拽控件和函数:在工具栏中选择需要的控件或函数,拖拽到面板或编辑区中。
- 连线功能模块:使用鼠标从一个输出端口拖拽线条到另一个输入端口,将功能模块串联起来。
- 配置控件和函数:右键点击控件或函数,选择"Properties"或"Configure"进行参数设置。
- 调试和运行程序:点击编辑器中的运行按钮,或按下快捷键Ctrl+R,运行程序并查看结果。
5. 数据采集和显示- 使用数据采集模块:LabVIEW提供了丰富的数据采集函数和工具,用于连接和读取各种传感器、仪器和设备。
- 配置数据显示:选择适当的图表或指示器,配置其参数和样式,将采集的数据显示在界面上。
6. 仪器控制和操作- 使用仪器控制模块:LabVIEW支持与各种仪器进行通信和控制,例如示波器、多用途数据采集卡等。
- 配置仪器控制:选择合适的仪器控制函数,配置通信接口和命令参数,实现对仪器的操作和控制。
