lazarus教程
- 格式:pdf
- 大小:447.26 KB
- 文档页数:9
华为⼿机内核代码的编译及刷⼊教程【通过魔改华为P9AndroidKernel对抗反调试机制】0x00 写在前⾯攻防对⽴。
程序调试与反调试之间的对抗是⼀个永恒的主题。
在安卓逆向⼯程实践中,通过修改和编译安卓内核源码来对抗反调试是⼀种常见的⽅法。
但⽹上关于此类的资料⽐较少,且都是基于AOSP(即"Android 开放源代码项⽬",可以理解为原⽣安卓源码)进⾏修改,然后编译成⼆进制镜像再刷⼊Nexus 或者Pixel 等⾕歌亲⼉⼦⼿机。
但因为⾕歌的亲⼉⼦在国内没有⾏货销售渠道,市场占有率更多的是国产⼿机,⽽修改国产⼿机系统内核的教程却很少,加之部分国产⼿机的安卓内核和主线 AOSP 存在些许差异,照搬原⽣安卓代码的修改⽅法⽆法在国产⼿机上实现某些功能,甚⾄⽆法编译成功。
所以本⽂以某国产⼿机为例,通过研究其内核源码,对关键代码进⾏分析、修改,编译内核、打包成刷机镜像,对全过程予以展⽰。
0x01 常见反调试⼿段及对抗策略简介在安卓程序的开发过程中,反调试的⼿段有很多种,简单列举若⼲:(1) 检测特定进程或端⼝号。
如 IDA Pro 在对安卓应⽤进⾏调试时,需要在⼿机端启动调试程序 android_server ,该调试程序默认开启端⼝23946。
⽬标程序若发现⼿机⾥有 android_server 进程或开启了端⼝23946,⽬标程序就⾃动退出,以达到反调试的⽬的。
(2)检测某些关键⽂件的状态。
如⽬标程序在调试状态时,Linux内核会向部分系统⽂件内写⼊⼀些进程状态信息,包括但不限于向 “ /proc/⽬标程序pid/status ” 这⼀⽂件的 TracerPid 字段写⼊调试进程的 pid 。
有部分程序会检查这些字段,⽐如⽬标程序发现对应的 TracerPid 不等于 0 ,则说明⾃⼰本⾝正在被别的程序调试,⽐如:(Pid为19707的进程正在被Pid为24741的进程调试)(3)检测软件断点。

lazarus pas2js 例子Lazarus Pas2JS示例简介Lazarus Pas2JS是一种能够将Delphi/Pascal代码转换为JavaScript的工具,使开发者能够在Web上运行原本为桌面应用程序设计的代码。
这种技术可以使软件开发者更方便地将现有的Delphi/Pascal代码迁移到Web平台上,以提供在线应用的功能。
通过Lazarus Pas2JS,开发者可以利用现有的Delphi/Pascal代码基础来创建交互式的Web应用程序。
它提供了丰富的功能和库,使开发者能够轻松地实现用户界面和数据交互等功能。
通过这个工具,开发者可以在不改变原始代码的情况下,使用Web技术来部署应用程序并实现跨平台的兼容性。
下面是一个简单的Lazarus Pas2JS示例,展示了如何在Web中创建一个简单的计算器应用程序:```program Calculator;useswebtypes, w3c.utils, w3c.dom;typeTCalculator = classprivateFNumber1: Integer;FNumber2: Integer;FResult: Integer;publicconstructor Create;procedure Add;procedure Subtract;procedure Multiply;procedure Divide;procedure UpdateResultElement; end;constructor TCalculator.Create; beginFNumber1 := 0;FNumber2 := 0;FResult := 0;end;procedure TCalculator.Add;beginFResult := FNumber1 + FNumber2; UpdateResultElement;end;procedure TCalculator.Subtract; beginFResult := FNumber1 - FNumber2;UpdateResultElement;end;procedure TCalculator.Multiply;beginFResult := FNumber1 * FNumber2;UpdateResultElement;end;procedure TCalculator.Divide;beginif FNumber2 <> 0 thenFResult := FNumber1 div FNumber2elseFResult := 0;UpdateResultElement;end;procedure TCalculator.UpdateResultElement;varResultElement: JElement;beginResultElement := document.getElementById('result');ResultElement.innerHTML := IntToStr(FResult); end;varCalculator: TCalculator;procedure OnAddButtonClick(Sender: TObject); beginCalculator.Add;end;procedure OnSubtractButtonClick(Sender: TObject); beginCalculator.Subtract;end;procedure OnMultiplyButtonClick(Sender: TObject); beginCalculator.Multiply;end;procedure OnDivideButtonClick(Sender: TObject); beginCalculator.Divide;end;procedure Initialize;varAddButton, SubtractButton, MultiplyButton, DivideButton: JElement;beginCalculator := TCalculator.Create;AddButton := document.getElementById('addButton');SubtractButton := document.getElementById('subtractButton');MultiplyButton := document.getElementById('multiplyButton');DivideButton := document.getElementById('divideButton');AddButton.addEventListener('click', @OnAddButtonClick);SubtractButton.addEventListener('click', @OnSubtractButtonClick);MultiplyButton.addEventListener('click', @OnMultiplyButtonClick);DivideButton.addEventListener('click', @OnDivideButtonClick);end;beginInitialize;end.```上述示例展示了一个简单的计算器应用程序,用户可以在网页上输入两个数字,然后选择加法、减法、乘法或除法操作,并点击对应的按钮进行计算。


第一章游戏概述课程名称:游戏概述本次授课内容:游戏的含义、特点及地位授课教师姓名:岳玉阁职称:讲师所在教学单位:教育系授课对象:09级学前教育授课时数:6课时授课周次:3周课程类别:专业基础课授课方式(讲课实验实习设计):讲课教材名称及版本:《学前儿童游戏教程》复旦大学出版社2006年版本单元或章节的教学目的与要求1.通过对游戏的经典学说的学习,能够对游戏有一个初步的认识。
2.掌握儿童游戏的特征。
3.理解儿童游戏在幼儿园中的重要地位。
4.了解儿童游戏的分类。
授课主要内容及学时分配1.游戏的经典学说的学习2.儿童游戏的特征。
3.儿童游戏在幼儿园中的重要地位。
4.儿童游戏的分类。
重点、难点及对学生的要求(掌握、熟悉、了解、自学)1.游戏的经典学说。
2.儿童游戏的特征。
辅助教学情况(多媒体课件、板书、绘图、标本、示教等)多媒体课件复习思考题思考题:你比较赞同哪一种关于游戏含义的观点,为什么?你认为游戏应该怎样界定?说说你的看法参考教材(资料)1.翟理红主编《学前儿童游戏教程》复旦大学出版社,2006,9.2.邱学青《学前儿童游戏》江苏教育出版社,2005,8.3.华爱华《幼儿游戏理论》上海教育出版社,2004,7.第一节游戏的定义游戏是一种广泛存在的社会生活现象,在大街小巷我们到处可见玩耍的儿童。
有了人类就有了游戏,游戏随着人类社会的持续进步而不断发展,人们从不同的角度关注着儿童游戏的行为,许多心理学家和教育学家都提出了自己的游戏理论。
由于他们研究的角度和对象不同,因此,对游戏的本质作了种种不同的解释。
又由于他们所处的时代和心理学发展水平不同,因而形成了各种不同学派的游戏理论。
在这里,我们采用国外经典的游戏理论来了解游戏。
19世纪下半叶到20世纪30年代左右,是儿童游戏研究的初兴阶段。
在这一阶段出现了最早的一批游戏理论,被称为“经典的游戏理论”。
下面我们逐一来介绍。
一、剩余精力说代表人物:德国思想家、诗人席勒(J.C.F.Schiller)和英国社会学家、心理学家斯宾塞(H.Spencer)。
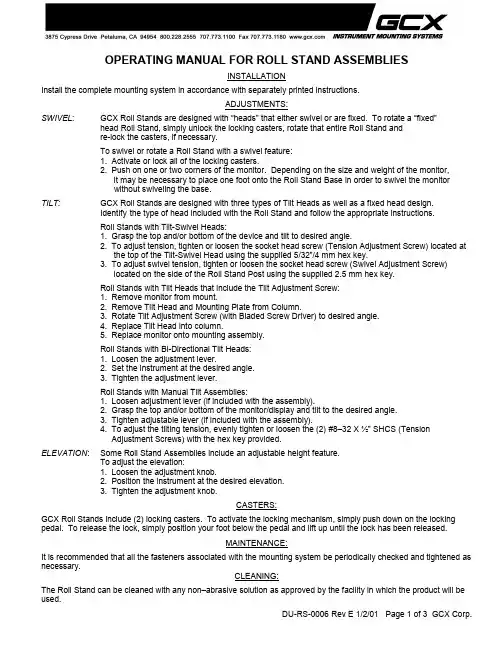
OPERATING MANUAL FOR ROLL STAND ASSEMBLIESINSTALLATIONInstall the complete mounting system in accordance with separately printed instructions.ADJUSTMENTS:SWIVEL: GCX Roll Stands are designed with “heads” that either swivel or are fixed. To rotate a “fixed”head Roll Stand, simply unlock the locking casters, rotate that entire Roll Stand andre-lock the casters, if necessary.To swivel or rotate a Roll Stand with a swivel feature:1. Activate or lock all of the locking casters.2. Push on one or two corners of the monitor. Depending on the size and weight of the monitor,it may be necessary to place one foot onto the Roll Stand Base in order to swivel the monitorwithout swiveling the base.TILT: GCX Roll Stands are designed with three types of Tilt Heads as well as a fixed head design.Identify t he type of head included with the Roll Stand and follow the appropriate instructions.Roll Stands with Tilt-Swivel Heads:1. Grasp the top and/or bottom of the device and tilt to desired angle.2. To adjust tension, tighten or loosen the socket head screw (Tension Adjustment Screw) located atthe top of the Tilt-Swivel Head using the supplied 5/32”/4 mm hex key.3. To adjust swivel tension, tighten or loosen the socket head screw (Swivel Adjustment Screw)located on the side of the Roll Stand Post using the supplied 2.5 mm hex key.Roll Stands with Tilt Heads that include the Tilt Adjustment Screw:1. Remove monitor from mount.2. Remove Tilt Head and Mounting Plate from Column.3. Rotate Tilt Adjustment Screw (with Bladed Screw Driver) to desired angle.4. Replace Tilt Head into column.5. Replace monitor onto mounting assembly.Roll Stands with Bi-Directional Tilt Heads:1. Loosen the adjustment lever.2. Set the instrument at the desired angle.3. Tighten the adjustment lever.Roll Stands with Manual Tilt Assemblies:1. Loosen adjustment lever (if included with the assembly).2. Grasp the top and/or bottom of the monitor/display and tilt to the desired angle.3. Tighten adjustable lever (if included with the assembly).4. To adjust the tilting tension, evenly tighten or loosen the (2) #8–32 X ½” SHCS (TensionAdjustment Screws) with the hex key provided.ELEVATION: Some Roll Stand Assemblies include an adjustable height feature.To adjust the elevation:1. Loosen the adjustment knob.2. Position the instrument at the desired elevation.3. Tighten the adjustment knob.CASTERS:GCX Roll Stands include (2) locking casters. To activate the locking mechanism, simply push down on the locking pedal. To release the lock, simply position your foot below the pedal and lift up until the lock has been released.MAINTENANCE:It is recommended that all the fasteners associated with the mounting system be periodically checked and tightened as necessary.CLEANING:The Roll Stand can be cleaned with any non–abrasive solution as approved by the facility in which the product will be used.OPERATING MANUAL FOR ROLL STAND ASSEMBLIESAttach roll stand post to the base using the 5/16”-18 X ¾” bolt, split lock washer, and the 5/16” flat washer provided: Roll Stand PostRoll Stand Base5/16” X 2” Flat Washer (1)5/16”-18 X 3/4” Bolt (1)Optional:Counter Weight fits around Core of Roll Stand Base.Carefully lean the Post onto the floor, exposing the undersideof the Base.Place the Counter Weight onto the core of the Base. The CounterWeight has been machined to fit snugly onto the core detail.Secure the Counter Weight using the 5/16”-18 x 2” HHCS andfender washer provided. Firmly tighten this bolt.Split Lock Washer (1)OPERATING MANUAL FOR ROLL STAND ASSEMBLIES – TILT ADJUSTMENTSRoll Stands with Tilt-Swivel HeadMounting Plate Tilt Swivel HeadTilt AdjustmentScrewSwivel Adjustment Screw。
开发利器 Lazarus 入门级别: 初级曹江华 (goodcjh1@ ), 自由撰稿人 2003 年 5 月 10 日Lazarus 是一个用于Free Pascal 的快速应用开发(RAD )的面向对象的Pascal 集成开发环境(IDE )。
Lazarus 是一个用于Free Pascal 的快速应用开发(RAD )的面向对象的Pascal 集成开发环境(IDE )。
Lazarus 对于窗口管理来说是中性的。
可以工作在KDE (1.13版本)下,也可以工作在GNOME (1.23版本)或其他窗口管理器(MVM 、WindowMaker )。
Lazarus 的设计目标是应用Free Pascal ,所以所有凡是Free Pascal 能运行的平台,Lazarus 也可以运行。
最新版本能运行于Linux ,Win9x/2000/xp 和FreeBSD 。
Lazarus 的工作界面、外观和操作和Borland 的Delphi IDE 非常相似,所不同的是Lazarus 是完全的自由软件。
Lazarus 可以直接移植Delphi 的代码。
Lazarus 的编程语言是以Pascal 为基础的。
Pascal 语言具有可读性好、编写容易的特点,这使得它很适合作为基础的开发语言。
同时,使用编译器创建的应用程序只生成单个可执行文件(.EXE),正是这种结合,使得Pascal 成为Lazarus 这种先进开发环境的编程语言。
在Linux 中,Lazarus 的图形用户接口(GUI) 由以下几个部分组成:• 窗口系统--组织显示屏上的图形输出并执行基本的文本和绘图功能。
• 窗口管理器--负责对窗口的操作(比如最小化、最大化、关闭按钮的形状,窗口边框外观等)以及输入焦点的管理。
•工具包--带有明确定义的编程界面的常规库。
Lazarus 对系统软件、硬件要求都不高:硬件方面:Intel Pentium 200MHz 、32MB 内存、100MB 硬盘空间。
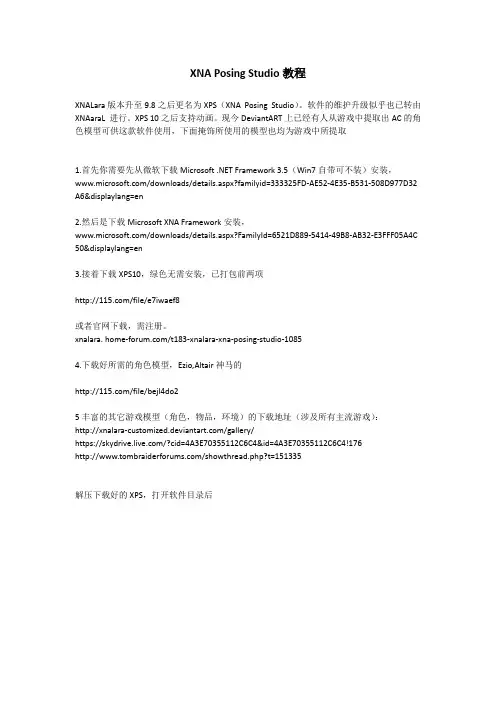
XNA Posing Studio教程XNALara版本升至9.8之后更名为XPS(XNA Posing Studio)。
软件的维护升级似乎也已转由XNAaraL 进行。
XPS 10之后支持动画。
现今DeviantART上已经有人从游戏中提取出AC的角色模型可供这款软件使用,下面掩饰所使用的模型也均为游戏中所提取1.首先你需要先从微软下载Microsoft .NET Framework 3.5(Win7自带可不装)安装,/downloads/details.aspx?familyid=333325FD-AE52-4E35-B531-508D977D32 A6&displaylang=en2.然后是下载Microsoft XNA Framework安装,/downloads/details.aspx?FamilyId=6521D889-5414-49B8-AB32-E3FFF05A4C 50&displaylang=en3.接着下载XPS10,绿色无需安装,已打包前两项/file/e7iwaef8或者官网下载,需注册。
xnalara. /t183-xnalara-xna-posing-studio-10854.下载好所需的角色模型,Ezio,Altair神马的/file/bejl4do25丰富的其它游戏模型(角色,物品,环境)的下载地址(涉及所有主流游戏):/gallery/https:///?cid=4A3E70355112C6C4&id=4A3E70355112C6C4!176/showthread.php?t=151335解压下载好的XPS,打开软件目录后把下载下来的角色模型解压后放到data这这个文件夹,这里我用的是Ezio和Christina 软件界面是英文的,暂时没有汉化,将就点选择file->add model,就可以看见之前放在data下的模型,这里我们选择ezio很酷,是吧,用鼠标左键试着移动一下,各个角度都是可见的,鼠标滚轮可以放大下面我们来说一下软件怎么使用,首先model这项是模型,也就是你导入了多少个模型,这里就分别有多少个模型可选然后pos,这是模型的坐标值,分别对应XYZ轴,试着输入一下感觉不同的位置变化Scale是模型大小右边的滑块区域是调整身体的各个部位的位置用的,分别对应XYZ轴,height是模型的离地高度,默认是零,一般不用调整。
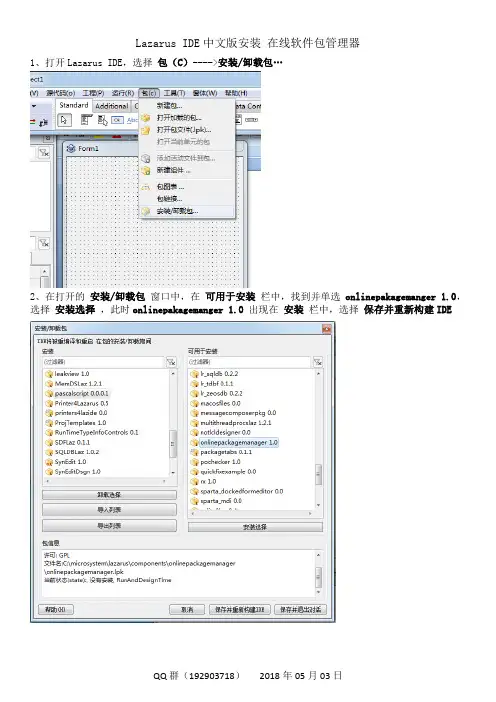
Lazarus IDE中文版安装在线软件包管理器
1、打开Lazarus IDE,选择包(C)---->安装/卸载包…
2、在打开的安装/卸载包窗口中,在可用于安装栏中,找到并单选onlinepakagemanger 1.0,选择安装选择,此时onlinepakagemanger 1.0出现在安装栏中,选择保存并重新构建IDE
3、在打开的确认新包设置对于IDE窗口中,选择继续,等待自动编译完成
4、编译完成后,在Lazarus IDE中包(C)下出现在线软件包管理器,选择并单击在线软件包管理器
5、在打开的在线软件包管理器窗口中,即可选择任意软件包单击下面的安装按键进行在线软件包安装
6、卸载方法,同以上相反。
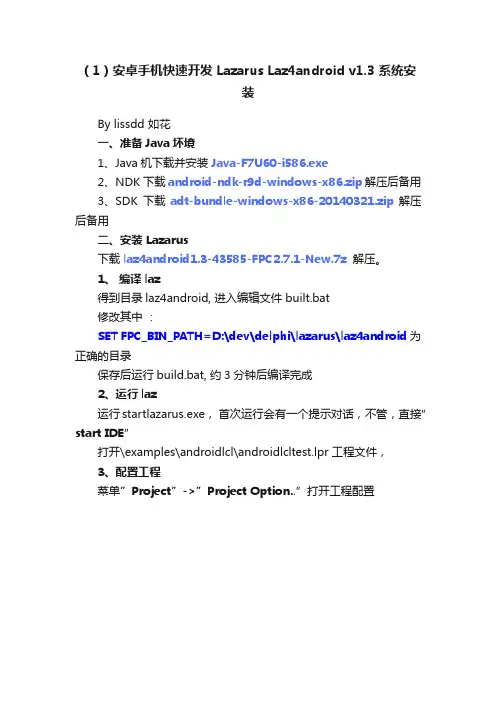
(1)安卓手机快速开发 Lazarus Laz4android v1.3 系统安装By lissdd 如花一、准备Java坏境1、Java机下载并安装Java-F7U60-i586.exe2、NDK下载android-ndk-r9d-windows-x86.zip解压后备用3、SDK下载adt-bundle-windows-x86-20140321.zip解压后备用二、安装 Lazarus下载laz4android1.3-43585-FPC2.7.1-New.7z解压。
1、编译laz得到目录laz4android, 进入编辑文件 built.bat修改其中:SET FPC_BIN_PATH=D:\dev\delphi\lazarus\laz4android为正确的目录保存后运行build.bat, 约3分钟后编译完成2、运行laz运行startlazarus.exe,首次运行会有一个提示对话,不管,直接”start IDE”打开\examples\androidlcl\androidlcltest.lpr 工程文件,3、配置工程菜单”Project”->”Project Option..”打开工程配置图一、工程配置点击“Librariyes”路径设置如图一找到第二步已经解压好的NDK目录,点击“Delete Invalid Paths”删除无效路径,加入新路径:android-ndk-r9d\toolchains\arm-linux-androideabi-4.6\prebuilt\windows\lib\gcc\arm-linux-androideabi\4.6和android-ndk-r9d\platforms\android-8\arch-arm\usr\lib如图二红线圈出部分图二、设置NDK路径该新路径根据个人NDK版本选择有所变化设置目标平台左下角的Config and Target右边一定要把Target OS (默认为Linux,害我2个小时),拉选为“android”如图三红线圈出部分,否则编译时会得到如下错误:“Fatal: cannot find unit system used by fcllaz of package FCL"图三、设置编译目标4、编译例子“OK”确定配置后, 就可以shift + F9 等待不到一分钟后,就可以在目录:\examples\androidlcl\android\libs\armeabi 下发现编译成的liblclapp文件,但不知为何没有扩展名, 加上.so吧,阿门!图四、成功编译5、制作APK包(1)生成Key:修改\examples\androidlcl\android\generate_debug_key.bat中的路径为本地正确路径我的为:SET PATH=D:\dev\delphi\lazarus\adt-bundle-windows-x86-20140321\sdk\tools\;D:\dev\delphi\lazarus\adt-bundle-windows-x86-20140321\sdk\platform-tools\;C:\ProgramFiles\Java\jdk1.7.0_60\bin\SET APP_NAME=androidlcltestSET ANDROID_HOME=D:\dev\delphi\lazarus\adt-bundle-windows-x86-20140321\sdkSET APK_SDK_PLATFORM=D:\dev\delphi\lazarus\adt-bundle-windows-x86-20140321\sdk\platforms\android-19 SETAPK_PROJECT_PATH=D:\dev\delphi\lazarus\laz4android\exampl es\androidlcl\android运行时要求输入密码,记住,下次要用的图五、生成Key 需要填写密码等运行生成\bin\LCLDebugKey.keystore文件(2)、打包生成APK用批处理文件\examples\androidlcl\android\build_debug_apk.bat ,但它调用了apkbuilder.bat 和dx.bat会引起版本不同找不到apkbuilder.jar等问题,故改用网友truetom 提供的build_debug_apk.bat ,他用鸟语说该文件:In this batch file, as you saw , my batch file is not called apkbuilder.bat and dx.bat.So it can used to any version of Andrid SDK即:无版本问题,适用各种版本的SDK哦!再次感谢鸟语鸟人网友truetom 在论坛中提供的build_debug_apk.bat其中有一行:jarsigner -verbose -keystore bin\LCLDebugKey.keystore -keypass123456-storepass123456-signedjar bin\%APP_NAME%-unaligned.apk bin\%APP_NAME%-unsigned.apk LCLDebugKey蓝色的123456即刚才生成Key时第(1)步generate_debug_key.bat运行时要求你输入的密码,修改到一致。
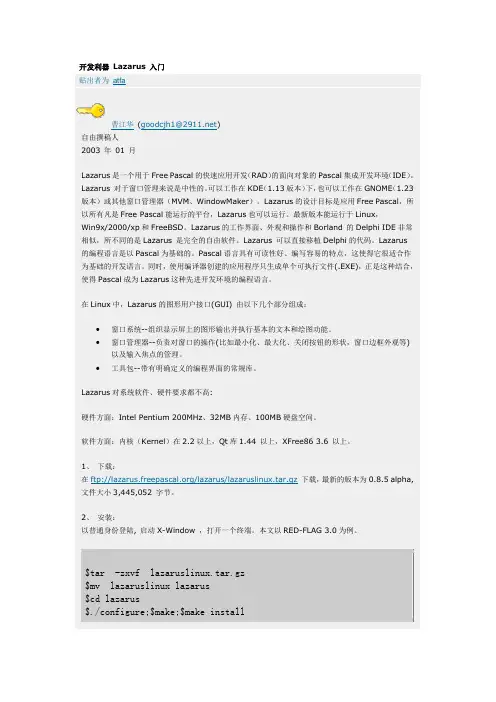
开发利器Lazarus 入门lazarus的旧标识图-2 lazarus的启动标志4、功能简介图-3 lazarus 功能标注1)、主菜单括File、Edit、Serach、View、Project、Run、Tools、Environment、Help 九个子菜单选项。
2)、信息窗口(Message View)信息窗口在代码浏览器窗口和代码编辑器窗口的下部,在编译和链接过程中出现的一些信息将显示在信息窗口中。
3)、Object Inspector(对象编辑器)对象编辑器的功能是实现对象(尤其是组件)的属性设置,创建事件处理过程并进行管理。
对象编辑器分为下面的三个部分:1.对象列表对象列表是一个组合框,包含了当前窗体上的所有组件。
有时一些组件因为太小或没有明显的标志,利用鼠标点击不容易选中,这时可以利用对象列表组合框来选择该组件。
2.属性页( Properties )属性页中列举了当前被选中的对象(比如说组件)的属性。
可以在程序设计的过程中直接对这些属性进行修改,也可以在程序运行期间通过代码进行修改。
在有些属性的前面有一个带有方框的加号标志,表明该属性是由一些子属性组成的。
点击该加号标志就可以展开该属性,同时加号标志变成了一个带有方框的减号标志。
3.事件页( Event )通常情况下,事件处理过程为空。
可以双击事件右面的组合框来添加事件的处理过程。
如果要共用已存在的事件处理过程,可通过下拉式组合框进行选择。
4)、Syntax Highlighting (语法高亮)5)、Souce Edit Code (代码编辑窗口)代码窗口处于窗体窗口之下。
因为在Lazarus中,设计用户界面直接在窗体中进行,运行结果和设计样板完全一致。
当部件被放到窗体上时,会自动生成大部分的用户界面代码。
您所应做的只是在它为您生成的框架中加入完成所需功能的程序段而已。
点动Form1的状态行使代码窗口可见。
这个窗口中是代码编辑器。
lazarus教程
安庆龙狮中心小学沈宜明如何安装软件
1、从QQ群中下载软件下来
2、双击lazarus-1.0.12-fpc-2.6.2-win32.exe,出现安装界面
3、点击【next】,一路点击next,这样软件就会被安装到你的电脑中。
如何更改成中文界面
安装完成后,我们第一步要做的事情是把软件的界面改成中文。
找到【tool】,选择其中的【options】
在右边的【language】语言里更改系统语言为Chinese中文,这样我们的英文就变成我们熟悉的中文界面了。
如何编辑PASCAL程序
1、选择【文件】菜单,然后单击【新建...... 】
1、
2、在打开的窗口中选择【PROJECT】【程序】,然后点击【确定】。
3、这时出现一个文件,删除其中不需要的代码。
4、可以发挥你的聪明,在其中添加你的代码。
5、保存,选择文件菜单的【另存为】,输入文件名。
如何调试程序
1、如果你的程序没有错误了,那么恭喜你了,在消息窗口中我们就会看见编译成功的信息了。
2、在程序的最后一句最左边添加一个断点,这样程序运行到最后,我们能看到我们程序的运行结果。
3、单击【运行】菜单中的【运行】,或者按F9,系统就会出现程序的运行结果。
4、单击【运行】菜单中的【停止】命令,我们的程序查看窗口消失,我们就可以进一步修改程序,编译,查看,使我们的程序更加完美了!
过这些,大家基本上就可以在lazarus平台上编辑,调试,编译程序了。
Operations ManualMBCMaster Buss Converter1. Read these instructions.2. Keep these instructions.3. Heed all warnings.4. Follow all instructions.5. Do not use this apparatus near water.6. Clean only with a dry cloth.7. Do not block any ventilation openings. Install in accordance with themanufacturer’s instructions.8. Do not install near any heat sources such as radiators, heat registers, stoves, or other apparatus (including amplifiers) that produce heat.9. Do not defeat the safety purpose of the polarized or grounding-typeplug. A polarized plug has two blades with one wider than the other.A grounding-type plug has two blades and a third grounding prong.The wide blade or the third prong are provided for your safety. If theprovided plug does not fit into your outlet, consult an electrician forreplacement of the obsolete outlet.10. Protect the power cord from being walked on or pinched particularly atplugs, convenience receptacles, and the point where they exit from theapparatus.11.12. Use only with a cart, stand, tripod, bracket, orthe apparatus. When a cart is used, use cautionavoid injury from tip-over.13. when unused for long periods of time.14. Refer all servicing to qualified service personnel. Servicing is requiredwhen the apparatus has been damaged in any way, such as power-supply cord or plug is damaged, liquid has been spilled or objects have fallen into the apparatus, the apparatus has been exposed to rain ormoisture, does not operate normally, or has been dropped.15. This apparatus shall not be exposed to dripping or splashing, and noobject filled with liquids, such as vases or beer glasses, shall be placed on the apparatus.16. Do not overload wall outlets and extension cords as this can result in a risk of fire or electric shock.17. This apparatus has been designed with Class-I construction and must be connected to a mains socket outlet with a protective earthingconnection (the third grounding prong).18. This apparatus has been equipped with a rocker-style AC mains power switch. This switch is located on the rear panel and should remainreadily accessible to the user.19. The MAINS plug or an appliance coupler is used as the disconnect device, so the disconnect device shall remain readily operable.20. N OTE: This equipment has been tested and found to comply with the limits for a Class B digital device, pursuant to part 15 of the FCC Rules. These limits are designed to provide reasonable protection against harmful interference in a residential installation. This equipment generates, uses, and can radiate radio frequency energy and, if not installed and used in accordance with the instructions, may cause harmful interference to radio communications. However, there is no guarantee that interference will not occur in a particular installation. If this equipment does cause harmful interference to radio or televisionreception, which can be determined by turning the equipment o and on, the user is encouraged to try to correct the interference by one or more of the following measures:• Reorient or relocate the receiving antenna.• Increase the separation between the equipment and the receiver.• Connect the equipment into an outlet on a circuit different from that to which the receiver is connected.• Consult the dealer or an experienced radio/TV technician for help. CAUTION: Changes or modifications to this device not expressly approved by Rupert Neve Designs LLC, could void the user's authority to operate the equipment under FCC rules.21. This apparatus does not exceed the Class A/Class B (whichever is applicable) limits for radio noise emissions from digital apparatus as set out in the radio interference regulations of the Canadian Department of Communications.ATTENTION — Le présent appareil numérique n’émet pas de bruits radioélectriques dépassant las limites applicables aux appareils numériques de class A/de class B (selon le cas) prescrites dans le réglement sur le brouillage radioélectrique édicté par les ministere des communications du Canada.22. Exposure to extremely high noise levels may cause permanent hearing loss. Individuals vary considerably in susceptibility to noise-induced hearing loss, but nearly everyone will lose some hearing if exposed tosufficiently intense noise for a period of time. The U.S. Government’s Occupational Safety and Health Administration (OSHA) has specifiedthe permissible noise level exposures shown in the following chart. According to OSHA, any exposure in excess of these permissible limitscould result in some hearing loss. To ensure against potentially dangerous exposure to high sound pressure levels, it is recommended that all persons exposed to equipment capable of producing highsound pressure levels use hearing protectors while the equipment is in operation. Ear plugs or protectors in the ear canals or over the ears must be worn when operating the equipment in order to preventpermanent hearing loss if exposure is in excess of the limits set forth here:Important Safety InstructionsThe lightning flash with arrowhead symbol within an equilateral triangle is intended to alert the user to the presence of uninsulated "dangerousvoltage" within the product's enclosure, that may be of sufficient magnitude to constitute a risk of electric shock to persons.Le symbole éclair avec point de flèche à l'intérieur d'un triangle équilatéral est utilisé pour alerter l'utilisateur de la présence à l'intérieur du coffret de "voltage dangereux" non isolé d'ampleur suffisante pour constituer un risque d'éléctrocution.The exclamation point within an equilateral triangle is intended to alert the user of the presence of important operating and maintenance (servicing) instructions in the literature accompanying the appliance.Le point d'exclamation à l'intérieur d'un triangle équilatéral est employépour alerter les utilisateurs de la présence d'instructions importantes pour le fonctionnement et l'entretien (service) dans le livret d'instruction accompagnant l'appareil.WARNING — To reduce the risk of fire or electric shock, do notexpose this apparatus to rain or moisture.Duration, per day in hours Sound Level dBA, Slow Response Typical Example 890Duo in small club 692495Subway Train3972100 Typical music via head phones 1.51021105Siren at 10 m distance 0.51100.25 or less 115Loudest parts at a rock concertTable of ContentsIntroduction Block DiagramFront PanelRear Panel MBC FeaturesSpecifications Limited Warranty 1 1 2 3 4 6 9Rupert Neve Designs MBC: Master Buss ConverterThank you for purchasing the Rupert Neve Designs Master Buss Converter. We hope you enjoy using this product as much as we have enjoyed designing and building it. The MBC features Class-A analog signal paths, a stereo VCA limiter and AKM Analog-to-Digital conversion.1M B C B l o c k D i a g r a mM B C F r o n t P a n e l231-c o h i g h gM B C R e a r P a n e l345 WMBC Front-Panel FeaturesSample RateThis illuminated tactile switch toggles through the MBC’s available digital output sample rates: 44.1kHz, 48 kHz, 88.2kHz, 96kHz, 176.4kHz, and 192kHz at 24-bit depth resolution. In addition, there are six corresponding front-panel LEDs that illuminate when their corresponding sample rate is selected.SyncThe SYNC LED will illuminate when Word Clock is enabled and a valid Word Clock signal is detected at the WORD CLOCK IN BNC on the MBC’s rear panel.Word ClockThis illuminated tactile switch enables the WORD CLOCK IN and WORD CLOCK OUT BNC jacks on the MBC rear-panel. When a valid word clock signal is present at the word clock input jack, the SYNC LED will illuminate, the sample rate LED status will update to reflect the incoming word clock rate, and a buffered version of the word clock input signal will be provided at the word clock output BNC jack for word clock daisy-chaining.ADC Calibration (ADC CAL)This illuminated tactile switch toggles through the MBC’s available digital reference calibration standards: -14dBFS, -16dBFS, -18dBFS, and -20dBFS. Each of these digital levels are referenced to +4dBu in the analog domain. In addition, there are four corresponding LEDs that illuminate when their respective reference level is selected. Transformer InThis illuminated tactile switch engages the custom Rupert Neve Designs inter-stage transformer within the MBC’s ana-log signal path. The transformer path is designed to add harmonic character and tonality to the audio path, while still maintaining wide bandwidth, low distortion, and high signal to noise ratio. If more color and transformer saturation is desired, the user can engage the SILK feature.SilkThis illuminated tactile switch toggles through the available SILK transformer saturation modes: OFF, RED, and BLUE. Red Silk adds transformer saturation to the audio path with a high frequency pre-emphasis. Blue Silk adds transformer saturation to the audio path with a low frequency pre-emphasis.TextureThis 31-detent potentiometer controls the amount of SILK transformer saturation added to the analog signal path when TRANSFORMER IN is selected.Limiter InThis illuminated tactile switch engages both channels of the limiter. This enables the user to AB the compressed and uncompressed signal while dialing in the proper compression characteristic for the given source material. LinkThis illuminated tactile switch engages limiter stereo link mode. In stereo link mode, the limiter channel that is actively limiting the input signal the most will control the other channel in order to maintain a properly balanced stereo image. Side-chain High Pass Filter (S/C HPF)The limiter side-chain has a fully-variable 31-detent potentiometer that controls the 12 dB/octave sallen-key high-pass filter. This allows the user to de-emphasize the amount of limiting that takes place on low frequency energy in the source material. The full range of the limiter side-chain high-pass filter is 20Hz to 250Hz.4MBC Front-Panel FeaturesGainThe 31-detent limiter GAIN control allows the user to increase the gain of the input signal until it reaches the level at which the threshold is currently set. If gain is increased beyond the threshold level, the limiter output level will increase at the limiter’s fixed ratio of 10:1 (for every +10dB increase is input level, only +1dB increase in limiter output level). ThresholdThe 31-detent THRESHOLD potentiometer controls the level at which limiting begins in -dBFS scaling. The full range of the threshold control is from -14 dBFS (fully CCW) to OVER (fully CW). The OVER position allows the user to have the limiter engaged without incurring any limiting. This way, the user can more precisely control the point at which limiting occurs as they bring the limiter threshold down to the desired ceiling level below 0 dBFS.ReleaseThis 31-detent potentiometer controls the limiter RELEASE time within a range of 50mS (fully CCW) to 1S (fully CW). The limiter’s attack time is fixed at 500μS.MBC Rear-Panel FeaturesPowerIEC standard 3-pin grounded AC power inlet with power switch. 100-240VAC 50/60Hz input range with a maximum power consumption of 45W.Line InputsThe MBC has two balanced inputs made available on Neutrik XLR Combo jacks. The input topology is designed to provide excellent Common Mode Rejection and a constant input impedance regardless of whether they are fed from a balanced or unbalanced source.Digital Audio OutputsThe MBC has three available digital output connections: AES3 Balanced, Optical S/PDIF, and Coaxial S/PDIF. All three outputs can be connected simultaneously if needed. The digital output sample rates will follow the sample rate indi-cated on the MBC front panel.Word Clock InThis 75 Ω terminated Word Clock Input BNC jack is made available for synchronizing the MBC to an external Master Clock. When a valid Word Clock signal is connected and the front panel WORD CLOCK switch is selected, the MBC will sync to the incoming rate and adjust its digital outputs accordingly.Word Clock OutWhen the WORD CLOCK front-panel switch is enabled, the MBC will provide a buffered version of the Word Clock Input signal on the Word Clock Output BNC jack. If there is no valid Word Clock Input signal, but the WORD CLOCK front-panel switch is engaged, then the MBC will provide its own internal Master Clock at the Word Clock Output BNC jack. If the WORD CLOCK front-panel switch is not engaged, then there will be no Word Clock Ouput signal.Meter Peak HoldThis dual dipswitch allows the user to adjust the MBC’s meter Peak Hold feature. The left switch turns the Peak Hold feature ON (Up) and OFF (Down), and the right switch toggles between a 1S (Up) and 3S (Down) peak hold time.5MBC Specifications= 40 Ω Balanced XLR Line Input to AES3 Digital Output (Limiter Bypassed) ZSOURCE Impedance 9.9kΩInputCommon Mode Rejection @ 1 kHz 105 dB typicalTransformer-less PathtypicaldB0.025 Frequency Response (20 Hz to 70 kHz)+/-THD+N @1 kHz @ -2 dBFS (10 Hz - 22 kHz BW) 0.0009% typicaltypicaldBFS Noise (BW 10 Hz - 22 kHz)-108 Transformer PathTransformer Frequency Response (20 Hz to 70 kHz)+/- 0.1 dB typical THD+N @1 kHz @ -2 dBFS (10 Hz - 22 kHz BW) 0.002% typicaltypicaldBFS Noise (BW 10 Hz - 22 kHz)-114 Limiter Specifications (Transformer-less Path Selected) Z= 40 Ω BalancedSOURCEtypical0.1dB Frequency Response (20 Hz to 70 kHz)+/-typicaldBFS Noise @ 0 dB Make-Up Gain (10 Hz - 22 kHz BW)-107 Noise @ +20 dB Make-Up Gain (10 Hz - 22 kHz BW)-97dBFStypical Product Dimensions (W x D x H) 19” (48.3 cm) x 9” (22.9 cm) x 1.65” (4.2 cm) Shipping Dimensions (L x W x H) 24” (61 cm) x 13” (33 cm) x 4” (10.2 cm) Shipping Weight 10 lbs. (4.5 kg)67M B C F r e q u e n c y R e s p o n s e - T r a n s f o r m e r -l e s s v s . T r a n s f o r m e r (192k H z S R )This page intentionally left blankPRODUCT WARRANTYRupert Neve Designs warrants this product to be free from defects in materials and workmanship for a period of three (3) years from date of purchase, and agrees to remedy any defect identified within such three year period by, at our option, repairing or replacing the product.LIMITATIONS AND EXCLUSIONSThis warranty, and any other express or implied warranty, does not apply to any product which has been improperly installed, subjected to usage for which the product was not designed, misused or abused, damaged during shipping, damaged by any dry cell battery, or which has been altered or modified in any way. This warranty is extended to the original end user purchaser only. A purchase receipt or other satisfactory proof of date of original purchase is required before any warranty service will be performed. THIS EXPRESS, LIMITED WARRANTY IS IN LIEU OF ALL OTHER WARRANTIES, EXPRESS OR IMPLIED, TO THE EXTEND ALLOWED UNDER APPLICABLE STATE LAW. IN NO EVENT SHALL RUPERT NEVE DESIGNS BE LIABLE FOR ANY SPECIAL, INCIDENTAL, OR CONSEQUENTIAL DAMAGES RESULTING FROM THE USE OF THIS PRODUCT. Some states do not allow the exclusion or limitation of consequential damages or limitations on how long an implied warranty lasts, so this exclusion may not apply to you.WARRANTY SERVICEIf you suspect a defect in this product, please call us at 512-847-3013 or contact our support staff (service@rupertneve. com) for troubleshooting. I f it is determined that the device is malfunctioning, we will issue a Return Material Authorization and provide instructions for shipping the device to our service department.Rupert Neve DesignsPO Box 1969Wimberley TX 78676tel: +1 512-847-3013fax: +1 512-847-8869775-00039 Rev B。
masa blazor itemclass用法下载提示:该文档是本店铺精心编制而成的,希望大家下载后,能够帮助大家解决实际问题。
文档下载后可定制修改,请根据实际需要进行调整和使用,谢谢!本店铺为大家提供各种类型的实用资料,如教育随笔、日记赏析、句子摘抄、古诗大全、经典美文、话题作文、工作总结、词语解析、文案摘录、其他资料等等,想了解不同资料格式和写法,敬请关注!Download tips: This document is carefully compiled by this editor. I hope that after you download it, it can help you solve practical problems. The document can be customized and modified after downloading, please adjust and use it according to actual needs, thank you! In addition, this shop provides you with various types of practical materials, such as educational essays, diary appreciation, sentence excerpts, ancient poems, classic articles, topic composition, work summary, word parsing, copy excerpts, other materials and so on, want to know different data formats and writing methods, please pay attention!MASA Blazor ItemClass用法Blazor是Microsoft开发的新型Web开发框架,其中的Masa Blazor组件库为开发者提供了丰富的UI组件和工具,使开发过程更加高效和便捷。
第八课字符串8.0字符型数据复习:1、类型:char(有序型)2、定义:var a,b:char;3、占用空间:每个变量占用1个字节。
每个变量只能存放一个字符。
4、每个字符都有唯一对应的ASCII码。
0-9 A-Z a-z48-57 65-90 97-1225、相关函数:(1)Chr(i) 求ASCII码为i的字符(2)Ord(a) 求字符的ASCII玛(3)Pred(a) 求字符的前趋字符(4)Succ(a) 求字符的后继字符8.1字符串类型我们把用两个单引号括起来的一串字符称为字符串。
字符型数据的每个变量只能存放一个字符,我们如何才能保存一个字符串呢?很容易想到的是定义一个基类型为字符型的一维数组来保存。
可是,在一般程序设计语言中,都会有一种专门用于储存和处理字符串的变量类型,其原理和字符型一维数组完全相同,并且定义了一些相应的专用运算命令,因此,使用起来远比字符型一维数组方便。
一、基本概念:1、类型名:sting(有序型)2、定义:var s,st:string; (最大串长为默认的256)var s:string[20]; (指定最大串长为20)3、占用空间:默认256字节,即最大串长256。
如果指定最大串长为20,则占用20个字节。
注意:一个默认串长的字符串变量,哪怕是空串(一个字符都没有),也要占用256个字节的内存空间。
4、引用方法:(1)整体引用:var s,s1:string;1)读入一个串并保存到变量s中:read(inf,s);或readln(inf,s);注意:当前数据行中包括当前数据项在内的后面所有内容都将被作为一个串读入,包括空格。
例如:有输入文件:abc 12 34 1执行完上面语句后,s=’abc 12 34 1’,且读数指针移到最后。
再如:输入文件:12 abc 34 1执行语句read(inf,n,s,m,p);结果为:n=12,s=’abc 34 1’,m、p没有读到值。
Lazarus跨平台编程环境搭建指导Lazarus跨平台编程环境搭建指导⼴西机电⼯业学校信息中⼼耀程哥哥2017年6⽉21⽇⼀、安装前准备安装前需要确认安装环境如下:操作系统:Windows XPSP3、Windows 7 SP1(32位或64位)需要准备的相关源码包和⼯具包:fpc-2.6.2.source.zipx86_64-linux-gnu-4.8.4-glibc-2.19.rar(根据⽬标平台准备)notepad++(编辑器)⼆、安装2.1到/doc/046518d85ebfc77da26925c52cc58bd6318693fa.html 下载最新版本的Lazarus安装包,如lazarus-1.0.12-fpc-2.6.2-win32.exe。
2.2运⾏lazarus-1.0.12-fpc-2.6.2-win32.exe开始安装,安装⽬录根据⾃⼰需要进⾏修改,如D:\Program Files\lazarus。
2.3安装完成后,新建⼀个测试⼯程,是否正常编译。
如果编译成功并⽆错误则安装成功。
三、制作交叉编译器3.1到https:///doc/046518d85ebfc77da26925c52cc58bd6318693fa.html/projects/freepascal/files/Source/下载与当前安装的lazarus的fpc版本对应源码包,如当前安装的Fpc版本为2.6.2,则下载fpc-2.6.2.source.zip。
3.2根据⽬标平台准备好相关可在Windows下运⾏的交叉编译⼯具链。
以⽬标平台为x86_64的Linux为例,对应的交叉⼯具链为x86_64-linux-gnu-4.8.4-glibc-2.19。
3.3将fpc源码包解压到D:\Program Files\lazarus\fpc-build;将交叉⼯具链解压到D:\Program Files\lazarus\fpc-build\crosstool。
Lazarus简明使用手册
1介绍
Lazarus是一个免费的使用Freepascal编译器作为后台编译器的pascal集成开发环境。
Lazarus由Pascal编写而成,界面风格类似Delphi,具有强大的程序开发功能。
图一是在运行中的Lazarus:
图一
图中,窗口1是主窗口,窗口2是对象属性窗口,窗口3是源码编辑窗口,窗口4是程序中的窗口布局。
在NOI比赛中,不会用到窗口2和窗口4。
2安装Lazarus
2.1获取Lazarus的RedHat Linux 9.0安装文件
当前版本Lazarus需要的安装文件有三个,它们是:fpc-1.9.8-0.i586.rpm、fpcsrc-1.9.8-050225.i386.rpm、lazarus-0.9.6-fpc_1.9.8_0.i386.rpm,这三个文件的下载地址分别为:
/lazarus/fpc-1.9.8-0.i586.rpm?download
/lazarus/fpcsrc-1.9.8-050225.i386.rpm?downl oad
/lazarus/lazarus-0.9.6-fpc_1.9.8_0.i386.rpm?d
ownload
2.2在RedHat Linux 9.0上安装Lazarus
使用root用户登录Linux,在终端中进入安装文件所在目录,并输入如下命令安装Lazarus。
rpm –Uvh fpc-1.9.8-0.i586.rpm
rpm –Uvh fpcsrc-1.9.8-050225.i386.rpm
rpm –Uvh lazarus-0.9.6-fpc_1.9.8_0.i386.rpm
2.3在RedHat Linux 9.0上安装高版本的gdb
为使Lazarus在RedHat Linux 9.0下正确调试程序,需要安装高版本的gdb。
用户可以通过中国计算机学会的网站,下载gdb 6.3的RedHat Linux 9.0下的安装文件:gdb-6.3.0.0-1.10.i386.rpm。
使用root用户登录Linux,在终端中进入安装文件所在目录,并输入命令rpm –hUv gdb-6.3.0.0-1.10.i386.rpm
回车执行该命令安装gdb 6.3。
3初次使用Lazarus
3.1启动Lazarus
在终端中输入Lazarus命令,回车执行该命令即可以启动Lazarus集成开发环境。
3.2主窗口
在Lazarus界面的主窗口中,包含了主菜单,常用工具条。
如图二所示
图二
主菜单包括File(文件)、Edit(编辑)、Search(查找)、View(视图)、Project (工程)、Run(运行)、Components(组件)、Tools(工具)、Environment(环境)、Windows(窗口)、Help(帮助)。
在主窗口的左下角,有几个常用的工具按钮:局
比辑会入;
图三
4建立程序
Lazarus下,采用“工程”来管理生成同一程序的源代码,因此在开始编写一个新的程序时,需要先为此程序建立一个工程。
4.1新建工程
从主菜单中选择,“File”->“New…”,此时会弹出如图四所示的对话框:
图四
选择Custom Program,并点击OK。
此时,将生成一个新的工程,且自动生成一个源程序模板,并在源码编辑窗口中显示该模版。
如图五所示:
图五
此时的工程名以及生成的源程序模板的文件名并不是用户所需要的,而且并未保存到磁盘上,因此,必须对此工程进行保存并将文件名改为所需要的名字。
选择主菜单“File”->“Save”,弹出保存对话框,如图六所示:
图六
选择指定保存的目录,并在填入工程名。
注意,工程名的主文件名必须为指定的程序名,并且,工程名必须以.lpi作为扩展名。
点击OK后,在指定保存的目录下,将保存两个文件,一个是工程文件,以.lpi作为扩展名;另一个是源代码文件,以.pas作为扩展名。
这两个文件的主文件名均为指定的程序名。
例如:比赛题目的名字叫game,那么在保存工程时,应该选择指定的目录(即选手竞赛用户主目录下的game目录),并输入game.lpi作为工程名。
在点击OK后,将在指定的目录下,出现game.lpi、game.pas 两个文件。
此时,可以在源码编辑窗口中开始编辑源码。
4.2编译建立程序
源代码文件编辑保存完成后,可以开始编译建立程序。
选择主菜单中的“Run”->“Build”,或者使用快捷键Ctrl+F9,即可开始编译创建程序。
在编译的过程中,将会弹出消息窗口,并在其中看到编译器输出的信息。
如果编译过程中出现错误,可以单击错误信息定位到源代码中对应的地方,如图七所示。
图七
如果正确地编译建立了程序,生成的可执行程序将存放在与源代码所在目录中。
程序名为源代码文件名的主文件名字,如:源代码文件名为test.pas,生成的可执行程序为test。
4.3运行程序
正确创建了可执行文件后,可以运行该程序观察运行结果是否正确。
点击主
菜单“Run”->“Run”,或者使用快捷键F9,或者点击Lazarus主窗口中的
图八
5调试
5.1过程调试
过程调试包括“步入”(Step into)、“跳过”(Step over)、“执行到光标”(Run to cursor)三个调试操作,分别对应快捷键F7、F8、F4。
用户也可以通过点击主菜单“Run”中对应的菜单项,来完成相应的功能。
也可以点击Lazarus主窗口上的
图九
5.3变量察看
Lazarus的变量察看功能分为两部分:局部变量察看、观测点察看。
5.3.1局部变量察看
局部变量察看功能在调试过程中,实时显示当前所在函数的局部变量的变化。
点击主菜单“View”->“Debug windows”->“Local V ariables”,可显示局部变量察看窗口,如图十右下角所示。
5.3.2观测点察看
观测点察看功能在调试过程中,实时显示用户关心的变量或者表达式的值的变化。
点击主菜单“View”->“Debug windows”->“Watches”,可显示观测点察看窗口,如图十左下角所示:
用户可以在观测点察看窗口中右击鼠标,选择“Add”,并在随后的对话框中输入自己希望看到的变量或者表达式,确定后即将该变量或者表达式加入了观察项目中。
用户也可以选中已有的观测点并右击鼠标,选择“Delete”,将选中的观测点去掉。
图十。