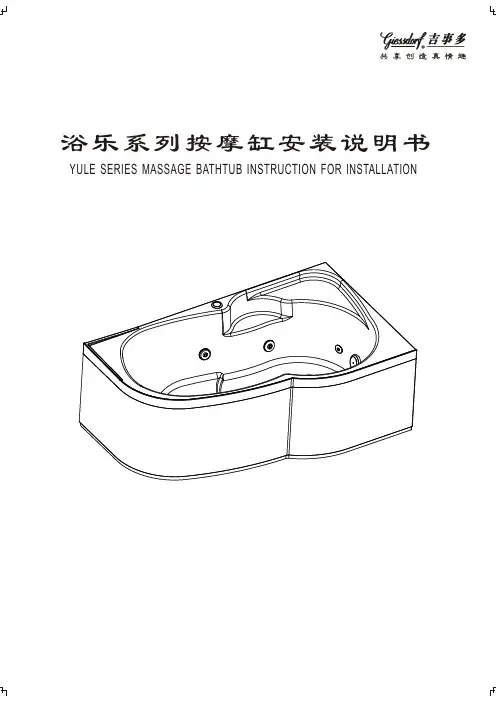
按摩浴缸安装说明书(中英文版)
- 格式:doc
- 大小:154.00 KB
- 文档页数:3
卫浴中英文对照盆:sink, basin艺术盆:art counter basin (artistic basin)挂盆:wall-hung basin挂式安装:wall-hung installation拖布池:mop tub洗菜盆:sink不锈钢盆:Stainless steel sink立柱盆:pedestal basin背靠墙安装:fixing with back to wall柜盆:counter basin台上安装:above counter mounting台下安装:fixing below counter台下盆:below counter basin台上盆:above counter basin洗脚盆:foot bath卫浴五金:hardware and accessories纸盅:paper holder毛巾架:towel rack 圆环毛巾架:towel ring皂盅:soap holder支架:wall brackets(支架都是成对的啦)浴室小挂件:wall-hung accessories for bathroom水龙头:faucet, tap (注:mixer也可作为水龙头的关键词,但是不常用)厨房水龙头:kitchen faucet橱柜水龙头:tub faucet瀑布式水龙头:waterfull faucet自动感应水龙头:Automatic Sensor Faucet水龙头零部件:装饰盖:ornament cover阀芯:cartridge过滤网:filter netting阀:valve手柄: handle面板:panel出水管:outlet本体:ontology花洒:hand shower(带把手),固定装在墙上的是shower head 排水器:trap地漏:floor drainage便器:小便斗:urinal浮雕彩金座便器:decorated bathroom set马桶坐盖:toilet seat cover坐头:toilet bowl水箱:tank水箱配件:tank fitting环保型节水功能:environmental protection & water economy电子隧道窑:computer automatic tunnel kiln直冲式连体坐便器:Wash down one piece closet (toilet)瓷质陶瓷:Vitreous china排污中心离墙(地排,直排):S-trap排污中心离地(横排):P-trap(虹吸式)连体坐便器:(Siphonic) one piece closet分体坐便器:separated closet/ two piece toilet妇洗器/净身盆:bidet挂式小便器:wall-hung urinal顶部冲水安装:top flushing installation蹲便盆:squatting pan浴室家具:bathroom furniture橱柜:bathroom vanity(常用), bathroom cabinet主柜:Main cabinet侧柜:Side cabinet玻璃盆带柜子:Glass basin with cabinet浴缸、淋浴房:入地式脚踏板:built-in pedal淋浴屏:shower panel淋浴房:shower room, shower cabin蒸汽房:steam room桑拿房:sauna room浴缸:bathtub按摩浴缸:massage bathtub, whirlpool bathtub (注:很多人会用Jacuzzi这个词来指按摩浴缸,实际上Jacuzzi是一个商标名称,极可意水流按摩浴缸.)涡流按摩浴缸:Whirlpool bathtub,jacuzzi就是一种涡流按摩浴缸。
抗衰老长寿浴缸是一款适合所有人群使用的卫浴产品,可高效地产生活性水合体,普通人通过此浴缸来进行日常的泡浴,能够使人体在20分钟内快速、有效地获得中国十大寿乡长寿人群独有的、神奇的抗衰老益寿能量和人体特征。
人体充分获得养生能量后,可进一步激活身体内营养物质和器官的各项生命功效,可对某些疾病起到辅助治疗作用,达至祛病养生。
活性水合体对人体的改善是全方位的,不特定针对某种疾病,改善程度也因人的敏感度而异。
使用方法:▲每次使用浴缸时,应让浴缸外表面保持比较干燥的状态。
若浴缸外壁和外底部沾有大量水滴,如淋浴过程中洒到外壁上的水滴,记得用软布擦干;▲定期使用专用洗涤剂来清洁浴缸外壁(配合专用浴缸刷子清洁更方便),即可保持功效;▲清洗浴缸内壁,使用中性液体清洁剂(切忌使用含磨损成份及高碱性的清洁剂)。
避免使用深色或者浓的腐蚀性液体,避免色素浸入缸体,或者缸体受到腐蚀;▲清洁时,使用专用浴缸刷子或柔性布料、海绵,切勿用刷子硬刷,以免产生划痕;▲亚克力浴缸的亚克力层出现擦伤时,应用1500#以上水磨砂进行砂磨,清洁后再用绒布蘸牙膏进行擦拭即可(用布轮绒或羊毛抛光更佳)▲除了下述的使用注意事项,可按普通浴缸那样使用,正常泡浴即可;注意事项:1. 第一次使用时,切忌泡浴时水温过高,应以舒适的温度为宜。
体质虚弱者,第一次泡浴时的水温避免超过37度(与人的体温接近);2. 第一次使用时,请控制泡浴用水量。
首次使用应以水刚浸没过双腿为宜,然后用水量可逐日增加20%~30%,最终达到个人喜好的泡浴用水量。
3. 第一次使用时,请控制泡浴时间,应不超过5分钟时间。
以后可每次增加5分钟,直至使用者个人喜好。
4. 一般人只需要3~5次的适应期,个别人群可能需要1~2周时间的才完全适应。
5. 浴缸务必定期清洁,才能保持功效。
每使用10人次后,需用专用清洗剂来正确清洗一次。
6. 确保浴缸闲置时保持干爽洁净。
7. 在身体完全适应后,若只是维持人体效果,只需要每10天泡浴一次即可。

安裝說明一、安裝前注意事項:(一)為確保浴缸光潔,施工中請在浴缸上覆蓋報紙或紙板保護。
(二)切勿在浴缸內拌水泥或其他工作。
(三)施工時勿將工具放在浴缸上,尤其是尖硬物。
(四)確保使用電源為110V±9%以內且電線各接點絕緣良好。
(五)安裝請參考所推薦乾式施工法(註)為之,其他方式請勿採用否則因不當安裝,而於服務維修後,必須移動浴缸或重施土木工程時,買方需負責所需之費用。
註:乾式施工法,為一精緻且符合按摩浴缸特性之土木施工法。
施工作業上,大部維修時,不若以往需敲除水泥、磁磚,大費周章。
僅需割除週緣矽利康,浴缸即可依維修需要,作適當的移動,維修作業簡易許多,更確保顧客權益,實是兩全其美。
二、安裝程序:(一)安裝浴缸之地板需做防水處理,並預留直徑1 1/2〞排水口。
(二)依選購之浴缸型別,按照預鑄槽尺寸及構工圖,先砌妥預鑄槽體和貼磁磚,槽體上緣面以水平儀量測水平。
(三)預鑄槽構工同時,並預留直徑1/2〞冷熱出水口(LF607)及電源管路。
(四)俟前項構工材乾涸後,將浴缸試放定位,以度量構工尺寸是否正確;並確認配管銜接位置,是否有需調整之處,若有應立即調整至適當位置。
(五)前述作業就緒無誤後,將浴缸放置定位於預鑄槽中,進行水電配管銜接。
1.排水:將浴缸底部排水軟管及其上所附之亞比股插入預留於地板上之直徑1 1/2〞排水口並以亞比股塞緊之。
請注意勿使軟管壓折,長度可自行調整。
2.供水:以三角凡而(LF607)及高壓軟管(3780-10)連接給水管及給水銅器閥體間,請注意冷、熱水位置。
3.電源:請參照下圖連接。
若有異常應檢查各項水電源接頭是否有不當之處或參考故障排除法。
(八)試車完成,將牆板上端插入浴缸前緣與彈簧片間,再壓入下端確實固定即可。
(九)為避免水份滲透,浴缸及邊牆週緣與預鑄槽接縫處需以填縫劑(Silicon)填封。
三、安裝後檢查事項:(一)清除雜物:殘留浴缸內之水泥漿等雜物,必須清除,否則易侵蝕浴缸表面色澤及光滑。
浪鲸553说明书(最新版)目录1.浪鲸 553 说明书概述2.浪鲸 553 的安装与操作3.浪鲸 553 的功能与特点4.浪鲸 553 的维护与保养5.浪鲸 553 的使用注意事项正文浪鲸 553 说明书概述浪鲸 553 是一款高品质的按摩浴缸,集时尚、舒适、便捷、智能于一身,为用户带来极致的沐浴体验。
本说明书将为您详细介绍浪鲸 553 的安装与操作、功能与特点、维护与保养以及使用注意事项等方面的内容,帮助您更好地了解和使用浪鲸 553。
浪鲸 553 的安装与操作1.安装:在安装浪鲸 553 之前,请确保您已经准备好以下物品:安装工具、水龙头、排水管等。
按照安装图纸进行操作,依次完成浴缸主体、水龙头、排水管等的安装。
在安装过程中,请务必保证各个部件的牢固性。
2.操作:安装完成后,您可以通过以下步骤开始使用浪鲸 553:首先,打开水龙头,将水注入浴缸;其次,按下遥控器上的启动键,选择您喜欢的按摩模式;最后,享受舒适的按摩浴。
浪鲸 553 的功能与特点1.多功能按摩:浪鲸 553 内置多种按摩模式,如颈部、背部、腰部等,满足您不同部位的按摩需求。
2.智能控制:通过遥控器,您可以轻松调整按摩强度、水流温度等,实现个性化的沐浴体验。
3.安全保护:浪鲸 553 具备漏电保护、过热保护等功能,确保您在使用过程中的安全。
4.节能环保:浪鲸 553 采用低能耗设计,既能满足您的舒适需求,又实现了节能环保。
浪鲸 553 的维护与保养1.清洁:每次使用完浪鲸 553 后,请及时清洁浴缸内外,保持卫生。
2.检查:定期检查浴缸各部件是否完好,如发现损坏,请及时联系售后服务。
3.润滑:定期为浴缸按摩电机添加润滑油,确保其正常运行。
浪鲸 553 的使用注意事项1.使用前,请务必阅读本说明书,了解浪鲸 553 的相关操作和注意事项。
2.孕妇、儿童、老人及患有心脏病、高血压等疾病的人群,应在他人陪同下使用,并确保按摩强度适中。
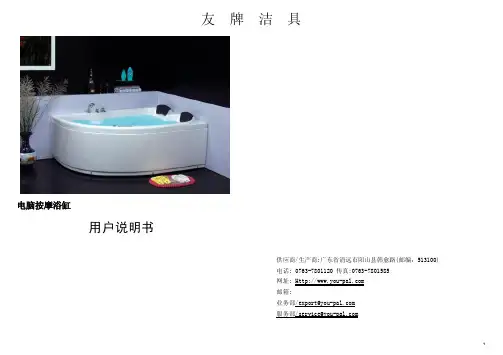
1内容致用户 (2)警告事项.....................................................................................2-3 使用需知. (3)维护 (3)保修..........................................................................................3-4 电脑按摩浴缸特征........................................................................4-7 控制系统特征..............................................................................7-8 故障排除. (9)备忘纪录……………………………….......…………………………………..….9 致用户各位用户,友牌卫浴祝贺您使用本厂的浴缸,很荣幸您加入到友牌不断壮大的大家庭,我们的产品将为您带来最佳的水疗体验。
使用说明书将便于您熟悉,掌握按摩缸的操作和总体维护。
请联系您当地代理商或直拨友牌售后电话。
我们的售后工作人员具有丰富的产品安装及使用经验,会协助您更好地感受我们产品的优点。
所有出厂产品的外箱标签有序号栏,同时在浴缸的底部盖有序号戳,这有便于售后的追踪服务。
注意:友牌卫浴在没有特别通知情况下保留规格,款式变化的自主权。
警告:1.必须更换破损的接线以防触电,否则可能造成不必要的伤害。
2.浴缸装有漏电保护装置。
漏电保护在插头前端。
使用产品前,按下保护键,这时指示灯亮,电脑关闭。
等候一段时间重按保护键,电脑恢复通电。
如果漏电保护装置没有正常切断电源会有漏电的隐患,如果发现这类情况,请在漏电保护正常切断电源前拔掉插头。
3.电脑控制盒内装有地线终端,将地线接入室内地线设备,如果要加接地线,用与接出地线配套的绝缘线。
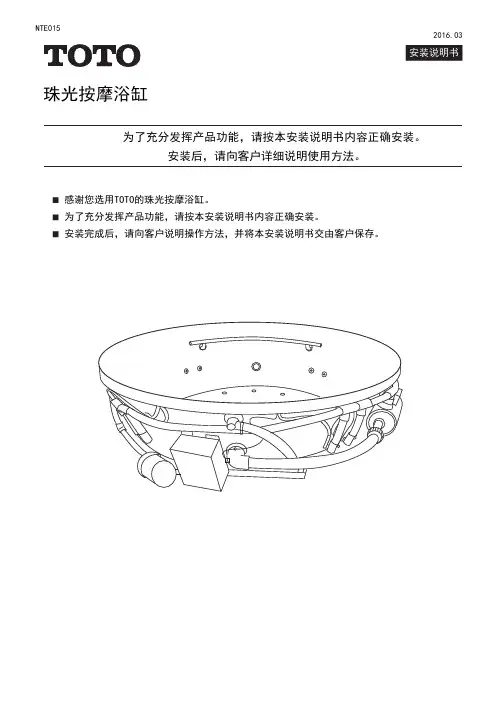
珠光按摩浴缸NTE015安装说明书2016.03为了充分发挥产品功能,请按本安装说明书内容正确安装。
安装后,请向客户详细说明使用方法。
感谢您选用TOTO的珠光按摩浴缸。
为了充分发挥产品功能,请按本安装说明书内容正确安装。
安装完成后,请向客户说明操作方法,并将本安装说明书交由客户保存。
目录1.安全上的注意点 — — — — — — — — 4-62.安装施工上的注意点 — — — — — — — 7-83.部件清单 — — — — — — — — — — 94.规格及尺寸图 — — — — — — — — 10-145.各部件名称 — — — — — — — — 15 6.安装顺序一览表 — — — — — — — 167.安装步骤 — — — — — — — — — 17-277-1.浴缸安装前的准备 — — — — — 17-187-2.浴缸的控制器的安装 — — — — 19-217-3.浴缸的固定 — — — — — — — 22-237-4.电器施工 — — — — — — — — 237-5.试运转 — — — — — — — — — 247-6.瓷砖的砌筑 — — — — — — — 26-271.安全上意点为了使施工人员安全、正确地安装产品,本说明书及产品中还采用了如下标志。
请在完全理其内容的基础上正确安装。
安全起见,请务必遵守。
请详阅“安全上的注意点”后,正确安装。
为了安全、正确的安装产品,防止给您或他人造成人身伤害或财产损失,此说明书采用了很多标志。
标志的意思说明如下。
安装完成后,请确认器具有进行无松脱或漏水等安全上的隐患。
此说明书,对使用者能否安全、正确的使用产品非常重要。
请妥善的保管,勿遗失、弄脏。
该说明书与使用说明书,在安装完成后交由使用者保管。
2.安装施工上的注意点3.部件清单4.规格及尺寸图规 格4-1 按摩浴缸规格一览表尺寸(mm) *1 满水容量(L) 重量(Kg) 材 料 喷嘴数量(个) 排水金具所需电路安装方式噪音(dB) *2安全设置符合标准(QB)颜 色半嵌入式*3嵌入式嵌入式高耐久压克力等需要专用的220V、50Hz家用电路分支,需要高敏感、快速型漏电开关(额定感应电流15mA以下,跳闸时间0.1秒以下,额定电流30A以上),并请专业人员安装接地线和漏电开关。
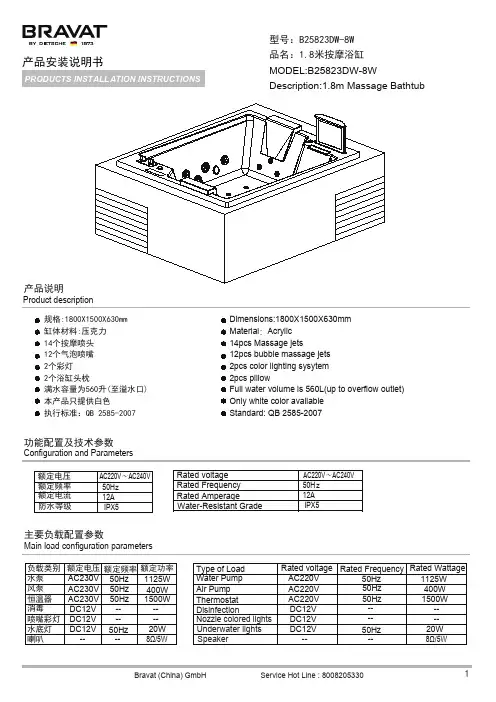
Configuration and ParametersWater-Resistant GradeRated AmperageRated Frequency Rated voltage 防水等级额定频率额定电流IPX5额定电压功能配置及技术参数12A 50Hz IPX512A 50H z AC220V ~AC240V AC220V ~AC240V Main load configuration parameters--------50Hz 50Hz DC12V DC12V AC230V AC230V AC230V 额定功率额定频率额定电压喷嘴彩灯消毒恒温器水泵风泵负载类别主要负载配置参数50Hz 50Hz DC12V 水底灯----喇叭8Ω/5W型号:B25823DW-8W 品名:1.8米按摩浴缸Description:1.8m Massage Bathtub产品说明Product descriptionMODEL:B25823DW-8W规格:1800X1500X630mm 缸体材料:压克力14个按摩喷头12个气泡喷嘴2个彩灯2个浴缸头枕满水容量为560升(至溢水口)本产品只提供白色执行标准:QB 2585-2007Dimensions:1800X1500X630mm Material :Acrylic 14pcs Massage jets12pcs bubble massage jets 2pcs color lighting sysytem 2pcs pillowFull water volume is 560L(up to overflow outlet)Only white color available Standard: QB 2585-20071125W 400W 1500W 20W 产品安装说明书说明书包含重要的保养、清洁及担保方面的内容,请把这些资料交给用户阅读。
This manual contains important maintenance, cleaning and warranty information. Please make sure to hand over this manual to the users.必须在牢固、水平的底层地板上安装此按摩浴缸。

BedienungsanleitungV I V O T U R B O按摩浴在当今快速的生活节奏中按摩浴具有特殊的作用。
他将调动所有的感官, 让您全身心地体会水给您带来的享受。
Kaldewei 按摩浴装置让水,空气和热能有效地为您的健康服务。
请花一些时间仔细阅读有关您所使用的按摩浴缸的操作说明。
在操作说明中会出现以下所列的图示。
这些图示表明有一些特别注意事项。
会影响按摩浴缸的功能。
会影响您的健康。
有效保养按摩浴缸及其性能的相关清洁和保养说明。
目录系统说明.............................. 第2页可选设备.............................. 第2页安全提示.............................. 第3页医学建议.............................. 第4页正确进行按摩浴........................ 第5页排水及溢水设备........................ 第6页按摩喷嘴.............................. 第6页水位传感器............................ 第6页按摩浴缸VIVO TURBO 控制................. 第7页VIVO TURBO PLUS 的附加功能.............. 第9页浴缸的清洁............................ 第10页排水及溢水设备的清洁.................. 第10页按摩喷嘴的清洁........................ 第10页按摩喷嘴的保养........................ 第11页按摩系统的新开始...................... 第12页故障排除.............................. 第12页备注• Kaldewei 根据最佳专业知识编写了该操作说明。
按摩浴缸使用说明书欢迎购买本款按摩浴缸,在使用之前,请务必详细阅读以下使用说明,以确保您能够正确并安全地享受按摩浴缸带来的舒适体验。
一、安全须知1. 本产品仅适用于家庭使用,请勿将其用于商业场所。
2. 在使用之前,请确保电源和线路的正常工作,以免发生电击事故。
如发现电线损坏,请及时更换。
3. 在使用按摩浴缸前,请确认水源的温度不超过40摄氏度。
4. 在使用按摩浴缸时,勿让婴儿或儿童独自在浴缸中,以免发生危险事故。
二、基本操作步骤1. 打开按摩浴缸,检查水位是否位于适宜水位范围内,一般为浴缸高度的3/4处。
2. 打开浴室防滑开关,确保浴缸的稳定性。
3. 打开按摩浴缸上的控制面板,调节水泵的速度和按摩强度。
4. 调节水温,根据个人的舒适程度调整水温,一般建议在37-40摄氏度之间。
三、按摩功能1. 按摩浴缸配备了多种不同类型的按摩功能,如气泡按摩、热石按摩、水流按摩等。
请根据个人需求选择使用。
2. 在享受按摩功能时,建议使用专用的按摩浴盐、按摩液或泡泡浴剂,以增强按摩效果。
四、定期保养1. 每次使用完毕后,务必清洁浴缸内壁和底部,以保持卫生。
2. 按摩浴缸需定期更换水泵过滤器,避免水质不佳影响按摩效果。
3. 注意定期检查按摩浴缸的走水情况,如有异常请及时修理或更换零件。
五、注意事项1. 使用按摩浴缸时,请勿过度使用。
一般每次使用建议在15-30分钟之间。
2. 在使用按摩浴缸过程中,如感觉身体不适,请立即停止使用。
3. 按摩浴缸禁止放置过重物品或坐在边缘上,以免发生意外事故。
4. 切勿在按摩浴缸中饮酒、吸烟或使用药物,以免对身体造成伤害。
六、故障排除1. 若按摩浴缸出现异常,如无法启动、水流弱或无水流等情况,请先检查电源和线路是否正常,并在确认正常后再寻求其他方法解决。
2. 若仍无法解决问题,请联系售后服务中心或专业维修人员进行维修。
七、保修条款1. 按摩浴缸享有一年的免费保修服务,但不包括人为损坏和自然灾害造成的损失。
1) If you are installing the lavatory in a new or substantially remodeled bathroom, refer to the rough-in section of the product’s Specifications Sheet for the locations of shut-off valves and drain. The inlets of the shut-off valves should match the size of piping in the house, and outlets should match the water supply tubes you will run to the faucet. The latter are usually 1/2” I.P.S. tubing.You should also install shut-off valves, if there were none in the existing bathroom or if the old ones are unserviceable or unsightly.A cross brace is required to provide a solid mounting support for the new lavatory. Check to besure there is one in the existing bathroom. If not, use a saw and chisel to mortise a 2” x 4” board across at least 3 of the vertical 2” x 4” wall studs. Nail it securely into place.The center of this cross brace or mounting height can be found in the rough-in specifications of the product’s Specifications Sheet.2) Position the pedestal base at the location centered on the waste and shut-off valves.3) Place the lavatory basin on top of the pedestal base. Slide the complete unit until the backside ofthe lavatory basin fits flat against the wall and is level.4) With a pencil, from underneath the lavatory basin, mark the location of the 2 mounting holes onthe back side of the lavatory basin.5) Now remove the lavatory basin. For drywall installation with no wood stud cross brace support,drill 5/16” holes and insert the plastic wall anchors. Move on to step #6.For installations with wood stud cross-brace support, drill 2 holes, then continue to the next step.6) Insert threaded bolts, such that you will have at least 1/2” of thread sticking out past the holes inthe underside of the lavatory basin.* For wood stud installation, same as above but without the wall anchor.7) Place the new lavatory basin onto a thick layer of newspaper or a drop cloth to protect it frombeing scratched.Attach the pop-up drain and the faucet to the lavatory according to the manufacturer’s instructions. You may also attach the hot and cold water supply lines to the faucet at this time.Sealant may be required around the faucet and pop-up drain where they meet the china. Check the faucet manufacturer’s recommendations.These steps are easier to do before you mount the lavatory in its place.8) Set the lavatory basin on top of the pedestal base flat against the wall, making sure that thethreaded bolts slide through the mounting holes in the back of the basin. Put a washer onto each of the threaded bolts. Put a nut onto each of the threaded bolts. Thread the nuts loosely against the basin.9) Examine the alignment of the pedestal lavatory to the wall, to be sure it is centered where youwant it. The elliptical holes in the china allow for some shifting. Also check the level and adjust as needed. Tighten the nuts alternately until the lavatory is flush to the wall.CAUTION: Do not over-tighten, since this may crack the vitreous china.10) Connect the drain trap to the pop-up drain tail piece, then join the trap to the drain pipe in the wall.You may use metal or plastic drain pipe and trap, following the directions as provided by the manufacturer.11) Use a tube cutter to trim the free ends of the hot and cold supply tubes, to at least 1/4” longer thannecessary to reach into the inlets of the shut-off valves. It is better to cut the tubes longer than needed, then trim them again. Remove any burrs or sharp edges with an emery cloth.Join the hot and cold water supply to the shut-off valves, as instructed by the faucet manufacturer.12) Turn on the main water supply, then open the shut-off valves. Check all connections for leaks. Aslight tightening of about 1/4 turn will normally stop any leaks.Your installation should now be complete.。
产品安装说明书B25563W-21.5米按摩浴缸1500X500X700mm8亚克力AB功能配置及技术参数功能概述注:"√"表示所包含功能,"*"号表示为选装功能.A .控制器系统包括:1)控制面板(1套)2)控制电箱(1套)B .控制器控制电箱特性1)额定电压 :AC220V-240V 2)额定频率 :50Hz/60Hz 3)使用电压范围 :AC198V-242V 4)待机功率 :<10W (所有负载关闭)5)使用环境温度 :+5℃ ~+40℃1)C .受控制系统控制的装置冲浪水泵: AC220V/3HP 2)1)恒温器 : AC220V/2000W 3)气泡泵 : AC220V/1HP 4)水底灯 : DC12V/5W 5)排水电磁阀: DC12V/5W 6)臭氧发生器: DC12V/8W 7)扬声器 :8Ω/15W (最C水路图:接线示意图:电参数电器安装供水安装 安装说明,额定电压/频率220V/50H z 2200W 额定功率额定电流<4A 工作电压12V3.供水安装4.安装说明1 房屋的电源设施应符合国家标准,电源的电压和频率应与产品要求相符。
特别要安装漏电开关,并验明接地保护设施有效;2 按摩缸的电源线应为固定式永久性接线,电源线应为3芯线,每芯截面积不小于12A ,电源线通过墙壁时应使用保护套管直至电源插座为止;3 按摩缸的接地线与房屋的接地线接通并验明有效;4 电控箱引出线的接线端子分别接至控制面板、水底灯、扬声器、电机和保护探头。
1 本设备供水压力为0.2-0.4M pa ;2 墙上的供水特点:浴室内冷热水供水点奕设在按摩缸便于遮挡的部位,通过软管与按摩缸的冷、热水接头相连接。
水管走向由用户自行决定,随机不提 供软管。
1 安装前必须考虑安装按摩缸的位置是否能承受此设备的压力;2 把按摩缸放到安装位置,调整水平度,使按摩缸排水顺畅;3 调整地脚螺丝,使所有地脚螺丝完全着地;4 将排水软管装好,连接处应作适当防漏水措施;5 接好按摩缸的冷、热进水管,安装好淋浴花洒,把排水软管接入下水管, 接好电源并验明接地设施有效。
Cascade Premier and Elite Premier Bathing Systems with Aqua-Aire® Installation / Assembly Instructions360745P Revision B – 10/01/09Table of Contents INTRODUCTION (3)TERMINOLOGY AND SYMBOLS MEANINGS: (3)REGULATORY INFORMATION (3)STANDARD PREMIER SYSTEM CONTROL PANEL (4)ELITE PREMIER SYSTEM CONTROL PANEL (5)BASIC DIMENSIONS ELITE PREMIER:ROUGH IN SPECIFICATIONS ELITE PREMIER (6)ELITE WITH SWIVEL LIFT (7)ELITE WITH SIDE ENTRY (8)ELITY WITH END OPENING ENTRY (9)BASIC DIMENSIONS STANDARD PREMIER:ROUGH IN SPECIFICATIONS STANDARD PREMIER (10)STANDARD WITH SWIVEL LIFT (11)STANDARD WITH SIDE ENTRY (12)STANDARD WITH END OPENING ENTRY (13)DRAIN REQUIREMENTS: (14)HOT AND COLD WATER SUPPLY REQUIREMENTS (14)ELECTRICAL REQUIREMENTS (14)UNPACKING THE TUB (14)UNPACKING THE TUB AND CABINET (14)ASSEMBLY OF TUB AND CABINET (15)ANCHORING THE SWIVEL LIFT CASCADET UB (16)WATER SUPPLY AND DRAIN CONNECTIONS (16)ELECTRICAL CONNECTIONS (17)SYSTEM CHECK (18)FINISHING UP: (19)These instructions are for the installation of Cascade Standard and Elite Premier Bathing System Cabinets and Tubs. The Reservoir is included in the cabinet of this system, which is to be pre-filled prior to placing the resident into the tub. Then the water in the reservoir can be released into the tub. This shortens the time required before the tub is full.When the terms “left” or “right” are used with reference to the tub, this means left or right as you look at the control panel from the seat end of the tub.Meaning: Safety warning. Failure to understand and obey this warning may result in injury to you or to others.Meaning: Failure to follow these instructions may cause damage to parts or systems.Note: Refer to the “Tub Controls” section of this manual for the location of any of the controls referenced.FDA Medical Device CompliantRegulation Number: 890.5100 Regulatory Class: II Product Code: ILJ General Regulation: 21 CFR Part 820American National Standard for Plastic BathtubsANSI Z124.1.2 CertifiedPlumbing Requirements: It is required that a licensed plumber make all plumbing connections. He can select the best method of connection and if Reduced Pressure Zone Backflow Preventers are required.61LN Regulatory InformationFigure 1 Tub ControlsFigure 2 Tub ControlsFigure 3Figure 4Top ViewFigure 5 Side ViewFigure 7 Side ViewFigure 6 TopViewFigure 9 Side ViewFigure 8 Top ViewFigure 10Figure 11Top ViewFigure 12 Side ViewFigure 13Top ViewFigure 14 Side ViewFigure 16 Side ViewFigure 15 Top ViewFigure 3 & 10 shows two different options for roughing in the drain pipe – from the floor or fromthe wall. The tub is equipped with a 2” nominal (2 3/8” O.D.) PVC drain pipe. Refer to Figures 3 & 10 for drain pipe end approximate distance from the wall.It is required that a licensed plumber make all plumbing connections. He can select the bestmethod of connection for the particular situation and if Reduced Pressure Zone Backflow Preventers are required.3/4” supply lines with on/off valves with 3/4” NPT Male threads. We recommend 3/4” ball valve with 3/4” NPT female ports. (Valves supplied by others.) See figure 5 for recommended locations.For optimum performance, dynamic pressures should be nominally equal between hot and cold supplies.Maximum static supply pressure: 145 PSI.Maximum dynamic/maintained supply pressure: 81 PSI.Maximum supply Hot water temperature: Consult local requirements for maximum allowed supply temperatures. (Not recommended over 120oF) 20 amp GFCI circuit is required.(The TV is to be plugged into an existing approved outlet near the Cabinet) Insure installation is in compliance with NEC and local and state regulations.1. Remove the Tub from the shipping crate.2.Locate and save the installation parts.2. Locate and save the installation parts.3. Remove the Top or lid, and the two end panels and place to the side out of the way.1. Place the cabinet approximately 2 feet from the wall directly in front of the intended finallocation.2. Install the television into the cabinet and onto the television mounting bracket and secure withprovided screw. See mounting bracket instructions (provided) for adjustment instructions.3. Connect television power cord to the receptacle in the back of the television and route the plug endof the cord through the hole at the lower back side of the television opening of the cabinet. This will be plugged into a wall receptacle after locating the cabinet and tub in their final location.4. Move the tub directly in front of the tub with the foot end of the tub just in front of the tub openingin the cabinet.5. To avoid damaging the seal at the top of the tub opening of the cabinet, tip the cabinet back andthen slide the tub into the opening of the cabinet. Lower the cabinet back down.6. Connect the tub and cabinet frames together with the bolts, flat washer, and hex nuts provided. Usethe flat washers under the heads of the bolts and under the hex nuts to protect the powder coatedfinish of the frames. Note: Some adjustment of the leveling feet of the tub may be needed to align the bolt holes in the frames.7. Connect the air line manifold of the tub to the union connection of the cabinet plumbing locatedinside the lower left side door.8. Connect the tub temperature probe to the tub at the probe fitting in the foot well of the tub justabove the drain outlet. Tighten the compression nut slightly. Further tightening is needed only if the connection leaks with the tub full of water.9. Connect the clear 3/8” I.D. drain tube from the bottom of the air system check valve to the barbfitting located on the tub drain base shoe. Secure the connection with the provided clamp.10. Connect the overflow tee of the cabinet to the drain outlet of the tub and tighten.11. With the help of 2 or 3 additional people, slide the cabinet and tub into the final location. Note: Theleveling pads of the tub have non-skid pads on them. So it is not easy to slide. Picking up on the tub as it is pushed helps. The tub and cabinet are heavy and are not easy to move. Anchoring to thefloor is not required except on the built in Swivel Lift tub. The Swivel Lift tub must be anchored to the floor.Warning: The Elite Cascade Premier Tub with the built in Swivel lift System must to be anchored to the floor. Failure to anchor the Built in Swivel Lift Tub to the floor could result in injury to the operator or resident.Note:These instructions for anchoring the swivel lift tub are written with the assumption that the installation is being done on a concrete floor. If this is not the case, consult an Architect. There are three anchoring locations, two at the control end, and one at the seat end of the tub (see Figure 17). Anchoring the Reservoir is not necessary.1.Remove the end panel, at the seat end of the tub, and set it to the side.2.The tub is heavy and is not easy to move. Picking up on the tub as it is pushed helps. With the helpof 2 or 3 additional people, place the tub/cabinet in the final installation position.3.The leveling bushings are to be adjusted and can be done with a ¾” socket as show in Figure 17.ing a 3/8” masonry bit, drill through the one leveling bushing into the concrete floor as shownin Figure 17. (2” deep)5.Clean the drilled holes and clean the drilling dust from the area.6.Insert the provided 3/8” anchor through the leveling bushing and into the anchor hole just drilled.7.Tighten the anchor nuts.8.Re-install the end panel on the tub.Note: Every installation is different. So the connecting fittings and the p-trap are not provided with the tub. A licensed plumber is required to make the drain connection.1. Connect the tub drain outlet to the drain pipe.2. The connecting fittings with the connecting hoses are provided. Do not open The Supplyvalves yet.BushingThe tub is equipped with a 2” nominal (2 3/8” O.D.) PVC drain pipe. As shown in Figure 4, the tub’s drain pipe is approximately 9” from the wall and 5 1/4” above the floor. Figure 4 shows two different options for roughing in the drain pipe – from the floor or from the wall.It is recommended that a licensed plumber make all plumbing connections. He can select the best method of connection for the particular situation.3/4” supply lines with on/off valves with 3/4” NPT Male threads. We recommend 3/4” ball valve with 3/4” NPT female ports. (Valves supplied by others.) See figure 5 for recommended locations. For optimum performance, dynamic pressures should be nominally equal between hot and cold supplies.Maximum static supply pressure: 145 PSI.Maximum dynamic/maintained supply pressure: 81 PSI.Maximum supply Hot water temperature: Consult local requirements for maximum allowed supply temperatures. (Not recommended over 120oF)Warning:This unit is to be connected only by a licensed electrician. A minimum of 20 amp 120 volt service is required with ground fault circuit interrupter. 1. Remove the cabinet’s electrical box cover and locatethe connecting points within the box. See figure12.2. Ensure that the supply power has been turned OFF.3. Connect the power cord from the tub lift electrical box to the cabinet electrical box (figure 18). Black to line bar, white to neutral bar, green to ground bar.4. Run flex conduit and power wires from the wallmounted supply box to the connection hole of theelectrical box located on the upper left side of the box.5. Connect the line, neutral and ground wires to the appropriate connections within theelectrical box. A female wire terminal is provided for connection of the line wire to the tub circuit breaker.6. Replace the electrical box cover and turn off the tub’s circuit breaker on the top of thebox.7. Turn ON the supply power. 8. Switch ON the tub circuit breaker. All the temperature gages located inside the upperright hand door of the cabinet should now be lit up.9. Route the T.V. power cord to the wall receptacle and plug it in.Fig. 18 Tub Electrical BoxWarning:Do not use an extension cord to connect the T.V. to the wall receptacle or allow the cord to touch the floor. Failure to heed this warning may result in injury to a resident or operator.10. The tub is now ready to be checked for leaks. Turn off the tub circuit breaker.1. Ensure that the tub water door is closed.2. Turn ON water supply valves and check for any leaks. Tighten any leaky connections asneeded.3. Switch ON the tub circuit breaker and switch off any water valves or the blower if theyare ON by way of the control panel buttons.4. On each of the water systems (Tub Fill, Reservoir Fill, Disinfect Jets, Rinse Jets, andHand shower), and checking only one system at a time, turn ON the valve by pressing the appropriate control panel button. Look for any leaks and tighten connections as needed.Note: The hand shower needs to be directed into the tub before starting it.5. Place the drain plug in the drain and partially fill the tub. Remove the drain plug andcheck the drain system for any leaks and repair if needed.6. Close the reservoir (release) valve by moving the “Reservoir Valve” lever to the closedposition. Place the drain plug in the tub drain and fill the reservoir by pressing the“Reservoir Fill ON” button. Watch the “Fill - Shower” temperature read out and adjustthe mixing valve to get the desired temperature. The “Reservoir Temperature” read-outindicates the temperature of the water already in the reservoir.7. Wait until the reservoir stops filling. Should it stop filling before the water level in thereservoir reaches the float switch, then the timer, within the electrical box needs to beadjusted to a longer time. The float switch is the primary system to turn OFF the reservoir fill. The timer is a back up system in the event that the float switch fails.8. Check for any leaks.9. Release the reservoir water into the tub by moving the “Reservoir Valve” lever to the“Open” position. Check for any leaks in that plumbing.10. With the tub nearly full, check that there is no leaking around the temperature probe ofthe tub. Tighten the compression fitting if needed.11. Start the Aqua-Aire blower by pressing the button. Note: The blower takes a few secondsto start and winds up to full speed somewhat slowly. This is normal. The bubbles should start flowing from each of the jets in the bottom of the tub shortly there after.12. Stop the blower and drain the tub.13. Install the end panels and the cabinet top.1.Once the tub/reservoir has been connected to the drain, checked for leaks (and fixed ifneeded), and is connected to power, the access doors can be installed.2.Train all operators of this equipment before using it per the Safe Operation & DailyMaintenance Instruction Manual.Warning!Because this equipment requires a trained operator, and to assure that these benefits are realized, do not operate your PMI equipment until an authorized member of your staff has reviewed the Safe Operation & Daily Maintenance Instruction Manual and spoken to your PMI Representative. Failure acquire this training could result in damage to the equipment or injury to the operator and resident. If needed, Your PMI Products Representative will assist you with questions you may have in the operation of this equipment.。
It is important to read all information BEFORE proceeding with the installation.The information will guide you in installing your feeder properly and to avoidproblems due to improper installation.IF YOUR POOL OR SPA HAS COPPER PLUMBING ...STOP!!Never install the feeder into copper plumbing as pipe damage will occur.(SeeEquipment Safety CAUTION sheet enclosed).NOTE:If heaters are used,aFireman’s Switch or equivalent must be installed to prevent possible damageand improper operation of Check Valve and other equipment subject to heatdamage.WHERE TO INSTALL YOUR FEEDERSeries #300and #302are designed for EXISTING pools or spas or new pools orspas where conditions are such to make permanent installation into the returnline impractical.The outlet line must be installed after the heater.If your pool doesnot have a heater,then it must be installed after the filter.(see Fig.A &B)DAMAGE TO YOUR HEATER COULD RESULT IF HIGHLY CHLORINATEDWATER FLOWS THROUGH IT.If your pool has a heater,install the line to the feeder between the filter andheater.If your pool does not have a heater,install the inlet line between thepump and the filter.Refer to installation drawings A &B for your particularcondition.Choose a site where feeder can be installed in a vertical position.Always install as far from any metal equipment as practical since fumes,etc.can corrode them.If optional corrosion resistant check valve is required,referto installation instructions before next step.INSTALLATION INSTRUCTIONSPosition feeder close to filter and cut tubing to desired lengths.Be careful to cutends straight.ATTACH INLET LINE TO FEEDERScrew control valve into side of e teflon tape to seal threads.Pushcompression nut over tubing and then push tubing onto tapered end of controlvalve.Tighten nut firmly by hand.ATTACH OUTLET LINE TO FEEDERScrew Combination check valve elbow into bottom of feeder.Refer to drawing onother e threaded seal tape to seal.CAUTION,do not overtighten.Damageto threads or check valve could occur.Push compression nut over tubing end.Then push tubing onto tapered end of elbow.Tighten nut firmly by hand.INSTALL INLET LINE IN PLUMBING(Line to side of feeder).Turn off pump and timer switches.Drill 3/8"hole inplumbing,remove burrs and install saddle clamp assembly.See drawing on otherside.Attach inlet line by first pushing compression nut over tub end.Then pushtube onto tapered end of tube fitting.Tighten nut firmly by hand.INSTALL OUTLET LINE IN PLUMBING(Line from feeder.)Drill 3/8"hole in plumbing (AFTER the heater.If no heater,drill after filter.)and remove burrs.See drawing on other side.Install saddleclamp assembly.Attach outlet line by first pushing compression nut over tubeend.Then push onto tapered end of tube fitting.tighten nut firmly by hand.Installation is now complete.OPERATING INSTRUCTIONSBefore start up of feeder,your pool should be properly conditioned and theresidual should be 1.0to 1.5ppm,(Bromine 2.0-4.0ppm).The water in a newly-filled pool should be properly conditioned to insure maximum effectiveness of the feeder.Consult your local dealer for water conditioning information for your area.1.Remove cap of feeder and fill with proper size tablets.Series 300uses 1"or 3"dia.tablets Series 302uses 1"dia.tablets in Spa Chamber.2.Making sure O-Ring is clean,lubricated with Lifegard Silicone and is in place,replace cap.Hand tighten only.3.Turn on pump and timer switches.4.Adjust control valve according to your pool/spa e a test kit.It is recommended that the chemical residual be checked daily for the first 5days.Remember ...hot days,higher water temperature or increased pool/spa activity will cause your pool/spa to use more sanitizer.When possible,increase the feed rate a day or two in advance.Because the sanitizer demand in your pool/spa varies and is dependent on many factors (sunlight,bather load,water temperature,etc.)your valve setting may have to be changed from time to time to adjust to these conditions.For example,the winter setting may be #2while the summer setting is #3.Check the residual daily to find the ideal setting.Note:Higher numbers dispense more chemical.Small gradual changes are imperative for control.HOW TO RECHARGE FEEDER 1.Turn control valve to the closed position.SHUT OFF PUMP.2.Wait one minute.This will allow water and fumes to drain from feeder.3.Leave control valve closed and turn on pump.The check valve will prevent water from entering the feeder.4.Remove cap and fill with proper size tablets or sticks.(See Operating Instructions #1)5.Making sure O-Ring is clean,lubricated with Lifegard Silicone and is in place,replace cap.Hand tighten only.6.Open control valve to original setting.Inspect inlet and outlet line each time feeder is recharged.Replace lines yearly if necessary.BELOW WATER LEVEL INSTALLATION Feeder should be installed above water level whenever practical.If installed below water level,a drain valve must be installed to prevent spillage and dangerous splash back of high chlorinated water during recharging.Drill and tap a ¼"MPT hole at the same level the control valve is located.Make sure there is no water or tablets inside the feeder before drilling.Install optional drain valve,Part R172060,or suitable chemical resistant drain valve.BELOW WATER LEVEL RECHARGING INSTRUCTIONS 1.Shut off pump and timer switches.2.Shut off control valve.3.Place a clean container under drain and open drain valve.4.Exercise extreme caution when opening or servicing feeder.Do not inhale fumes.Wear protective gear.Remove cap.Water will now drain from feeder.Empty container back into pool or spa.5.Close drain valve.fill with proper size tablets or sticks.6.Making sure O-Ring is clean,lubricated with Lifegard Silicone and in place,replace cap.7.Turn on pump and timer switches.8.Reset control valve to original setting.Inspect inlet and outlet line each time feeder is recharged.Replace lines yearly if necessary.Features:•No special venting required.•Completely enclosed-no escaping gases.•Positive external no-clog control valve.•Feeder is designed to automatically lower thewater level so tablets are no soakingduring off period of pump.This allows moreefficient use of tablets.•No equipment damage.Feeds sanitizer directly to pool or spa.•All parts replaceable.•To prevent over feeding during use,completely close the control valve and the built in check valve will prevent chemical from being fed into pool or spa.YOUR LIFEGARD ™FEEDER IS THE MOST EFFICIENT AND TROUBLE-FREE AUTOMATIC FEEDER YOU CAN BUY,BUT IT CAN ALSO BE DANGEROUS TO YOU AND YOUR EQUIPMENT.PLEASE FOLLOW INSTRUCTIONS EXACTLY ANDHEED ALL CAUTIONS.YOUR SAFETY AND THE PROTECTION OF YOUR EQUIPMENT IS OUR FIRST CONCERN.••© 2015 Pentair Water Pool and Spa, Inc. All rights reserved. Sanford, NC Moorpark, CA Chino, CA visit P/N R24292 D 3/15(* Using Bromine tablets with this device is not NSF certified) CHLORINE/BROMINE* FEEDER MODEL #300RAINBOW ™WARNING! During no flow through feeder. potential for elevated chemical concentrations and hazadadous gasE X T E NS IONS•Going on vacation?•Need more chlorine?•Filling Chlorinator/Brominator too frequently?LIFEGARD CHLORINATOR EXTENSIONS SOLVE THE ABOVE PROBLEMS BY:1.Increasing tablet capacity.rger chamber size allows more erosion of tablets.(See special instructions below)The10"extension doubles and the20"extension triples(approximately)the capacity and time between refills.*AVAILABLE THROUGH LIFEGARD DEALERS ONL Y.NOTE:On free standing#300series chlorinators,the base of the chlorinator should be secured to prevent the possibility of the chlorinator tipping over due to increased height. INSTALLATION INSTRUCTIONS1.Follow recharging instructions to the point of filling with tablets2.Making sure O-Ring is clean,lubricated with Lifegard Silicone and in place,screw on extensiontightly and secure with lock screw.(Y ou may wish to wait until back in operation before tightening screw to insure against leaks).3.Fill with tablets and continue with normal recharging procedure.SPECIAL INSTRUCTIONS:The large chamber size will result in more chlorine being dispensed at thesame valve setting,therefore,once installed,several days monitoring willbe necessary to readjust chlorinator output.*Does not apply to large capacity#300-19or#300-29.Parts Breakdown DrawingItem Quantity Part No.Description11R172078Lockscrew(bottom collar)21R172009O-RingR780271#382271R#10"Chlorinator extension complete20"Chlorinator extension completeR24054-1200inletlineandpump.used,aFIREMAN’SSWITCHorChlorinator outlet line**Chlorinator inlet line#R172323*¼"CheckValveor#R172324*½"CheckValveChlorinatorHeaterPump#R1722881½"-2"CheckValveReturnlinepool/spaFilter Technical Support: (800) 831-71331620 Hawkins Ave., Sanford,NC 27330 • (919) 566-800010951 West Los Angeles Ave., Moorpark, CA 93021 • (805) 553-5000Rainbow LifeGuard™ and Pentair Water Pool and Spa® is a trademark and/or a registered trademark of Pentair Water Pool and Spa, Inc. and/or its affiliated companies in the United States and/or other countries. Unless noted, names and brands of others that may be used in this document are not used to indicate an affiliation or endorsement between the proprietors of these names and brands and Pentair Water Pool and Spa, Inc. Those names and brands may be the trademarks or registered trademarks of those parties or others.© 2015 Pentair Water Pool and Spa, Inc. All rights reserved*R24292*R24292 RevD 13950 Mountain Ave., Chino, CA 91710。
产品安装说明书AINSTALLATION DIMENSIONSB25807TW-1BHELPFUL TOOLS1、安装前,请仔细阅读本手册,并正确施工。
2、请按本说明书内记载的方法施工。
擅自变更施工方法所引起的 不良后果,本公司将不负责所引起之损失。
3、按摩缸安装要求高,请专业人员施工。
检查(1) 在您收到浴缸打开包装箱后,检查开关和所有的配件是否完好。
(2) 请检查浴缸表面是否有任何撞击或破损的现象。
(3) 请检查管道口是否紧密牢固。
安装注意事项(1) 我们建议您为了方便维修和清洁,请将浴缸安装在瓷砖已经贴 好的台面和地砖已经贴好的地坪上。
(2) 将墙、地砖的工程完全结束后,再将浴缸从包装箱中取出进行 安装。
(3) 施工过程中,请不要将浴缸表面的保护膜撕开。
(4) 施工时,严禁将灯泡,明火置于浴缸内。
(5) 施工时,严禁在浴缸内存放置黄沙,水泥及其它容易损坏缸体 表面的杂物。
(6) 施工时,严禁向浴缸内倾倒油漆,胶水等溶剂。
1.Please read the instruction carefully before beginning to install.2.Please follow steps in the instruction to install this product or may resultin costly mistake. Bravat shall not be responsible for any loss from that mistake.3. Professional help is required for installation of this product.Inspection(1)Check and ensure all switch and accessories are in good condition .(2)Check and ensure bathtub surface is free of hit and damage.(3)Check and ensure pipe connection is firm and compact.Attention points at Installation(1) To facilitate maintenance and clean, we recommend to install bathtub onfinished floor with ceramic tile or terrace with ground tile.(2)DON’T take bathtub out of package for installation until wall and floor preparation finished.(3)DON’T remove the protective tape and film of bathtub during installation.(4)NO bulbs and open fires are allowed to place in bathtub duringinstallation.(5)NO stuff like sand, cement or other sundries are allowed to place inbathtub as that may likely damage bathtub surface.(6) NO solvent like paint or glue are allowed to contact with bathtub.1、为使浴缸干净整洁,建议您在沐浴后,趁水刚放完而浴缸还没 干的时候立即清洁浴缸,这时候很容易将肥皂、人体脂肪及污 垢等清除,以免污垢粘在浴缸上干结后不便清洁。
按摩浴缸安装说明书(中英文版)
(一)需要准备的材料
1. 水源:冷热水镀锌管各一根,离地高度300mm,出墙装截止阀
2. 电源:AC220V/50Hz,单相三线制,BV=3,离地高度400mm,装10A防水插座
3. 在离地高度130mm左右,产品外侧装电源控制开关。
4. 排水:下水口应位以图示排水口为中心,半径200mm的范围内(不要在中心位置),并用软管连接
(二)安装步骤本产品各部件采用标准通用件,安装时请参考产品技术参数,按以下步骤进行安装:
1. 确定产品安装位置:请参考水电参数表及水电安装图布置下水管道、电源插座、给水管等。
并确保有足够的位置连接。
然后将浴缸至于安装场所,调节底部平衡螺母使缸体保持水平。
为了下一步安装方便,先将浴缸移出少许,待安装完成后再移回安装位。
2. 连接下水道:排水管在浴缸底部,是11/4喉节塑料管,可任意角度弯曲,连接时请将末端固定在下水道上,然后使用胶带或者玻璃密封。
注意不能打折,以免影响排水
3. 连接进水管:进水管为耐热高压耐高温网丝管,请按接头处标识连接冷‘热水接头,不要接反,为了维护方便,建议冷、热水接头处各装一个阀门
4. 连接电源:本产品适用于220v交流电源,请参照水电安装图位置装漏电开关及插座,注意防水。
将插头插入电源插座,按下漏电保护插头的复位按钮,其指示灯亮即可。
注意保证浴缸接地良好。
5. 检查清理:以上步骤完成后,检查各管道接头是否密封,确保无误后清理缸内杂物,打开排水装置,用水清洗浴缸(务必清洗干净以免损坏水泵)。
6. 加水测试:确认缸内无杂物后关闭排水,然后蓄水加电测试(参照使用说明。
)
Jacuzzi installation instructions (in English)
(1) the need to prepare material
1. Source: cold galvanization each a root, from the ground level 300 mm, the wall with globe valve
2. Power: AC220V/frequency 50 Hz, single phase three wire, BV = 3, from the ground level 400 mm, with 10 A waterproof socket
3. From ground level in 130 mm or so, the product with the power control switch.
4. Drainage: buccal should be a drain on here as the center, the radius of the 200 mm range (don't in the center), and hose connection
(2) the installation process This product components adopt standard part, when installation, please refer to the product technical parameters, according to the following steps to installation:
1. Determine product installation position: please refer to the water and electricity parameter table and hydropower installation figure decorate water pipe, power outlets, pipes, etc. And to ensure enough position connection. Then will bath crock as for installation place, adjust the bottom to keep balance nut cylinder level. In order to the next step of convenient installation, the first move out of a bath crock, to install complete to move back to install a.
2. Connections sewer: drain in bath crock bottom, is 1 throat section plastic pipe, can be arbitrary
Angle bending, connection will be fixed in the sewers please end, then use adhesive tape or glass seal. Note can't discount, so as not to affect the drainage
3. Connect feed line: feed line for heat resistant to high temperature high pressure pipe net silk, please click joints connected cold 'hot water mark joint, do not take the, in order to maintain convenient, the proposal within the cold and hot water to install a valve
4. Connect the power: this product is suitable for 220 v ac power, please according to the installation drawing with electricity and water leakage switch and socket position, note waterproof. Insert the plug into the power supply socket, press the reset button leakage protection plugs, the indicator light can. Pay attention to ensure good bath crock grounding.
5. Check the cleaning: the above steps after completion, check the pipe joints is sealed, make sure clear after the cylinder is sundry, open the drainage device, water to clean bath crock (be sure to clean in order to avoid damage the pump).
6. Adding water test: confirmation without sundries in cylinder closed after drainage, then water storage, electric test (see instructions.)。