用SoapUI进行Webservice的性能压力测试
- 格式:docx
- 大小:41.96 KB
- 文档页数:3
SoapUI实践:自动化测试、压力测试、持续集成因为项目的原因,前段时间研究并使用了SoapUI 测试工具进行自测开发的api。
下面将研究的成果展示给大家,希望对需要的人有所帮助。
SoapUI 是什么?SoapUI 是一个开源测试工具,通过soap/http 来检查、调用、实现Web Service 的功能/负载/符合性测试。
该工具既可作为一个单独的测试软件使用,也可利用插件集成到Eclipse,maven2.X,Netbeans 和intellij 中使用。
SoapUI 的安装下载地址,最好下载最新版本安装包,因为SoapUI 是基于java 开发的测试工具,3.0 以前版本的安装包没有集成JRE,这样就得自己安装和配置java 运行环境了。
SoapUI 的使用1. 在主界面File 菜单,点击“New REST Project”,填写你想要测试的url,根据我们的项目Teacher Site 中的url 举例:参照下图需要在Resource 输入框输入/Login/Login 路由,并在Params 中输入登录时需要的查询参数accountName 和password。
2. 点击绿色按钮,SoapUI 发送登录请求,可以在右侧框中看到登录请求返回的结果。
根据Teacher site 项目的业务需求,发送Login 请求完成后还得发送SchoolItemChange 接口才会返回用户登录成功后认证的Token,如下图中Set-Cookie 的值将会在下一个GetOverview 接口的请求头中Cookie 属性使用:3. 接下来的第三个请求GetOverview 如下图,在Header 框中添加Cookie 属性,值就是上一个请求SchoolItemChange 返回的Set-Cookie 值:自动化测试其实以上三个接口的调用,只是简单的测试接口是否调用正常,如果想要对三个接口的调用进行自动化测试,请看下面的分解:1. 右键每一个接口下的Request 请求,如图所示,选择”Add TestCase”项,依次为以上三个接口设置Test Case,在TestSteps 下分别有Login,SchoolItemChange,GetOverview 三个TestCases。


使用SoapUI测试SAP的Web Service我们经常会遇到SAP系统与外部系统对接的需求,而web service就是一个比较好用的工具。
下面讲解一下如何测试web service以及调试。
1.安装SoapUISoapUI可以在网上找到免费开源的版本,我的是Mac电脑,目前最新的是Soapui 5.4.0。
安装过程省略2.打开soapui如下图所示然后在Project上右键,选择New SOAP Project然后在Initial WSDL里面添加发布的web service地址然后在Project那里就会出现添加的接口双击Request 1就会出现如图所示的接口字段然后添加接口连接到SAP的账号,找到如上图所示的Auth,点击如下图所示的,选择Add New Authorization然后在弹出的界面选择OK,如下图所示:然后输入账号和密码(web service接口连接SAP的账号和密码,需要对话类型的账号,不然无法打外部断点)。
输入完之后,点击Auth隐藏账号界面然后就出现如下图所示:上图中打问号的地方就是需要填写值的地方。
当填完一些参数之后,点击执行,就能得到一些返回结果,如下图所示这说明接口就是通的。
特别需要注意的地方是:在使用soapui来测试sap的web service时,日期,数量,金额字段因为类型不一样,要么不传值,将参数里的问号去掉,要么就是传一个类型正确的值,不然接口不会通的。
如果接口不通,可以到服务器端查询也可以打外部断点来进行调试。
本文档是写给媳妇儿Yuna看的。
所以我只保证她能看懂。
其他人如有不懂的地方,请参考网络上的其他文档,谢谢!。

经常有人问我web service的性能测试是用JMeter好还是SoapUI好。
说句实话这两款都是非常优秀的开源Web Service性能测试工具,简单地说哪个更好真不太容易。
影响Web Service 性能测试的因素太多到底谁的结果更准确一些很多时候并不主要取决于测试工具。
在soapUI官方网站上有一个文章比较了这两款工具,我将要点抽出来加以分析希望能反映它们的特点。
JMeter在整个负载测试的优越性是毋庸置疑的,它覆盖了常见的各种测试类型,如HTTP, JDBC, JMS 和SOAP。
单就Web Service测试,作者做了一个简单的实验,但并没有涉及太多的细节。
试验准备:本地Web Service,运行于JBoss 4.0.3SP1,每个简单请求在4种不同负载下执行5000次,分别是1线程,5线程,10线程和25线程。
在SoapUI中为简单起见均使用简单负载策略,并且五执行延时。
要分别记录关闭连接和非关闭连接方式的数据。
关闭连接方式是指每次请求完毕后关闭连接。
反之则是让连接仍然保持打开以等待下个请求,显然会省去很多额外开销。
在JMeter中也可以做类似配置,如线程数为1,循环次数5000或线程数25,循环200次。
环境:WinXP SP2, Pentium M 1.8 1 G RAM, JRE 1.5.0_06.结果:其中带*的是非关闭连接模式下测试的结果。
从结果中看出Jmeter的测试值均较SoapUI偏大,但与UI连接关闭模式下执行结果相差无几。
实验未给出JMeter命令行下的测试结果。
但从经验来讲,命令行执行方式避免了测试工具本身带来的巨大资源消耗,更接近真实值。
soapUI 在命令行连接不关闭模式下TPS随线程的增加在初期有明显上升的。
从计时机制来看,JMeter 用的是System.currentTimeMillis(),而soapUI用的是更为精确的System.nanoTime().综上所述(文中没有点明,但这是显而易见的),soapUI在单纯的Web Service 测试时有明显的优势,当要综合其他测试时可以组合使用多种工具。

webserviceapi自动化测试(一)最近在webservice的项目中,主要使用SOAPUI进行webservice的测试,SOAPUI是一个开源的测试API的工具,对于现在的SOAP,REST的webservice的支持都很好。
下面简单介绍下SOAPUI的原理,SOAPUI和大多数的工具一样,都是使用HTTPREQUEST对相应的资源进行请求很提取。
再得到response之后进行相应的处理,对XML进行XPATH定位。
注意的是SOAP方法中包含GET,POST的方法,POST的方法主要使用Application/xml的MIME形式发送相应的POST数据。
这里注意webservice都有一些通病,对SQLinjection基本都没有相应的保护,所以我们要注意的是对webservice中POST的数据进行校验。
也就是通常所说的安全校验。
对webservice的测试主要分为两个阶段,首先是对WEB Ui层面的数据XML Response与webservice的schema进行对比测试,其次是web Ui层面的数据与数据库服务器中相应的数据进行验证。
这两个阶段的测试必须进行对比,以防止webservice的编写严谨度不够。
在实际项目中遇到过这样的一个BUG,在UI界面的功能中,详细信息中的必填项(非0)与受限制项(比如有文本限制,字体限制等等)在webservice实现中没有体现,我们可以用0值POST 到数据库中。
主要是由于开发在wenservice编写中没有校验和严谨的设计。
SOAPUI支持的语言是GROOVY,作为JA V A 的脚本语言,GROOVY的扩展性很强,再加上SOAPUI中原本实现的utils类能对相应的response进行XPATH的定位,得到相应的数据进行验证,在webservice实现中还能够使用property transfer进行对参数的传递,功能十分强大。
在使用SOAPUI前如果是大数据量的,比如100个CASE对数据的查询比较频繁,建议在使用前,对SOAPUI的JVM的设置提高,建议在1G左右,这样可以提高SOAPUI的可用性。

SoapUI调⽤webservice实现的两种⽅式SoapUI⽤来做测试,已经是很多⼈做过的事情了,⽽且⽹上教程也很多。
不过还是写下来,对⽐webservice协议与http协议脚本编写的不同。
⾸先测接⼝得有⼀个服务,刚好笔者所在项⽬做ESB集成。
就顺道⽤⼀下⼯作环境截⼏张图。
业务模型: 从客户端post⼀个字符串给ESB服务器,ESB服务器收到该请求后,返回⼀个在原字符串前添加⼀个Hello。
请求的报⽂添加三个head“Svc_Inbound","TEST"”Svc_ServiceCode","AAA-TEST-BBB""Svc_Version","1"报⽂正⽂<?xml version="1.0" encoding="UTF-8"?><soapenv:Envelope xmlns:soapenv="/soap/envelope/" xmlns:ser=""><soapenv:Header/><soapenv:Body><ser:sayHi><ser:in0>this is a request</ser:in0></ser:sayHi></soapenv:Body></soapenv:Envelope>服务器返回的报⽂<soap:Envelope xmlns:soap="/soap/envelope/" xmlns:xsd="/2001/XMLSchema" xmlns:xsi="/2001/XMLSchema-instance"> <soap:Body><ns1:sayHiResponse xmlns:ns1=""><ns1:out>Hello this is a request</ns1:out></ns1:sayHiResponse></soap:Body></soap:Envelope>1.通过SOAP协议实现功能的实现,⾸先⽤soapui来实现,打开soapui ,file---new soap project在⼯程创建弹出框输⼊WSDL地址,输⼊⼯程名称,点击OK双击Request 1,在创建⼯程时创建的默认请求,双击后会看到该请求内容。

SoapUI接口测试使用手册()\1.~的介绍2.SoapUISoapUI是专门针对Webservice接口的测试工具,功能强大且界面易用。
它是直接利用Web Service的WSDL文件测试Web服务的接口,利用SOAPUI测试不需要了解底层的接口、调用关系及详细协议,也不需要使用编程来实现测试用例,而是基于WSDL自动产生测试消息。
SOAPUI还支持接口的负载测试。
在对同一Web Service接口进行测试时,SOAPUI比Loadrunner表现的性能会更加优越、真实,更接近反映接口的性能指标。
并且SoapUI支持多种语言,java、c++,且wcf 这种形式的接口也可支持。
3.S oapUI的安装SoapUI基于JAVA开发,支持多个平台,需要设置JAVA_HOME 变量指向到相应的JRE 目录,同时修改PATH 变量,将的bin 目录添加到PATH里面。
4.S oapUI接口测试3.1创建/导入工程启动SoapUI程序,双击目录bin下的,即可启动程序。
程序第一次打开后,在左侧导航面板上,自动有一个空的Projects 工程。
鼠标右键点击Projects,选择第一项“New SoapUI Project”,新建一个工程。
(如果本地有现成的工程,也可直接选择第二项导入工程“Import Project”,选择本地的xml文件导入即可)如下图《页面弹出“New SoapUI Project”框,输入Project Name,“Initial WSDL/WADL”可填入URL 地址或直接导入WSDL 文件,(在这一步骤中,也可不导入WSDL文件,等到工程创建好后,右键点击工程名,选择“Add WSDL”也可导入)如下图所示:—默认选上:Create Requests:Create sample requests for all operations(为每个接口创建一个请求)Create TestSuite:Creates a TestSuite for the imported WSDL or WADL(为WSDL 或WADL 创建一个测试包)点击OK按钮,弹出创建测试包的对话框“Generate TestSuite”:、此处显示的都是WSDL文件中的所有方法,只须选择要测试的方用来进行接口的性能测试,如果有需要可以勾选说明:Single TestCase with one Request for each Operation(为每个接口的请求都创建一个测试用例)Create new empty requests(创建一个空的请求)Generates a default LoadTest for each created TestCase(为每个创建好的测试用例生成一个默认的负载测试)》点击OK按钮,在弹出框中填入测试包的名称,点击确定按钮后,工程便创建成功。
WebService测试方案
1.WebService简介
WebService是一种革命性的分布式计算技术,本质上就是网络上可用的API,可以直接在网络环境调用的方法。
WebService常用的框架有axis、xfire、cxf等。
WebService发布后,其服务是封装在一个wsdl(Web Services Description Language,Web服务描述语言)文件中,客户端发请求主要是向发布好的wsdl地址以SOAP方式发请求,调用过程如下:
Ø 服务端:
n 生成服务描述文件,以供客户端获取。
n 接收客户端发来的SOAP请求消息,解析其中的方法调用和参数格式。
n 根据wsdl和wsml的描述,调用相应的COM对象来完成指定功能,并把返回值放入SOAP回应消息返回给用户。
Ø 客户端:
n 取得服务端的服务描述文件,解析该文件从而获得服务端的服务信息以及调用方式。
n 指定调用方法和参数,生成恰当的SOAP请求消息,发往服务端。
n 等待服务端返回的SOAP回应消息,解析得到返回值。
2.WebService测试说明
WebService的测试主要围绕功能测试、性能测试和安全性测试展开,下面主要描述WebService三大测试的要点。
PS:双击后Ctrl+A,Ctrl+C然后粘贴到word即可不能直接提供word版,抱歉。
soapUI测试web service(官方教程)使用soapUI测试web service十分简单。
到官方网站/index.html下载最新版本,并安装。
下面开始我们的soapUI测试之旅。
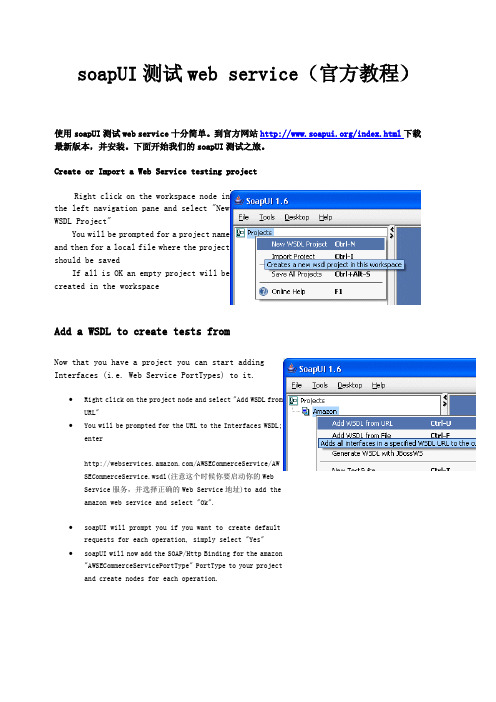
Create or Import a Web Service testing projectRight click on the workspace node inthe left navigation pane and select "NewWSDL Project"and then for a local file where the projectshould be savedcreated in the workspaceAdd a WSDL to create tests fromNow that you have a project you can start addingInterfaces (i.e. Web Service PortTypes) to it.∙Right click on the project node and select "Add WSDL fromURL"∙You will be prompted for the URL to the Interfaces WSDL;enter/AWSECommerceService/AWSECommerceService.wsdl(注意这个时候你要启动你的WebService服务,并选择正确的Web Service地址)to add theamazon web service and select "Ok".∙soapUI will prompt you if you want to create defaultrequests for each operation, simply select "Yes"∙soapUI will now add the SOAP/Http Binding for the amazon"AWSECommerceServicePortType" PortType to your projectand create nodes for each operation.Try some Web Service requestsNow that you have added the amazon Web Service you can start playing around with some requests. When you added the interface in the previous step soapUI created default requests for each operation in accordance with their WSDL and Schema definition.∙Expand the Interface node and anyOperation node under it, you should seethe created "Request 1".∙Double-click the request node to open the request editor in the right part of soapUI(see image below)∙The request editor is divided into 3 parts:o A toolbar at the top with a numberof request relatedactions/optionso A request area to the lefto A response area to the right ∙The default request created by soapUI will have "?" for each value that needsto be supplied in the request, replace orremove any values as required and postrequest by pressing the left-most toolbarbutton (a green arrow) (?代表你需要填充的值)∙The request will run in the background and its response will be displayed in theright editor。

SOA Testing 工具介绍目录SOA Testing 工具介绍 (1)目录 (2)一、SOAP UI (3)1. 介绍 (3)2. 安装、运行SOAP UI (3)3. 使用指南 (4)1.3.1创建、导入工程 (4)1.3.2执行web service操作请求 (7)1.3.3功能测试(Functional Testing) (9)1.3.4压力测试(Load Testing) (13)1.3.5 Web Service Mocking (19)二、Apache JMeter (19)1. 介绍 (19)JMeter简介 (19)JMeter主要特性 (19)2. 安装、运行Apache JMeter (20)3. 使用指南 (20)3.3.1在JMeter中测试Web Service (20)3.3.2在JMeter中测试JMS (28)三、PushToTest TestMaker (33)1. 介绍 (33)2. 安装、运行PushToTest_TestMaker (34)3. 使用指南 (36)2.3.1基于SOAP的Web Service的测试和监控 (37)一、S OAP UI1.介绍Soap ui提供一个工具通过soap/http来检查,调用,实现web service和web service的功能/负载/符合性测试。
该工具既可作为一个桌面应用软件使用,也可利用插件集成到Eclipse,maven2.X,netbeans和intellij中使用。
利用该工具可以方便快速的验证、测试WebService;同时可以作为WebService性能测试工具。
官方网址:/下载地址:/projects/soapui2.安装、运行SOAP UI根据下面的步骤来安装、运行soapUI:●从站点t /,通过Java WebStart可以在线安装最新的版本:●从站点sourceforge(/projects/soapui),下载安装soapUI的Windows版本,该版本包括了需要的Java运行环境(JRE1.5)。


WebService性能测试简单分析案例—大傻日期版本号作者修订历史2010-12-8 1.0 大傻编写版权声明:本文由BSTT成员收集整理,只作相互交流学习使用,不能作为任何商业用途,转载时请务必标识BSTT统一LOGO,并注明BSTT宗旨(倡导测试开源,分享测试经验)。
QQ交流群号:149265621测试结果(100用户)1.1100*1001.1.1事物执行情况(看Action_Transaction)1.1.2稳定性控制图3431282522191613107410.200.150.100.050.00观测值单独值_X =0.1347UCL=0.2172LCL=0.052211ESB 的单值控制图1.1.3服务器资源1.2100*1501.2.1事物执行情况(看Action_Transaction)1.2.2稳定性控制图514641363126211611610.200.150.100.050.00观测值单独值_X =0.1227UCL=0.2021LCL=0.043411ESB 的单值控制图1.2.3服务器资源1.3100*2001.3.1事物执行情况(看Action_Transaction)1.3.2稳定性控制图3431282522191613107410.1750.1500.1250.1000.0750.050观测值单独值_X =0.1187UCL=0.1706LCL=0.06681ESB 的单值控制图1.3.3服务器资源1.4100*2501.4.1事物执行情况(看Action_Transaction)1.4.2稳定性控制图41373329252117139510.2000.1750.1500.1250.1000.0750.050观测值单独值_X =0.1201UCL=0.1908LCL=0.04941ESB 的单值控制图1.4.3服务器资源2测试结果(200用户)2.1200*1002.1.1事物执行情况(看Action_Transaction)2.1.2稳定性控制图282522191613107410.50.40.30.20.1观测值单独值_X =0.3654UCL=0.5161LCL=0.2146111ESB 的单值控制图2.1.3服务器资源2.2200*1502.2.1事物执行情况(看Action_Transaction)2.2.2稳定性控制图41373329252117139510.60.50.40.30.20.1观测值单独值_X =0.4174UCL=0.5521LCL=0.282711ESB 的单值控制图2.2.3服务器资源2.3200*2002.3.1事物执行情况(看Action_Transaction)2.3.2稳定性控制图282522191613107410.550.500.450.400.350.300.250.20观测值单独值_X =0.4028UCL=0.5163LCL=0.289311ESB 的单值控制图2.3.3服务器资源2.4200*2502.4.1事物执行情况(看Action_Transaction)2.4.2稳定性控制图3329252117139510.60.50.40.30.20.1观测值单独值_X =0.4088UCL=0.5670LCL=0.2506111ESB 的单值控制图2.4.3服务器资源3测试分析3.1响应时间场景名称最小值平均值最大值90Percent 100*100 0.010 0.140 0.479 0.253100*1500.010 0.128 0.434 0.223100*2000.008 0.122 0.432 0.213100*2500.010 0.123 0.419 0.223200*100 0.010 0.382 1.009 0.585200*1500.016 0.428 1.055 0.605200*2000.021 0.412 1.025 0.595200*2500.016 0.418 1.128 0.6053.2每秒执行数场景名称执行事物数(次)执行总时间(秒)每秒执行事物数(次/秒)100*100 10000 35 286100*150 15000 50 300100*200 20000 65 308100*250 25000 80 313200*100 20000 60 333200*150 15000 90 167200*200 40000 120 333200*250 50000 140 3574测试结论1.根据并发用户数的增加,响应时间逐步增加,响应时间受迭代次数的影响没有。
soapui用法
SOAPUI是一款专业的Web Service接口测试工具,目前是企业级应用服务测试市场最受欢迎的工具之一,它针对XML、WebService、SOAP等技术研发,具有可视化界面、可扩展性和可维护性,可以极大地提高企业应用服务测试和监控效率,以及缩短产品向市场投放所需的时间。
首先,SOAPUI可以支持用户快速建立、覆盖多种功能的各种接口测试用例,节约人力成本,提高测试工作效率。
其次,SOAPUI具备自动化测试功能,dfg可以根据用户提供的测试用例及数据,按照一定流程自动运行测试。
同时,它可以借助一定配置,实现脚本调度,从而实现更复杂的功能测试任务,如回归测试、压力测试等。
此外,SOAPUI还可以收集整理服务的历史运行数据,更好的追踪服务的运行状态,以确定可用性端口数,避免服务报错和拥塞,且可以自由地将测试结果存入自己定义的项目中,减少纸质报表录入的工作量。
因此,SOAPUI是一种多功能的Web Service接口测试工具,可以帮助企业提高接口测试效率、节省成本,以及确保企业应用服务质量。
企业用这款工具建立测试环境,可以在较短的时间内进行交互式测试,维护服务监控,最大程度地保证服务的可用性和稳定性,获得最新的测试结果,从而推进产品快速向市场投放,实现业务智能化管理。
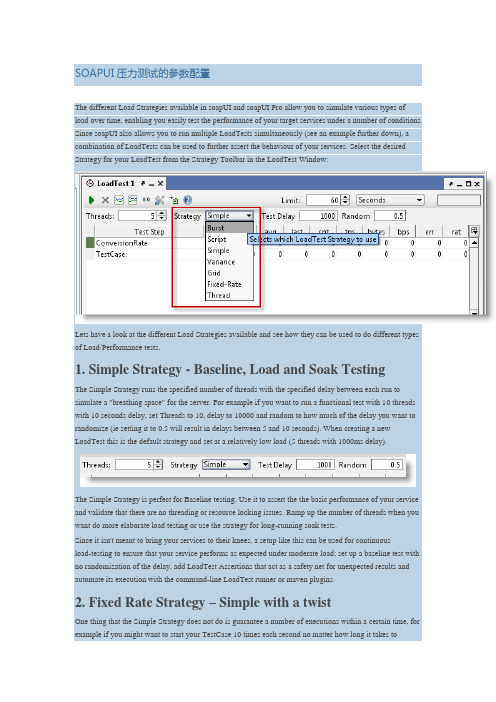
SOAPUI压力测试的参数配置The different Load Strategies available in soapUI and soapUI Pro allow you to simulate various types of load over time, enabling you easily test the performance of your target services under a number of conditions. Since soapUI also allows you to run multiple LoadTests simultaneously (see an example further down), a combination of LoadTests can be used to further assert the behaviour of your services. Select the desired Strategy for your LoadTest from the Strategy Toolbar in the LoadTest Window:Lets have a look at the different Load Strategies available and see how they can be used to do different types of Load/Performance tests.1. Simple Strategy - Baseline, Load and Soak TestingThe Simple Strategy runs the specified number of threads with the specified delay between each run to simulate a "breathing space" for the server. For example if you want to run a functional test with 10 threads with 10 seconds delay, set Threads to 10, delay to 10000 and random to how much of the delay you want to randomize (ie setting it to 0.5 will result in delays between 5 and 10 seconds). When creating a new LoadTest this is the default strategy and set at a relatively low load (5 threads with 1000ms delay).The Simple Strategy is perfect for Baseline testing. Use it to assert the the basic performance of your service and validate that there are no threading or resource locking issues. Ramp up the number of threads when you want do more elaborate load testing or use the strategy for long-running soak tests.Since it isn't meant to bring your services to their knees, a setup like this can be used for continuousload-testing to ensure that your service performs as expected under moderate load; set up a baseline test with no randomization of the delay, add LoadTest Assertions that act as a safety net for unexpected results and automate its execution with the command-line LoadTest runner or maven plugins.2. Fixed Rate Strategy – Simple with a twistOne thing that the Simple Strategy does not do is guarantee a number of executions within a certain time, for example if you might want to start your TestCase 10 times each second no matter how long it takes toexecute. Using the Simple Strategy you could set up 10 Threads and a delay compensating for the average gap between the end of the TestCase and the start of the next second, but this would be highly unreliable over time. The Fixed-Rate strategy should be used instead; set the rate as desired (10 in our case) and off you go; the strategy will automatically start the required number threads for this setting attempting to maintain the configured value.As hinted in the headline, there are some twists here: what if our TestCase takes more than one second to execute? To maintain the configured TPS value, the strategy will internally start new threads to compensate for this; after a while you might have many more than 10 threads running due to the fact that the original ones had not finished within the set rate. And not surprisingly this could cause the target service to get even slower, resulting in more and more threads being started to "keep up" with the configured TPS value. As you probably guessed the "Max Threads" setting is her to prevent soapUI from overloading (both itself and the target services) in this situation, specifying a value here will put a limit on the maximum number of threads the soapUI will be allowed to start to maintain the configured TPS, if reached the existing threads will have to finish before soapUI will start any new ones.The "Request Level" setting will attempt to maintain the TPS not on the TestCase execution level but on the request level instead, for example if you have a data-driven LoadTest or a TestCase with many requests, you want the TPS setting to apply not on the execution level of the entire TestCase but on the request level.In any case, the Fixed Rate strategy is useful for baseline, load and soak-testing if you don’t run into the "Thread Congestion" problem described above. On the other hand, you might provoke the congestion (maybe even in combination with another LoadTest) to see how your services handle this or how they recover after the congestion has been handled.3. Variable Load StrategiesThere are several strategies that can be used to vary load (the number of threads) over time, each simulating a different kind of behavior. They can be useful for recovery and stress testing, but just as well for baseline testing, either on their own or in combination with other strategies. Let's have a quick look:1.Variance strategy–this varies the number of threads over time in a “sawtooth” manor asconfigured; set the Interval to the desired value and the Variance to the how much the number ofthreads should decrease and increase. For example if we start with 20 threads, set interval to 60 and Variance to 0.8, the number of threads will increase from 20 to 36 within the first 15 seconds, then decrease back to 20 and continue down to 4 threads after 45 seconds, and finally go back up to the initial value after 60 seconds. In the Statistics Diagrams we can follow this variance easily:2.Burst Strategy - this strategy is specifically designed for Recovery Testing and takes variance toits extreme; it does nothing for the configured Burst Delay, then runs the configured number of threads for the “Burst Duration” and goes back to sleep. Here you could (and should!) set the number of threads to a high value (20+) to simulate an onslaught of traffic during a short interval, then measure the recovery of your system with a standard base-line LoadTest containing basic performance-related assertions. Lets try this with a burst delay and duration of 10 seconds for 60 seconds;Here can see the bursts of activity in the diagram, please also note that the resolution has been changed to 250ms (from the default "data" value), otherwise we not have had any diagram updates during the "sleeping" periods of the execution (since no data would have been collected).3.The Thread Strategy lets you linearly change the number of threads from one level to anotherover the run of the LoadTest. It’s main purpose is as a means to identify at which level certain statistics change or events occur, for example to find at which ThreadCount the maximum TPS or BPS can be achieved or to find at which ThreadCount functional testing errors start occurring. Set the start and end thread values (for example 5 to 50) and set the duration to a relatively long duration (I use at least 30 seconds per thread value, in this example that would be 1350 seconds) to get accurate measurements (more on this below).4.Grid Strategy– this strategy allows to specifically configure the relative change in number ofthreads over time, its main use for this is more advanced scenario and recovery testing, where you need to see the services behavior under varying loads and load changes. For example lets say you want to run for 60 seconds with 10, 20, 10, 40, 10 threads. Configure your LoadTest to start with 10 threads and then enter the following values in the Grid:Both values are stored relative to the duration and actual ThreadCount of the LoadTest; if you change these, the corresponding Grid Strategy values will be recalculated. Running the test shows thefollowing output:5.Script Strategy– the script strategy is the ultimate customization possibility; the script you specifyis called regularly (The "Strategy Interval" setting in the LoadTest Options dialog) and should return the desired number of threads at that current time. Returning a value other than the current one will start or stop threads to adjust for the change. This allows for any kind of variance of the number of threads, for example the following script randomizes the number of threads between 5 and 15.Running this with the strategy interval set to 5000 the number of threads will change every 5 seconds: The possibilities here are endless.4. Statistics Calculation and ThreadCount ChangesMany of these strategies will change the number of threads which has an important impact on the statistics calculation that you need to be aware of; when the number of threads changes, this will usually change the response times of the target services, resulting in a change in avg, tps, etc. but since the LoadTest has already run at a previous number of threads the results for those runs will skew the result for the new ThreadCount. For example lets say you have been running at 5 threads and got and average to 500ms. Using the Thread Strategy you increase the number of threads gradually; when running 6 threads the average increases to600ms but since the “old” values collected for 5 threads are still there, these will in total result in a lower average. There are two eas y ways to work around this; select the “Reset Statistics on ThreadCount change” value in the LoadTest Options dialog, or manually reset the statistics with the corresponding button in the LoadTest toolbar; in either case old statistics will be discarded. To see this in action lets do a ThreadCount Strategy test from 10 to 20 threads over 300 seconds (30 seconds per thread), below you can see results both with this setting unchecked and then checked;In the latter you see the “jumps” in statistics each time they are reset when the number of threads changes, gradually leveling out to a new value. The final TPS calculated at 20 threads differs about 10% between these two, showing how the lower results “impact” the higher ones.5. Running Multiple LoadTests SimultaneouslyOk, lets have a quick look at this; we'll create one baseline test with the simple strategy and a low number of threads, and at the same time run a burst strategy to see how the baseline test performance "recovers" after the burst;Here you can see the simple strategy (bottom diagram) recovering gradually after each burst of load.6. Final WordsHopefully you have gotten a good overview of the different strategies in soapUI and how they can be used to simulate different scenarios and kinds of load. As you may have noticed, soapUI focuses more on"behavioral" LoadTesting (understanding how your services handler different loads) instead of exact numbers, which is anyhow hard to calculate since there are so many external factors influencing it.。
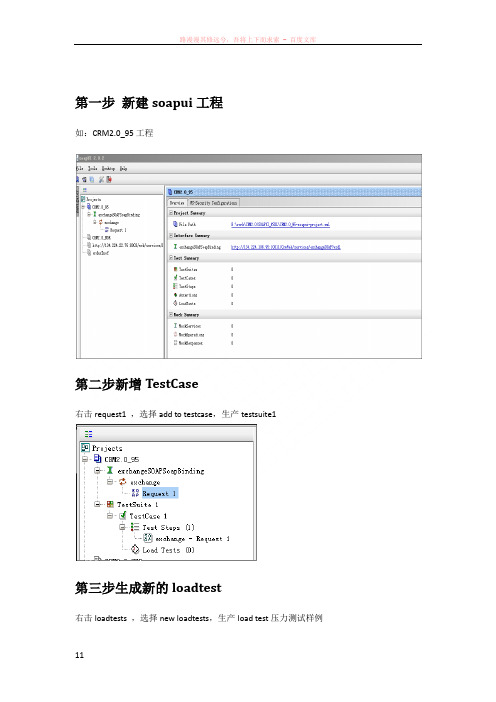
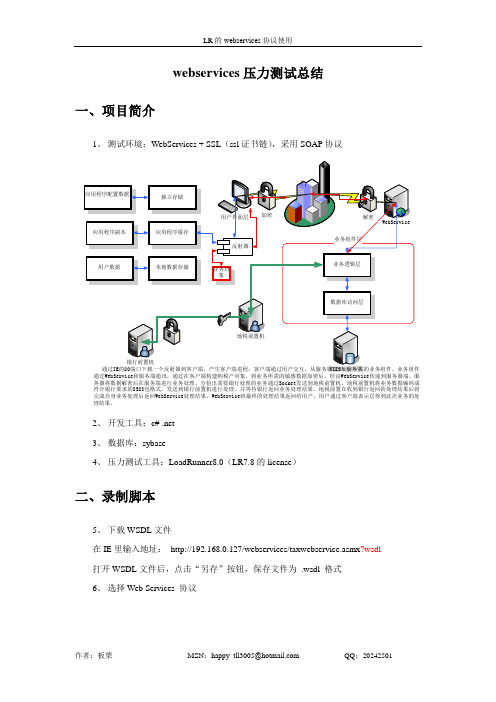
webservices压力测试总结一、项目简介1、测试环境:WebServices + SSL(ssl证书链),采用SOAP协议数据库服务器通过IE的80端口下载一个反射器到客户端,产生客户端进程。
客户端通过用户交互,从服务器IIS反射所需的业务组件。
业务组件通过WebService和服务端通讯,通过在客户端构建纳税户对象,将业务所需的敏感数据加密后,经由WebService传递到服务器端。
服务器将数据解密后在服务端进行业务处理。
分捡出需要银行处理的业务通过Socket发送到地税前置机。
地税前置机将业务数据编码成符合银行要求的8583包格式,发送到银行前置机进行处理。
并等待银行返回业务处理结果。
地税前置在收到银行返回的处理结果后将完成自身业务处理后返回WebService处理结果。
WebService将最终的处理结果返回给用户。
用户通过客户端表示层得到此次业务的处理结果。
2、开发工具:c# .net3、数据库:sybase4、压力测试工具:LoadRunner8.0(LR7.8的license)二、录制脚本5、下载WSDL文件在IE里输入地址:http://192.168.0.127/webservices/taxwebservice.asmx?wsdl打开WSDL文件后,点击“另存”按钮,保存文件为.wsdl 格式6、选择Web Services 协议7、Scan WSDL File8、Specify WSDL for scanning9、选择方法10、Specify argument values11、Start Record点击“Start Record”按钮12、Specify application to record13、调用程序开始录制三、SSL配置14、Recording Options(Ctrl+F7)15、Port Mapping16、点击“New Entry”补充:定义端口映射VuGen 使用“端口映射”设置,通过特定的服务器: 端口组合将流量定向到需要的通信协议。

webservice接⼝测试
1,⽤soupui进⾏测试
2,安装soupUI
3,测试的时候是给了⼀个wdsl
操作步诹:new (name , 填写地址)---导⼊wsdl⽂件---看到所有的接⼝
发送请求的格式<xml> canshu</xml>
应⽤场景,传统⾏业,电信等
导⼊时遇到问题怎么解决:
解决⽅案:关闭程序并找到SoapUI的安装位置中的SoapUI-4.6.4.vmoptions这个⽂件,在末尾加⼊ -Dfile.encoding=UTF8 可解决
webservice接⼝进⾏性能测试:
1.有些⾮标准的wsdl⽂件导⼊到loadrunner时候会报错,这时候我们就能利⽤jmeter进⾏性能测试
2.Saopui导⼊wsdl⽂件或者url地址,导⼊报错的见说明⽂档
3.如果有参数输⼊的,输⼊参数(讲?号替换成传⼊的参数值),参数见wsdl接⼝调⽤说明
查看“Raw”
4.Jmeter,所以请求全部拷贝于saopui中。

LoadRunnner下的Webservices压力测试过程一、概念介绍A、webservices压力测试网上介绍:/html/75/n-159175.html/s/blog_51dc0fba0100amyj.html/html/79/n-98479.html在进行性能测试时,大部分对Web性能测试,选择“Web(HTTP/HTML)”协议即可,但录制完脚本后,回放脚本过程中有时会发生中断或停止的情况,查看错误时,如果无法找到SOAP文件字样时,就需要考虑更换脚本录制协议了。
通常首先考虑更换Web Services协议,再次录制脚本,问题就相应解决了。
在录制Web Services脚本前,首先对Web Services做一个简要的介绍,这样有助于读者或者测试人员能够更好地利用Web Services协议录制脚本。
1.什么是Web ServicesWeb Services是一种构建应用程序的普通模型,并能在所有支持Internet通信的操作系统上实施运行。
Web Services令基于组件的开发和Web的结合达到最佳,基于组件的对象模型,如:分布式组件对象模型(Distributed Component Object Model, DCOM)、远程方法调用(Remote Method Invocation, RMI)、互联网内部对象请求代理协议(Internet Inter-Orb Protocol, IIOP)都已经发布很长时间,但是它们都依赖于特殊对象模型协议。
而Web Services利用SOAP和XML对这些模型在通信方面作了进一步的扩展,以消除特殊对象模型的障碍。
进一步地,Web Services还基于HTTP和SOAP协议,使得Web用户通过Web调用的方法使用SOAP 和HTTP来调用远程对象,确保业务数据得以在Web上传输。
2.Web Services结构客户根据WSDL描述文档,会生成一个SOAP请求消息。
性能测试一般使用loadrunner,或者自己写的调用客户端进行测试。
loadrunner是全面的性能测试工具,对一般开发人员来说太重,并且需要license。
自己写调用的客户端则测试的统计数据也需要写程序处理,比较麻烦。
这里推荐使用soapui,SOAPUI可以直接根据WSDL 生成SOAP数据包,手工填入参数后可以直接进行性能测试。
1、下载soapui的最新安装包,目前的最新版本是soapui-1.7.5,SOAPUI里的TESTSUITE 包含一些列的TESTCASE,TESTCASE由若干的测试步骤组成。
每个TESTCASE包含TESTSTEP和LOADTEST。
2、解包运行soapui.bat3、创建File--new WSDL Project,输入WSDL的HTTP URL地址4、SOAPUI产生该WSDL的HTTPBinding,里面有WSDL定义的业务方法5、每个业务方法下有自动产生的SOAP数据包的文本,编辑数据后可以直接发送6、性能测试,在TESTCASE的TEST STEP中编辑测试步骤,在LoadTest中填入性能测试的参数,可以直接进行性能测试7、使用property transfer功能生成复杂的性能测试步骤,假设一个WSDL定义了两个方法,第一个测试步骤调用了第一个方法,返回authorid,作为第二个方法的输入参数(第二个步骤)。
7.1在第一个测试步骤和第二个测试步骤之间添加一个property transfer的步骤,选择transfer 的源是第一个方法的Response对象。
填写xpath将该属性从Response中选择出来7.2选择transfer的目的地是第二个方法的request对象。
填写xpath将该属性从request中选择出来7.3属性影射从souce影射到dest8、更复杂的功能可以由goovy实现。
用S o a p U I进行W e b s e r v i c e的性能压
力测试
Company number:【0089WT-8898YT-W8CCB-BUUT-202108】
用S o a p U I进行W e b s e r v i c e的性能压力测试1. 新建测试工程
选择在一个测试用例中测试多个方法,并为测试生成压力测试:
2. 为测试 Step 添加变量:
右键选中 Test Step ,添加一个 Grooy Script Step ;添加一个变量 count 并设置初始值为0
3. 添加一个随机变量:
右键选中 Test Step ,添加一个 Grooy Script Step ;名称为 rand ,用下面的代码产生一个随机值
view plaincopy to clipboardprint
rand = new Random()
= "test_" + (100)
Random rand = new Random()
result = "test_" + (100)
4. 使用动态参数:
打开 init 操作的 SOAP 请求,将输入参数用上面步骤产生的随机替换
view plaincopy to clipboardprint
02. <soapenv:Header/>
03. <soapenv:Body>
04. <web:run>
05. <web:in0>${rand#result}</web:in0>
06. </web:run>
07. </soapenv:Body>
08.</soapenv:Envelope>
<soapenv:Header/>
<soapenv:Body>
<web:run>
<web:in0>${rand#result}</web:in0>
</web:run>
</soapenv:Body>
</soapenv:Envelope>
5. 按条件选择执行操作:
同样的再添加一个 Grooy Script Step ;名称叫 ExecHandler ,用来条件控制用例的执行
view plaincopy to clipboardprint
index = ("count")
(index == "0") {
04. ("init")
05.} else {
06. ("run")
07.}
def index = ("count")
if (index == "0") {
("init")
} else {
("run")
}
("count", "1")
6. 执行测试:
打开 LoadTest , disable 掉 init 和 run(ExecHandler 控制 init 和 run 的执行 ) ,设置好参数, OK 可以开始跑了。
正如你所预期的 init 方法只执行一次,而 run 将会按照你所设置的方式来执行。