nbu备份oracle
- 格式:docx
- 大小:336.64 KB
- 文档页数:16
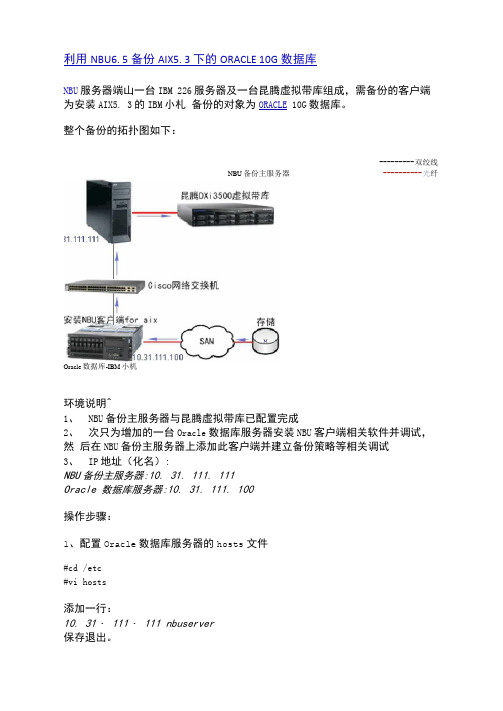
利用NBU6. 5备份AIX5. 3下的ORACLE 10G数据库NBU服务器端山一台IBM 226服务器及一台昆腾虚拟带库组成,需备份的客户端为安装AIX5. 3的IBM小札备份的对象为ORACLE 10G数据库。
整个备份的拓扑图如下:--------- 双绞线NBU备份主服务器---------- 光纤Oracle数据库-IBM小机环境说明^1、NBU备份主服务器与昆腾虚拟带库已配置完成2、次只为增加的一台Oracle数据库服务器安装NBU客户端相关软件并调试,然后在NBU备份主服务器上添加此客户端并建立备份策略等相关调试3、IP地址(化名):NBU备份主服务器:10. 31. 111. 111Oracle 数据库服务器:10. 31. 111. 100操作步骤:1、配置Oracle数据库服务器的hosts文件#cd /etc#vi hosts添加一行:10. 31・ 111・ 111 nbuserver保存退出。
2、安装NBU clients软件通过FTP将NBU客户端软件上传至小机的TMP LI录下,然后运行:#cd /tmp#chmod - R 777 unixclients#cd unixclients#・/installSymantec Installation ScriptCopyright 1993 - 2007 Symantec Corporation, All Rights Reserved・Installing NetBackup Client SoftwareNOTE: To install NetBackup Server software, insert the appropriateNetBackup Server cdrom.Do you wish to continue? [y, n] (y) 偷入yDo you want to install the NetBackup client software for this client? [y, n](y) //输入yThis package will install RS6000/AIX5 client・This package will install NetBackup client 6. 5・Enter the name of the NetBackup server : nbuserver /输入NBU备份主服务器hostnameWould you like to use u oraclel u as the configuredname of the NetBackup client? [y, n] (y) 血入y,使川原小机的hostsname: oraclel确认后,就开始安装NBU客户端软件,安装的默认路径为/usr/openv/netbackupo 3、配置和査看bp. conf#cd /usr/openv/netbackup#cat bp. confSERVER = nbuserverCLIENT_NAME = oraclel4、安装database age nt将database agent安装文件上传至上机的/tmp文件夹中,然后:#cd /tmp#chmod - R 777 /agents#・/installSymantec Installation ScriptCopyright 1993 - 2007 Symantec Corporation, All Rights Reserved・Installation Options1 NetBackup Add-On Product Software2 NetBackup Database Agent Software q To quit from this scriptChoose an option [default: q]: 2选择 2, 安装 database agent•I • • I • • I • • I • • I • • I • • I • • I • • I • • I •There are two ways to install database agent software ・ 1.Remote Installation:Loads the software on a server withthe intent of pushing database software out to affected clients ・2.Local Ins tdllation: Loads and ins tails the software only to thislocal machine ・•I • • I • • I • • I • • I • • I • • I • • I • • I • • I •Do you want to do a local installation? [y, n] (n) y 安装•I • • I • • I • • I • • I • • I • • I • • I • • I • • I •NetBackup Database Agent InstallationChoose the Database Agents you wish to install one at a time or select Install All Database Agents.7) Install All Database Agents Done Selecting Agents Exit from this Script//选择 oracle //完成选择操作You have chosen to install these Database Agents: NetBackup for Oracle Is this list correct? [y, n] (y) (询宦安诫 oracle agents1) NetBackup 2) NetBackup 3) NetBackup 4) NetBackup 5) NetBackup 6)NetBackup for DB2 for Informix for Lotus Notes for Oracle for SAP for Sybase Q)X )Choose an option: 4 Choose an option: q5、编辑sh备份脚本Database agent安装完后,会在/ usr/openv/netbackup/ext/db_ext / orac 1 e/samp les/rman 中有一些例子文件,利用其中的一个,运行:#cd /usr/openv/netbackup/ext/db_ext/orac1e/samples/rman#cp hot_database_backup・ sh hot_database_backup・ 10. 31. 111. 100. sh然后使用Vi编辑该sh,只需修改如下参数:ORA CLE_HOME=/or a c 1 e/pro due t/1 OGexport ORACLE_HOME0RACLE_SID=orcl2export ORACLE_SIDORACLE_ USER=oracleTARGET_ CONNECT_STR=/完成设叠后,保静退出。

NBUoracle备份配置1、建⽴连接[root@localhost ~]# su - oracle[oracle@localhost ~]$ cd /usr/openv/netbackup/bin[oracle@localhost bin]$ ./oracle_link2012年 08⽉ 25⽇星期六 09:43:28 CSTAll Oracle instances should be shutdown before running this script.Please log into the Unix system as the Oracle owner for running this scriptDo you want to continue? (y/n) [n] yLIBOBK path: /usr/openv/netbackup/binORACLE_HOME: /orcl/oracleOracle version: 10.2.0.1.0Platform type: i686Linking LIBOBK:ln -s /usr/openv/netbackup/bin/libobk.so /orcl/oracle/lib/libobk.soDonePlease check the trace file located in /tmp/make_trace.4459to make sure the linking process was successful.2、创建备份脚本[root@localhost ~]# mkdir -p /usr/openv/netbackup/script[root@localhost ~]# cd /usr/openv/netbackup/ext/db_ext/oracle/samples/rman[root@localhost rman]# lscold_database_backup.sh database_restore.sh hot_tablespace_backup.sh cold_duplex_database_backup_full.sh hot_database_backup.sh pit_database_restore.sh [root@localhost rman]# cp hot_database_backup.sh /usr/openv/netbackup/script/[root@localhost rman]# cd /usr/openv/netbackup/script/[root@localhost script]# lshot_database_backup.sh[root@localhost script]# mv hot_database_backup.sh rman.sh[root@localhost script]# chmod o+x rman.sh[root@localhost script]# vi rman.sh#!/bin/sh# $Header: hot_database_backup.sh,v 1.2 2002/08/06 23:51:42 $#bcpyrght#***************************************************************************#* $VRTScprght: Copyright 1993 - 2008 Symantec Corporation, All Rights Reserved $ * #***************************************************************************#ecpyrght## ---------------------------------------------------------------------------# hot_database_backup.sh# ---------------------------------------------------------------------------# This script uses Recovery Manager to take a hot (inconsistent) database# backup. A hot backup is inconsistent because portions of the database are# being modified and written to the disk while the backup is progressing.# You must run your database in ARCHIVELOG mode to make hot backups. It is# assumed that this script will be executed by user root. In order for RMAN# to work properly we switch user (su -) to the oracle dba account before# execution. If this script runs under a user account that has Oracle dba# privilege, it will be executed using this user's account.# ---------------------------------------------------------------------------# ---------------------------------------------------------------------------# Determine the user which is executing this script.# ---------------------------------------------------------------------------CUSER=`id |cut -d"(" -f2 | cut -d ")" -f1`# ---------------------------------------------------------------------------# Put output in <this file name>.out. Change as desired.# Note: output directory requires write permission.# ---------------------------------------------------------------------------RMAN_LOG_FILE=${0}.out# ---------------------------------------------------------------------------# You may want to delete the output file so that backup information does# not accumulate. If not, delete the following lines.# ---------------------------------------------------------------------------if [ -f "$RMAN_LOG_FILE" ]rm -f "$RMAN_LOG_FILE"fi# -----------------------------------------------------------------# Initialize the log file.# -----------------------------------------------------------------echo >> $RMAN_LOG_FILEchmod 666 $RMAN_LOG_FILE# ---------------------------------------------------------------------------# Log the start of this script.# ---------------------------------------------------------------------------echo Script $0 >> $RMAN_LOG_FILEecho ==== started on `date` ==== >> $RMAN_LOG_FILEecho >> $RMAN_LOG_FILE# ---------------------------------------------------------------------------# Replace /db/oracle/product/ora81, below, with the Oracle home path. # ---------------------------------------------------------------------------ORACLE_HOME=/u01/app/oracle/product/11.2.0/export ORACLE_HOMEOracle HOME⽬录,可通过env命令查出# ---------------------------------------------------------------------------# Replace ora81, below, with the Oracle SID of the target database. # ---------------------------------------------------------------------------ORACLE_SID=orclexport ORACLE_SIDOracle实例名# ---------------------------------------------------------------------------# Replace ora81, below, with the Oracle DBA user id (account).# ---------------------------------------------------------------------------ORACLE_USER=oracleOracle系统账户# ---------------------------------------------------------------------------# Set the target connect string.# Replace "sys/manager", below, with the target connect string.# ---------------------------------------------------------------------------TARGET_CONNECT_STR=sys/Qweasd123Sys⽤户及其密码# ---------------------------------------------------------------------------# Set the Oracle Recovery Manager name.# ---------------------------------------------------------------------------RMAN=$ORACLE_HOME/bin/rman# ---------------------------------------------------------------------------# Print out the value of the variables set by this script.# ---------------------------------------------------------------------------#中间代码不⽤更改,此处略CMD_STR="ORACLE_HOME=$ORACLE_HOMEexport ORACLE_HOMEORACLE_SID=$ORACLE_SIDexport ORACLE_SID$RMAN target $TARGET_CONNECT_STR nocatalog msglog $RMAN_LOG_FILE append << EOFRUN {ALLOCATE CHANNEL ch00 TYPE 'SBT_TAPE';ALLOCATE CHANNEL ch01 TYPE 'SBT_TAPE';echo send 'NB_ORA_POLICY=your_policy, NB_ORA_SERV=your_serverí';发送备份信息给相对应的备份策略,当每⼀台Oracle只有⼀个NBU备份策略时,次句可以不写BACKUP$BACKUP_TYPESKIP INACCESSIBLETAG hot_db_bk_level0FILESPERSET 5# recommended formatFORMAT 'bk_%s_%p_%t'DATABASE;sql 'alter system archive log current';RELEASE CHANNEL ch00;RELEASE CHANNEL ch01;# backup all archive logsALLOCATE CHANNEL ch00 TYPE 'SBT_TAPE';ALLOCATE CHANNEL ch01 TYPE 'SBT_TAPE';echo send 'NB_ORA_POLICY=your_policy, NB_ORA_SERV=your_serverí';发送备份信息给相对应的备份策略,当每⼀台Oracle只有⼀个NBU备份策略时,次句可以不写BACKUPfilesperset 20FORMAT 'al_%s_%p_%t'ARCHIVELOG ALL;RELEASE CHANNEL ch00;RELEASE CHANNEL ch01;ALLOCATE CHANNEL ch00 TYPE 'SBT_TAPE';DELETE NOPROMPT ARCHIVELOG ALL COMPLETED BEFORE 'SYSDATE-7'; RELEASE CHANNEL ch00;原脚本备份后直接删除归档⽇志,可以如上编写,删除7天前的归档⽇志## Note: During the process of backing up the database, RMAN also backs up the# control file. This version of the control file does not contain the# information about the current backup because "nocatalog" has been specified.# To include the information about the current backup, the control file should# be backed up as the last step of the RMAN section. This step would not be# necessary if we were using a recovery catalog.#ALLOCATE CHANNEL ch00 TYPE 'SBT_TAPE';BACKUP# recommended formatFORMAT 'cntrl_%s_%p_%t'CURRENT CONTROLFILE;RELEASE CHANNEL ch00;}EOF"# Initiate the command stringif [ "$CUSER" = "root" ]thensu - $ORACLE_USER -c "$CMD_STR" >> $RMAN_LOG_FILERSTAT=$?else/usr/bin/sh -c "$CMD_STR" >> $RMAN_LOG_FILERSTAT=$?fi# ---------------------------------------------------------------------------# Log the completion of this script.# ---------------------------------------------------------------------------if [ "$RSTAT" = "0" ]thenLOGMSG="ended successfully"elseLOGMSG="ended in error"fiecho >> $RMAN_LOG_FILEecho Script $0 >> $RMAN_LOG_FILEecho ==== $LOGMSG on `date` ==== >> $RMAN_LOG_FILEecho >> $RMAN_LOG_FILEexit $RSTAT3、创建备份策略3.1 选择策略类型和存储位置3.2 创建备份策略Frequency: 备份周期 Retention: 保留周期策略时间表,默认的Default-Application-Backup不要随意更改,⼀般只更改保留周期。
windowsnbu上备份oracle测试环境:硬件环境:Master Server:C4 1.7GHz/512 DDR/80GB IDE/D-Link 100MbpsClient:Dell 1750/3GHz志强/512MB ECC/18.3GBSCSI/Broadcom1000Mbps*2软件环境:Master Server:Windwos 2000 Server with SP4Oracle 9i (9.0.1.1.1)Veritas NetBackup 5.0MP5简体中文(DiskBackup) Client:RedHat Linux Enterprise Server 3.0Oracle 9i (9.2.0.4.0)Veritas NetBackup Client for LinuxVeritas NetBackup DB Agent for Oracle对于DataBase Agent,在NetBackup Server for Windows以及NetBackup Client for Windows程序中均包含,只是需要用注册号来激活随笔启用NetBackup for Oracle1. 在客户机上停止Oracle 服务。
2. 在主服务器上的NetBackup 管理控制台中,单击帮助(Help) > 许可证密钥(LicenseKeys)。
3. 添加NetBackup for Oracle 的许可证密钥。
4. 在客户机上重新启动Oracle 服务。
或者:先激活NetBackup for Oracle 许可证后,重新启动Oracle 服务。
使用Windows 控制台设置“每个客户机的最大作业数”属性1. 在NetBackup 管理控制台的左窗格中,展开主机属性(Host Properties)。
2. 选择主服务器(Master Server)。
3. 在右窗格中,双击服务器图标。
NetBackup备份oracle无nocatalog解决方案1. NetBackup通过RMAN nocatalog方式备份设置步骤当通过r man nocatalog方式备份Oracle,Oracle使用controlfile存放备份信息。
因此,当使用rman nocatalog方式备份时,备份controlfile是非常重要的。
有一个问题,当使用rman nocatalog恢复时,数据库必须是处于“mount”状态的。
而Oracle startup mount的前提条件是control必须存在。
因此,你必须在恢复datafile之前先恢复controlfile。
使用rman catalog方式时,能startup nomount然后restore control file;但使用rman nocatalog时,必须先用文件方式恢复controlfile。
下面对比一下rman nocatalog和rman catalog的恢复时的步骤,以便建立正确的备份策略(以下的恢复都是在online状态下的备份):rman nocatalog恢复:1) 建立oracle运行环境(包括init或sp文件)2) 文件方式恢复controlfile到init文件指定的位置3) startup mount4) rman,恢复datafile5) alter database open resetlogsrman catalog恢复:1) 建立oracle运行环境(包括init或sp文件)2) rman ,restore controfile3) alter database mount4) rman, restore datafile5) alter database open resetlogs能看出,rman nocatalog备份时,必须用文件方式备份controlfile。
另外,由于nocatalog时利用controlfile存放备份信息,建议将Oracle参数文件中的CONTROL_FILE_RECORD_KEEP_TIME值加大(缺省为7天), 该参数在$ORACLE_HOME/dbs/initSID.ora中(9i后也可能在spfile中,只能通过Oracle语句更改)。

NBU 实现Oracle 备份简要步骤-windows平台(一)Windows 平台Client 操作步骤1,检查oracle 数据库状态sqlplus ”/as sysdba“sqlplus>archive log list; (确定数据库归档模式已经打开)sqlplus>select INSTANCE_NAME from v$instance (获得SID)sqlplus>exitcd $ORACLE_HOMEpwd (获得ORACLE_HOME)2,拷贝脚本(1)样本脚本目录:install_path\NetBackup\db_ext\Oracle\sample s(2)将文件hot_database_backup.cmd,拷贝到 install_path\scripts\hot_database_backup.sh(3)编辑脚本文件:如:c:\program files\veritas\scripts\hot_database_backup.sh只需修改如下参数:ORACLE_HOME=改为您的Oracle安装主目录ORACLE_SID= 您的Oracle 实例名称TARGET_CONNECT_STR=Oracle sysdba 用户名称 / 密码(对应修改成您的,也可先不修改,使用默认值)最后} 后覆盖修改为:echo }) > c:\rman_cmd.txt%RMAN% target %TARGET_CONNECT_STR% nocatalog msglog '%RMAN_LOG_FILE%' append <c:\rman_cmd.txt完成设置后,保存退出。
(二)Master server 操作步骤1,修改参数: Maximum jobs per clientThe following procedure shows how to set the Maximumjobsperclient attribute.打开master server console:1 In the left pane of the NetBackup Administration Console, expand NetBackup Management > Host Properties.2 Select Master Server.3 In the right pane, double-click the server icon.4 Click Global Attributes.5 Change the Maximum jobs per client value to 99.The Maximumjobs per client specifies the maximum number of concurrent backups that are allowed per client. The default is 1.2,创建oracle 备份策略3 If■ Windows: In the left pane, right-click Policies and choose New Policy.■ Java interface: In the left pane, click Policies. In the All Policies pane,right-click the master server, and click New Policy.5 In the Add a New Policy dialog box, in the Policy name box, type a unique name for the new policy.6 Click OK.7 In the Add New Policy dialog box, in the Policy type list, select Oracle.8 Complete the entries on the Attributes tab.9 Add other policy information as follows:■ Add schedules.See “About adding schedules to a NetBackup for Oracle policy” on page 47.■ Add clients.,输入您的客户端名字■ Add templates or scripts to the backup selections list.:输入您的客户端的备份脚本路径及名称10 When you have added all the schedules, clients, and backup selections you need, click OK.。
认识NBU备份Oracle时Code 29错误的解答问题:在对Oracle做备份时出现Status Code 29错误:Failed trying to execute a command。
具体的情况和设置如下:NBU EN SERVER 5.1;MASTER SERVER和装在ORACLE服务器上,通过SAN连接磁带库。
(配置确认无误)制定备份循环策略如下:1.在管理控制台,制定策略->名称(oracle_backup)->type(oracle)->选择(完全和累积备份)->添加备份(本机)->完成。
2.在backup、archive and restore里选中oracle->backup for marked->策略名(oracle_backup),日程表(Default-Application-Backup)->不选择立即运行,选择存成模板(test)。
3.在管理控制台中修改策略(oracle_backup),在备份文件中引用模板(test)。
然后选择手工运行,则有一个作业schedule=full在完全备份成功后会出Status Code 29错误,然后自动重试,再进行完全备份。
问题是在步骤2中点立即运行则不会错误,根据http:///docs/268284.htm的解决方法修改了,可问题依旧,望高手支招。
(另:备份类型里面的Application Backup是什么用途?日程表选择(Default-Application-Backup)这步有错吗?)解决办法:1.停止和启动Netbackup Client Service,而不是使用“重新启动”。
2.改变了Backup Selections选择模板文件的方式。
3.不对Default-Applications-Backup改名,原来改为一个好记的名称再引用。
2的可能性最大,问题在于Backup Selections中,必须通过单击“Template”选择Oracle_RMAN 和模板文件或者直接输入模板脚本名称(不包含完整路径),而不是直接用"选择",定位RMAN模板的文件位置(包含完整路径),这在备份其他主机时,要先把脚本拷贝到那台主机上,才能定位到。
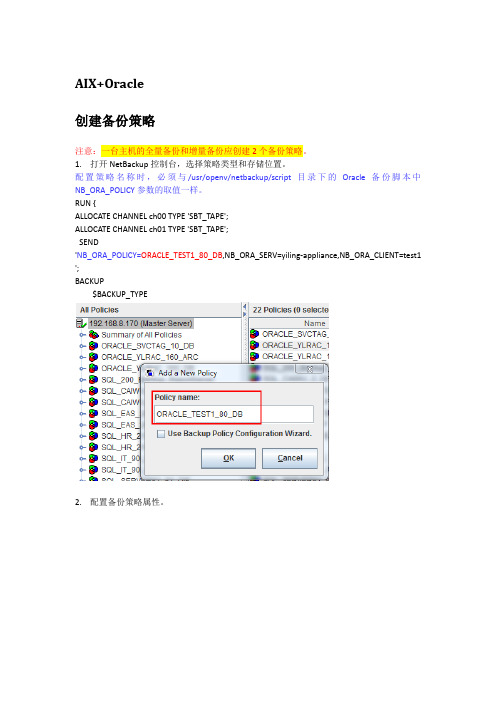
AIX+Oracle创建备份策略注意:一台主机的全量备份和增量备份应创建2个备份策略。
1.打开NetBackup控制台,选择策略类型和存储位置。
配置策略名称时,必须与/usr/openv/netbackup/script目录下的Oracle备份脚本中NB_ORA_POLICY参数的取值一样。
RUN {ALLOCATE CHANNEL ch00 TYPE 'SBT_TAPE';ALLOCATE CHANNEL ch01 TYPE 'SBT_TAPE';SEND'NB_ORA_POLICY=ORACLE_TEST1_80_DB,NB_ORA_SERV=yiling-appliance,NB_ORA_CLIENT=test1 ';BACKUP$BACKUP_TYPE2.配置备份策略属性。
3.配置备份周期及频率(全量备份1周1次,增量备份1周6次)。
全量备份:增量备份:4.配置备份客户端。
注意:以上界面中的client name,是指客户端的主机名,必须已在192.168.8.170上的/etc/hosts文件中配置。
5.选择备份脚本。
执行备份策略手工执行备份策略,验证策略是否配置成功。
在All Policies下选中ORACLE_TEST1_80_DB,右键选择Manual Backup,并在Activity Monitor 中查看状态。
当启动job全部为Done时,表明备份成功。
WINS+Oracle基本配置在172.16.140.25(主机名XIONGMIAOMIAO)上安装Oracle 11gR2的服务端。
1.在C:\Windows\System32\drivers\etc\hosts文件中配置NBU服务端的IP及主机名。
192.168.8.170 yiling-appliance2.更改oracle的归档模式。
SQL> archive log list;数据库日志模式非存档模式自动存档禁用存档终点 USE_DB_RECOVERY_FILE_DEST最早的联机日志序列 10当前日志序列 12SQL> shutdown immediate;数据库已经关闭。

目录1.软件安装 (3)1.1 安装环境 (3)1.2 NetBackup7.1服务器安装 (3)1.3 NetBackup7.1 SAN Media Server服务器安装 (12)1.4 NetBackup7.1客户端安装 (22)1.3.1 NetBackup Lan 客户端安装-Windows (22)1.3.2 NetBackup Lan 客户端安装-Linux (28)1.3.3 NetBackup 客户端安装-Solaris (31)Backup7.1服务器配置 (33)2.1 NetBackup7.1 FT Media Server配置 (33)2.1.1在Solaris系统中配置磁带库存储设备 (33)2.1.2配置FT Media Server (39)2.2NetBackup7.1 SANClient配置 (43)2.2.1安装SAN Client软件 (43)2.2.1客户端安装完成后,开启SAN Client的功能 (43)2.3NetBackup7.1设备配置 (43)2.3.1基于磁盘的存储单元配置 (43)2.3.2配置磁带存储设备 (44)2.3.2重复删除数据存储单元配置 (53)Backup7备份策略配置 (64)3.1 NetBackup7.1 SQLServer数据库备份 (64)3.2 NetBackup7.1 Oracle(Windows)数据库备份 (76)3.3 NetBackup7.1 Oracle(Solaris)数据库备份 (82)3.4 NetBackup7.1 Exchange邮件服务器备份 (94)3.5NetBackup7.1物理机(传统)备份策略配置-文件备份 (98)Backup7.1数据恢复 (107)4.1物理(传统)备份方式-文件的恢复 (107)4.3SQLServer数据库的完全恢复 (110)2. 选择Server Software Installation开始安装。
AIX+Oracle创建备份策略注意:一台主机的全量备份和增量备份应创建2个备份策略。
1.打开NetBackup控制台,选择策略类型和存储位置。
配置策略名称时,必须与/usr/openv/netbackup/script目录下的Oracle备份脚本中NB_ORA_POLICY参数的取值一样。
RUN {ALLOCATE CHANNEL ch00 TYPE 'SBT_TAPE';ALLOCATE CHANNEL ch01 TYPE 'SBT_TAPE';SEND'NB_ORA_POLICY=ORACLE_TEST1_80_DB,NB_ORA_SERV=yiling-appliance,NB_ORA_CLIENT=test1 ';BACKUP$BACKUP_TYPE2.配置备份策略属性。
3.配置备份周期及频率(全量备份1周1次,增量备份1周6次)。
全量备份:增量备份:4.配置备份客户端。
注意:以上界面中的client name,是指客户端的主机名,必须已在192.168.8.170上的/etc/hosts文件中配置。
5.选择备份脚本。
执行备份策略手工执行备份策略,验证策略是否配置成功。
在All Policies下选中ORACLE_TEST1_80_DB,右键选择Manual Backup,并在Activity Monitor 中查看状态。
当启动job全部为Done时,表明备份成功。
WINS+Oracle基本配置在172.16.140.25(主机名XIONGMIAOMIAO)上安装Oracle 11gR2的服务端。
1.在C:\Windows\System32\drivers\etc\hosts文件中配置NBU服务端的IP及主机名。
192.168.8.170 yiling-appliance2.更改oracle的归档模式。
SQL> archive log list;数据库日志模式非存档模式自动存档禁用存档终点 USE_DB_RECOVERY_FILE_DEST最早的联机日志序列 10当前日志序列 12SQL> shutdown immediate;数据库已经关闭。

注:在这里,我只会讲到如何修改备份脚本来进行备份,如果用户对于如何创建oracle备份策略、如何运行全备份和增量备份、如何寻找NBU提供的备份脚本模板等问题存在疑惑的话,请参加前文《用NBU备份oracle系统-冷备份》。
数据库级热备份:对于数据库级热备份来说,我们可以利用NBU提供的脚本文件:/usr/openv/netbackup/ext/db_ext/oracle/samples/rman/hot_database_backu p.sh,这是一个可执行脚本,内容就是在设置好运行oracle rman程序所需的一些环境变量后,从root用户切换到oracle系统用户的帐号下,利用rman程序,将数据库的数据文件、归档日志文件和控制文件备份到用户指定的存储单元中。
在该文件中,我们需要修改如下参数(建议将该文件拷贝一份出来做修改,以免改错):ORACLE_HOME:表示oracle所在的目录,NBU需要到其目录下执行相应的rman 命令;ORACLE_SID:指明需要冷备份的数据库;ORACLE_USER:oracle数据库所属的系统用户,NBU会先用该用户登录,再执行各种备份操作;TARGET_CONNECT_STR:登录oracle数据库的帐号,必须是系统管理员,因为冷备份需要停止oracle数据库先;热备份和冷备份模板脚本修改的区别在于:冷备份需要指定oracle启动文件参数,这是因为冷备份需要关闭和重新启动数据库,所以需要启动配置文件;而热备份不关闭数据库,所以不需要该变量。
重要:另外需要用户注意的是,NBU提供的脚本运行时,会在脚本所在目录下生成一个同名的.out文件,里面记录了NBU脚本运行时产生的日志,然而该脚本会将这个日志名称作为参数传递给rman,而rman无法识别该参数中“.out”中的“.”,所以当运行该脚本时,会出现图一所示的错误,解决办法是:要么用户在hot_database_backup.sh脚本中,将这条rman命令中的记录日志相关内容删除(图二);要么利用转义字符处理该字符串,使得rman可以正确识别该命令。

NBU备份与存储系统实施方案目录第一章环境概述 (3)1.1 概述 (3)1.2 名词解释 (3)第二章 NBU的安装 (5)2.1 MASTER服务器的安装 (5)2.2 MEDIA服务器的安装 (10)第三章备份与恢复简略步骤 (15)3.1.MSSQL备份与恢复简略步骤 (15)3.1.1 sql server备份步骤 (15)3.1.2 sql server恢复步骤 (22)3.2.oracle 数据库的备份与恢复步骤 (27)3.2.1 oracle 数据库备份: (27)3.2.2 oracle 数据库恢复预案: (31)3.2.2.1 恢复oracle的控制文件: (31)3.2.2.2 恢复日志文件: (33)3.2.2.3 恢复数据文件 (36)3.2.2.4 打开数据库: (36)3.2.2.5 验证数据库恢复成功: (36)3.3. 文件的备份与还原 (37)3.3.1普通文件系统的备份与恢复管理 (37)3.3.1.1 创建备份策略 (37)3.3.1.2 文件系统的恢复 (38)3.4.VM虚拟机备份 (39)3.4.1 VM备份的准备 (39)3.4.2 VM备份 (41)3.5 Exchange 设置 (45)3.5.1 exchange数据库备份 (45)第一章环境概述1.1 概述采用了Symantec VERITAS NetBackup作为信息系统数据集中备份解决方案。
整个方案涉及整个系统的软硬件系统,包括数量众多的UWindows服务器、磁带库、磁盘阵列、和各种数据库系统。
本文档讲述了NetBackup软件在各种服务器的补丁要求、安装、配置和管理,还包括如何配置NetBackup管理下的磁带库机械手和磁带机。
同时还设计了备份系统所需的各种表格,方便用户填写和管理。
1.2 名词解释从技术层面划分,NetBackup采用三层结构进行数据的备份和管理,包括NetBackup Master Server主备份服务器、NetBackup Server备份服务器(包含SAN Media Server)、以及NetBackup Client备份客户端和NetBackup Agent 备份代理模块。

nbu备份oracle步骤NBU备份Oracle步骤NBU(NetBackup)是一款常用的备份和恢复软件,广泛应用于企业的数据保护和灾难恢复领域。
在使用NBU备份Oracle数据库时,需要按照一定的步骤进行操作,以确保备份数据的完整性和可恢复性。
下面将详细介绍NBU备份Oracle的步骤。
一、安装和配置NBU客户端需要在Oracle数据库服务器上安装NBU客户端软件。
安装完成后,还需要进行配置,包括指定备份服务器、设置备份策略等。
二、创建备份策略在NBU管理控制台中,需要创建一个备份策略,用于定义备份的类型、时间、保留期等参数。
可以根据需求创建多个备份策略,以适应不同的备份需求。
三、创建Oracle备份主机在NBU管理控制台中,需要创建一个Oracle备份主机,用于指定要备份的Oracle数据库实例。
在创建过程中,需要提供数据库实例的相关信息,如主机名、端口号、SID等。
四、创建备份选项在NBU管理控制台中,需要创建一个备份选项,用于定义备份的具体内容。
可以选择备份整个数据库、某个表空间、某个数据文件等。
同时,还可以指定备份的方式,如完全备份、增量备份等。
五、创建备份任务在NBU管理控制台中,需要创建一个备份任务,将备份策略、备份选项和备份主机进行关联。
在创建过程中,可以设置备份任务的调度时间、优先级等参数。
六、执行备份任务在NBU管理控制台中,可以手动执行备份任务,也可以设置自动执行。
执行备份任务时,NBU客户端将连接到Oracle数据库实例,并将备份数据传输到指定的备份服务器。
七、监控备份过程在NBU管理控制台中,可以实时监控备份任务的执行情况。
可以查看备份日志、备份进度等信息,以确保备份过程正常进行。
八、验证备份数据在备份完成后,可以使用NBU提供的工具进行备份数据的验证。
可以检查备份数据的完整性和可恢复性,以确保备份数据的有效性。
九、恢复备份数据在需要恢复备份数据时,可以使用NBU提供的恢复工具进行操作。

一、配置环境介绍新搭建了一套RAC环境(没有安装实例),文档中称作目标端,配置信息如下:Oracle版本:11.2.0.4SID :RAC1、RAC2此次恢复实验取总部OA(10.0.1.128)生产库备份数据,OA在文档中称作源端二、在新环境安装NBU客户端具体方法参考《01-隆基硅NBU实施文档.docx》1.执行oracle_link在client上的oracle账户下,执行oracle_link,将NBU与Oracle的tape库进行链接$ /usr/openv/netbackup/bin/oracle_link2.查看备份集在需要恢复的client上,利用bplist检查oracle以往备份的备份集[root@rac1 ~]# cd /usr/openv/netbackup/bin/[root@ bin]# ./bplist -C (源端主机名) -t 4 -R -l /./bplist -C -t 4 -R -l /3.修改用户属组查看目标端的Oracle用户属组ID是否与源端一致,如果不一致,需要修改(只需要用户一致,组不影响)groupmod -g 601 dbausermod -u 1002 oracle查找并修改文件(1001为Oracle用户原来的uid,602为文件原来的gid)。
RAC环境慎用,有部分软链接修改不了find /u01 -user 1001find / -user 1001 -exec chown oracle {} \;find / -group 602 -exec chgrp dba {} \;relink all三、在源端创建pfile文件SQL> create pfile='/tmp/ekp_init.ora' from spfile;修改目标端两个节点的Oracle环境变量四、创建必要的目录1. 修改导出来的pfile文件,创建必要目录(所有节点执行)[oracle@rac1 ~]$ mkdir -p /u01/app/oracle/admin/EKP/adump2.使用grid用户下在共享设备创建必要的目录[grid@rac1 ~]$ asmcmdASMCMD> lsARCH/DATA/OCR/ASMCMD> cd DATAASMCMD> mkdir EKPASMCMD> cd EKPASMCMD> mkdir TEMPFILEASMCMD> mkdir DATAFILEASMCMD> mkdir ONLINELOGASMCMD> mkdir PARAMETERFILEASMCMD> mkdir controlfile五、创建口令文件[oracle@rac1~]$ orapwd file=$ORACLE_HOME/dbs/orapw$ORACLE_SID password=oracle force=y[oracle@rac2~]$ orapwd file=$ORACLE_HOME/dbs/orapw$ORACLE_SID password=oracle force=y六、用源端 pfile 创建目标端数据库 spfile1.根据实际内存调整pfile文件注意adump路径,dbname,增加instance_number,undo参数,控制文件2.在目标端用 pfile.ora 在共享设备上创建spfileSQL> create spfile='+DATA/TMSPROD/spfileTMSPROD.ora' from pfile='/tmp/tms_pfile.ora';3.在所有节点上创建 pfile 内容指向共享设备上的spfile文件Vi /u01/app/oracle/product/11.2.0/db_1/dbs/initTMSPROD1.ora SPFILE='+DATA/TMSPROD/spfileTMSPROD.ora'七、还原控制文件1.启动数据库到nomountSQL> startup nomount pfile = '/tmp/ekp_init.ora';2.恢复控制文件,启动到mountrun{allocate channel c1 TYPE SBT_TAPE;SEND 'NB_ORA_SERV=LONGI-XA-NBU,NB_ORA_CLIENT=ekp-db2';restore controlfile from '/c-3745138837-20180806-02';release channel c1;}启动数据库到mount状态RMAN> alter database mount;八、还原数据文件1.set newnameset linesize 1000set pagesize 10002.还原run{allocate channel c1 type SBT_TAPE;allocate channel c2 type SBT_TAPE;allocate channel c3 type SBT_TAPE;allocate channel c4 type SBT_TAPE;set newname for datafile ... ...send 'NB_ORA_SERV=LONGI-XA-NBU,NB_ORA_CLIENT=ekp-db2';restore database;switch datafile all;recover database;release channel c1;release channel c2;release channel c3;release channel c4;}九、打开数据库SQL> alter database open resetlogs;删除dblink(根据实际情况选做)SQL> set lines 160set pagesize 500col db_link for a70select owner,db_link from dba_db_links ;select 'drop public database link '|| db_link|| ';' from dba_db_links where owner = 'PUBLIC';二、调整redo,undo1.redo1,删除还原的redo信息alter database drop logfile group #;2,增加新的redoalter database add logfile thread 1 group 1 '+DATA' size 50m;alter database add logfile thread 1 group 2 '+DATA' size50m;alter database add logfile thread 1 group 3 '+DATA' size50m;alter database add logfile thread 2 group 4 '+DATA' size50m;alter database add logfile thread 2 group 5 '+DATA' size50m;alter database add logfile thread 2 group 6 '+DATA' size50m;使新添加的redo生效SQL> alter database enable THREAD 2;3,查看redo信息select a.group#,a.THREAD#,a.status,b.member from v$log a,v$logfile b where a.group#=b.group#;2.undo1,增加undo表空间create undo tablespace UNDOTBS2 datafile '+DATA' size 500M autoextend on next 1g maxsize 10G;2,查看增加参数文件中undo_tablespace参数如果不需要修改数据库名称,则下面步骤可省略,直接检查修改参数文件中rac相关参数,然后修改环境变量,注册数据库信息十、调整数据库其他信息1.关闭数据库所有实例关闭实例检查参数文件,设置*.cluster_database=false然后把其中一个实例启动到mount状态下SQL> startup mount pfile ='/tmp/mes_pfile.ora'2.使用nid修改数据库名称nid target=system/oracle dbname=RAC3.修改参数文件修改环境变量实例名称和参数文件名称, cluster_database等SQL> startup mount pfile = '/tmp/ekp_init.ora';SQL> alter database open resetlogs;SQL> create spfile='+DATA' from pfile='/tmp/ekp_init.ora';修改pfile内容$ORACLE_HOME/dbs/initEKP1.ora然后修改其他节点的数据库的环境变量,参数文件,然后启动数据库SQL> alter database enable thread 2;SQL> alter system set cluster_database=true scope=spfile sid='*';4.修改TEMP表空间清除并建立tempfileselect TABLESPACE_NAME,FILE_NAME,status from dba_temp_files;select 'alter database tempfile '''||name||''' offline;' from v$tempfile;select 'alter database tempfile '''||name||''' drop;' from v$tempfile;alter tablespace TEMP_NAME add tempfile '+DATA' size 2G reuse autoextend on next 128m maxsize 30g;十一、将其他的信息注册到CRS里关闭所有节点数据库SQL> shutdown immediate[oracle@rac1 ~]$ srvctl add database -d EKP -o $ORACLE_HOME -p +data/ekp/PARAMETERFILE/spfile.3375.983445137[oracle@rac1 ~]$ srvctl add instance -d EKP -i EKP1 -n rac1[oracle@rac1 ~]$ srvctl add instance -d EKP -i EKP2 -n rac2[oracle@rac1 ~]$ srvctl start database -d EKP -o open十二、验证1.查看数据库启动情况[oracle@rac1 ~]$ srvctl status database -d EKP2.数据库配置信息[oracle@rac1 ~]$ srvctl config database -d EKP3.集群配置信息[grid@rac1 ~]$ crsctl stat res -t。

NBU-Oracle备份恢复配置手册NBU ORACLE备份恢复配置手册Version 1.012安装前准备安装NBU SAN Media Server软件参照《NBU Media Server 安装手册》3安装配置NBU Oracle agent软件root@QC_P550_731:/mnt/install/NB_65_UOptions_20070723/vDBA>./install **********There are two ways to install database agent software.1. Remote Installation: Loads the software on a server withthe intent of pushing database software out to affected clients.2. Local Installation: Loads and installs the software only to thislocal machine.**********Do you want to do a local installation? [y,n] (n) y**********NetBackup Database Agent InstallationChoose the Database Agents you wish to installone at a time or select Install All Database Agents.1) NetBackup for DB22) NetBackup for Informix3) NetBackup for Lotus Notes4) NetBackup for Oracle5) NetBackup for SAP6) NetBackup for Sybase7) Install All Database Agentsq) Done Selecting Agentsx) Exit from this ScriptChoose an option: 4Choose an option: qYou have chosen to install these Database Agents:NetBackup for OracleIs this list correct? [y,n] (y)**********Of the agents selected, the following are supportedon this platform and will be installed:OracleNOTE: A license key for each of these selected agentswill be required on the master server in order for theagent to function properly.Loading the Database Agent packages into the/usr/openv/netbackup/dbext directory and installing.**********Installing NetBackup for OracleInstalling NetBackup for Oracle...Extracting files from /usr/openv/netbackup/dbext/OEBU.rs6000_51.tar.Z ... x usr/openv/netbackupx usr/openv/netbackup/binx usr/openv/netbackup/bin/bpubsora, 137444 bytes, 269 tape blocksx usr/openv/netbackup/bin/bpdbsbora, 128302 bytes, 251 tape blocksx usr/openv/netbackup/bin/libobk.a, 108793 bytes, 213 tape blocksx usr/openv/netbackup/bin/oracle_link, 32260 bytes, 64 tape blocksx usr/openv/netbackup/bin/bporaexp, 150370 bytes, 294 tape blocksx usr/openv/netbackup/bin/bporaimp, 162223 bytes, 317 tape blocksx usr/openv/netbackup/bin/libobk.a64, 117484 bytes, 230 tape blocksx usr/openv/netbackup/bin/bporaexp64, 164480 bytes, 322 tape blocksx usr/openv/netbackup/bin/bporaimp64, 177322 bytes, 347 tape blocksx usr/openv/netbackup/dbextx usr/openv/netbackup/dbext/OEBU.rs6000_51.version, 24 bytes, 1 tape blocksx usr/openv/netbackup/extx usr/openv/netbackup/ext/db_extx usr/openv/netbackup/ext/db_ext/oraclex usr/openv/netbackup/ext/db_ext/oracle/samplesx usr/openv/netbackup/ext/db_ext/oracle/samples/rmanx usr/openv/netbackup/ext/db_ext/oracle/samples/rman/cold_database_backup.sh, 11875 bytes, 24 tape blocksxusr/openv/netbackup/ext/db_ext/oracle/samples/rman/cold_duplex_database_backup_full .sh, 12789 bytes, 25 tape blocksx usr/openv/netbackup/ext/db_ext/oracle/samples/rman/database_restore.sh, 7155 bytes, 14 tape blocksx usr/openv/netbackup/ext/db_ext/oracle/samples/rman/hot_database_backup.sh, 11538 bytes, 23 tape blocksx usr/openv/netbackup/ext/db_ext/oracle/samples/rman/hot_tablespace_backup.sh, 11154 bytes, 22 tape blocksx usr/openv/netbackup/ext/db_ext/oracle/samples/rman/pit_database_restore.sh, 10307 bytes, 21 tape blocksx usr/openv/netbackup/ext/db_ext/oracle/samples/rman/hot_database_backup_proxy.sh, 9983 bytes, 20 tape blocksxusr/openv/netbackup/ext/db_ext/oracle/samples/rman/hot_tablespace_backup_proxy.sh, 8575 bytes, 17 tape blocksx usr/openv/netbackup/ext/db_ext/oracle/samples/bpend_notify.oracle_bli.sh, 27764 bytes, 55 tape blocksx usr/openv/netbackup/ext/db_ext/oracle/samples/bpstart_notify.oracle_bli.sh, 31867 bytes, 63 tape blocksx usr/openv/netbackup/ext/db_ext/oracle/samples/post_checkpoint_notify.oracle_bli.sh, 21844 bytes, 43 tape blocksx usr/openv/netbackup/ext/db_ext/oracle/samples/bporaexpx usr/openv/netbackup/ext/db_ext/oracle/samples/bporaexp/data_archiver_export.sh, 5124 bytes, 11 tape blocksx usr/openv/netbackup/ext/db_ext/oracle/samples/bporaexp/data_archiver_export64.sh, 5130 bytes, 11 tape blocksx usr/openv/netbackup/ext/db_ext/oracle/samples/bporaexp/bporaexp_help.param, 733 bytes, 2 tape blocksx usr/openv/netbackup/ext/db_ext/oracle/samples/bporaexp/bporaexp_partitions.param, 1605 bytes, 4 tape blocksxusr/openv/netbackup/ext/db_ext/oracle/samples/bporaexp/bporaexp_table_to_files.param, 1652 bytes, 4 tape blocksx usr/openv/netbackup/ext/db_ext/oracle/samples/bporaexp/bporaexp_tables.param, 1669 bytes, 4 tape blocksxusr/openv/netbackup/ext/db_ext/oracle/samples/bporaexp/bporaexp_tables_rows.param, 1868 bytes, 4 tape blocksx usr/openv/netbackup/ext/db_ext/oracle/samples/bporaimpx usr/openv/netbackup/ext/db_ext/oracle/samples/bporaimp/data_archiver_import.sh, 5044 bytes, 10 tape blocksx usr/openv/netbackup/ext/db_ext/oracle/samples/bporaimp/data_archiver_import64.sh, 5050 bytes, 10 tape blocksx usr/openv/netbackup/ext/db_ext/oracle/samples/bporaimp/bporaimp_archive.param, 1242 bytes, 3 tape blocksxusr/openv/netbackup/ext/db_ext/oracle/samples/bporaimp/bporaimp_archive_schema_to_ files.param, 1317 bytes, 3 tape blocksxusr/openv/netbackup/ext/db_ext/oracle/samples/bporaimp/bporaimp_archive_to_users.pa ram, 1510 bytes, 3 tape blocksx usr/openv/netbackup/ext/db_ext/oracle/samples/bporaimp/bporaimp_bfile_table.param, 1604 bytes, 4 tape blocksx usr/openv/netbackup/ext/db_ext/oracle/samples/bporaimp/bporaimp_help.param, 733 bytes, 2 tape blocksxusr/openv/netbackup/ext/db_ext/oracle/samples/bporaimp/bporaimp_ignore_rows_table.p aram, 1530 bytes, 3 tape blocksx usr/openv/netbackup/ext/db_ext/oracle/samples/bporaimp/bporaimp_large_table.param, 1542 bytes, 4 tape blocksx usr/openv/netbackup/ext/db_ext/oracle/samples/bporaimp/bporaimp_list.param, 1594 bytes, 4 tape blocksxusr/openv/netbackup/ext/db_ext/oracle/samples/bporaimp/bporaimp_old_archive.param, 1556 bytes, 4 tape blocksx usr/openv/netbackup/ext/db_ext/oracle/samples/bporaimp/bporaimp_partitions.param, 1513 bytes, 3 tape blocksxusr/openv/netbackup/ext/db_ext/oracle/samples/bporaimp/bporaimp_table_from_files.par am, 1370 bytes, 3 tape blocksxusr/openv/netbackup/ext/db_ext/oracle/samples/bporaimp/bporaimp_table_to_files.param , 1301 bytes, 3 tape blocksxusr/openv/netbackup/ext/db_ext/oracle/samples/bporaimp/bporaimp_table_to_user.param , 1656 bytes, 4 tape blocksx usr/openv/netbackup/ext/db_ext/oracle/samples/bporaimp/bporaimp_tables.param, 1289 bytes, 3 tape blocksx usr/openv/netbackup/ext/db_ext/oracle/binx usr/openv/netbackup/ext/db_ext/oracle/bin/setup_bli_scripts, 18091 bytes, 36 tape blocksx usr/openv/libx usr/openv/lib/libdbsbrman.so, 2029485 bytes, 3964 tape blocksx usr/openv/lib/libbpora.so.8.0, 257994 bytes, 504 tape blocksx usr/openv/lib/libbpora.so.9.0, 258010 bytes, 504 tape blocksx usr/openv/lib/libbpora64.so.9.0, 288345 bytes, 564 tape blocksx usr/openv/lib/libnbberman.so, 161051 bytes, 315 tape blocksLiveUpdate is not installed, skipping registration step...NetBackup for Oracle installation completed.**********Execution of ./install_dbext is complete.Execution of ./install is complete.File /usr/openv/tmp/install_addon_trace.2761086 contains a trace of this install.root@QC_P550_731:/mnt/install/NB_65_UOptions_20070723/vDBA>配置NBU Oracle Agentroot@QC_P550_731:/mnt/install/NB_65_UOptions_20070723/vDBA>su - oracle [YOU HAVE NEW MAIL]QC_P550_731:/home/oracle$cd /usr/openv/netbackup/binQC_P550_731:/usr/openv/netbackup/bin$./oracle_linkFri Apr 3 10:07:28 BEIST 2009All Oracle instances should be shutdown before running this script.Please log into the Unix system as the Oracle owner for running this scriptDo you want to continue? (y/n) [n] yLIBOBK path: /usr/openv/netbackup/binORACLE_HOME: /oracle/app/oracle/product/9.2.0Oracle version: 9.2.0.8.04创建Oracle备份脚本数据库全备份脚本/usr/openv/rman/hot_database_backup_zjcj2.sh,其中红色字体部分根据oracle修改#!/bin/sh# $Header: hot_database_backup.sh,v 1.2 2002/08/06 23:51:42 $##bcpyrght#***************************************************************************#* $VRTScprght: Copyright 1993 - 2007 Symantec Corporation, All Rights Reserved $ * #***************************************************************************#ecpyrght## ---------------------------------------------------------------------------# hot_database_backup.sh# ---------------------------------------------------------------------------# This script uses Recovery Manager to take a hot (inconsistent) database# backup. A hot backup is inconsistent because portions of the database are# being modified and written to the disk while the backup is progressing.# You must run your database in ARCHIVELOG mode to make hot backups. It is# assumed that this script will be executed by user root. In order for RMAN# to work properly we switch user (su -) to the oracle dba account before# execution. If this script runs under a user account that has Oracle dba# privilege, it will be executed using this user's account.# ---------------------------------------------------------------------------# ---------------------------------------------------------------------------# Determine the user which is executing this script.# ---------------------------------------------------------------------------CUSER=`id |cut -d"(" -f2 | cut -d ")" -f1`# ---------------------------------------------------------------------------# Put output in <this file name>.out. Change as desired.# Note: output directory requires write permission.# ---------------------------------------------------------------------------RMAN_LOG_FILE=${0}.`date +%Y%m%d%H%M%S`.out# ---------------------------------------------------------------------------# You may want to delete the output file so that backup information does # not accumulate. If not, delete the following lines.# ---------------------------------------------------------------------------if [ -f "$RMAN_LOG_FILE" ]thenrm -f "$RMAN_LOG_FILE"fi# -----------------------------------------------------------------# Initialize the log file.# -----------------------------------------------------------------echo >> $RMAN_LOG_FILEchmod 666 $RMAN_LOG_FILE# ---------------------------------------------------------------------------# Log the start of this script.# ---------------------------------------------------------------------------echo Script $0 >> $RMAN_LOG_FILEecho ==== started on `date` ==== >> $RMAN_LOG_FILEecho >> $RMAN_LOG_FILE# ---------------------------------------------------------------------------# Replace /db/oracle/product/ora81, below, with the Oracle home path.# ---------------------------------------------------------------------------ORACLE_HOME=/oracle/app/oracle/product/9.2.0export ORACLE_HOME# ---------------------------------------------------------------------------# Replace ora81, below, with the Oracle SID of the target database.# ---------------------------------------------------------------------------ORACLE_SID=zjcj2export ORACLE_SID# ---------------------------------------------------------------------------# Replace ora81, below, with the Oracle DBA user id (account).# ---------------------------------------------------------------------------ORACLE_USER=oracle# ---------------------------------------------------------------------------# Set the target connect string.# Replace "sys/manager", below, with the target connect string.# ---------------------------------------------------------------------------TARGET_CONNECT_STR=/# ---------------------------------------------------------------------------# Set the Oracle Recovery Manager name.# ---------------------------------------------------------------------------RMAN=$ORACLE_HOME/bin/rman# ---------------------------------------------------------------------------# Print out the value of the variables set by this script.# ---------------------------------------------------------------------------echo >> $RMAN_LOG_FILEecho "RMAN: $RMAN" >> $RMAN_LOG_FILEecho "ORACLE_SID: $ORACLE_SID" >> $RMAN_LOG_FILEecho "ORACLE_USER: $ORACLE_USER" >> $RMAN_LOG_FILE echo "ORACLE_HOME: $ORACLE_HOME" >> $RMAN_LOG_FILE# ---------------------------------------------------------------------------# Print out the value of the variables set by bphdb.# ---------------------------------------------------------------------------echo >> $RMAN_LOG_FILEecho "NB_ORA_FULL: $NB_ORA_FULL" >> $RMAN_LOG_FILE echo "NB_ORA_INCR: $NB_ORA_INCR" >> $RMAN_LOG_FILE echo "NB_ORA_CINC: $NB_ORA_CINC" >> $RMAN_LOG_FILE echo "NB_ORA_SERV: $NB_ORA_SERV" >> $RMAN_LOG_FILE echo "NB_ORA_POLICY: $NB_ORA_POLICY" >> $RMAN_LOG_FILE# ---------------------------------------------------------------------------# NOTE: This script assumes that the database is properly opened. If desired,# this would be the place to verify that.# ---------------------------------------------------------------------------echo >> $RMAN_LOG_FILE# ---------------------------------------------------------------------------# If this script is executed from a NetBackup schedule, NetBackup# sets an NB_ORA environment variable based on the schedule type.# The NB_ORA variable is then used to dynamically set BACKUP_TYPE# For example, when:# schedule type is BACKUP_TYPE is# ---------------- --------------# Automatic Full INCREMENTAL LEVEL=0# Automatic Differential Incremental INCREMENTAL LEVEL=1# Automatic Cumulative Incremental INCREMENTAL LEVEL=1 CUMULATIVE ## For user initiated backups, BACKUP_TYPE defaults to incremental# level 0 (full). To change the default for a user initiated# backup to incremental or incremental cumulative, uncomment# one of the following two lines.# BACKUP_TYPE="INCREMENTAL LEVEL=1"# BACKUP_TYPE="INCREMENTAL LEVEL=1 CUMULATIVE"## Note that we use incremental level 0 to specify full backups.# That is because, although they are identical in content, only# the incremental level 0 backup can have incremental backups of# level > 0 applied to it.# ---------------------------------------------------------------------------if [ "$NB_ORA_FULL" = "1" ]thenecho "Full backup requested" >> $RMAN_LOG_FILEBACKUP_TYPE="INCREMENTAL LEVEL=0"elif [ "$NB_ORA_INCR" = "1" ]thenecho "Differential incremental backup requested" >> $RMAN_LOG_FILEBACKUP_TYPE="INCREMENTAL LEVEL=1"elif [ "$NB_ORA_CINC" = "1" ]thenecho "Cumulative incremental backup requested" >> $RMAN_LOG_FILEBACKUP_TYPE="INCREMENTAL LEVEL=1 CUMULATIVE"elif [ "$BACKUP_TYPE" = "" ]thenecho "Default - Full backup requested" >> $RMAN_LOG_FILEBACKUP_TYPE="INCREMENTAL LEVEL=0"fi# ---------------------------------------------------------------------------# Call Recovery Manager to initiate the backup. This example does not use a# Recovery Catalog. If you choose to use one, replace the option 'nocatalog'# from the rman command line below with the# 'rcvcat <userid>/<passwd>@<tns alias>' statement.## Note: Any environment variables needed at run time by RMAN# must be set and exported within the switch user (su) command.# ---------------------------------------------------------------------------# Backs up the whole database. This backup is part of the incremental# strategy (this means it can have incremental backups of levels > 0# applied to it).## We do not need to explicitly request the control file to be included# in this backup, as it is automatically included each time file 1 of# the system tablespace is backed up (the inference: as it is a whole# database backup, file 1 of the system tablespace will be backed up,# hence the controlfile will also be included automatically).## Typically, a level 0 backup would be done at least once a week.## The scenario assumes:# o you are backing your database up to two tape drives# o you want each backup set to include a maximum of 5 files# o you wish to include offline datafiles, and read-only tablespaces,# in the backup# o you want the backup to continue if any files are inaccessible.# o you are not using a Recovery Catalog# o you are explicitly backing up the control file. Since you are# specifying nocatalog, the controlfile backup that occurs# automatically as the result of backing up the system file is# not sufficient; it will not contain records for the backup that# is currently in progress.# o you want to archive the current log, back up all the# archive logs using two channels, putting a maximum of 20 logs# in a backup set, and deleting them once the backup is complete.## Note that the format string is constructed to guarantee uniqueness and# to enhance NetBackup for Oracle backup and restore performance.### NOTE WHEN USING TNS ALIAS: When connecting to a database# using a TNS alias, you must use a send command or a parms operand to# specify environment variables. In other words, when accessing a database # through a listener, the environment variables set at the system level are not # visible when RMAN is running. For more information on the environment # variables, please refer to the NetBackup for Oracle Admin. Guide.## ---------------------------------------------------------------------------CMD_STR="ORACLE_HOME=$ORACLE_HOMEexport ORACLE_HOMEORACLE_SID=$ORACLE_SIDexport ORACLE_SID$RMAN target $TARGET_CONNECT_STR rcvcat rman/rman@qcrman msglog $RMAN_LOG_FILE append << EOFRUN {resync catalog;allocate channel t1 type 'SBT_TAPE';send 'NB_ORA_POLICY=$NB_ORA_POLICY';send 'NB_ORA_CLIENT=QC_P550_732';backuptag controlfformat 'cf_%s_%p'(current controlfile);release channel t1;#allocate channel t1 type 'SBT_TAPE' parms 'BLKSIZE=131072';allocate channel t2 type 'SBT_TAPE' parms 'BLKSIZE=131072';send 'NB_ORA_POLICY=$NB_ORA_POLICY';send 'NB_ORA_CLIENT=QC_P550_732';set maxcorrupt for datafile 1 to 0;backuptag bcktbs1filesperset 10format 'df_t%s_p%p'(tablespace system,users,tools,indx,undotbs1,undotbs2,id_user,id_user_ind);sql 'alter system archive log current';release channel t1;release channel t2;}EOF"# Initiate the command stringif [ "$CUSER" = "root" ]thensu - $ORACLE_USER -c "$CMD_STR" >> $RMAN_LOG_FILE RSTAT=$?else/usr/bin/sh -c "$CMD_STR" >> $RMAN_LOG_FILERSTAT=$?fi# ---------------------------------------------------------------------------# Log the completion of this script.# ---------------------------------------------------------------------------if [ "$RSTAT" = "0" ]thenLOGMSG="ended successfully"elseLOGMSG="ended in error"fiecho >> $RMAN_LOG_FILEecho Script $0 >> $RMAN_LOG_FILEecho ==== $LOGMSG on `date` ==== >> $RMAN_LOG_FILEecho >> $RMAN_LOG_FILEexit $RSTAT数据库归档备份脚本/usr/open/rman/hot_database_backup_zjcj2.sh,其中红色字体部分根据oracle修改#!/bin/sh# $Header: hot_database_backup.sh,v 1.2 2002/08/06 23:51:42 $##bcpyrght#***************************************************************************#* $VRTScprght: Copyright 1993 - 2007 Symantec Corporation, All Rights Reserved $ * #***************************************************************************#ecpyrght## ---------------------------------------------------------------------------# hot_database_backup.sh# ---------------------------------------------------------------------------# This script uses Recovery Manager to take a hot (inconsistent) database# backup. A hot backup is inconsistent because portions of the database are# being modified and written to the disk while the backup is progressing.# You must run your database in ARCHIVELOG mode to make hot backups. It is # assumed that this script will be executed by user root. In order for RMAN# to work properly we switch user (su -) to the oracle dba account before# execution. If this script runs under a user account that has Oracle dba# privilege, it will be executed using this user's account.# ---------------------------------------------------------------------------# ---------------------------------------------------------------------------# Determine the user which is executing this script.# ---------------------------------------------------------------------------CUSER=`id |cut -d"(" -f2 | cut -d ")" -f1`# ---------------------------------------------------------------------------# Put output in <this file name>.out. Change as desired.# Note: output directory requires write permission.# ---------------------------------------------------------------------------RMAN_LOG_FILE=${0}.`date +%Y%m%d%H%M%S`.out# ---------------------------------------------------------------------------# You may want to delete the output file so that backup information does # not accumulate. If not, delete the following lines.# ---------------------------------------------------------------------------if [ -f "$RMAN_LOG_FILE" ]thenrm -f "$RMAN_LOG_FILE"fi# -----------------------------------------------------------------# Initialize the log file.# -----------------------------------------------------------------echo >> $RMAN_LOG_FILEchmod 666 $RMAN_LOG_FILE# ---------------------------------------------------------------------------# Log the start of this script.# ---------------------------------------------------------------------------echo Script $0 >> $RMAN_LOG_FILEecho ==== started on `date` ==== >> $RMAN_LOG_FILEecho >> $RMAN_LOG_FILE# ---------------------------------------------------------------------------# Replace /db/oracle/product/ora81, below, with the Oracle home path.# ---------------------------------------------------------------------------ORACLE_HOME=/oracle/app/oracle/product/9.2.0export ORACLE_HOME# ---------------------------------------------------------------------------# Replace ora81, below, with the Oracle SID of the target database. # ---------------------------------------------------------------------------ORACLE_SID=zjcj2export ORACLE_SID# ---------------------------------------------------------------------------# Replace ora81, below, with the Oracle DBA user id (account).# ---------------------------------------------------------------------------ORACLE_USER=oracle# ---------------------------------------------------------------------------# Set the target connect string.# Replace "sys/manager", below, with the target connect string.# ---------------------------------------------------------------------------TARGET_CONNECT_STR=/# ---------------------------------------------------------------------------# Set the Oracle Recovery Manager name.# ---------------------------------------------------------------------------RMAN=$ORACLE_HOME/bin/rman# ---------------------------------------------------------------------------# Print out the value of the variables set by this script.# ---------------------------------------------------------------------------echo >> $RMAN_LOG_FILEecho "RMAN: $RMAN" >> $RMAN_LOG_FILEecho "ORACLE_SID: $ORACLE_SID" >> $RMAN_LOG_FILEecho "ORACLE_USER: $ORACLE_USER" >> $RMAN_LOG_FILE echo "ORACLE_HOME: $ORACLE_HOME" >> $RMAN_LOG_FILE# ---------------------------------------------------------------------------# Print out the value of the variables set by bphdb.# ---------------------------------------------------------------------------echo >> $RMAN_LOG_FILEecho "NB_ORA_FULL: $NB_ORA_FULL" >> $RMAN_LOG_FILEecho "NB_ORA_INCR: $NB_ORA_INCR" >> $RMAN_LOG_FILEecho "NB_ORA_CINC: $NB_ORA_CINC" >> $RMAN_LOG_FILEecho "NB_ORA_SERV: $NB_ORA_SERV" >> $RMAN_LOG_FILEecho "NB_ORA_POLICY: $NB_ORA_POLICY" >> $RMAN_LOG_FILE# ---------------------------------------------------------------------------# NOTE: This script assumes that the database is properly opened. If desired, # this would be the place to verify that.# ---------------------------------------------------------------------------echo >> $RMAN_LOG_FILE# ---------------------------------------------------------------------------# If this script is executed from a NetBackup schedule, NetBackup# sets an NB_ORA environment variable based on the schedule type.# The NB_ORA variable is then used to dynamically set BACKUP_TYPE# For example, when:# schedule type is BACKUP_TYPE is# ---------------- --------------# Automatic Full INCREMENTAL LEVEL=0# Automatic Differential Incremental INCREMENTAL LEVEL=1# Automatic Cumulative Incremental INCREMENTAL LEVEL=1 CUMULATIVE ## For user initiated backups, BACKUP_TYPE defaults to incremental# level 0 (full). To change the default for a user initiated# backup to incremental or incremental cumulative, uncomment# one of the following two lines.# BACKUP_TYPE="INCREMENTAL LEVEL=1"# BACKUP_TYPE="INCREMENTAL LEVEL=1 CUMULATIVE"## Note that we use incremental level 0 to specify full backups.# That is because, although they are identical in content, only# the incremental level 0 backup can have incremental backups of# level > 0 applied to it.# ---------------------------------------------------------------------------if [ "$NB_ORA_FULL" = "1" ]thenecho "Full backup requested" >> $RMAN_LOG_FILEBACKUP_TYPE="INCREMENTAL LEVEL=0"elif [ "$NB_ORA_INCR" = "1" ]thenecho "Differential incremental backup requested" >> $RMAN_LOG_FILEBACKUP_TYPE="INCREMENTAL LEVEL=1"elif [ "$NB_ORA_CINC" = "1" ]thenecho "Cumulative incremental backup requested" >> $RMAN_LOG_FILEBACKUP_TYPE="INCREMENTAL LEVEL=1 CUMULATIVE"elif [ "$BACKUP_TYPE" = "" ]thenecho "Default - Full backup requested" >> $RMAN_LOG_FILEBACKUP_TYPE="INCREMENTAL LEVEL=0"fi# ---------------------------------------------------------------------------# Call Recovery Manager to initiate the backup. This example does not use a# Recovery Catalog. If you choose to use one, replace the option 'nocatalog'# from the rman command line below with the# 'rcvcat <userid>/<passwd>@<tns alias>' statement.## Note: Any environment variables needed at run time by RMAN# must be set and exported within the switch user (su) command.# ---------------------------------------------------------------------------# Backs up the whole database. This backup is part of the incremental# strategy (this means it can have incremental backups of levels > 0# applied to it).## We do not need to explicitly request the control file to be included# in this backup, as it is automatically included each time file 1 of# the system tablespace is backed up (the inference: as it is a whole# database backup, file 1 of the system tablespace will be backed up,# hence the controlfile will also be included automatically).## Typically, a level 0 backup would be done at least once a week.## The scenario assumes:。


备份ORACLE(非脚本模式)申明:本文档中的截图来自于windows软件版本的操作,部分截图可能与利用javaconsole 的界面有小的差异,请做对比操作日期:2016.3.8作者:the rain day一:客户端安装注:如果是NBU一体机的下面为一体机的登陆方式1:登陆NBU5230的系统命令行NBU5230地址:10.254.5.100用户名:admin密码:P@sswrd(maintenance’s密码一致)由于系统版本的原因登陆系统需Xmanger版本高于5、SCRT版本高于7.登陆NBU5230自带的命令行2:Windows客户端安装①添加NBU服务端和客户端之间的主机名解析在N BU5230和所需要安装的客户端上添加解析(假设客户端为server01 IP10.254.3.21) NBU5230 vi /etc/hosts 添加如下内容10.254.3.21 server0110.254.5.100 nbu5230客户端上对应目录C:\Windows\System32\drivers\etc\hosts添加如下内容10.254.5.100 nbu523010.254.3.21 server01然后进入客户端,点击安装程序进行安装,详细的截图如下①启用SANCLIENT3:linux或者unix客户端的安装①分别在NBU5230和所需备份客户端上做HOSTS解析(假设客户端为erpcx1 、IP10.254.8.7)NBU5230 vi /etc/hosts 添加如下内容10.254.8.7 erpcx110.254.5.100 nbu5230客户端上对应目录vi /etc/hosts 添加如下内容10.254.8.7 erpcx110.254.5.100 nbu5230把软件安装包上传到服务器上注:第一个为UNIX对应的平台,第二个为linux平台并解压后执行对应目录下的install.sh文件,按照要求填写与客户端和NBU5230的相关信息②如果对应的服务器进行oracle的备份则需要在ORACLE用户下执行oracle_linkSu – oracle/usr/openv/netbackup/bin/oracle_link 最后选择yes即可完成二:添加oracle的实例右击选择添加新的单机实例(如果是主备或者RAC请选择)输入实例的相关信息注:数据库的实例名数据库所在服务器的主机名数据库的home路径点击进行关于oracle更详细的参数设置红色框中都是所需要填写的数据库所在服务器的凭据数据库所在服务器的用户名、密码和域数据库的凭据用户名为sys三:创建备份oracle的策略新建一个备份策略定义备份策略的名字定义备份数据类型和存储数据的位置定义数据备份的执行方式、备份的时间、数据的保留周期等选择所需要备份的实例定义备份oracle的一些相关要素备份数据文件开启的通道数备份归档日志开启的通道数备份生成文件名字的格式最后保存则备份oracle的策略制定完成手动执行备份成功。

NBU for Oracle 安装和RMAN备份、恢复配置及测试一、NBU for Oracle 安装安装master server1、改/etc/hosts文件,添加本备份系统内所有主机的IP地址和主机名,因为NBU是根据主机名来查找主机。
2、确保media server所在主机上/dev/rmt目录下能看到磁带机信息。
最好是能在磁带机内放一盘磁带并用tar命令确认能向磁带机写数据。
3、将介质放在光驱内#cd /cdrom/cdrom0#./install选择安装Netbackup,根据提示继续。
在安装过程中,会问到“此主机是不是master server”,安装master server时就答yes,安装media server时答no,并根据提示输入master server的主机名。
注意在集群环境中,请在安装过程中输入NetBackup client的虚拟名称而不是实际的本地主机名。
4、为方便使用,在root 的profile 中加入PATH=$PATH:/usr/openv/netbackup/bin:/usr/openv/netbackup/bin/admincmd:/usr/openv/netback up/bin/goodies:/usr/openv/volmgr/bin:/usr/openv/volmgr/bin/goodiesMANPATH=$MANPATH:/usr/openv/man/share/manexport MAN MANPA TH安装client 和agent1、将介质放入光驱#cd /cdrom/cdrom0#./install在提示输入server名字时输入master server的名字。
2、修改/usr/openv/netbackup/bp.conf文件,在第一行的“SERVER = XXXXX”下面按照此格式增加其他media server的名字,有几台media server就增加几行。
学习和掌握如何使用NBU备份文件系统,对于一个数据管理员来说,仅仅是一个开始。
因为对于大部分企业来说,买来NBU主要是为了备份企业数据库的数据,保护数据库的数据安全,进而保证企业应用的安全运行。
Oracle备份简介:简单的按照备份进行的方式,可以分为逻辑备份、冷备份(脱机备份)、热备份(联机备份),其实冷备份与热备份又可以合称为物理备份。
按照备份的工具,可以分为EXP/IMP备份和RMAN。
一般来说,Exp/Imp是oracle的一个好的转储工具,特别是在小型数据库的转储,表空间的迁移,表的抽取,检测逻辑和物理冲突等中有很强的功能。
但是目前主要最广泛的Oracle备份恢复工具是rman 。
RMAN 是Oracle提供的一个数据库备份和恢复工具,利用rman可以方便进行数据库的冷备份和热备份。
此外,有一些个人用户,会使用OS拷贝,但是它的缺点是占用空间大,而且拷贝文件的内容一般与系统环境有很大关系,转移到其他机器不容易恢复,不是企业用户的选择。
在本文中,我们将介绍如何利用NBU和oracle的rman工具进行oracle的冷备份。
NBU备份oracle步骤简介:如果用户需要备份oracle数据库,那么需要依次进行如下步骤:1,按照NBU oracle代理到NBU客户端,使得NBU能够获取客户端的oracle数据库的内容;2,在NBU主服务器(master server)上,创建类型为oracle备份的备份策略,使得NBU可以定时发起NBU备份;3,手动运行oracle备份策略,确定备份策略配置无误;4,添加增量备份,手动运行增量备份,检查无错误;5,在指定oracle运行时刻检查备份作业的工作情况,确定其可以自动运行无误。
现在,我们来依次介绍一下相关的步骤:一,安装NBU oracle代理首先用户需要将oracle代理软件挂载到文件系统中,然后运行install脚本,在显示界面中选择“2 NetBackup Database Agent Software”,在接着出来的界面中选择远程按照或者本地安装后,出现按照数据库代理界面,如图一所示:图一:选择NBU数据库代理在图一的选择中,选择“4 NetBackup for Oracle”,然后选择“q”确定选择,然后oracle代理就会被安装到本地系统中了。
接着,我们需要确认NBU oracle代理的注册码是否已经安装,因为NBU的oracle代理注册码是独立于NBU程序的,所以如果没有注册码,NBU oracle代理无法正常使用。
为此,在NBU客户端执行如下命令:#/usr/openv/netbackup/bin/admincmd/get_license_key在出现的界面中选择列出“F List Active License Keys”,在列出的feature中确定有如下feature:“Oracle extension”,保证oracle的注册码安装在系统中。
如果注册码不存在,那么需要用户输入注册码,可以在上述命令中选择“A Add a License Key”,将oracle代理注册码装入系统中。
二,在NBU主服务器上创建oracle备份策略首先,本文作者假定用户已经阅读过前作(《NBU设置备份策略》),所以与普通策略配置相同的地方,将不重复阐述。
设定备份属性页在设置备份策略的时候,首先需要在策略属性页中,将备份类型设置为oracle,然后指定数据保存到什么地方(需要提前设置好存储单元,详见《NBU设置存储单元》一文),如图二所示:图二:设置oracle备份策略-属性1. 设定备份日程表在备份策略的日程表设定中,有一个默认存在的备份日程表“Default-Application-Backup”,这次我们先不管它,我们去创建一个全备份日程表,如图三所示:图三:NBU备份策略-全备份日程表属性由图三可知,在日程表的属性中,主要是可以修改日程表的名称,另外就是备份类型是“Automatic Full Backup”,其他的选项去普通配置相同,请参见《NBU设置备份策略》。
注意这里要设置好NBU全备份的频率,太过频繁会导致磁盘占用的增多,如果是冷备份的话,还会导致数据库停机频繁,所以一般一周到几个月比较合适。
接着用户需要去设定oracle 全备份的日程表,就是周几的什么时间可以执行全备份,用户可以选择周一下午到周二早晨(非工作时间),然后点击“duplicate”按钮,指定周几都可以,但是一定要是下班时间,见图四:图四:NBU备份策略-设置启动时间2. 设定备份客户端:在设定好oracle的全备份日程表之后,我们就可以设置NBU客户端列表了,这里与普通备份策略的设置没有什么区别,所以这里不在累述了。
3. 设定备份选择在oracle备份策略的配置中,对于备份选择是非常重要的,这里将花费一些篇幅重点介绍它,见图五:图五:添加备份选择在图五所示界面中,有两个选项:一是模板类型(Template set),其中包括RMAN方式和imp/exp方式两种,如图六所示:图六:oracle备份的模板类型本文因为要做oracle的冷备份,所以在这里选择RMAN方式,接着需要添加一个运行脚本。
这个是我们备份过程中的重点。
备份脚本就是一系列命令的集合,它内部记录了系统的oracle用户、登录oracle 的用户帐号、要访问的数据库等等,此外,它还能获取到NBU的参数,包括备份的类型、要备份到的目标地等等。
通过这些参数,我们就可以让NBU的oracle代理帮助我们自动备份oracle数据库了。
现在可能会有读者说,我不会写脚本啊。
没有关系,NBU为用户提供了各种备份的模板,存放在/usr/openv/netbackup/ext/db_ext/oracle/samples目录下,见图七:图七:备份脚本模板由图七可见,NBU为oracle备份提供了rman、exp和imp的各种脚本。
今天我们要从最基础的冷备份讲起,所以我们要去修改的脚本是cold_database_backup.sh(注:cold_duplex_database_backup_full.sh脚本是为多个拷贝而设计的,目前我们只做一个拷贝,所以不需要这个)。
对于cold_database_backup.sh脚本来说,我们只需要修改脚本中的如下参数即可: ORACLE_HOME:表示oracle所在的目录,NBU需要到其目录下执行相应的rman命令;ORACLE_SID:指明需要冷备份的数据库;ORACLE_USER:oracle数据库所属的系统用户,NBU会先用该用户登录,再执行各种备份操作;TARGET_CONNECT_STR:登录oracle数据库的帐号,必须是系统管理员,因为冷备份需要停止oracle数据库先;TARGET_INIT_FILE:指定启动脚本,冷备份完毕后重启oracle时候需要;对于冷备份来说,修改如下项目即可,大家可以看修改后的模板,见图八:图八:修改脚本模板实例在用户修改好脚本之后,就可以将其添加到oracle的备份选择中去了,见图九:图九:添加备份选择在设置好上述属性之后,oracle备份策略就成功了制定了三,手动运行全备份策略:右键点击新生成的备份策略,选择手动执行,然后在活动监控器页面观察oracle 备份执行的情况,见图十:图十:全备份oracle数据库由图十可见,oracle备份已经成功,在全备份过程中,oracle代理启动了一些属性为“application backup”的子任务(job id分别是128、129、130)来完成全备份。
四,增加差分备份:由于全备份会占用很长的备份时间,所以用户使用备份策略时,不仅仅要设置好全备份,而且要在每两个全备份之间,设置一些差分备份,在减少备份时间的同时,增加备份的次数。
差分备份日程表的设置很简单,仅仅需要在原先生成的全备份策略中,添加一个差分备份日程表即可,见图十一:图十一:差分备份日程表此外,需要设置好差分策略启动的时间,见图十二:图十二:差分备份执行时间表五,手动执行差分备份日程表:在设置好差分备份日程表之后,我们可以点击该备份策略,选择执行差分备份(图十三),之后在活动监控界面检查作业的执行情况(图十四):图十三:选择差分备份图十四:监控差分备份情况由图十四可知,差分备份已经顺利执行完毕了(注意图十四的schedule列,里面包括全备份和差分备份)。
这样,用户就顺利执行了以后oracle数据库的冷备份。
接着,用户需要等待NBU在备份策略设定的启动时间到达时,查看是否作业能够自动运行,如果可以,那么NBU的备份策略就算是大功告成了。
热备份的条件:用户如果需要进行热备份,那么必须将数据库设置为archivelog模式。
用户可以登录数据库后,通过“SQL> archive log list”查看数据库的模式是否是archivelog模式。
如果用户数据库不是在archivelog模式下,可以通过下列命令将其设置为归档模式:•SQL>shutdown immediate•SQL>startup mount•SQL>alter database archivelog•SQL>alter database open在归档模式下,用户的数据库会将所有的日志记录起来,所以时间一久就会占用大量的磁盘空间,所以用户可以按需,将数据库改回到非归档模式,方法如下所示:•SQL>shutdown immediate•SQL>startup mount•SQL>alter database noarchivelog•SQL>alter database open热备份的类型:从NBU的角度来说,oracle的热备份分为两种:一种是数据库备份,可以在不关闭数据库的情况下,备份某个数据库的数据文件、控制文件和归档日志文件等等;第二种备份模式是热备份表空间,可以在数据库关闭的情况下,备份某个数据库表空间的内容。
在本文中,我们就分别介绍一下如何进行数据库级备份和表空间级备份。
注:在这里,我只会讲到如何修改备份脚本来进行备份,如果用户对于如何创建oracle备份策略、如何运行全备份和增量备份、如何寻找NBU提供的备份脚本模板等问题存在疑惑的话,请参加前文《用NBU备份oracle系统-冷备份》。
数据库级热备份:对于数据库级热备份来说,我们可以利用NBU提供的脚本文件:/usr/openv/netbackup/ext/db_ext/oracle/samples/rman/hot_database_back up.sh,这是一个可执行脚本,内容就是在设置好运行oracle rman程序所需的一些环境变量后,从root用户切换到oracle系统用户的帐号下,利用rman程序,将数据库的数据文件、归档日志文件和控制文件备份到用户指定的存储单元中。