In-gel digestion protocol
- 格式:pdf
- 大小:29.99 KB
- 文档页数:2
Method: Plasmid SubcloningMay 20 1990Matthew S. HoltPurpose:The method is used to clone smaller portions of inserts (up to 15 kb in size) which previously have been cloned in YACs phage cosmids or other plasmids.Time required:∙Plasmid Vector Preparation1.Restriction digest and Calf Intestinal Phosphatase (CIP)reaction - 4-6 hours or overnight2.Gel electrophoresis- 4-8 hours or overnight3.Fragment elution and purification - 4-6 hours∙Insert Preparation1.Restriction digest -4-6 hours or overnight2.Gel electrophoresis- 4-8 hours or overnight3.Fragment elution and purification - 4-6 hours∙Ligation Reaction - minimum of 4 hours, best overnightSpecial Reagents:∙10X CIP Buffer∙10X Ligation BufferPreface:Bacterial plasmids are double-stranded circular DNA molecules of 1- 200 kb in size that replicate and are inherited independently of the bacterial chromosome. Different plasmids replicate todifferent extents in their host some reaching a copy number as high as 700 per cell. They function as accessory genetic units frequently containing genes coding for enzymes that are advantageous to the bacterial host. The most commonly conferred phenotype by plasmids is antibiotic resistance though plasmids can also code forantibiotic production restriction and modification enzymescolicins enterotoxins and enzymes used to degrade complex organic compounds. More than one plasmid can occur in a single cell but sincethey compete for the same set of replication enzymes one plasmid usually dominates the others. Over the course of a few generations the minority plasmids are completely eliminated and the descendants of the original cell will contain only one of the original plasmids. Over 30 different "incompatibility" plasmid groups have been identified.Under natural conditions many plasmids are transmitted to a new host by a process known as bacterial conjugation. Newer plasmid vectors however lack the nic/bom site and cannot be conjugated. In the laboratory plasmid DNA can be introduced into modified bacteria (called competent cells) by the process of transformation. Even under the best circumstances plasmids become stably established in a small minority of the bacterial population. Transformants can be easily identified by the selectable marker encoded by the plasmid i.e. antibiotic resistance and the resulting phenotype of those bacterial cells.Uncut plasmid DNA can be in any of five forms - nicked circular linear covalently closed supercoiled or circular single-stranded. When run on a gel one frequently will see these forms as different bands. The exact distances between the bands of these different forms is influenced by percentage of agarose in the gel time of electrophoresis degree of supercoiling and the size of the DNA. One cannot accurately determine size from uncut plasmid DNA. When cut with an enzyme with one recognition site in the plasmid almost all the DNA will fall in one band which equals the linear size of the plasmid (see illustration below).Almost all research plasmid vectors contain a closely arranged series of synthetic restriction sites called the "polylinker". In most cases these restriction sites are unique to the polylinker and hence provide a variety of targets that can be used singly or in combination to clone foreign DNA fragments. The most recent phase of construction of plasmid vectors involves the incorporation ofancillary sequences that are used for a variety of purposes including generating single-stranded DNA templates for DNA sequencing transcription of foreign DNA sequences in vitro and expression of large amounts of foreign protein in vitro.Fragments of foreign DNA can be cloned in a linearized plasmid vector bearing compatible ends by the activity of Bacteriophage T4 DNA Ligase. The enzyme will catalyze the formation of a phosphodiester bond between adjacent nucleotides if one nucleotide contains a 5'-phophate group and the other nucleotide contains a 3'-hydroxyl group.During the ligation reaction however the vector can recircularize without the insert DNA. This can be minimized by removing the5'-phosphate from both termini of the linear vector with Calf Intestinal Alkaline Phosphatase (CIP). Described in the following procedures is a method that has worked consistently. It is recommended to run the vector on a gel cut out the vector band and gel elute to separate the vector from any uncut DNA.The smallest amount of uncut vector will transform efficiently and make finding the bacteria containing the recombinant plasmid virtually impossible. CIP has no effect on uncut circularized plasmids.A fragment of foreign DNA can be inserted into the vector by a process knows as directional cloning by cutting the vector polylinker with two unique restriction sites. Because of the lack of complementary ends the vector fragment cannot circularize efficiently. The insert DNA however must also have the same cohesive termini as the vector. Directional cloning is widely used when insert DNA orientation is specific. Directional cloning also depletes the number of available cloning sites for further constructing. Specific orientations can be obtained by screening several recombinants from a single-enzyme ligation until the desired orientation is identified.Another method of ligation though substantially less efficient is blunt-end ligations. Some restriction enzymes cleave both strands of DNA resulting in blunt ends - i.e. no cohesive overhang. Both the insert and vector termini resulting from any restriction enzyme digest can be made blunt. One method utilizes T4 DNA Polymerase and dNTPs to fill in the overhang. Another method uses the enzyme Mung Bean Nuclease to cleave the single stranded overhang. Ligation reactions involving blunt-ended molecules require much higher concentrations of both vector and insert DNA and T4 DNA ligase. One end blunt ligations are slightly more efficient (and directional)and can be achieved by first blunting the linear DNA and thendigesting with a restriction enzyme unique to only one end of the DNA. Again both vector and insert must have complementary ends.Either of these methods may change the DNA sequence resulting in the loss of the restriction site.When it is impossible to find a suitable match between restrictions sites in the plasmid and those at the ends of the insert synthetic linkers can be ligated to the linearized DNA. The procedure requires blunt-end linear DNA fragments to which ligase adds a series of thesesynthetic restriction sites. By the digesting with that specific restriction enzyme the resulting DNA has only one linker on each end because the DNA-linker bond is not a restriction site.Certain restriction overhangs can be modified using Klenow and the recessed 3' termini can be partially filled to generatecomplementary restriction overhands that are otherwiseincompatible. For instance an insert with BamH1 recognition site G'GATC C C CTAG'G has the overhang GATC after digesting. By filling in with dCTP and dTTP and Klenow the resulting overhand is AG. This is compatible with an Acc1 overhang of AG. Note however that the sequence resulting from this ligation is neither a BamH1 site nor an Acc1 site and an alternative method must be used to cut out the insert.Procedures:Plasmid Vector Preparation1.Digest 10-20 ug of plasmid DNA with the desired restriction enzymein a total volume of 100 ul. Incubate appropriately for yourspecific enzyme (usually 37 degrees C) for 1-4 hours. Supercoiled DNA will take longer to cut and it is recommended to use twice as much enzyme.2.Dephosphorylate the now linear DNA. Add to the completed digest:30 ul 10X CIP Buffer 167 ul ddH2O and 3 ul CIP enzyme (1 unit perul). Incubate at 45 degrees C for 25 minutes.3.Prepare an 0.8-1.2% agarose gel with approximately 6 cm wells. Thiscan be achieved by taping several teeth together. Be certain that the taped comb clears the bottom of the gel bed. Also prepare a mini-gel to run a 5 ul aliquot to verifycomplete digestion anddetermine running time to obtain desired separation.4.Add another 3 ul CIP (probably an unnecessary step by CIPspecification standards) and incubate at 45 degrees C for another25 minutes.5.Inactivate the CIP enzyme by adding 500 ul of phenol. Vortex thenspin in the microfuge at 14000 rpm for 5 minutes. Transfer theaqueous phase to a sterile eppendorf tube.6.Add 500 ul of chloroform (to remove phenol) vortex microfuge at14000 rpm for 2 minutes and transfer the aqueous phase to a sterile tube.7.Precipitate the DNA by adding 30 ul 3M NaAcetate pH 5.2 and 800 ulof -20 degrees C EtOH (must be cold!). Microfuge at 4 degrees Cimmediately for 30 minutes. If you suspect low yields place samples on dry ice for 10 minutes prior to spinning.8.Decant the supernatant immediately and vacuum dessicate or lay tubeon its side to dry the DNA pellet for 15 minutes. Resuspend in 100 ul 1X glycerol dye and load on gel along with a 1kb ladder (BRL) and several molecular weight standards. Run gel 4-8 hours at 80volts until the desired separation is obtained.9.Stain the gel excise band with a clean razor blade and gel elutethe vector (see Gel Elution protocol). Resuspend in 20-50 ul 1X TE and quantitate on a mini-gel. Vector is now ready for ligation.Insert Preparation1.Digest 10-20 ug of insert DNA with the appropriate enzyme in a 100ul volume. Incubate appropriately (usually 37 degrees C) for aminimum of 4 hours. Remove 5 ul for a test gel.2.Prepare an 0.8-1.2% agarose gel with approximately 6 cm wells. Thiscan be achieved by taping several wells together. Be certain that the taped comb clears the bottom of the gel bed. Also prepare amini-gel to run a 5 ul aliquot to verify complete digestion andrunning time to obtain desired separation.3.After verifying complete digestion add 10 ul of 10X glycerol dyeto the digest and load on gel. Run at 80V for 4-8 hours.4.Stain gel excise band(s) with a clean razor blade and gel elute thefragments (see Gel Elution protocol). Resuspend in 20-50 ul 1X TE and quantitate in a mini-gel. Inserts are now ready for ligation.Ligation Reaction1.Maniatis has several complicated formulas to determine the amountsof vector and insert to use for the most efficient ligations. To simplify always have a ratio of 3:1 insert to vector. The more DNA used the more efficient the ligation will be. Insert is usually the limiting factor but try to have between 100-300 ng of vector.2.Set up the reactions with an appropriate amount of vector and insert1 ul of 10X Ligation buffer then adjust the volume to 10 ul withddH2O. Remove 1 ul of the mixture for a negative control then add1 ul of Ligase (2-4 Weiss units per ul) to the original reaction.Incubate the reaction for a minimum of 4 hours though best results are obtained if allowed to ligate overnight (12 hours).Cohesive-end ligations should be done at 11 degrees C blunt-endligations at room temperature.3.Remove another 1 ul of the ligation mixture to test ligationefficiency: Run the aliquot along with the negative control on a mini-gel. The sample with added ligase will have bands of higher molecular weight if a substantial amount of ligation has occurred.e 5 ul of the ligation reaction for transformation (seetransformation procedures). The remaining 4 ul can be stored at -20 degrees C and used as a back-up if necessary.Solutions:1.10X CIP Buffer:2.10 mM ZnCl23.10 mM MgCl24.100 mM Tris pH 8.05.6.10X Ligation Buffer:7.8.0.5 M Tris pH 7.49.0.1 M MgCl210.0.1 M DTT11.10 mM ATP12.10 mM Spermidine13.References:Sambrook J. Fritsch E.F. and T. Maniatis.(1989) Molecular Cloning A Laboratory Manual. Second edition. Cold Spring Harbor Laboratory Press pp.1.53-1.69.。
胶上酶切方法1.切胶:用切胶笔、枪头或刀片切取胶粒(胶粒直径1-2mm),置于1.5ml Appendorf 试管中。
2.清洗:用200ul洗2次,每次10分钟。
3.脱色:对于考染胶,加200ul考染脱色液(25mM NH4HCO3, 50% CH3CN),超声脱色5分钟或37℃20分钟,吸干。
反复洗至胶粒基本无色;对于银染胶,可以不脱色,也可以加100ul银染脱色液(15mM K3Fe(CN)6, 50mM Na2S2O3)轻摇至变为淡黄色透明,再用水反复洗至无色)。
4.脱水:加CH3CN 100ul,使胶粒变白,吸弃CH3CN。
5.还原:加10mM DTT(溶于25mM NH4HCO3)20ul,37℃水浴1小时。
6.烷基化:冷至室温,吸弃溶液。
快速加30mM IAA(溶于25mM NH4HCO3)20ul,置于暗室45min。
(对于二维胶,可以省略还原和烷基化步骤)7.清洗:依次用双蒸水(2次)和50%CH3CN(2次)进行超声或混悬清洗,每次10分钟。
8.脱水:加CH3CN 100ul,使胶粒变白,吸弃CH3CN。
9.将0.1ug/ul酶液用25mM NH4HCO3稀释10-20倍,每管加2-3ul,稍微离心一下,让酶液与胶粒充分接触,4℃放置30min 。
待酶液被胶粒完全吸收后,加入10-15ul 25mM NH4HCO3,37℃过夜。
10. 离心收集酶解液,点靶。
注:1)每加一次溶液,都要旋涡振荡,胶粒要充分浸没在溶液中,进行下一步操作前把溶液吸走。
2)保持溶液和用具洁净,防止污染。
AnchorChip 点样须知1.配基质溶液:0.4mg/ml HCCA in A T (ACN: 0.1%TFA=70:30).2. 点样(二步法):取样品酶解液1ul (考染样品)或2ul (银染样品)点靶,晾干。
3.点基质:取1ul基质点在晾干的样品上。
4.点标准品:将1 pmol/ul的肽混合物标准品用基质溶液稀释100倍后,取1 ul点靶,晾干。
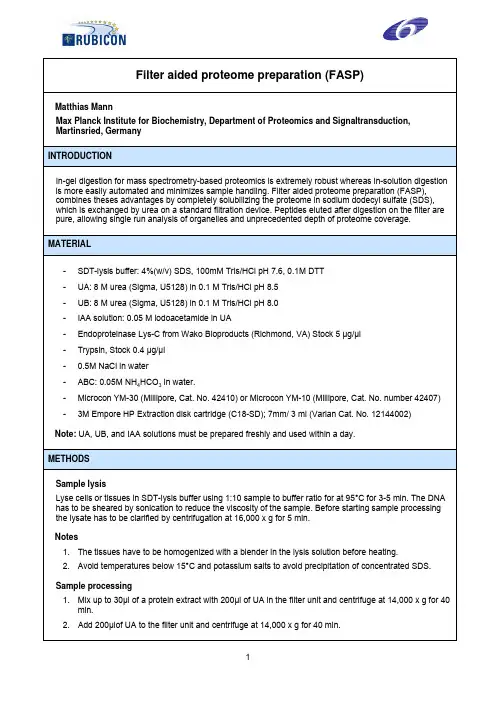
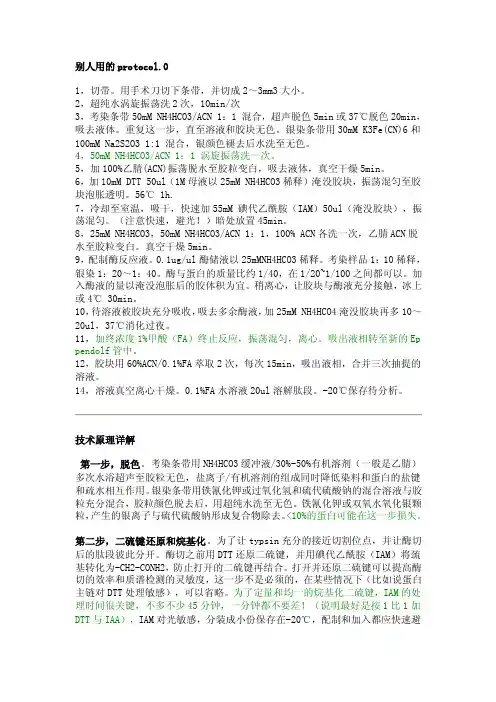
别人用的protocol.01,切带。
用手术刀切下条带,并切成2~3mm3大小。
2,超纯水涡旋振荡洗2次,10min/次3,考染条带50mM NH4HCO3/ACN 1:1 混合,超声脱色5min或37℃脱色20min,吸去液体。
重复这一步,直至溶液和胶块无色。
银染条带用30mM K3Fe(CN)6和100mM Na2S2O3 1:1 混合,银颜色褪去后水洗至无色。
4,50mM NH4HCO3/ACN 1:1 涡旋振荡洗一次。
5,加100%乙腈(ACN)振荡脱水至胶粒变白,吸去液体,真空干燥5min。
6,加10mM DTT 50ul(1M母液以25mM NH4HCO3稀释)淹没胶块,振荡混匀至胶块泡胀透明。
56℃ 1h.7,冷却至室温,吸干,快速加55mM 碘代乙酰胺(IAM)50ul(淹没胶块),振荡混匀。
(注意快速,避光!)暗处放置45min。
8,25mM NH4HCO3,50mM NH4HCO3/ACN 1:1,100% ACN各洗一次,乙腈ACN脱水至胶粒变白。
真空干燥5min。
9,配制酶反应液。
0.1ug/ul酶储液以25mMNH4HCO3稀释。
考染样品1:10稀释,银染1:20~1:40。
酶与蛋白的质量比约1/40,在1/20~1/100之间都可以。
加入酶液的量以淹没泡胀后的胶体积为宜。
稍离心,让胶块与酶液充分接触,冰上或4℃ 30min。
10,待溶液被胶块充分吸收,吸去多余酶液,加25mM NH4HCO4淹没胶块再多10~20ul,37℃消化过夜。
11,加终浓度1%甲酸(FA)终止反应,振荡混匀,离心。
吸出液相转至新的Ep pendolf管中。
12,胶块用60%ACN/0.1%FA萃取2次,每次15min,吸出液相,合并三次抽提的溶液。
14,溶液真空离心干燥。
0.1%FA水溶液20ul溶解肽段。
-20℃保存待分析。
技术原理详解第一步,脱色。
考染条带用NH4HCO3缓冲液/30%-50%有机溶剂(一般是乙腈)多次水浴超声至胶粒无色,盐离子/有机溶剂的组成同时降低染料和蛋白的盐键和疏水相互作用。
蛋白酶解及质谱鉴定完整操作流程仪器:ABI 4800 MALDI-TOF/TOF串联质谱仪(ABI)、真空冷冻干燥机、水浴锅、Mascot分析软件、移液器、离心管主要溶液配置:考染脱色液:25mmol/L NH4HCO3、50%乙腈的水溶液银染脱色液:15mM K3Fe(CN)6、50mM NaS2O3的水溶液脱水液1:50%的乙腈溶液脱水液2:100%的乙腈吸胀液:25mmol/L NH4HCO3的水溶液酶解覆盖液:25mM的NH4HCO3、10%乙腈的水溶液酶解工作液:含0.02ug/ul胰蛋白酶的酶解覆盖液蛋白萃取液:含5% TFA、67%乙腈的水溶液一、实验操作:1、将0.2ml的枪头前端剪去2cm左右,以增大孔径,2、将枪头垂直戳向凝胶上的蛋白点,旋转枪头直至将胶点取下,3、将取好的胶粒转入装有去离子水的0.5ml离心管里,用枪头反复吸打溶液至枪头内胶粒进入离心管,4、吸干去离子水后封盖保存并做好标记。
二、注意事项:1、离心管最好用进口离心管,以免塑料污染;水最好用去离子水,2、取点时带好口罩与手套以及头套,以免皮屑等角蛋白的污染,3、蛋白鉴定需要的蛋白量越多越好,所以尽可能把某一个点里所有的蛋白全部取到,不过某些比较大的点就只要取一部分就可以了,4、针对特别小的蛋白点,枪头孔径可能会比蛋白点面积大,取点时把该蛋白点的边上空白部分也一起取一些下来也不要紧,5、蛋白点的纯度越高越容易鉴定,一般双向电泳的点都是独立的蛋白,纯度完全满足鉴定的要求,针对有部分交叉的蛋白点,取点时注意不要取混,混合的蛋白点增加质谱鉴定的难度,降低鉴定成功率,6、取完的蛋白点可以放在室温下保存1周左右,可以放在-20度或者-80度保存半年以上,7、只有胶图上清晰可见的蛋白点,其含量就足够用于质谱鉴定,所以只要取一次蛋白点就可以了,不需要把几张胶上的蛋白点取了放在一起进行鉴定,同时注意不要把胶点弄得太碎8、条件允许的话可以多取一次胶点的重复以做好备份。
胰岛素的提取工艺流程英文回答:Insulin extraction is a complex process that involves several steps to obtain pure insulin from the pancreas. The process can be divided into the following stages: isolation, purification, and final formulation.The first step in the insulin extraction process is the isolation of the pancreas. This can be done by either surgical removal of the pancreas from a donor or by using animal pancreases. Once the pancreas is obtained, it is immediately placed in a cold solution to preserve the insulin.After isolation, the pancreas is then minced into small pieces and treated with a mixture of enzymes to break down the pancreatic tissue. This step is called digestion and it helps to release the insulin from the cells. The mixture is then incubated at a specific temperature for a certainperiod of time to allow the enzymes to work.Once the digestion is complete, the mixture is filtered to remove any remaining tissue debris. The filtrate, which contains the insulin, is then subjected to a series of purification steps. This involves using techniques such as chromatography, which separates the insulin from other proteins and impurities based on their size and charge.The purified insulin is then concentrated and further processed to remove any remaining impurities. This can be done through techniques like ultrafiltration or diafiltration. These processes help to increase the concentration of insulin and ensure its purity.Finally, the purified and concentrated insulin is formulated into a suitable dosage form, such as a solution or a powder for injection. This involves adding excipients and stabilizers to ensure the stability and efficacy of the insulin product.中文回答:胰岛素的提取是一个复杂的过程,需要经过几个步骤才能从胰腺中提取纯净的胰岛素。
胰岛素的提取工艺流程英文回答:Insulin extraction is a complex process that involves several steps to obtain purified insulin from the pancreas. The process begins with the isolation of the pancreas from an animal source, such as pigs or cows. The pancreas is then minced into small pieces and subjected to enzymatic digestion.During enzymatic digestion, proteolytic enzymes are used to break down the proteins present in the pancreas. This step helps in releasing insulin, which is stored in specialized cells called beta cells within the pancreas. The mixture is then centrifuged to separate the insoluble residue from the soluble fraction.The soluble fraction obtained from the centrifugation step contains a mixture of proteins, including insulin. To separate insulin from other proteins, various purificationtechniques are employed. One commonly used method is ion exchange chromatography, which separates proteins based on their charge properties. Insulin, being a small protein with a specific charge, can be selectively adsorbed onto an ion exchange resin while other proteins pass through.After ion exchange chromatography, the insulin-containing fraction is further purified using techniques such as gel filtration chromatography. This method separates proteins based on their size, allowing for the isolation of insulin molecules from larger proteins. The purified insulin is then subjected to additionalpurification steps, including ultrafiltration and diafiltration, to remove any remaining impurities.Finally, the purified insulin is freeze-dried to obtain a stable powder form that can be easily stored and reconstituted for use. The freeze-drying process involves removing water from the insulin solution under vacuum conditions, resulting in the formation of a dry powder.中文回答:胰岛素的提取是一个复杂的过程,需要经过多个步骤才能从胰腺中获得纯化的胰岛素。
MASS SPECTROMETRY FACILITYPurification and Concentration of Peptides IsolatedFrom In-gel Digestion of Protein Bands by Zip-TipAs it would be in the case of Reversed-Phase HPLC, an important precaution to take during the procedure described below is never to allow the Zip-Tip column to dry out during any one of the steps. Channeling due to air-bubbles in the Zip-Tip will lead to poor retention of peptides, causing large losses of peptides, and also a great variability in yields of individual peptides.(The procedure described here may be used in parallel to process several digests side-by-side.)Items Required For Each Peptide Digest:Zip-Tip C18 Cartridge columnTube A. 100μ1 Acetonitrile (HPLC Grade) - Wetting SolutionTube B. 1000 μ1 water (HPLC Grade) - Cleaning SolutionTube C. 10-20 μ1 Sample SolutionDissolve the extracted peptides in 10-20μ1 0.5% formic acid; make sure to wash the lower sides of the PCR tube containing the extracted peptides to achieve maximum dissolution of the peptides.Tube D. 500 μ1 0.5% Formic acid - Desalting/Wash SolutionTube E. 100 μ1 0.5% Formic Acid in 1:1 (v/v) water: acetonitrile - 1st Extraction Solution.Tube F. 100 μ1 Acetonitrile - 2nd Extraction SolutionTube G. A clean empty 200 μ1 PCR tube1. Attach the Zip-Tip column to the 20μ1micropipet (e.g. Gilson's Pipetman P20) snugly. Adjust the volume setting to 7μ1. Carefully,withdraw acetonitrile (Tube A) through the Zip-Tip and then, while the tip of the Zip-Tip is still under acetonitrile, pipet out the acetonitrile carefully, taking precaution to prevent introducing air bubbles into the Zip-Tip. Repeat this step at least 7-8 times, or until no bubbles arise during the pipetting out step. Finally, pipet out the acetonitrile slowly, and while the plunger is still down.immerse the tip of the Zip-Tip into the water (Tube B).2. Slowly withdraw 7μ1of water through the Zip-Tip, and then pipet it out carefully, taking care not to introduce any air into theZip-Tip. Repeat this step carefully at least 10 times to ensure that all acetonitrile has been washed away.3. Pipet out the water, and while the plunger is still down. move the tip of the Zip-Tip into the sample solution (Tube C). Carefully, f i llthe Zip-Tip with the Sample Solution, and, slowly push out into the tube (Tube C). Repeat at least 10 times to ensure that most of the peptides have been retained on the Zip-Tip.4. In the same fashion as in steps 2, and 3, above, wash the Zip-Tip with 0.5% formic acid solution (Tube D) at least 10 times toperform the desalting and washing of the peptides.5. After pipeting out the wash solution and. with the plunger is still down. transfer the Zip-Tip to the tube containing the extractionsolution (Tube E), and slowly fill with the extraction solution. Wait for 20 sec to ensure a complete extraction.6. Pipet out the extracting solution (Extract 1) into the empty tube G, and, while the plunger is still down. move to the tube Fcontaining the acetonitrile. Slowly withdraw acetonitrile through the Zip-Tip.7. After waiting for 10 sec., pipet out the solution (Extract 2) into the tube G containing the Extract 1.8. Submit the combined extracts (Tube G) for MS Analysis, or store in a freezer until required for analysis. If you intend to us by mail,then we recommend that you dry the solution completely in a Speed-vac before mailing.。
Trypsin Profile IGD KitFor In-Gel DigestsProduct Code PP0100Storage Temperature 2–8 °CTECHNICAL BULLETINProduct DescriptionIn-gel tryptic digestion of unknown proteins isolated by one dimensional or two dimensional polyacrylamide gel electrophoresis is a common tool used in proteomics. To determine or confirm their identities, proteins of interest are excised from the gel, digested with trypsin, and then analyzed by MALDI-MS or HPLC-MS with subsequent database searching. Trypsin is a pancreatic serine protease, which hydrolyzes peptide bonds specifically at the carboxyl side of arginine and lysine residues. The rate of hydrolysis is slower if an acidic residue is on either side of the cleavage site and cleavage may not occur if a proline residue is on the carboxyl side. 1-5 Tryptic digestion of the protein of interest results in a highly specific cleavage and a limited number of peptide fragments. The procedure detailed here is a modification of published protocols.6,7 The Trypsin Profile IGD Kit contains Proteomics Grade Trypsin that has been chemically modified through reductive methylation of the ε-amino groups of lysine to reduce autolysis and minimize autolytic fragments. In addition, it has been TPCK treated to remove residual chymotrypsin activity and then further purified by affinity chomatography, yielding a highly purified trypsin suitable for proteomics work.This procedure has been optimized for polyacrylamide gels stained with Coomassie Brilliant Blue, SYPRO™Orange, or SYPRO Ruby dyes. For silver stained gels, a gel destaining step different than that used for dye stained gels is required. The ProteoSilver™ Plus Silver Staining Kit (Product Code PROT-SIL2) is recommended for silver staining prior to tryptic digestion and MS analysis. It contains destaining solutions for silver stained gels and a procedure for preparing gel slices for tryptic digestion.The Trypsin Profile IGD Kit provides adequate material to digest up to 100 samples. ReagentsThe Trypsin Profile IGD Kit is composed of 6 reagents: • Destaining Solution – Solution to remove dye bound to the protein of interest. One bottle ofpowder that reconstitutes to a final volume of 75 ml (Product code D 9940).• Trypsin Reaction Buffer – Buffer provides optimal pH for the trypsin digestion reaction. One bottle of powder that reconstitutes to a final volume of 11 ml (Product Code R 3527).• Biotech grade acetonitrile – Solvent for preparation of other reagents. One 50 ml bottle (Product Code 49,444-5).• Trypsin Solubilization Reagent – Reagent for reconstituting and stabilizing the enzyme. One vial containing 1 ml of reagent (Product Code T 2073). • Peptide Extraction Solution – Solution for extracting peptides from the gel piece. One bottle containing10 ml of solution (Product Code P 0743).• Proteomics Grade Trypsin - The enzyme is supplied in five vials of 20 µg each (Product Code T 6567).Equipment and Reagents Required But Not Provided• ultra-pure water (18 megaohm or equivalent)• flat nosed tweezers• siliconized Eppendorf tubes (Product Code T 4691 or equivalent)• 37 °C heating block or heating bath• scalpel (S 2771 and S 3021) or razor blade• bench-top centrifuge (microcentrifuge)• centrifugal concentrator (SpeedVac )• sonic bath• ZipTippipette tips2Precautions and DisclaimerThis product is for laboratory use only, not for drug, household, or other uses. Consult the MSDS for information regarding hazards and safe handling practices. It is recommended to read the entire technical bulletin prior to starting the procedure. Preparation InstructionsIt is recommended to use ultrapure water (18 megaohm or equivalent) when reconstituting the reagents.• Destaining Solution - Add 45 ml of water and 30 ml of Biotech grade acetonitrile to the bottle. Afterreconstitution, the bottle contains a solution of200 mM ammonium bicarbonate and 40%acetonitrile.• Trypsin Reaction Buffer – Add 10 ml of water and1 ml of Biotech grade acetonitrile to the bottle.After reconstitution, the bottle contains a solution of40 mM ammonium bicarbonate and 9% acetonitrile.Note: The Destaining Solution and the TrypsinReaction Buffer do not need pH adjustment (pH is approximately 8.2).• Trypsin Solubilization Reagent – Reagent contains1 mM HCl and is ready to use.• Peptide Extraction Solution – Solution contains0.1% trifluoroacetic acid (TFA) in 50% acetonitrileand is ready to use.• Trypsin Solution – Add 100 µl of the Trypsin Solubilization Reagent to one vial of trypsin. Mix the vial briefly to ensure the trypsin is dissolved. Add900 µl of the Trypsin Reaction Buffer to the vial and mix. The final concentration of trypsin is 20 µg/ml.Note: Alternately, one vial of trypsin may bereconstituted with 100 µl of the TrypsinSolubilization Reagent (1 mM HCl) and stored at2–8 °C for 2 weeks or at –20 °C for up to 4 weeks.When ready to prepare the working TrypsinSolution, an aliquot of the acidic trypsin solutionmay be combined with the correct amount ofTrypsin Reaction Buffer(1 part of acidic trypsin solution to 9 parts of TrypsinReaction Buffer).Storage/StabilityThis kit is stable for at least 1 year when stored at2–8 °C. The Destaining Solution and the Trypsin Reaction Buffer are stable for up to one month after reconstitution when stored at 2–8 °C. The ammonium bicarbonate Trypsin Solution may be stored either at2–8 °C for 2 weeks or as frozen aliquots for up to4 weeks. The reconstituted Trypsin Solution is stable for at least 3 freeze-thaw cycles. ProcedureThe following procedure does not contain reduction or alkylation steps of the protein sample. For most in-gel digestion procedures, reduction and alkylation of the protein sample are suggested prior to running on the gel.8 This sample treatment results in a 2D gel with less streaking and increased resolution, producing a gel with fewer artifacts and better reproducibility.The ProteoPrep™ Reduction and Alkylation Kit (Product Code PROT-RA) contains reagents and procedures for reduction and alkylation of the protein sample during solubilization, equilibration for 2D electrophoresis, or in-gel tryptic digestion. Reduction and alkylation of the protein in solution prior to electrophoresis is most efficient.The following procedure starts with a Coomassie Brilliant Blue, SYPRO™ Orange, or SYPRO Ruby dye stained 1D or 2D polyacrylamide gel of a reduced and alkylated protein sample.1. Carefully cut the band of interest from a 1D gel orthe protein spot from a 2D gel, using a scalpel orrazor blade, taking care to include only stained gel.Lift out the gel piece using clean flat nosedtweezers.2. Place the gel piece in a siliconized Eppendorf tubeor equivalent. A siliconized tube reduces binding of the peptides to the tube surface. If unsure ofchemicals leaching from the tube, which couldinterfere or suppress the MALDI-MS signal,prewash the tube with 100 µl of Peptide Extraction Solution and then allow it to dry before use.Note: The gel piece may be cut into equal sections of 1 to 1.5 mm size and the sections may be usedin place of the intact piece.3. Cover the gel piece with 200 µl of DestainingSolution) and incubate at 37 °C for 30 minutes.Remove and discard the solution from the tube.4. Repeat step 3 one more time.5. Dry the gel piece in a Speed Vac® forapproximately 15 to 30 minutes.6. Add 20 µl (0.4 µg of trypsin) of the prepared TrypsinSolution to the gel sample.7. Add 50 µl of the Trypsin Reaction Buffer to the gelsample.8. Confirm that the gel piece is at the bottom of thetube and covered with liquid.9. Incubate for 4 hours to overnight at 37 °C.Note: A shorter digestion time may be sufficient,but may yield slightly lower sequence coverage. 10. After the incubation, remove the liquid from the gelpiece and transfer the liquid to a new labeled tube.3This solution contains the extracted trypticpeptides. If MALDI analysis is to be performed atthis step, acidification with TFA prior to matrixaddition may be needed.11. Add 50 µl of the Peptide Extraction Solution to thegel piece and incubate for 30 minutes at 37 °C.Note: This extraction step only increases thepeptide yield by about 5%.6 If the extra 5% is notrequired for your system, the extraction step can be eliminated and the sample solution from step 10may then be analyzed.12. Remove Peptide Extraction Solution and combinewith the liquid from step 10.13. The combined sample solution from step 12 isready for MALDI-MS analysis.Note: If digesting low levels of protein, the samplemixture may need to be concentrated with aZipTip before spotting on the MALDI target. ResultsA solution of 2.5 mg/ml of E. coli cells (EC-1) in Cellular and Organelle Membrane Solubilization Reagent (Product Code C0356) was sonicated, then reduced with tributylphosphine and alkylated with iodoacetamide. A 109 µg protein sample was loaded on a 7 cm, pH 4-7, IPG strip (Product Code I 2906), focused for 50,000 Volt hours, then run on a 4-20%Tris-glycine SDS-PAGE gel at 150 Volts for 70 minutes. The gel was stained with EZBlue™ Gel Staining Reagent (Product Code G 1041) (See Figure 1). Figure 1.The 2D electrophoresis gel of a reduced and alkylated E. coli extract.The indicated spot was cut out and digested with trypsin using the procedure for this kit. The peptide sample was desalted using a ZipTip™ C18 pipette tip and eluted directly onto the MALDI target using the MALDI matrix of 10 mg/ml of α-cyano-4-hydroxycinnamic acid in 70% acetonitrile with 0.03% trifluoroacetic acid. The MALDI analysis was performed in the reflectron positive ion mode (see Figure 2). Figure 2.The MALDI-MS of the Trypsin In-Gel Digested Spot from Figure 1.The resulting monoisotopic masses were searched against the NCBI database at a tolerance of 150 ppm. The circled protein was identified as Outer Membrane Protein 3a from E. coli with the matched peptides providing 30% sequence coverage.Note: A common autolytic fragment observed from a trypsin digest is 842.51 (A7) m/z produced by arginine cleavage. Other autolytic peptides occasionally detected include the 2239.14 (A4) and 1045.56 (A6)m/z. The cited peptide at 2211.10 (A4) m/z containing an unmodified lysine69 is not observed in the Proteomics Grade Trypsin, as it is fully converted to the dimethylated 2239.14 m/z peptide.4Related Products Product Code ProteoPrep KitsTotal Extraction SampleMembrane Protein Extraction Universal Extraction PROT-TOT PROT-MEM PROT-TWOProteoPrep Reduction andAlkylation KitPROT-RA ProteoSilver™ Plus SilverStaining KitPROT-SIL2 ProteoMass™ MALDI-MSCalibration KitsProtein and Peptide PeptideProtein MS-CAL1 MS-CAL2 MS-CAL3EZBlue Gel Staining Reagent G 1041 Bradford Reagent B 6916 Bicinchoninic Acid Kit for ProteinDeterminationBCA-1 QuantiPro™ BCA Assay Kit QP-BCAProtein Standard Solution (1.0 mg/ml BSA)P 0914References1. Walsh, K.A., Meth. Enzymol., 19, 41 (1970).2. Smith, B.J., Methods in Molecular Biology, Volume3, New Protein Techniques, Humana Press, (NewJersey, 1988) p 57.3. Aitken, A. et al., Protein Sequencing: A PracticalApproach, IRL Press, (Oxford, 1989) p 43.4. Burdon, R.H., and Knippenberg, P.H. (eds.),Laboratory Techniques in Biochemistry andMolecular Biology: Sequencing of Proteins andPeptides, Volume 9, Elsevier, (New York, 1989)p 73.5. Stone, K.L. et al., A Practical Guide to Protein andPeptide Purification for Microsequencing, AcademicPress, Inc. (New York, 1989) p 31.6. Speicher, K. D. et al., J. Biomolecular Techniques,11, 74-86 (2000).7. Sechi, S. et al., Analytical Chemistry, 70, 5150-5158 (1998).8. Herbert, B. R., Electrophoresis, 19, 845-851 (1988).Coomassie is a registered trademark of ICI PLC.SYPRO is a trademark of Molecular Probes.Eppendorf is a registered trademark of Eppendorf-Netheler-Hinz GmbH.SpeedVac is a registered trademark of Savant.ZipTip is a registered trademark of Millipore.MKS/MAM 10/03 Sigma brand products are sold through Sigma-Aldrich, Inc.Sigma-Aldrich, Inc. warrants that its products conform to the information contained in this and other Sigma-Aldrich publications. Purchaser must determine the suitability of the product(s) for their particular use. Additional terms and conditions may apply. Please see reverse side ofthe invoice or packing slip.。
Protocol for In-Solution Tryptic DigestionPreparationI. Materiala. Trypsin Stock: Prepare the Trypsin Stock solution in a concentration of0.1ug/uL by adding 200uL of Trypsin resuspension buffer to 20ug of Trypsin.Store this solution at -20°C for up to two months.b. Digestion Buffer: Weigh 10 mg of the Ammonium Bicarbonate and dissolvein 2.5mL of ultrapure water for a final concentration of ~50mM. This solutioncan be stored at 4°C for up to two months.c. Reducing Buffer: Weigh 8 mg of DDT and dissolve with 500uL of ultrapurewater for a final concentration of ~100mM. Store reducing buffer at -20°C.d. Alkylation Buffer: Prepare Alkylation Buffer just before use. Weigh 9 mg ofIodoaceamide and add it to a foil-wrapped tube to avoid exposure to light.Add 500uL of ultrapure water for a final concentration of ~100mM. Do notstore excess.e. Protein Concentrations: The procedure described below has been found towork well with protein concentrations in the range of 0.1 – 1.0 mg/mL. Thisconcentration range will allow you to work with from 1.0ug to 10ug of protein,respectively, in 10uL total volume for the digestions.II. Procedure for In-Solution Digestiona. Reduction and Alkylationi. Add 15uL of Digestion Buffer and 1.5uL of Reducing Buffer to a0.5mL microcentrifuge tube.ii. Add 10uL of the protein solution to the tube and adjust the finalvolume to 27uL with ultrapure water.iii. Incubate sample at 95°C for 5 minutes. Allow sample to cool.iv. Prepare Alkylation Buffer as described in the MaterialPreparation Section. Add 3uL of Alkylation Buffer to the tube andincubate in the dark at room temperature for 20 minutes.b. Digestioni. Prepare Trypsin as described in the Material Preparation Section.ii. Add 1uL Trypsin to reaction tube and incubate at 37°C for 3 hours.iii. Add an additional 1uL Trypsin and incubate the reaction at 30°Covernight.iv. Spot 0.5 µL of α-cyano-4-hydroxycinnamic acid matrix (10 mg/mLin 50% HPLC grade acetonitrile, 0.1 % TFA) on MALDI sampleplate followed by 0.5 µL of sample. Unused sample may be frozenat -20°C in case further analyses are required.v. Allow spots to dry completely and perform MALDI MS datacollection as soon as possible.Notes•Always use non-latex gloves when handling samples, keratin and latex proteins are potential sources of contamination.•Never re-use any solutions, abundant proteins will partially leach out and contaminate subsequent samples.References1. Procedure modified from Pierce In-Solution Tryptic Digestion Kit.。
蛋白质组学样品制备注意事项蛋白组学样品制备常规流程及注意事项一、细胞, 组织裂解●Lysis buffer (SDT, RIPA…): ThermoFisher提供了针对于各种样品的解缓冲液●Detergent: SDS, CHAPS, NP40… (破坏细胞膜,蛋白质变性)●Reducing agent: DTT… (打开二硫键,使得蛋白质结构更为开放,更易酶解)●Urea: 增加蛋白质的可溶性,适用于提取全蛋白二、蛋白质抽提三、样品蛋白质含量测定、还原烷基化还原烷基化原理: 蛋白质不能从PAGE胶里被抽提出,而肽段则可以被抽提出,打断蛋白质的二硫键,破坏蛋白质二级结构,是蛋白质结构松散,增加蛋白质酶切效率。
四、蛋白水平的预分级或蛋白质免疫沉淀五、蛋白质酶解i.胶内酶解 (In-gel digestion)●将考染后的SDS-PAGE切成小块●用100mM NH4HCO3/30%ACN 脱色●在胶内进行 DTT, IAA●在NH4HCO3溶液体系中加入酶,在胶内进行酶解●用60% ACN/0.1% TFA 从胶中抽提生成的肽段ii.FASP: Filter aided sample preparation●采用滤膜装置进行溶液置换(10K, 20K, 30K)●使用尿素可以更有效的除去溶液体系中的去垢剂(如SDS)●最后置换至NH4HCO3 or TEAB 溶液体系进行蛋白质酶切(pH 在8.0左右)●酶解完成后收集滤膜的流穿组分得到肽段原理: 蛋白质不能通过滤膜,而酶解生成的肽段则可以通过。
丙酮沉淀是另一种去除去垢剂的方法,从而可进行溶液内酶解。
iii.蛋白酶的选择:最为常用的蛋白酶: Trypsin(保持胰酶处于低温,并且保存在酸性环境中,以防止胰酶自身酶解)●特异的切断C端为Arg, Lys的肽键(若Arg, Lys后紧跟Proline, 酶切效率降低)●生成的肽段平均长度为9个氨基酸●胰酶酶解生成的肽段至少为2+价,易于离子化其他一些蛋白酶,酶切位点的特异性可在搜库软件中查找。
Goodlett LabIn-gel digestion protocolNote that this protocol requires extreme care in handling the gel slices to avoid contamination with “finger proteins” (skin keratins). The contamination of gel slices with keratins prior to tryptic digestion overwhelms the spectra generated from the tryptic digestion of the protein of interest, preventing identification by MS.At a minimum, scrub/wash all surfaces that will touch the gel with ethanol and then water. Always wear gloves. When removing gloves that you plan to re-use, do not touch the finger areas of the gloves with your bare hands. Use a clean glass surface upon which to lay the gel prior to excision of the band with a new razor blade. Do not allow any part of the gel or the gel slice to touch a surface that may have been touched by your or someone else’s hands.Staining/destaining procedureCoomassie Blue stain: Use Pierce’s Imperial Protein Stain (cat # 24615) andfollow their directions. This is a non-fixing Coomassie Blue stain. After staining, wash the gel many times with at least 100 mL of pure water to remove all SDS(which will interfere with the MS analysis), wash overnight, and several times the next day prior to gel band excision.Silver Staining: see the protocol on the Goodlett Lab website. After development of the gel, wash several times in pure water to remove excess formaldehyde assoon as possible to prevent protein cross-linking. In making up solution C, sodium thiosulphate, make it less than five min prior to use in step 4 or the stainingprocedure will fail.Destaining a Silver Stain: potassium ferricyanide (III) – K3Fe(CN)6; 0.2g in100mLReduction and AlkylationThis procedure is optional, but the idea is to reduce any disulfide bonds in your protein to allow the protease to access the protein better. Alkylation is to prevent the disulfide bonds from reforming.1.Place dry gel pieces in .2mL tubes, add 50-100uL of 20mM DTT (dithiothreitol)in 100mM Ammonium Bicarbonate, and incubate them for 1 h at 60°C2.Remove DTT solution and add 50-100uL of 55mM IAM (iodoacetamide) in100mM ammonium bicarbonate3.Incubate at room temp for 45 min in the dark4.Remove the IAM solution and rinse/vortex the gels for 10 min with 100mMammonium bicarbonate, and then for another 10 min with ACN (acetonitrile).Repeat this procedure.5.Dry the gels using the speed vac (~30 min)Protein digestion1.After excision of the gel slice with a new, clean razor blade, place it in a 1.5 mLEppendorf tube. Add 500 uL of 100 mM ammonium bicarbonate andshake/rotate for 15 min at room temp.2.Discard the liquid and add 500 uL of highly pure acetonitrile (Optima, Fisher, cat# A996-4) and shake/rotate 15 min at room temp. Discard the liquid. Repeat thiswash cycle twice more with ammonium bicarbonate and acetonitrile.3.With a sterile needle, punch several holes in the cap of each Eppendorf tubecontaining a gel slice, close the tube, and Speedvac at room temp for 45 min to remove all liquid from the gel slices.4.To a 20 ug vial of Promega Sequencing Grade trypsin (cat # V511) add 1 mL of50 mM ammonium bicarbonate.5.Add 50 uL to each gel slice and incubate the tube for 45 min on ice. (Do not chopthe gel slice into small pieces since these will be carried over and clog thereverse-phase column used to separate the peptides prior to MS analysis).6.Add enough 50mM ammonium bicarbonate to cover what will be the expandedgel slice and incubate the tube on a shaker (with Scotch tape over the needle holesto prevent evaporation) overnight at room temperature.7.Remove the solution to a new tube in the morning. Add 50 uL of 5%acetonitrile/0.1% TFA to the gel slice and shake 15 min, room temp. Repeat thisstep, pooling each wash with the solution from the overnight digest.8.Finally add 50 uL of 50% acetonitrile/0.1%TFA to the gel slice for 15 min withshaking. Pool with the prior eluates.9.Speedvac the eluates to about 10 uL volume but do not take the peptides todryness since some of the peptides will irreversibly adsorb to the surface of thetube.10.Transfer the solution to an autosampler vial for the mass spectrometer and store at–80C.References:•Shevchekno A, Wilm M, Vorm O, Mann M “Mass-spectrometric sequencing of proteins from silver-stained polyacrylamide gels” Analytical Chemistry,1996 68, 850-858。