思科交换机基本配置[非常详细]
- 格式:doc
- 大小:103.50 KB
- 文档页数:9

思科交换机的基本配置随着Internet的高速发展,网络规模不断膨胀,对于从事网络专业的学生熟练掌握路由器和交换机的配置已显得十分重要。
接下来是小编为大家收集的思科交换机的基本配置方法,希望能帮到大家。
思科交换机的基本配置的方法一、交换机的基本配置Author:chenchao in ZJNU从本篇文章开始,将连载大概8-9篇自己学习交换与路由的实验报告,但是怕自己能力不行,会出现错误,所以,先载两篇文章,依次为:交换机的基本配置;路由器基本配置。
本篇为交换机的基本配置,使用的仿真软件是Cisco的一款免费软件:Cisco Packet Tracer。
想学习的可以在百度自行下载。
下面开始附上实验过程:实验环境:Cisco 2950交换机1台,Console电缆1根,PC机一台,网线1根。
连接如下图所示:实验步骤:一、交换机的带外配置;1、在用户模式、特权模式、全局模式、接口模式之间转换;Switch>enableSwitch#configure terminalEnter configuration commands, one perline. End with CNTL/Z.Switch(config)#interface FastEthernet 0/1Switch(config-if)#exitSwitch(config)#exitSwitch#%SYS-5-CONFIG_I: Configured from console byconsoleSwitch#exitSwitch con0 is now availablePress RETURN to get started.Switch>2、将交换机的名称改为“student”;Switch(config)#hostname studentstudent(config)#3、为交换机各个模式设置密码“cisco”;特权模式下的密码保护student#enablestudent#configure tEnter configuration commands, one perline. End with CNTL/Z.student(config)#enable password ciscostudent(config)#enable secret cisco1远程登录口令设置student#configure tEnter configuration commands, one perline. End with CNTL/Z.student(config)#line console 0student(config-line)#line vty 0 4student(config-line)#password cisco2student(config-line)#loginstudent(config-line)#student#4、为交换机制定一个IP地址10.10.10.X/24;student#configConfiguring from terminal, memory, ornetwork [terminal]?Enter configuration commands, one perline. End with CNTL/Z.student(config)#interface vlan 1student(config-if)#ip address 10.10.10.1255.0.0.05、开启交换机的Telnet服务功能,建立Telnet用户admin,口令cisco,并制定只能从10.10.10.y/24登录Telnet服务器;student#student#configure tEnter configuration commands, one perline. End with CNTL/Z.student(config)#user admin password 0 ciscostudent(config)#6、查看配置情况;student>enablePassword:student#show running-cBuilding configuration...hostname student!enable secret 5$1$mERr$q.MA2tj.WFptzvbifq/1i.enable password cisco!!username admin password 0 ciscointerface Vlan1ipaddress 10.10.10.1 255.0.0.0!!line con 0!line vty 0 4password cisco2loginline vty 5 15login!!End二、交换机的端口配置:1、配置接口的描述、关闭借口、启动接口、配置接口的速度为100Mbps、配置接口工作模式为全双工、配置接口的流程控制;student#configure terminalEnter configuration commands, one perline. End with CNTL/Z.student(config)#interface FastEthernet0/1student(config-if)#shutdown%LINK-5-CHANGED: Interface FastEthernet0/1,changed state to administratively down%LINEPROTO-5-UPDOWN: Line protocol onInterface FastEthernet0/1, changed state to down%LINEPROTO-5-UPDOWN: Line protocol onInterface Vlan1, changed state to downstudent(config-if)#student(config-if)#exitstudent(config)#interface FastEthernet0/1student(config-if)#no shutdown%LINK-5-CHANGED: Interface FastEthernet0/1,changed state to up%LINEPROTO-5-UPDOWN: Line protocol onInterface FastEthernet0/1, changed state to up%LINEPROTO-5-UPDOWN: Line protocol onInterface Vlan1, changed state to upstudent(config-if)#speed 100student(config-if)#duplex full%LINK-5-CHANGED: Interface FastEthernet0/1,changed state to down%LINEPROTO-5-UPDOWN: Line protocol onInterface FastEthernet0/1, changed state to down%LINEPROTO-5-UPDOWN: Line protocol onInterface Vlan1, changed state to downstudent(config-if)#2、配置接口FastEthernet0/10为Access口;student#student#configure terminalEnter configuration commands, one perline. End with CNTL/Z.student(config)#interface FastEthernet0/10student(config-if)#switchport mode accessstudent(config-if)#3、配置接口FastEthernet0/12为Trunk口;student#student#configure tEnter configuration commands, one perline. End with CNTL/Z.student(config)#interface fastethernet0/12student(config-if)#switchport mode Trunkstudent(config-if)#end4、查看配置情况;!interface FastEthernet0/1duplex fullspeed100!!interface FastEthernet0/9!interface FastEthernet0/10switchport mode access!interface FastEthernet0/11!interface FastEthernet0/12switchport mode trunk!student#show running-cBuilding configuration...Current configuration : 1275 bytes!version 12.1no service timestamps log datetime msecno service timestamps debug datetime msec no service password-encryption!hostname student!enable secret 5$1$mERr$q.MA2tj.WFptzvbifq/1i. enable password cisco!!username admin password 0 cisco!!duplex fullspeed 100!interface FastEthernet0/2 !interface FastEthernet0/3 !interface FastEthernet0/4 !interface FastEthernet0/5 !interface FastEthernet0/6 !interface FastEthernet0/7 !interface FastEthernet0/8 !interface FastEthernet0/9 !interface FastEthernet0/10 switchport mode access !interface FastEthernet0/11 !interface FastEthernet0/12 switchport mode trunk!interface FastEthernet0/13 !!interface FastEthernet0/15!interface FastEthernet0/16!interface FastEthernet0/17!interface FastEthernet0/18!interface FastEthernet0/19!interface FastEthernet0/20!interface FastEthernet0/21!interface FastEthernet0/22!interface FastEthernet0/23!interface FastEthernet0/24!interface GigabitEthernet1/1 !interface GigabitEthernet1/2 !interface Vlan1ipaddress 10.10.10.1 255.0.0.0 !!line con 0!line vty 0 4password cisco2loginline vty 5 15login!!end看了“思科交换机的基本配置”还想看:。
![思科交换机基本配置[非常详细]](https://img.taocdn.com/s1/m/799d5c4b27d3240c8547ef12.png)
cisco交换机基本配置1.Cisco IOS简介Cisco Catalyst系列交换机所使用的操作系统是IOS(Internetwork Operating System,互联网际操作系统)或COS (Catalyst Operating System),其中以IOS使用最为广泛,该操作系统和路由器所使用的操作系统都基于相同的内核和shell。
IOS的优点在于命令体系比较易用。
利用操作系统所提供的命令,可实现对交换机的配置和管理。
Cisco IOS操作系统具有以下特点:(1)支持通过命令行(Command-Line Interface,简称CLI)或Web界面,来对交换机进行配置和管理。
(2)支持通过交换机的控制端口(Console)或Telnet会话来登录连接访问交换机。
(3)提供有用户模式(user level)和特权模式(privileged level)两种命令执行级别,并提供有全局配置、接口配置、子接口配置和vlan数据库配置等多种级别的配置模式,以允许用户对交换机的资源进行配置。
(4)在用户模式,仅能运行少数的命令,允许查看当前配置信息,但不能对交换机进行配置。
特权模式允许运行提供的所有命令。
(5)IOS命令不区分大小写。
(6)在不引起混淆的情况下,支持命令简写。
比如enable通常可简约表达为en。
(7)可随时使用?来获得命令行帮助,支持命令行编辑功能,并可将执行过的命令保存下来,供进行历史命令查询。
1.搭建交换机配置环境在对交换机进行配置之前,首先应登录连接到交换机,这可通过交换机的控制端口(Console)连接或通过Telnet登录来实现。
(1)通过Console口连接交换机对于首次配置交换机,必须采用该方式。
对交换机设置管理IP地址后,就可采用Telnet登录方式来配置交换机。
对于可管理的交换机一般都提供有一个名为Console的控制台端口(或称配置口),该端口采用RJ-45接口,是一个符合EIA/TIA-232异步串行规范的配置口,通过该控制端口,可实现对交换机的本地配置。


CISCO交换机基本配置和使用概述CISCO交换机是一种常用的网络设备,用于构建局域网(Local Area Network,LAN)。
它可以通过物理线路的连接,将多台计算机或其他网络设备连接到同一个网络中,实现数据的传输和共享。
CISCO交换机的基本配置包括IP地址的配置、VLAN的配置、端口配置、安全性配置等。
接下来,我们将对这些配置进行详细说明。
首先,IP地址的配置是CISCO交换机的基本操作之一。
通过配置IP地址,我们可以对交换机进行管理和监控。
具体的配置步骤如下:1. 进入交换机的配置模式。
在命令行界面输入"enable"命令,进入特权模式。
2. 进入全局配置模式。
在特权模式下输入"configure terminal"命令,进入全局配置模式。
3. 配置交换机的IP地址。
在全局配置模式下输入"interfacevlan 1"命令,进入虚拟局域网1的接口配置模式。
然后输入"ip address 192.168.1.1 255.255.255.0"命令,配置交换机的IP地址和子网掩码。
4. 保存配置并退出。
在接口配置模式下输入"exit"命令,返回到全局配置模式。
然后输入"exit"命令,返回到特权模式。
最后输入"copy running-config startup-config"命令,保存配置到闪存中。
其次,VLAN的配置是CISCO交换机的关键配置之一。
通过配置VLAN,我们可以将交换机的端口划分为不同的虚拟局域网,实现数据的隔离和安全。
1. 进入交换机的配置模式。
同样,在特权模式下输入"configure terminal"命令,进入全局配置模式。
2. 创建VLAN。
在全局配置模式下输入"vlan 10"命令,创建一个编号为10的VLAN。

思科交换机路由基本配置命令常用命令1.配置接口:interface {interface_type} {interface_number}2.配置IP地址:ip address {IP_address} {subnet_mask}3.配置默认网关:ip default-gateway {default_gateway_IP}4.开启接口:no shutdown5.配置路由协议:router {routing_protocol}6.配置路由器ID:router-id {router_ID}7.配置路由信息:network {network_address} {subnet_mask}8.配置静态路由:ip route {destination_network} {subnet_mask}{next-hop_IP}9.配置动态路由:router {routing_protocol} {network_address}10.保存配置:copy running-config startup-config注意:上述命令仅作为参考,具体配置应根据实际环境和设备型号进行调整。
下面是一些基本的 Cisco 交换机路由配置命令:1.配置 hostname: hostname <name>2.配置 IP 地址: interface <interface> 后进入接口模式,再输入 ipaddress <ip address> <subnet mask>3.配置默认路由: ip route 0.0.0.0 0.0.0.0 <next hop IP>4.启用路由协议: router <protocol> (例如: router rip)5.配置路由连接: network <network address> (例如: network192.168.1.0)6.查看路由表: show ip routeCisco 交换机路由配置步骤1.进入配置模式:configure terminal2.配置 IP 地址和子网掩码:interface [interface-name] ; ip address[ip-address] [subnet-mask]3.配置默认路由:ip route 0.0.0.0 0.0.0.0 [next-hop-IP-address]4.启用路由协议:router [protocol-name] (如:router ospf)5.配置路由协议参数: [protocol-name] [process-id] (如:ospf 1)6.配置路由连接:network [network-address] [wildcard-mask] area[area-id] (如:network 192.168.1.0 0.0.0.255 area 0)7.保存配置:copy running-config startup-config8.退出配置模式:exit。

思科交换机的基本配置命令网络技术知识其实也是弱电里面的一个难点,这个一般是在大学课程里面才能详细的学习,今天小编带来的是交换机的基本配置命令。
一、基本配置命令switch>用户模式1:进入特权模式enableswitch>enableswitch#2:进入全局配置模式configureterminalswitch>enableswitch#configureterminalswitch(conf)#3:交换机命名hostnameaptech2950以aptech2950为例switch>enableswitch#configureterminalswitch(conf)#hostnameaptch-2950aptech2950(conf)#4:配置使能口令enablepasswordcisco以cisco为例switch>enableswitch#configureterminalswitch(conf)#hostnameaptch2950aptech2950(conf)#enablepasswordcisco5:配置使能密码enablesecretciscolab以cicsolab为例switch>enableswitch#configureterminalswitch(conf)#hostnameaptch2950aptech2950(conf)#enablesecretciscolab6:设置虚拟局域网vlan1interfacevlan1switch>enableswitch#configureterminalswitch(conf)#hostnameaptch2950aptech2950(conf)#interfacevlan1aptech2950(conf-if)#ipaddress192.168.1.1255.255.255.0配置交换机端口ip和子网掩码aptech2950(conf-if)#noshut是配置处于运行中aptech2950(conf-if)#exitaptech2950(conf)#ipdefault-gateway192.168.254设置网关地址7:进入交换机某一端口interfacefasteher0/17以17端口为例switch>enableswitch#configureterminalswitch(conf)#hostnameaptch2950aptech2950(conf)#interfacefasteher0/17aptech2950(conf-if)#8:查看命令showswitch>enableswitch#showversion察看系统中的所有版本信息showinterfacevlan1查看交换机有关ip协议的配置信息showrunning-configure查看交换机当前起作用的配置信息showinterfacefastether0/1察看交换机1接口具体配置和统计信息showmac-address-table查看mac地址表showmac-address-tableaging-time查看mac地址表自动老化时间9:交换机恢复出厂默认恢复命令switch>enableswitch#erasestartup-configureswitch#reload10:双工模式设置switch>enableswitch#configureterminalswitch2950(conf)#hostnameaptch-2950aptech2950(conf)#interfacefasteher0/17以17端口为例aptech2950(conf-if)#duplexfull/half/auto有full,half,auto三个可选项11:cdp相关命令switch>enableswitch#showcdp查看设备的cdp全局配置信息showcdpinterfacefastether0/17查看17端口的cdp配置信息showcdptraffic查看有关cdp包的统计信息showcdpnerghbors列出与设备相连的cisco设备12:csico2950的密码恢复拔下交换机电源线。


思科交换机基本配置命令思科交换机相关配置⼀、基础操作进⼊交换机界⾯为⼀般⽤户模式 switch>输⼊命令 enable进⼊特权⽤户模式 switch#输⼊命令config terminal进⼊全局配置模式 switch(config)#输⼊命令int xxx可进⼊端⼝或者vlan的全局配置⼦模式switch(config-if)#特权⽤户模式可输⼊show命令查看相关设置,命令后输⼊?可查询帮助可⽤no 命令撤销已经设置的配置⼆、Telnet远程登录设置1.交换机配置IP地址进⼊vlan 1 //int vlan 1启⽤ //no shutdown设置ip地址 ///ip address ip地址⼦⽹掩码2.设置交换机⽤户名和密码useename xxxpassword/secret xxx设置enable密码enable password xxx3.设置访问数量line vty 0 x(x是数量,最⼩为1)password xxxlogin也可以直接调⽤上⾯设置的本地⽤户名密码line vty 0 xlogin local4.console⼝的密码设置也相似line console 0login local三、SSH远程登录1.基础设置与Telnet类似2.设置访问数量line vty 0 x3.选择ssh⽅式transport input ssh4.更改hostnamehostname xxx5.设置域名ip domain-name 6.设置rsa加密密钥crypto key generate rsa[512]:在360-2048中选择即可7.PC端登录命令ssh -l username ip地址四、交换机中划分vlan1.创建vlanvlan x(数字)可以使⽤name命令改名2.进⼊端⼝,分配vlanint f0/1switchport access vlan x3.交换机之间相连需要在连接端⼝做trunk进⼊连接端⼝int f0/24创建trunkswitchport mode trunk五、核⼼交换机中划分vlan1.创建vlanvlan x1vlan x2…2.vlan 中设置⽹关,vlan下的pc终端也要设置相同⽹关int vlan xip address xxx xxx3.三层交换机与交换机相连端⼝做trunk封装dot1q协议switchport trunk encapsulation dot1q创建trunkswitchport mode trunk4.如有需要,可以开启路由功能ip routing六、本地端⼝镜像1.设置源端⼝monitor session 1 source int f0/12.设置⽬的端⼝monitor session 1 destination f0/2七、远程端⼝镜像1.设置远程专⽤vlanvlan 100开启远程端⼝镜像功能remote-span2.被监视交换机中设置源端⼝monitor session 1 source int f0/1设置⽬的端⼝monitor session 1 destination remote vlan 100 reflector-port f0/1 3.另⼀台监视交换机同上,创建vlan,开启远程镜像设置源端⼝monitor session 2 source remote vlan 100设置⽬的端⼝monitor session 2 destination int f0/3⼋、PVST配置,负载均衡1.打开pvst功能spanning-tree mode pvst2.进⼊交换机全局配置模式配置主根spainning-tree vlan x1 priority 4096配置次根spanning- tree vlan x2 priority 81923.进⼊另⼀个交换机配置主根spainning-tree vlan x2 priority 4096配置次根spanning- tree vlan x1 priority 81923.进⼊另⼀个交换机九、链路聚合lacp1.进⼊需要配置的端⼝int range f0/21-242.选择lacp协议channel-protocol lacp2.开启channel-group 1 mode active3.如果链路聚合需要做trunk,可以执⾏以下操作int port- channel 1switchport mode trunk。

思科交换机的常用配置思科交换机的常用配置1、交换机的端口2、端口:以太网端口(e0、e1)、快速以太网端口(fast0、fast0/1[第一个模块的第一端口、fast1、fast1/1)、光纤接口(Tx、Rx)2、交换机的配置方法a、通过CONSOLE端口利用配置第一次安装使用交换机时,只能通过配置口(Console)进行配置。
配置电缆连接第一步:将配置电缆的DB-9(或DB-25)孔式插头接到要对交换机进行配置的微机或终端的串口上。
第二步:将配置电缆的RJ-45一端连到交换机器的配置口(Console)上。
设置微机或终端的参数第一步:打开微机或终端。
如果使用微机进行配置,需要在微机上运行终端仿真程序,如Windows 3.1的Terminal、Windows95/Windows98/Windows NT的超级终端。
第二步:设置终端参数。
参数要求:设置波特率为9600,数据位为8,奇偶校验为无,停止位为1,流量控制为无,Windows98超级终端参数设置方法如下:(1) 在图5-2所示的超级终端窗口中,单击其[属性]按钮,出现图5-3所示的超级终端属性对话框。
(2) 在超级终端属性对话框中[连接时使用]一栏选择连接的串口。
(3) 在串口的属性对话框中设置波特率为9600,数据位为8,奇偶校验为无,停止位为1,流量控制为无。
单击[确定]按钮交换机上电确认交换机与配置终端的连接正确,确认已经完成配置终端参数的设置后,即可对交换机上电。
随后交换机出现自检内容。
启动完毕,回车,超级终端里显示字样(旧命令行提示的是router>)。
即可进行下一步的配置。
备注要进行配置,具体配置情况以后再讲b、命令输入时的技巧?、TAB、↑、CTrl+d(删除光标所在位置的字附)、CTRL+C的使用。
3、交换的日常维护A、交换机的几种工作状态a、用户命令状态(switch>)b、特权状态(switch #)在用户命令状态下输入enablec、全局配置状态[switch (config)#]在特权状态下输入config命令B、查看交换机的版本(show version)C、查看交换机正在运行的文件(show run)D、查看交换机的备份文件(show star)E、设置交换机的密码F、查看闪存内的信息(show flash 显示的是交换机的IOS软件信息)G、exit返回到上一步2950常用配置a、设置从用户命令状态到特权状态的密码switch (config)#enable password abc(密码设为abc)switch (config)#enable secret abc(密码设为abc,但密码已被加密)switch (config)#hostname ipkh(将交换机的名字改为ipkh)switch#reload(重新启动交换机)b、置利用TELNET进行远程登录router>enablerouter#config trouter(config)#enable password abc(设置一个密码)router(config)#line vty 0 4(设置4条虚拟线路)router(config-line)#login(让路由器显示输入口令的提示)router(config-line)#password 123router(config-line)#exit(返回一步)备注:如果不设置密码,远程用户无法进行TELNET登录siwtchVlan1Vlan2Vlan3交换机的VLAN配置Switch#conf tSwitch(config)#inter vlan1Switch(config-if)#ip add 192.168.1.1 255.255.255.0(VLAN1是用来管理交换机的,VLAN1的地址也就是交换机的地址)Switch(config)#no shutdownSwitch(config)#ip default-gateway 192.168.1.2(设置交换机的缺省网关)Switch(config-if)#exitSwitch(config)#exitSwitch#vlan dataSwitch(vlan)#vlan 2 name cwSwitch(vlan)#vlan 3 name rsSwitch(vlan)#exitSwitch#conf tSwitch(config)#int range fa0/1 –3Switch(config-if)# switchport mode access(将此端口设置为访问模式,属于默认方式)Switch(config-if)#switchport access vlan 1Switch(config)#int range fa0/4 –6Switch(config-if)# switchport access vlan 2Switch(config)#int range fa0/7 –10Switch(config-if)#switchport access vlan 3Switch(config)#int fa0/11Switch(config-if)#switchport mode trunkSwitch(config-if)#duplex fullSwitch(config-if)#speed 1002950Aserver2950BclientVlan1Vlan2Vlan1Vlan2主干道配置2950ASwitch#conf tSwitch(config)#inter vlan1Switch(config-if)#ip add 192.168.1.1 255.255.255.0(VLAN1是用来管理交换机的,VLAN1的地址也就是交换机的地址)Switch(config)#no shutdownSwitch(config)#ip default-gateway 192.168.1.2(设置交换机的缺省网关)Switch(config-if)#exitSwitch(config)#exitSwitch#vlan dataSwitch(vlan)# vtp serverSwitch(vlan)#vtp domain ipkhSwitch(vlan)#vlan 2 name cwSwitch(vlan)#vlan 3 name rsSwitch(vlan)#exitSwitch#conf tSwitch(config)#int range fa0/1 –3Switch(config-if)# switchport mode accessSwitch(config-if)#switchport access vlan 1Switch(config)#int range fa0/4 –6Switch(config-if)# switchport mode accessSwitch(config-if)# switchport access vlan 2Switch(config)#int range fa0/7 –10Switch(config-if)#switchport access vlan 3Switch(config-if)# switchport mode accessSwitch(config)#int fa0/11Switch(config-if)#switchport mode trunkSwitch(config-if)#duplex fullSwitch(config-if)#speed 1002950BSwitch#conf tSwitch(config)#inter vlan1Switch(config-if)#ip add 192.168.1.1 255.255.255.0(VLAN1是用来管理交换机的,VLAN1的地址也就是交换机的地址,必须与2950A相同)Switch(config)#no shutdownSwitch(config-if)#exitSwitch(config)#exitSwitch#vlan dataSwitch(vlan)# vtp clientSwitch(vlan)#vtp domain ipkhSwitch(vlan)#exitSwitch#conf tSwitch(config)#int range fa0/1 –3Switch(config-if)# switchport mode accessSwitch(config-if)#switchport access vlan 1Switch(config)#int range fa0/4 –6Switch(config-if)#switchport mode accessSwitch(config-if)# switchport access vlan 2Switch(config)#int range fa0/7 –10Switch(config-if)# switchport mode accessSwitch(config-if)#switchport access vlan 3Switch(config)#int fa0/11Switch(config-if)#switchport mode trunkSwitch(config-if)#duplex fullSwitch(config-if)#speed 100单臂路由器与交换机之间的合作组网(路由器的以太网口必须为快速以太网接口):实现1、各VLAN间相互通信,2、局域网内部的各计算机能与INTERNET 通信fa0RswitchVlan1Vlan2fa1E0:192.168.1.1E1:192.168.2.1R的配置Router(config)#int fa0/1Router(config-if)#ip add 192.168.2.1 255.255.255.0Router(config-if)#no shutdownRouter(config-if)#ip nat outsideRouter(config)#access-list 1 permit anyRouter(config)#ip route 0.0.0.0 0.0.0.0 fa0/1Router(config)#ip nat inside source list 1 interface fa0/1 overloadRouter(config-if)#exitRouter(config)#int fa0/0Router(config-if)#duplex fullRouter(config-if)#speed 100Router(config-if)#no shutdownRouter(config-if)#exitRouter(config)#int fa0/0.1(vlan 1的子接口)Router(config-subif)# encap isl 1/encap dot1q 1(路由器与交换机之间的互联协议为ISL/802.1q)Router(config-subif)#ip add 192.168.1.1 255.255.255.0Router(config-subif)#ip nat inside(此接口作为NAT内接口)Router(config)#int fa0/0.2(vlan 2的子接口)Router(config-subif)# encap isl 1(路由器与交换机之间的互联协议为ISL)Router(config-subif)#ip add 192.168.2.1 255.255.255.0Router(config-subif)#ip nat insideRouter(config)#int fa0/0.3(vlan 2的子接口)Router(config-subif)# encap isl 1(路由器与交换机之间的互联协议为ISL)Router(config-subif)#ip add 192.168.3.1 255.255.255.0Router(config-subif)#ip nat insideSwitch的配置Switch(config)#int fa0/0Switch(config-if)#switch mode trunkSwitch(config-if)#switch trunk encap isl/dot1q(要与路由器保持一致)Switch(config-if)#speed 100Switch(config-if)#duplex fullSwitch(config)#int vlan1Switch(config-if)#ip add 192.168.1.2 255.255.255.0Switch(config-if)#exitSwitch(config)#ip default-gateway 192.168.1.1Switch(config)#exitSwitch#vlan dataSwitch(vlan)#vlan 2 name cwSwitch(vlan)#vlan 3 name rsSwitch(vlan)#vtp serverSwitch(vlan)#vtp domain ipkhSwitch(vlan)#exitSwitch#conf tSwitch(config)#int range fa0/1 –3Switch(config-if)#switchprot access vlan 1Switch(config-if)spanning-tree portfastSwitch(config)#int range fa0/4 –7Switch(config-if)#switchprot access vlan 2Switch(config-if)spanning-tree portfastSwitch(config)#int range fa0/8 –10Switch(config-if)#switchprot access vlan 3Switch(config-if)spanning-tree portfastCisco6509交换机设置DHCP实例一位客户想把DHCP SERVER迁移到6509交换机的MSFC上,要求还挺复杂:1.同时为多个VLAN的客户机分配地址2.VLAN内有部分地址采用手工分配的方式3.为客户指定网关、Wins服务器等4.VLAN 2的地址租用有效期限为1天,其它为3天5.按MAC地址为特定用户分配指定的IP地址最终配置如下:ip dhcp excluded-address 10.1.1.1 10.1.1.19 //不用于动态地址分配的地址ip dhcp excluded-address 10.1.1.240 10.1.1.254ip dhcp excluded-address 10.1.2.1 10.1.2.19!ip dhcp pool global //global是pool name,由用户指定network 10.1.0.0 255.255.0.0 //动态分配的地址段domain-name //为客户机配置域后缀dns-server 10.1.1.1 10.1.1.2 //为客户机配置dns服务器netbios-name-server 10.1.1.5 10.1.1.6 //为客户机配置wins服务器netbios-node-type h-node //为客户机配置节点模式(影响名称解释的顺利,如h-node=先通过wins服务器解释...)lease 3 //地址租用期限: 3天ip dhcp pool vlan1network 10.1.1.0 255.255.255.0 //本pool是global的子pool, 将从global pool继承domain-name等optiondefault-router 10.1.1.100 10.1.1.101 //为客户机配置默认网关!ip dhcp pool vlan2 //为另一VLAN配置的poolnetwork 10.1.2.0 255.255.255.0default-router 10.1.2.100 10.1.2.101lease 1!ip dhcp pool vlan1_john //总是为MAC地址为...的机器分配...地址host 10.1.1.21 255.255.255.0client-identifier 010050.bade.6384 //client-identifier=01加上客户机网卡地址!ip dhcp pool vlan1_tomhost 10.1.1.50 255.255.255.0client-identifier 010010.3ab1.eac8相关的DHCP调试命令:no service dhcp //停止DHCP服务[默认为启用DHCP服务sh ip dhcp binding //显示地址分配情况show ip dhcp conflict //显示地址冲突情况debug ip dhcp server {events | packets | linkage} //观察DHCP服务器工作情况如果DHCP客户机分配不到IP地址,常见的原因有两个。

思科模拟器命令:设置交换机名字为yzhSwitch> 进入超级终端控制台Switch>enable 进入交换机特权模式Switch#Switch#configure terminal 进入交换机全局配置模式Switch(configure)#hostname yzh 改变名字为XXXyzh(configure)# 显示改名成功yzh(configure)#exit 退回上级操作模式,即返回特权模式yzh#yzh#exit 返回到用户模式yzh>参看交换机有关信息yzh#yzh#configure terminal 进入交换机全局配置模式yzh#show version 查看交换机的版本信息yzh#show vlan 查看交换机的VLAN信息,默认情况下所有借口均属于VLAN yzh#show running-config 查看交换机当前生效的配置信息配置交换机接口f0/2yzh>yzh>enableyzh#yzh#configure terminal 进入交换机配置模式yzh(config)#interface fastEthernet 0/2 进入交换机接口fa0/2yzh(config-if)# 进入接口配置模式yzh(config-if)#speed 100 设置接口F0/2速率为100Myzh(config-if)#duplex half 配置接口的双工模式是半双工yzh(config-if)#no shutdown 开启接口,使得处于工作状态,等待转发数据。
yzh(config-if)#exit 输入exit返回全局模式yzh(config)#exit 返回特权模式yzh# 位于特权模式yzh#show interfaces fastEthernet 0/2 查看刚才对接口f0/2配置情况设置交换机Enable特权密码为adminyzh> 进入超级终端控制台yzh>enable 进入交换机特权模式yzh#configure terminal 进入交换机配置模式yzh(config)#enable secret admin 设置Enable密码为admin注:验证密码自己思考。

在思科模拟器上怎么进行交换机的基本配置在思科模拟器上怎么进行交换机的基本配置在思科模拟器上怎么进行交换机的基本配置 11、首先,打开思科模拟器软件,连接三台交换机的连接线,将所有交换机互相连接起来,一台当服务器,一台当客户机,另外一台当透明模式。
2、把三台交换机的配置清除干净,重启交换机,配置命令为:复制内容到剪贴板S1#flash:vlan.dat S1#erasestartup-config S1#reload配置S1 为VTP server,配置命令为:复制内容到剪贴板 S1(config)#vtpmodeserver3、配置S3 为VTP transparent,配置命令是:复制内容到剪贴板S3#vlandatabase S3(vlan)#vtptransparent S3(vlan)#vtppasswordcisco(配置交换机的密码)SettingdeviceVLANdatabasepasswordtocisco4、配置S2 为VTP client,配置命令是:复制内容到剪贴板S2(config)#vtpmodeclient SettingdevicetoVTPCLIENTmode. S2(config)#vtpdomainVTP-TEST DomainnamealreadysettoVTP-TEST. S2(config)#vtppasswordcisco5、在S1 上创建VLAN,检查S2、S3 上的VLAN 信息,配置命令是:复制内容到剪贴板 S1(config)#vlan2 S1(config)#vlan3查看s1,s2,s3的VLAN配置信息。
命令是:复制内容到剪贴板 S1#showvlan S2#showvlan S3#showvlan6、查看VTP 信息,查看交换机的vtp详细信息和版本等信息:复制内容到剪贴板 S1#showvtpstatus注意事项:1、要成功配置vtp服务器,应确认配置的所有交换机都已设置为默认设置。


思科交换机的基本配置思科交换机的基本配置 H3C每年将销售额的15%以上⽤于研发投⼊,在中国的北京、杭州和深圳设有研发机构,在北京和杭州设有可靠性试验室以及产品鉴定测试中⼼。
下⾯⼩编整理⼀些思科交换机的基本配置,希望⼤家认真阅读! CISCO交换机基本配置:Console端⼝连接 ⽤户模式hostname# ; 特权模式hostname(config)# ; 全局配置模式hostname(config-if)# ; 交换机⼝令设置: switch>enable ;进⼊特权模式 switch#config terminal ;进⼊全局配置模式 switch(config)#hostname csico ;设置交换机的主机名 switch(config)#enable secret csico1 ;设置特权加密⼝令 switch(config)#enable password csico8 ;设置特权⾮密⼝令 switch(config)#line console 0 ;进⼊控制台⼝ switch(config-line)#line vty 0 4 ;进⼊虚拟终端 switch(config-line)#login ;虚拟终端允许登录 switch(config-line)#password csico6 ;设置虚拟终端登录⼝令csico6 switch#exit ;返回命令 交换机VLAN创建,删除,端⼝属性的设置,配置trunk端⼝,将某端⼝加⼊vlan中,配置VTP: switch#vlan database ;进⼊VLAN设置 switch(vlan)#vlan 2 ;建VLAN 2 switch(vlan)#vlan 3 name vlan3 ;建VLAN 3并命名为vlan3 switch(vlan)#no vlan 2 ;删vlan 2 switch(config)#int f0/1 ;进⼊端⼝1 switch(config)#speed ? 查看speed命令的⼦命令 switch(config)#speed 100 设置该端⼝速率为100mb/s (10/auto) switch(config)#duplex ? 查看duplex的⼦命令 switch(config)#duplex full 设置该端⼝为全双⼯(auto/half) switch(config)#description TO_PC1 这是该端⼝描述为TO_PC1 switch(config-if)#switchport access vlan 2 ;当前端⼝加⼊vlan 2 switch(config-if)#switchport mode trunk ;设置为trunk模式(access模式) switch(config-if)#switchport trunk allowed vlan 1,2 ;设置允许的vlan switch(config-if)#switchport trunk encap dot1q ;设置vlan 中继 switch(config)#vtp domain vtpserver ;设置vtp域名相同 switch(config)#vtp password ;设置发vtp密码 switch(config)#vtp server ;设置vtp服务器模式 switch(config)#vtp client ;设置vtp客户机模式 交换机设置IP地址,默认⽹关,域名,域名服务器,配置和查看MAC地址表: switch(config)#interface vlan 1 ;进⼊vlan 1 switch(config-if)#ip address 192.168.1.1 255.255.255.0 ;设置IP地址 switch(config)#ip default-gateway 192.168.1.6 ;设置默认⽹关 switch(config)#ip domain-name 设置域名 switch(config)#ip name-server 192.168.1.18 设置域名服务器 switch(config)#mac-address-table? 查看mac-address-table的⼦命令 switch(config)#mac-address-table aging-time 100 设置超时时间为100ms switch(config)#mac-address-table permanent 0000.0c01.bbcc f0/3 加⼊永久地址在f0/3端⼝ switch(config)#mac-address-table restricted static 0000.0c02.bbcc f0/6 f0/7 加⼊静态地址⽬标端⼝f0/6源端⼝f0/7 switch(config)#end switch#show mac-address-table 查看整个MAC地址表 switch#clear mac-address-table restricted static 清除限制性静态地址 交换机显⽰命令: switch#write ;保存配置信息 switch#show vtp ;查看vtp配置信息 switch#show run ;查看当前配置信息 switch#show vlan ;查看vlan配置信息 switch#show interface ;查看端⼝信息 switch#show int f0/0 ;查看指定端⼝信息 switch#show int f0/0 status;查看指定端⼝状态 switch#dir flash: ;查看闪存 Cisco路由器配置命令⼤全⽹络 2010-06-26 06:43:44 阅读657 评论0 字号:⼤中⼩订阅 . (1)模式转换命令 ⽤户模式----特权模式,使⽤命令"enable" 特权模式----全局配置模式,使⽤命令"config t" 全局配置模式----接⼝模式,使⽤命令"interface+接⼝类型+接⼝号" 全局配置模式----线控模式,使⽤命令"line+接⼝类型+接⼝号" 注: ⽤户模式:查看初始化的信息. 特权模式:查看所有信息、调试、保存配置信息 全局模式:配置所有信息、针对整个路由器或交换机的所有接⼝ 接⼝模式:针对某⼀个接⼝的配置 线控模式:对路由器进⾏控制的接⼝配置 (2)配置命令 show running config 显⽰所有的配置 show versin 显⽰版本号和寄存器值 shut down 关闭接⼝ no shutdown 打开接⼝ ip add +ip地址配置IP地址 secondary+IP地址为接⼝配置第⼆个IP地址 show interface+接⼝类型+接⼝号查看接⼝管理性 show controllers interface 查看接⼝是否有DCE电缆 show history 查看历史记录 show terminal 查看终端记录⼤⼩ hostname+主机名配置路由器或交换机的标识 config memory 修改保存在NVRAM中的启动配置 exec timeout 0 0 设置控制台会话超时为0 service password-encryptin ⼿⼯加密所有密码 enable password +密码配置明⽂密码 ena sec +密码配置密⽂密码 line vty 0 4/15 进⼊telnet接⼝ password +密码配置telnet密码 line aux 0 进⼊AUX接⼝ password +密码配置密码 line con 0 进⼊CON接⼝ password +密码配置密码 bandwidth+数字配置带宽 no ip address 删除已配置的IP地址 show startup config 查看NVRAM中的配置信息 copy run-config atartup config 保存信息到NVRAM write 保存信息到NVRAM erase startup-config 清除NVRAM中的配置信息 show ip interface brief 查看接⼝的谪要信息 banner motd # +信息 + # 配置路由器或交换机的描素信息 description+信息配置接⼝听描素信息 vlan database 进⼊VLAN数据库模式 vlan +vlan号+ 名称创建VLAN switchport access vlan +vlan号为VLAN为配接⼝ interface vlan +vlan号进⼊VLAN接⼝模式 ip add +ip地址为VLAN配置管理IP地址 vtp+service/tracsparent/client 配置SW的VTP⼯作模式 vtp +domain+域名配置SW的VTP域名 vtp +password +密码配置SW的密码 switchport mode trunk 启⽤中继 no vlan +vlan号删除VLAN show spamming-tree vlan +vlan号查看VLA怕⽣成树议 2. 路由器配置命令 ip route+⾮直连⽹段+⼦⽹掩码+下⼀跳地址配置静态/默认路由 show ip route 查看路由表 show protocols 显⽰出所有的被动路由协议和接⼝上哪些协议被设置 show ip protocols 显⽰了被配置在路由器上的路由选择协议,同时给出了在路由选择协议中使⽤ 的定时器 等信息 router rip 激活RIP协议 network +直连⽹段发布直连⽹段 interface lookback 0 激活逻辑接⼝ passive-interface +接⼝类型+接⼝号配置接⼝为被动模式 debug ip +协议动态查看路由更新信息 undebug all 关闭所有DEBUG信息 router eigrp +as号激活EIGRP路由协议 network +⽹段+⼦⽹掩码发布直连⽹段 show ip eigrp neighbors 查看邻居表 show ip eigrp topology 查看拓扑表 show ip eigrp traffic 查看发送包数量 router ospf +process-ID 激活OSPF协议 network+直连⽹段+area+区域号发布直连⽹段 show ip ospf 显⽰OSPF的进程号和ROUTER-ID encapsulation+封装格式更改封装格式 no ip admain-lookup 关闭路由器的域名查找 ip routing 在三层交换机上启⽤路由功能 show user 查看SW的在线⽤户 clear line +线路号清除线路 3. 三层交换机配置命令 配置⼀组⼆层端⼝ configure terminal 进⼊配置状态 nterface range {port-range} 进⼊组配置状态 配置三层端⼝ configure terminal 进⼊配置状态 interface {{fastethernet | gigabitethernet} interface-id} | {vlan vlan-id} | {port- channel port-channel-number} 进⼊端⼝配置状态 no switchport 把物理端⼝变成三层⼝ ip address ip_address subnet_mask 配置IP地址和掩码 no shutdown 激活端⼝ 例: Switch(config)# interface gigabitethernet0/2 Switch(config-if)# no switchport Switch(config-if)# ip address 192.20.135.21 255.255.255.0 Switch(config-if)# no shutdown 配置VLAN configure terminal 进⼊配置状态 vlan vlan-id 输⼊⼀个VLAN号, 然后进⼊vlan配态,可以输⼊⼀个新的VLAN号或旧的来进⾏修改 。

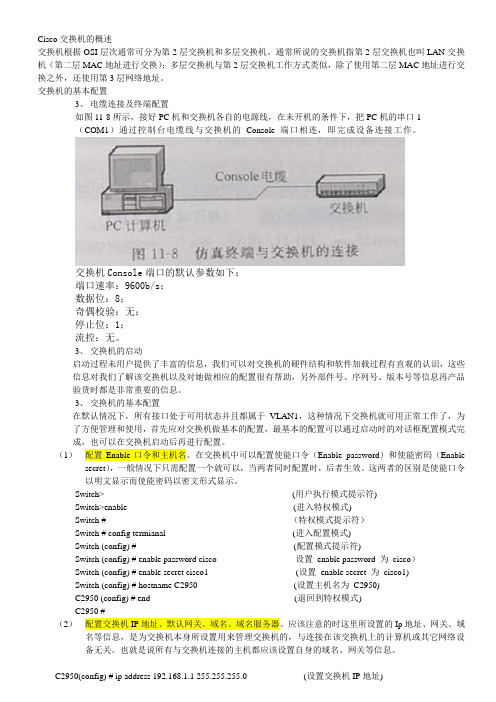
Cisco交换机的概述交换机根据OSI层次通常可分为第2层交换机和多层交换机。
通常所说的交换机指第2层交换机也叫LAN交换机(第二层MAC地址进行交换);多层交换机与第2层交换机工作方式类似,除了使用第二层MAC地址进行交换之外,还使用第3层网络地址。
交换机的基本配置3、电缆连接及终端配置如图11-8所示,接好PC机和交换机各自的电源线,在未开机的条件下,把PC机的串口1(COM1)通过控制台电缆线与交换机的Console端口相连,即完成设备连接工作。
交换机Console端口的默认参数如下:端口速率:9600b/s;数据位:8;奇偶校验:无;停止位:1;流控:无。
3、交换机的启动启动过程未用户提供了丰富的信息,我们可以对交换机的硬件结构和软件加载过程有直观的认识,这些信息对我们了解该交换机以及对她做相应的配置很有帮助,另外部件号、序列号、版本号等信息再产品验货时都是非常重要的信息。
3、交换机的基本配置在默认情况下,所有接口处于可用状态并且都属于VLAN1,这种情况下交换机就可用正常工作了,为了方便管理和使用,首先应对交换机做基本的配置,最基本的配置可以通过启动时的对话框配置模式完成,也可以在交换机启动后再进行配置。
(1)配置Enable口令和主机名。
在交换机中可以配置使能口令(Enable password)和使能密码(Enable secret),一般情况下只需配置一个就可以,当两者同时配置时,后者生效。
这两者的区别是使能口令以明文显示而使能密码以密文形式显示。
Switch> (用户执行模式提示符)Switch>enable (进入特权模式)Switch # (特权模式提示符)Switch # config termianal (进入配置模式)Switch (config) # (配置模式提示符)Switch (config) # enable password cisco 设置enable password 为cisco)Switch (config) # enable secret cisco1 (设置enable secret 为cisco1)Switch (config) # hostname C2950 (设置主机名为C2950)C2950 (config) # end (退回到特权模式)C2950 #(2)配置交换机IP地址、默认网关、域名、域名服务器。

思科交换机配置教程详解你还在为不知道思科交换机配置教程详解而烦恼么?接下来是小编为大家收集的思科交换机配置教程详解教程,希望能帮到大家。
思科交换机配置教程详解的方法1、基本概念介绍IOS: 互联网操作系统,也是交换机和路由器中用的操作系统VLAN: 虚拟lanVTP: VLAN TRUNK PROTOCOLDHCP: 动态主机配置协议ACL:访问控制列表三层交换机:具有三层路由转发能力的交换机2、密码、登陆等基本配置本节介绍的内容为cisco路由器或者交换机的基本配置,在目前版本的cisco交换机或路由器上的这些命令是通用的。
本教程用的是cisco的模拟器做的介绍,一些具体的端口显示或许与你们实际的设备不符,但这并不影响基本配置命令的执行。
3、cisco设备端口配置详解4、vlan的规划及配置在本节中我们讲解vlan的规划及具体的配置命令。
在此例中我们用的是vtp(VLAN Trunking Protocol)server的模式,在这种模式中我们需要配置核心交换机的vtp模式为server,各接入交换机的vtp模式为cilent,那么配置完成后接入交换机会通过trunk口自动从核心交换机学习到所有的vlan配置信息。
在接入交换机中只需要添加相应的端口即可,这样易于管理与部署。
具体的配置命令我们通过两小节来演示:4.1 核心交换机的相关配置4.2 接入交换机的相关配置5、配置交换机的路由功能说明:只有在三层交换机上才有路由功能,其他的二层接入交换机要想在不同的vlan之间传送数据需要通过trunk口到核心交换机上进行完路由交换后才可以。
6、配置交换机的DHCP功能7、常用排错命令看了“思科交换机配置教程详解”还看了:1.思科交换机的基本配置详解2.思科交换机配置命令教程3.Cisco 2960交换机的基础安装配置教程4.思科模拟器交换机的基本配置方法5.Cisco常用的路由器交换机配置命令6.Cisco交换机初始化配置的教程。


思科交换机配置维护手册目录一、端口配置1.1 配置一组端口当使用interface range命令时有如下的规则:•有效的组范围:o vlan从1 到4094o fastethernet槽位/{first port} - {last port}, 槽位为0o gigabitethernet槽位/{first port} - {last port},槽位为0o port-channel port-channel-number - port-channel-number, port-channel号从1到64•端口号之间需要加入空格,如:interface range fastethernet 0/1 – 5是有效的,而interface range fastethernet 0/1-5是无效的.•interface range命令只能配置已经存在的interface vlan•所有在同一组的端口必须是相同类别的。
见以下例子:Switch# configure terminalSwitch(config)# interface range fastethernet0/1 - 5Switch(config-if-range)# no shutdown以下的例子显示使用句号来配置不同类型端口的组:Switch# configure terminalSwitch(config)# interface range fastethernet0/1 - 3, gigabitethernet0/1 - 2 Switch(config-if-range)# no shutdown1.2 配置二层端口1.2.1 配置端口速率及双工模式Switch# configure terminalSwitch(config)# interface fastethernet0/3 Switch(config-if)# speed 10Switch(config-if)# duplex half1.2.2 端口描述1.2.3 配置三层口Catalyst 3750支持三种类型的三层端口: •SVIs: 即interface vlan•三层以太网通道口(EtherChannel)•.路由口:路由口是指某一物理端口在端口配置状态下用no switchport命令生成的端口所有的三层都需要IP地址以实现路由交换配置步骤如下:配置举例如下:Switch# configure terminalEnter configuration commands, one per line. End with CNTL/Z.Switch(config)# interface gigabitethernet0/2Switch(config-if)# no switchportSwitch(config-if)# ip address 192.20.135.21 255.255.255.0 Switch(config-if)# no shutdownSwitch(config-if)# endshow ip interface命令:Switch# show ip interface gigabitethernet0/2 GigabitEthernet0/2 is up, line protocol is upInternet address is 192.20.135.21/24Broadcast address is 255.255.255.255Address determined by setup commandMTU is 1500 bytesHelper address is not setDirected broadcast forwarding is disabled<output truncated>1.3 监控及维护端口1.3.1 监控端口和控制器的状态主要命令见下表:举例如下:Switch# show interfaces statusPort Name Status Vlan Duplex Speed TypeGi0/1 connected routed a-full a-100 10/100/1000Base TXGi0/2 wce server 20.20.2 disabled routed auto auto 10/100/1000Base TX Gi0/3 ip wccp web-cache notconnect routed auto auto 10/100/1000Base TX Gi0/4 notconnect routed auto auto 10/100/1000Base TX Gi0/5 notconnect routed auto auto 10/100/1000Base TX Gi0/6 disabled routed auto auto 10/100/1000Base TX Gi0/7 disabled routed auto auto 10/100/1000Base TX Gi0/8 disabled routed auto 100 10/100/1000Base TX Gi0/9 notconnect routed auto auto 10/100/1000Base TX Gi0/10 notconnect routed auto auto 10/100/1000Base TX Gi0/11 disabled routed auto auto unknownGi0/12 notconnect routed auto auto unknownSwitch# show interfaces fastethernet 0/1 switchportName: Fa0/1Switchport: EnabledAdministrative Mode: static accessOperational Mode: downAdministrative Trunking Encapsulation: dot1qNegotiation of Trunking: OffAccess Mode VLAN: 1 (default)Trunking Native Mode VLAN: 1 (default)Trunking VLANs Enabled: ALLPruning VLANs Enabled: 2-1001Protected: falseUnknown unicast blocked: disabledUnknown multicast blocked: disabledVoice VLAN: dot1p (Inactive)Appliance trust: 5Switch# show running-config interface fastethernet0/2Building configuration...Current configuration : 131 bytes!interface FastEthernet0/2switchport mode accessswitchport protectedno ip addressmls qos cos 7mls qos cos overrideend1.3.2 刷新、重置端口及计数器Clear命令目的clear counters [interface-id] 清除端口计数器.clear interface interface-id重置某一端口的硬件逻辑clear line [number | console 0 | vty number] 重置异步串口的硬件逻辑Note clear counters 命令只清除用show interface所显示的计数,不影响用snmp得到的计数举例如下:Switch# clear counters fastethernet0/5Clear "show interface" counters on this interface [confirm] ySwitch#*Sep 30 08:42:55: %CLEAR-5-COUNTERS: Clear counter on interface FastEthernet0/5by vty1 (171.69.115.10)可使用clear interface或clear line命令来清除或重置某一端口或串口,在大部分情况下并不需要这样做:Switch# clear interface fastethernet0/51.3.3 关闭和打开端口使用no shutdown命令重新打开端口.举例如下:Switch# configure terminalSwitch(config)# interface fastethernet0/5Switch(config-if)# shutdownSwitch(config-if)#*Sep 30 08:33:47: %LINK-5-CHANGED: Interface FastEthernet0/5, changed state to a administratively downSwitch# configure terminalSwitch(config)# interface fastethernet0/5Switch(config-if)# no shutdownSwitch(config-if)#*Sep 30 08:36:00: %LINK-3-UPDOWN: Interface FastEthernet0/5, changed state to up二、配置VLAN2.1 VLAN论述一个VLAN就是一个交换网,其逻辑上按功能、项目、应用来分而不必考虑用户的物理位置。
cisco交换机基本配置1.Cisco IOS简介Cisco Catalyst系列交换机所使用的操作系统是IOS(Internetwork Operating System,互联网际操作系统)或COS (Catalyst Operating System),其中以IOS使用最为广泛,该操作系统和路由器所使用的操作系统都基于相同的内核和shell。
IOS的优点在于命令体系比较易用。
利用操作系统所提供的命令,可实现对交换机的配置和管理。
Cisco IOS操作系统具有以下特点:(1)支持通过命令行(Command-Line Interface,简称CLI)或Web界面,来对交换机进行配置和管理。
(2)支持通过交换机的控制端口(Console)或Telnet会话来登录连接访问交换机。
(3)提供有用户模式(user level)和特权模式(privileged level)两种命令执行级别,并提供有全局配置、接口配置、子接口配置和vlan数据库配置等多种级别的配置模式,以允许用户对交换机的资源进行配置。
(4)在用户模式,仅能运行少数的命令,允许查看当前配置信息,但不能对交换机进行配置。
特权模式允许运行提供的所有命令。
(5)IOS命令不区分大小写。
(6)在不引起混淆的情况下,支持命令简写。
比如enable通常可简约表达为en。
(7)可随时使用?来获得命令行帮助,支持命令行编辑功能,并可将执行过的命令保存下来,供进行历史命令查询。
1.搭建交换机配置环境在对交换机进行配置之前,首先应登录连接到交换机,这可通过交换机的控制端口(Console)连接或通过Telnet登录来实现。
(1)通过Console口连接交换机对于首次配置交换机,必须采用该方式。
对交换机设置管理IP地址后,就可采用Telnet登录方式来配置交换机。
对于可管理的交换机一般都提供有一个名为Console的控制台端口(或称配置口),该端口采用RJ-45接口,是一个符合EIA/TIA-232异步串行规范的配置口,通过该控制端口,可实现对交换机的本地配置。
交换机一般都随机配送了一根控制线,它的一端是RJ-45水晶头,用于连接交换机的控制台端口,另一端提供了DB-9(针)和DB-25(针)串行接口插头,用于连接PC机的COM1或COM2串行接口。
Cisco的控制线两端均是RJ-45水晶头接口,但配送有RJ-45到DB-9和RJ-45到DB-25的转接头。
通过该控制线将交换机与PC机相连,并在PC上运行超级终端仿真程序,即可实现将PC机仿真成交换机的一个终端,从而实现对交换机的访问和配置。
Windows系统一般都默认安装了超级终端程序,对于Windows 2000 Server系统,该程序位于【开始】菜单下【程序】中【附件】的【通讯】群组下面,若没有,可利用控制面板中的【添加/删除程序】来安装。
单击【通讯】群组下面的【超级终端】,即可启动超级终端。
首次启动超级终端时,会要求输入所在地区的电话区号,输入后将显示下图所示的连接创建对话框,在【名称】输入框中输入该连接的名称,并选择所使用的示意图标,然后单击确定按钮。
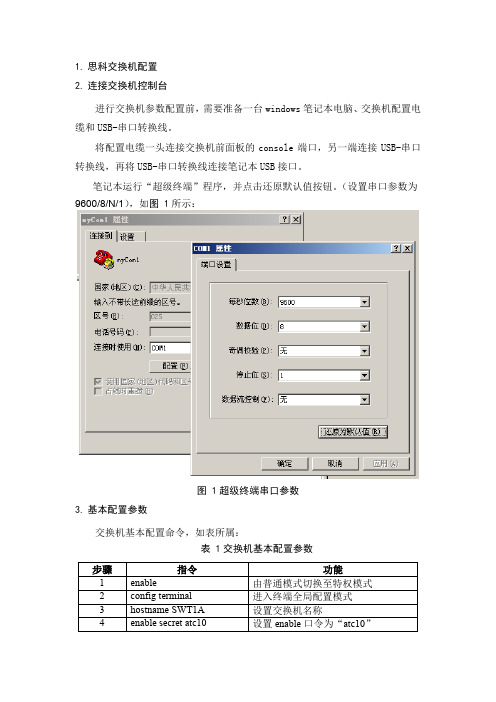
图9-2 超级终端连接创建对话框此时将弹出对话框,要求选择连接使用的COM端口,根据实际连接使用的端口进行选择,比如COM1,然后单击【确定】按钮.设置COM1端口的属性交换机控制台端口默认的通讯波特率为9600bit/s,因此需将COM端口的通讯波特率设置为9600,数据流量控制选择无。
也可直接单击【还原为默认值】按钮来进行自动设置。
设置好后,单击【确定】按钮,此时就开始连接登录交换机了,对于新购或首次配置的交换机,没有设置登录密码,因此不用输入登录密码就可连接成功,从而进入交换机的命令行状态“Switch >”,此时就可通过命令来在这个界面操作了连接成功后超级终端(2)通过Telnet连接交换机在首次通过Console控制口完成对交换机的配置,并设置交换机的管理IP地址和登录密码后,就可通过Telnet会话来连接登录交换机,从而实现对交换机的远程配置。
可在PC机中利用Telnet来登录连接交换机,也可在登录一台交换机后,再利用Telnet命令,来登录连接另一台交换机,实现对另一台交换机的访问和配置。
进入Windows的MS-DOS方式,这可利用windows开始菜单中的【运行】菜单项,通过执行command(Windows 9x系统)或cmd(Windows 2000)命令来实现。
然后在MS-DOS方式下执行“telnet交换机IP地址”命令来登录连接交换机。
假设交换机的管理IP地址为192.168.168.3,利用网线将交换机接入网络,然后在DOS命令行输入并执行命令telnet 192.168.168.3,此时将要求用户输入telnet登录密码,密码输入时不会回显,校验成功后,即可登入交换机,出现交换机的命令行提示符。
在DOS命令行telnet交换机若要退出对交换机的登录连接,执行exit命令。
对于华为交换机,则执行quit。
另外,也可在利用超级终端登入一台交换机后,再执行“telnet192.168.168.3”命令,来登录和访问IP地址为192.168.168.3的交换机。
2.交换机的组成交换机相当于是一台特殊的计算机,同样有CPU、存储介质和操作系统,只不过这些都与PC机有些差别而已。
交换机也由硬件和软件两部分组成。
软件部分主要是IOS操作系统,硬件主要包含CPU、端口和存储介质。
交换机的端口主要有以太网端口(Ethernet)、快速以太网端口(Fast Ethernet)、吉比特以太网端口(Gigabit Ethernet)和控制台端口。
存储介质主要有ROM(Read-Only Memory,只读储存设备)、FLASH(闪存)、NVRAM(非易失性随机存储器)和DRAM(动态随机存储器)。
其中,ROM相当于PC 机的BIOS,交换机加电启动时,将首先运行ROM中的程序,以实现对交换机硬件的自检并引导启动IOS。
该存储器在系统掉电时程序不会丢失。
FLASH是一种可擦写、可编程的ROM,FLASH包含IOS及微代码。
FLASH相当于PC机的硬盘,但速度要快得多,可通过写入新版本的IOS来实现对交换机的升级。
FLASH中的程序,在掉电时不会丢失。
NVRAM用于存贮交换机的配置文件,该存储器中的内容在系统掉电时也不会丢失。
DRAM是一种可读写存储器,相当于PC机的内存,其内容在系统掉电时将完全丢失。
3.交换机的基本命令Cisco IOS提供了用户EXEC模式和特权EXEC模式两种基本的命令执行级别,同时还提供了全局配置、接口配置、Line 配置和vlan数据库配置等多种级别的配置模式,以允许用户对交换机的资源进行配置和管理。
(1)用户EXEC模式当用户通过交换机的控制台端口或Telnet会话连接并登录到交换机时,此时所处的命令执行模式就是用户EXEC模式。
在该模式下,只执行有限的一组命令,这些命令通常用于查看显示系统信息、改变终端设置和执行一些最基本的测试命令,如ping、traceroute等。
用户EXEC模式的命令状态行是:student1>其中的student1是交换机的主机名,对于未配置的交换机默认的主机名是Switch。
在用户EXEC模式下,直接输入?并回车,可获得在该模式下允许执行的命令帮助。
(2)特权EXEC模式在用户EXEC模式下,执行enable命令,将进入到特权EXEC模式。
在该模式下,用户能够执行IOS提供的所有命令。
特权EXEC模式的命令状态行为:student1#Student1>enablePassword:Student1#在前面的启动配置中,设置了登录特权EXEC模式的密码,因此系统提示输入用户密码,密码输入时不回显,输入完毕按回车,密码校验通过后,即进入特权EXEC模式。
若进入特权EXEC模式的密码未设置或要修改,可在全局配置模式下,利用enable secret命令进行设置。
在该模式下键入?,可获得允许执行的全部命令的提示。
离开特权模式,返回用户模式,可执行exit或disable命令。
重新启动交换机,可执行reload命令。
(3)全局配置模式在特权模式下,执行configure terminal命令,即可进入全局配置模式。
在该模式下,只要输入一条有效的配置命令并回车,内存中正在运行的配置就会立即改变生效。
该模式下的配置命令的作用域是全局性的,是对整个交换机起作用。
全局配置模式的命令状态行为:student1(config)#student1#config terminalstudent1(config)#在全局配置模式,还可进入接口配置、line配置等子模式。
从子模式返回全局配置模式,执行exit命令;从全局配置模式返回特权模式,执行exit命令;若要退出任何配置模式,直接返回特权模式,则要直接end命令或按Ctrl+Z组合键。
例如,若要设交换机名称为student2,则可使用hostname命令来设置,其配置命令为:student1(config)#hostname student2student2(config)#若要设置或修改进入特权EXEC模式的密码为123456,则配置命令为:student1(config)#enable secret 123456或student1(config)#enable password 123456其中enable secret命令设置的密码在配置文件中是加密保存的,强列推荐采用该方式;而enable password命令所设置的密码在配置文件中是采用明文保存的。
对配置进行修改后,为了使配置在下次掉电重启后仍生效,需要将新的配置保存到NVRAM中,其配置命令为:student1(config)#exitstudent1#write(4)接口配置模式在全局配置模式下,执行interface命令,即进入接口配置模式。
在该模式下,可对选定的接口(端口)进行配置,并且只能执行配置交换机端口的命令。
接口配置模式的命令行提示符为:student1(config-if)#例如,若要设置Cisco Catalyst 2950交换机的0号模块上的第3个快速以太网端口的端口通讯速度设置为100M,全双工方式,则配置命令为:student1(config)#interface fastethernet 0/3student1(config-if)#speed 100student1(config-if)#duplex fullstudent1(config-if)#endstudent1#write(5)Line配置模式在全局配置模式下,执行line vty或line console命令,将进入Line配置模式。