大华说明书.doc
- 格式:doc
- 大小:43.02 KB
- 文档页数:6
Dahua Player Operation User’s ManualVersion 1.0.0Table of Contents1General Introduction (1)1.1Overview (1)1.2Features (1)2Installation (2)2.1Open Player (5)3Operation (6)3.1Main Interface (6)3.2Setting (6)3.2.1Add files (7)3.2.2Group Preview (7)3.2.3Export File (7)3.2.4Digital Zoom (8)3.2.5Drag/Child-window Switch (8)3.2.6Full Screen (8)3.2.7Watermark (9)3.2.8Config (9)3.3Playback Interface (9)3.3.1File List (9)3.3.2Window Layout (10)3.3.3Playback Window (11)3.3.4Playback Control Bar (12)3.3.5Time Line (13)3.4Group Preview (14)3.4.1File List (14)3.4.2Video Preview (15)3.5Export File (16)3.5.1File List (17)3.5.2Setup (18)3.5.3Video Preview (18)3.6Watermark (19)3.7Config (20)4Compatible OS (22)WelcomeThank you for using our Dahua player!This user’s manual is designed to be a reference tool for the installation and operation of your system!1General Introduction1.1OverviewThis player is excellent player software for the security field. It has various functions such as play, search, watermark, intelligent track display. It supports multiple-window synchronization play or asynchronous play. It supports multiple-channel display mode and customized setup. It adopts the time line design instead of the traditional process bar. Supports customized time line accuracy setup. It calls the play module to realize play operation and adopts framework design of plug-in matching mode. It reduces the risk of bug occurrence when you are implementing maintenance work and can meet flexible customized requirements.1.2FeaturesFrame by frame backward play function, support various speeds.Multiple-channel playback at the same time.Local zoom in and drag function (So called electronic PTZ function.)Support preview by periods to quickly find the scene you needed.Support intelligent device bit stream playback, can display intelligent event information on the video.Support watermark function to avoid vicious bit stream modification and support bit stream format switch function.Optimized player plan.Optimized audio/video synchronization plan.Optimized fast play plan, support various fast play speeds.2InstallationPlease follow the steps listed below to complete installation.Click .exe file, system begins installation. See Figure 2-1.Check the box to select English and then click next button to continue.Figure 2-1The Welcome interface is shown as in Figure 2-2. Here you can see software version and installation suggestions. Click the Next button to continue.Figure 2-2Now you can see an interface is shown as in Figure 2-3.You can click Change button to modify installation directory.Please click Next button to continue.Figure 2-3Now you can see shortcut folder interface. Here is going to create a new shortcut for Player folder. You can change according to your actual requirements. You can see the following interface. See Figure 2-4.Please click Next button to continue.Figure 2-4Now you go to the following interface. System becomes ready to install. The interface is shown as in Figure 2-5.Here you can see the installation path, shortcut folder information and etc. Please click Next button to continue.Figure 2-5Now you can see the installation process. You can click the Cancel button to terminate current installation process. See Figure 2-6.Figure 2-6After installation, the interface is shown as below. See Figure 3-6.Click Finish button to complete the installation.Figure 2-72.1Open PlayerThere are two ways for you to open the player.You can see the shortcut icon on the desktop after the installation. Double click the icon torun the software. See Figure 2-8.Figure 2-8After installation, you can see the Player folder from the Start->All programs->DahuaSmart Player->Smart Player. Here you can uninstall software, run software, view user’smanual and installation environments.3Operation3.1Main InterfaceYou can click the icon in the installation path or the desk to open the player interface.Player main interface is shown as in Figure 3-1.Figure 3-1Please refer to the following sheet for detailed information.SN Namemenu1 System2 Interfacename3 File list display/hide buttonlayout4 Window5 Video play window6 Play control column7 Timeline3.2SettingSystem menu is shown as below. See Figure 3-2.Figure 3-23.2.1 Add filesClick Add files button in Figure 3-2, you can see system pops up Open dialogue box. The interface is shown as in Figure 3-3. Select the DAV file and then click the OK button, system can automatically add the DAV file on the same directory or the sub-level and add to the corresponding file list. If the DAV file name conforms to the record file name rule, system can relate it to file list of the corresponding channel. Otherwise system creates new list to display current file.Tips: For your convenience, you can drag the DAV file or file directly to the play window. It has the same effect as the Add files button. The preview file is removed once you open another file.Figure 3-33.2.2 Group PreviewClick Preview button, you can open or go to group preview interface. It is mainly for the multiple-group preview of one file. See chapter 3.3 for detailed information.3.2.3 Export FileClick Export File, you can open or go to export file interface. It is mainly for the exporting the specified record footages or pictures.See chapter 3.5 for detailed information.3.2.4 Digital ZoomOn the playback interface, click the Digital Zoom button and then left click mouse you can draw a red rectangle, release left button, system can zoom in the specified red rectangle. See Figure 3-4.Note:System supports some specified zoon in speeds and can not zoom in as much as you click. You can right click mouse to restore the play window.Tips:Use the middle button of the mouse to zoon in the video as the middle button as the centre.Figure 3-43.2.5 Drag/Child-window SwitchOn the play interface, click Drag button, you can control the play window in these two modes. When system is in drag mode, the mouse indicator becomes palm size. You can use drag operation to view other hidden zones if you have realized digital zoom function. If the system is in child-window switch mode, you can drag one window to another window to realize window switch operation.3.2.6 Full ScreenOn play interface, click Full screen button, you can see the play window occupies the whole window. This function is suitable for the video monitor or playback record for a long time. You can click the “Esc” button on the keyboard to restore player main interface.3.2.7 WatermarkClick the Watermark button, you can open or go to Watermark interface. It is mainly for one or several record file watermark operation. See chapter 3.6 for detailed information.3.2.8 ConfigClick Config button, you can open or go to configuration interface. In this interface, you can set player snap saved path, format, footage clip saved path and format, play window rate, intelligent track enable/disable, and player language. See chapter 3.7 for detailed information.3.3Playback InterfaceThe playback interface is shown as in Figure 3-5.Figure 3-53.3.1 File ListThe file list interface is shown as in Figure 3-6.The group file list is to display the added file folder, file and the record file on the same directory. Current playback file is shown as green. Check the group name or double-click the group name; you can select a record group.Figure 3-63.3.2 Window LayoutHere is to define playback window size and position. Usually there are nine types. You can also customize some special window layouts. You can click the layout button to select the window display mode. See Figure 3-7.Figure 3-7Once you click Custom layout, you can see the following interface. See Figure 3-8.Figure 3-8Click Edit button, you can edit layout line, row and pane size. See Figure 3-9.Figure 3-93.3.3 Playback WindowThe playback window is to display record file corresponding information such as file name, time and etc. See Figure 3-10.Figure 3-10Move your mouse to any window; you can see the following control bar at the top right corner. See Figure 3-11.Figure 3-11z Clip: It is to edit a record. Please play a file first and then click this button to begin clip.Click this button again, click operation is complete. Now you get a new file. You cango to chapter 3.7 to set save path.z Snap: Click it to snap one picture. You can go to chapter 3.7 to set save path.z Close: Click it to close current video window.3.3.4 Playback Control BarThe playback control bar is shown as in Figure 3-12.Figure 3-12Please refer to the following sheet for detailed information.Button Notez System is in single repeated process when the button is highlighted. z System is in sequence play process when the button is grey.z System is in synchronization playback process when the button ishighlighted.z System is in asynchronous process when the button is grey.Note: it is for group playback mode.z System is in backward playback process when the button ishighlighted.z System is in normal playback process when the button is grey.Note: It is for all-window when system is in group playback mode. It is forcurrent window only when system is not in group playback mode.Play and stop button can realize multiple-window pause, playback.Stop: Stop all playback windows.z In pause mode, it is the previous frame, next frame playback.z In play mode, it is the preview group, next group playback.Note: It is for the whole group when system is in group playback. It is forcurrent window only when system is not in group playback mode.Speed setup:z1/2, 1/4, 1/8, 1/16z1×, 2×, 4×, 8×, 16×z-1/2, -1/4, -1/8, -1/16, -1, -2, -4, -8, -16Volume setup: You can set volume value and mute. System can play audiowhen in normal playback process.3.3.5 Time LineAfter you double click to playback a file, system cam automatcailly add time line. Anddisplay the real-time playback time of each window. See Figure 3-13.Once you check syncronization playback for the whole record group, there is only onetime line.Figure 3-133.4Group PreviewClick the Preview button, you can go to the following interface. Here you can view the video by periods and quick find out the video you want. Doubel clcik the file or folder you want to implement group preview, system can divide record to N (N= interface amount you set)sections by time. You can preview each period respectively. See Figure 3-14.Figure 3-143.4.1 File ListYou can view the file list of current selected folder. It is the same as in the playback interface. See Figure 3-15.Note:Group preview is for single record only. For record list, there is no record groupFigure 3-153.4.2 Video PreviewDouble click a file in the list, system can divide the record period according to the section amount and then display corresponding picture. See Figure 3-16. For example, record is from 2:00 to 3:00, the selected section amount is 4, the system displays 2: 00, 2:15, 2:30, and 2:45.Note:System may take time to create index. Please be patient. .Figure 3-16After system crated sections, you can select the corresponding time to play.Select corresponding play time window.Click Play button, the corresponding window begin play at the displayed time. You can implement pause, frame by frame playback, fast play, slow play and etc.Slices: System needs to slice again if there is record in the group preview. See Figure3-17.Figure 3-173.5Export FileClick Export button, you can see export file interface is shown as in Figure 3-18.Select the file(s) you want to export and use the preview to set period, file(s). The export format supports JPG, BMP, DAV, and AVI.Figure 3-183.5.1 File ListThe file list on the right side is to display all records of current selected folder. It is the same as the records on the playback interface. There are group record and general record. You can batch export record of the same group of the same day. See Figure 3-19. You need to check to select the record you want to export.z Check a date of one group to select records of all channels of one day.z Check some channels of one group of one day.z Check one file; you can see current preview channel is highlighted.Figure 3-193.5.2 SetupThe Setup interface is shown as in Figure 3-20.Figure 3-20 Please refer to the following sheet for detailed information.Item NoteExport format Export modes support JPG, BMP, DAV and AVI.The former two are picture modes and the later two are record modes.Start time It is to set file start time; it is corresponding to the left value of the time line.End time It is to set file end time; it is corresponding to the right value of the time line.Interval It is to set picture export interface. It is for picture export only.3.5.3 Video PreviewPlayback: Check a file, video preview interface will play the file from the playback list or the record or picture of the highlighted channel. At the same time, you can implement pause, frame by frame playback, slow playback, fast playback and etc. See Figure 3-21.Figure 3-21Export: After you set parameters, click the Begin export button to set save path and then begin. You can view export process bar or you can click the Stop export button to terminate. You can see export succeeded dialogue box after the export operation. See Figure 3-22.Figure 3-223.6WatermarkClick the Watermark button of the system menu; you can go to the watermark interface. See Figure 3-23.Watermark function is to check the selected record file has been tampered with or not. Select a record file first and then click the Start Check button to begin the process. You can view record path, percentage, check result and etc. You can click the Stop Check button to terminate current process. You can click the corresponding record column of watermark information to view the tamper information. See Figure 3-24.Figure 3-23Figure 3-243.7ConfigClick Config button on the system menu, you can see an interface shown as in Figure3-25.Figure 3-25Please refer to the following sheet for detailed information.Item NoteSnap path/format On the playback interface, you click the snap button,system can save picture to the specified path as your set format.Video path/format On the playback interface, you click the record button, system can save record file to the specified path as your set format.Video proportion It is to set video window proportion. There are three options: 4:3、16:9 and 100%.Show trace It is to set display intelligent track or not. Please note it is for intelligent device only.Language You can select English/Chinese.Please note system needs to reboot to activate current setup.Note:System can save current setup even after you close the player.4 Compatible OS CPU Intel P4 1.8GHz1G memory50MB freee HDD space Resolution16bit 800x600Mouse, keyboard,USBMiniRequirement Microsoft Windows 95/98/ME/NT4.X/2000/XPCPU Intel Core 2 Duo E6600Dual-channel 2G memory or higher ,256M independentdisplay card512MB free HDD space or higherResolution 16bit 1024x768Mouse, keyboard,USBRecommended RequirementMicrosoft Windows 2000-SP4/2003/XP-SP2Compatible OS z Windows Server 2003z Windows Server 2008 z Windows XPz WIN7Note:z This manual is for reference only. Slight difference may be found in the user interface.z All the designs and software here are subject to change without prior written notice.z All trademarks and registered trademarks mentioned are the properties of their respective owners.z If there is any uncertainty or controversy, please refer to the final explanation of us.z Please visit our website or contact your local retailer for more information.。
大华录像机说明书大华录像机说明书篇一:大华硬盘录像机操作说明大华录像机简单操作说明鼠标操作 * 本文档以右手使用鼠标习惯为例 :除前面板键操作菜单外,用户可用鼠标进行菜单功能操作。
将USB 接口鼠标插入机器面板的 USB 接口即可。
如果用户还没有登录系统则先弹出密码输入框 ; 实时画面监视时,单击鼠标左键进入主菜单对某功能菜单选项图标鼠标左键单击进入该菜单内容执行控件上指示的操作改变复选框或动态检测块的状态点击数字框或密码框时弹出数字面板,直接点击面板上的数字即可完成数字的输入。
X 表示清零, ? 表示确定输入的数值,并关闭面板单击鼠标左键点击组合框时弹出下拉列表执行控件的特殊操作,例如双击录像文件列表的某一项,回放该段录像双击鼠标左键多画面时对某通道画面双击鼠标左键使该画面全屏 ; 再次双击该单画面恢复到以前的多画面状态实时画面监视时,弹出快捷菜单 :多画面模式,多画面模式与机器路数有关,如 4 路只显示单画面、四画面 ; 及云台控制、图像颜色、录像查询、手动录像、主菜单等快捷方式。
其中云台控制和图像颜色是对光标所在的画面的通道进行设置,设置前如果是多画面模式,则会先自动切换到对应通道的单画面上单击鼠标右键对设置菜单内容不作保存并退出当前菜单数字框设置数值时转动鼠标滚轮增减数字框的数值切换组合框内的选项转动滚轮选中当前坐标下的控件或控件的某项进行移动框选动态检列表框上下翻页鼠标移动测的区域鼠标拖动框选区域设置区域覆盖开机与关机开机插上电源线,按下后面板的电源开关,电源指示灯亮,录像机开机,开机后视频输出默认为多画面输出模式,若开机启动时间在定时录像设定时间内,系统将自动启动定时录像功能,相应通道录像指示灯亮,系统正常工作。
进入系统菜单正常开机后,按 Enter 确认键(或单击鼠标左键)弹出[登录对话框],用户在输入框中输入用户名及相关密码。
用户组根据用户自定义增加或删除组:出厂设置包括USER\ADMI两级组,组中的用户享有与组同等权限。

“手机看店”终端设备说明书(浙江大华)中国电信浙江公司政企客户部2013年9月目录第一章DH-IPC-K100W ......................................................................................................... - 1 -1.1 产品概述 .......................................................................................................................- 1 -1.2 功能特性 .......................................................................................................................- 1 -1.3 外观介绍 .......................................................................................................................- 3 -1.4 技术参数 .......................................................................................................................- 4 -1.5 安装说明 .......................................................................................................................- 5 -1.6 参数设置 .......................................................................................................................- 6 - 第二章DH-IPC-K105W ..................................................................................................... - 10 -2.1 功能特性 .................................................................................................................... - 10 -2.2 技术参数 .................................................................................................................... - 11 -第一章DH-IPC-K100W1.1 产品概述本系列网络摄像机结合传统摄像机和网络视频的技术,集音视频数据采集、传输于一体,无需其他辅助设备,接入互联网即可使用。
数字硬盘录像机使用说明书一、开机与关机1、开机插上电源线,按下后面板的电源开关,电源指示灯亮,录像机开机,开机后视频输出默认为多画面输出模式,若开机启动时间再录像设定时间内,系统将自动启动定时录像功能,相应通道录像指示灯亮。
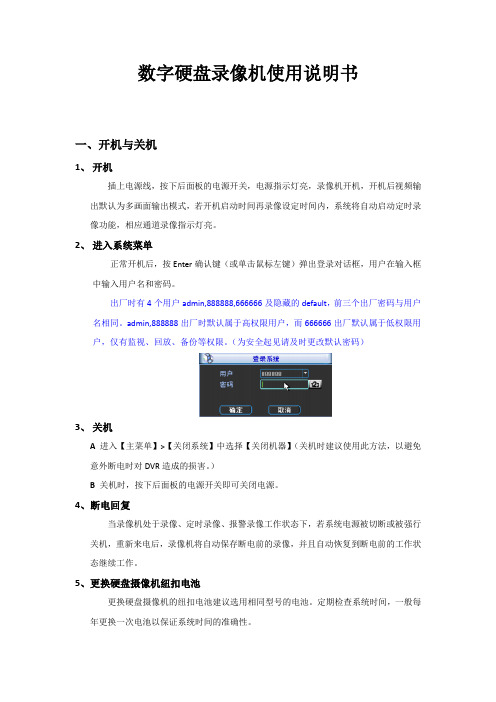
2、进入系统菜单正常开机后,按Enter确认键(或单击鼠标左键)弹出登录对话框,用户在输入框中输入用户名和密码。
出厂时有4个用户admin,888888,666666及隐藏的default,前三个出厂密码与用户名相同。
admin,888888出厂时默认属于高权限用户,而666666出厂默认属于低权限用户,仅有监视、回放、备份等权限。
(为安全起见请及时更改默认密码)3、关机A进入【主菜单】>【关闭系统】中选择【关闭机器】(关机时建议使用此方法,以避免意外断电时对DVR造成的损害。
)B 关机时,按下后面板的电源开关即可关闭电源。
4、断电回复当录像机处于录像、定时录像、报警录像工作状态下,若系统电源被切断或被强行关机,重新来电后,录像机将自动保存断电前的录像,并且自动恢复到断电前的工作状态继续工作。
5、更换硬盘摄像机纽扣电池更换硬盘摄像机的纽扣电池建议选用相同型号的电池。
定期检查系统时间,一般每年更换一次电池以保证系统时间的准确性。
二、录像操作1、预览设备正常登陆后,直接进入预览画面。
在每个预览画面上有叠加的日期、时间、通道名称,屏幕下方有一行表示每个通道的录像及报警状态图标。
2、手动录像提示:手动录像要求用户具有“录像操作权”,在进行这项操作前请确认硬盘录像机内已经安装且已经正确格式化硬盘。
进入手动录像操作界面单击鼠标右键或在【主菜单】>【高级选项】>【录像控制】中可进入手动录像操作界面。
在预览模式下按前面板【录像/●】兼或遥控器上的【录像】键可进入手动录像操作界面。
开启/关闭某个或某些通道要开启/关闭某个通道的录像,首先查看该通道录像状态。
(“○”表示关闭,“●”表示开启)使用左右方向键移动活动框到该通道,使用上下方向键或相应数字键切换开启/关闭状态。


table of Contents1、matters needing attention (3)2、Basic operation (4)2.1、System reset (4)2.2、Start/off host (4)2.3、volume adjusting (4)2.4、Power Key (4)2.5、Backing camera (4)3、Main interface operation (5)4、Bluetooth (6)4.1、Bluetooth main interface (6)4.2、Bluetooth–dial (6)4.3、Outgoing state diagram (7)4.4、Call state diagram (7)4.5、Phone book and phone records (8)4.6、Bluetooth-Music (8)5、Vehicle setup (9)5.1、General settings (9)5.2、Factory settings (10)5.3、Touch learning (10)5.4、Sound settings (10)5.5、Navigation set (11)5.6、Square set (11)6、radio reception (12)7、Multimedia music (13)8、Multimedia video: (14)9、File management operation (14)10、Common troubleshooting wizard (15)1、matters needing attentionFor your safety,please try not to while driving to watch video and operate the machine.When you're driving the volume knob can clearly hear the sound of the outside world.Product change iterations,the system will be updated step by step.The contents of this manual are for reference only,please refer to the actual product.1.1First pay attention to traffic safety.1.2Please park your car in a safe place if you have difficulty in operating the system.1.3Do not allow children to operate the machine,in order to avoid damage to the adult or machine.1.4Please follow the traffic rules when using the satellite navigation system.1.5Please do not prohibit the use of electronic equipment or the use of open flame,such as:gas stations,wineries,strong electromagnetic interference areas,or may cause danger.1.6Do not self maintenance,maintenance,installation of the machine.In the power supply is switched on do not install or repair the machine,because of no electronic equipment or vehicle accessories installation training or lack of experienced personnel to install and repair the machine is very dangerous.1.7Don't put the machine storage or installed in direct sunlight.Don't make placed and other harmful substances into the environment,especially LCD screen.If installed,LCD screen just in air conditioning ventilation Road in the vicinity,please ensure cool or hot air not blowing directly on the machine,otherwise it might damage the machine,even the car or bodily harm.2、Basic operation2.1、System resetCaused by the improper operation of the crashes and other non normal phenomenon, please use the tip of the short by a panel reset hole,the machine can be restored to normal.(Note:due to the reset button panel on a small,please press this button),using the pen or similar pointed object point2.2、Start/off hostIn the ACC switch in the open position,according to the host panel"power"button to turn on the power,insert the CD into the trough dish,machine will automatically open, open access to read disk mode;when the phone is switched on,long press"power" button switch for host panel,or flameout pull bus key will shut closed the power of this machine.2.3、volume adjustingRotate the volume knob on the console panel(some models have the volume control keys on the panel"VOL+/VOL-"button),which can adjust the volume of the machine.2.4、Power KeyPress the Power key on the panel to mute the system,press again or adjust the volume to restore the sound.2.5、Backing cameraThe vehicle go into reverse,regardless of the machines in the boot or shutdown state, the display will immediately switch to reverse the camera screen.3、Main interface operationIn the main interface,a different function icon into the corresponding interface,the function of the detailed operating instructions.Please see the back.About touch sliding page can switch between multiple pages,as shown below:Click the icon to access the third-party application menu as follows,Long press the icon to drag to move the icon position4、Bluetooth4.1、Bluetooth main interfaceAs shown below:Search around the open Bluetooth device.Select the device that exists around the click on the link to wait for the match or match Will automatically link.Disconnect the connected device.Settings:mainly for the Bluetooth device function selection,automatic connection,auto answer,Bluetooth name modification and Bluetooth PIN code modification.4.2、Bluetooth–dialBluetooth connection is successful,the user can dial directly,through the touch screen number keys,as shown below:4.3、Outgoing state diagramAfter the Bluetooth connection is successful,you can enter the number by phonebook,dialing,and manually pressing the number keys on your keyboard use Dial outthe phoneThe voice of the other party's call is output from the machine(in-car speaker).Click this icon to switch the voice of the other party to the output of the paired mobile phone.The voice of the other party's call is output from the paired mobile phone.Click this icon to switch the voice of the other party to the output of the machine(in-car speaker).The microphone on the machine is turned on.During the call,the other party can hear the content of the user on the machine and the two parties talk normally.Click this icon to turn off the microphone on the machine.The microphone on the machine is off.During the call,the other party cannot hear the content of the user on the machine.Click this icon to turn on the microphone on the machine.Dial the call or hang up during the call to end the callIn the call interface,you can hide or display the dial pad4.4、Call state diagramBluetooth connection status,there will be incoming calls call interface as follows:Answer the call and enter the call state.4.5、Phone book and phone recordsBluetooth connection,can enter the phone book and phone records,as follows:number in the phone book.to dial the number to contact each other.Used to synchronize the phone book in this connected phoneHas been dialed out of the number recordList of numbers that have been answeredList of unanswered numbers4.6、Bluetooth-MusicBluetooth media media connection is successful,if the phone supports Bluetoothmusic player,the audio will be transmitted to the Bluetooth device,as shown below:You can control the phone through the three buttons to control the music on a song,pause playback and the next song function5、Vehicle setupSet the main settings,navigation settings,network settings,sound settings,time settings,brightness settings,language and input method, steering wheel settings,factory settings and on the car,as shown below:5.1、General settingsGeneral settings include brake warning,reverse volume switch,button tone,reverse mirror,default system volume,default call volume,home page style,as shown below:Brake Warning:Controls whether or not a traffic warning switch pops up when playing a video file.Reverse volume switch:control the volume when the reversing switch.Touch tone:Whether the control system has a tone switch when it touches.Reversing Mirror:Controls whether the camera is turned on.GPS mix:Switch function options,navigation work with music-video-Bluetooth music-mix outputGPS Mixing Ratio:Controls the mixing ratio of GPS.Default system volume:Controls the system volume size by default.Default call volume:Controls the default value of the Bluetooth call volume.5.2、Factory settingsFactory settings are mainly for production,installation,after-sales,maintenance,non-professionals,please do not use[Note]Non-professionals are not allowed to enter the factory settings.Improper settings may result in the product not working properly!!!5.3、Sound settingsSound settings are sound and balance two parts,as shown below:Sound effects:sound type settings,you can off,users,rock,pop,live,dance, classical and soft eight types to choose,according to their own preferences equal loudness,bass and treble to adjust.Balance:sound field balance mode settings,according to the different effects of the upper and lower left and right reverse adjustment.5.4、Navigation setSelect map application:press GPS key,will display the default navigation software5.5、Square setSteering wheel control button settings:enter the steering wheel learning interface,first press,And then long press the button on the steering wheel,select the appropriate key in the interface,when the settings are successful,the correspondinginterface button will be lit,after learning press Will save this learning content.6、radio receptionThe main radio interface,as shown below:[Note]The introduction is for reference only,please refer to the actual product.band,as:FM1、FM2、FM3、AM1、AM2Short press the button from the system will search the radio station step by step from high frequency to low frequency or from low frequency to high frequency until you find the radio frequency you want(FM band short press for FM1\FM2\FM3bandbetween the1-6units switch;long press to automatically scan the radio to the highfrequency;long press to the low-end scanning stationNote:If there is a tuner on some models of the front panel button,rotate it to the search frequency).The stronger the FM signal,the switch of the stereo,the radio broadcast effect is good,whereas in the remote area,the wireless signal is not stable,close the stereo switch to single channel,can improve the effect of the radio.When in a remote area,the radio signal is unstable,usually switching to the remote mode,the closer to the city center,the more powerful the FM broadcast signal, usually switching to the short range to improve the effect of the radio broadcast.Automatically browse stations and store up to six preset stations per band.The system can store up to30preset stations(18FM stations and12AM stations).(Click the browse button to browse the stations that have been memorized in the band(view a station every5seconds).After browsing to the appropriate station,click Browse and the selected station will play.Click on the button system will automatically search the radio from low to high frequency,during the search process,once again hit the button will stop the search,while the frequency of the screen will stop changing.Can enter the sound settings to switch the sound.7、Multimedia musicAfter inserting the USB flash drive,entering the music application will update all the audio files in the USB flash drive to the list,as shown below:Enter the song list,as shown below:You can select different paths to view music,and you can update the newly added audio files in the USB flash drive with the refresh button.Circle all the songs.Random play.Sound settings.previous track.Pause playback.next track.8、Multimedia video:After inserting the USB flash drive,the video will automatically detect the USB flash drive and enter the video playback screen.Music lists the video files in the USB drive.Enter the video playback page,as shown below:Function is similar to music,can be selected from U disk or local path(Note:This video player has a total of8interfaces,it supports MP4,AVI,RMVB,3GP,MKV,MOV, MPG,FLV and1080p HD video playback formatCan be displayed on the screen length and width to switch the ratio.9、File management operationEnter the file management interface,click Query the file to be found orclick Create a new folder,as shown below:Can be different from the path into the corresponding folder Long press the optional file on the file to copy,delete,cut and rename the details of the file,as shown below10、Common troubleshooting wizardIf you encounter the following problems in use,troubleshooting will help you quickly solve the problem,if the problem is still not resolved,it is recommended to contact our service department to help solve.phenomenon Reason HandleCan not boot The car key is not inserted intothe switch and the switch is notopenInsert the vehicle key and openthe door Power line insertion host Insert power cordTouch screen is not allowed Recalibrate the touch screen,press and hold the screen with fivefingers,and the system will automatically enter the calibrationscreen.The touch screen does notrespond The system is processing the transaction(road search,etc.),wait a moment,if it still can't be solved,please press the RST hole throughthe needle or the tip of the pen.Reversing without rear viewimageCamera not installed Install cameraCamera system is wrong Restart the machineThe system does not start,the rear view image appears after the reverse process,and thebutton is invalid.Pay attention to the principle ofdriving safety when designingproducts,and preset the rearview priorityYou must terminate the reverseaction before you can start thesystem by pressing the originalcar power button.Navigation cannot be located May be in the shielding area ofsome navigation signalsTry to drive the car out of a distance and observe whether the navigation resumes thesignal.If it is not restored,please restart or reset the machine.Cannot locate and navigate afterbootingNavigation map blind spots,some remote mountain areas orroads have not been built in thismapConfirm update mapFuzzy search can't find where togo First confirm that the entered Chinese character is correct,and then try to enter another name for the location.If it is not found,the location may not be in the map database.The navigation system gives the selected road"a far-reachingapproach"The navigation system will consider various factors in the road search.In addition to the distance,it will also consider the level of the road,the traffic regulations,the viaduct,the main line,etc.In short,it is convenient for the driver to reach the destination in the shortestpossible time.Blank on the map The machine has no network or no offline map data.It is alsopossible that the navigation scale is set too large or too small.Trychanging the scale to see if you can restore the map display.If it hasnot been resolved,it may be caused by the loss of positioning.Please re-select a marker point.FCC Radiation Exposure Statement:This equipment complies with FCC radiation exposure limits set forth for an uncontrolled environment. This equipment should be installed and operated with minimum distance 20cm between the radiator & your bodyFCC WarningThis device complies with Part 15 of the FCC Rules. Operation is subject to the following two conditions:(1) This device may not cause harmful interference, and (2) this device must accept any interference received, including interference that may cause undesired operation.NOTE 1: This equipment has been tested and found to comply with the limits for a Class B digital device, pursuant to part 15 of the FCC Rules. These limits are designed to provide reasonable protection against harmful interference in a residential installation. This equipment generates uses and can radiate radio frequency energy and, if not installed and used in accordance with the instructions, may cause harmful interference to radio communications. However, there is no guarantee that interference will not occur in a particular installation. If this equipment does cause harmful interference to radio or television reception, which can be determined by turning the equipment off and on, the user is encouraged to try to correct the interference by one or more of the following measures:- Reorient or relocate the receiving antenna.- Increase the separation between the equipment and receiver.-Connect the equipment into an outlet on a circuit different from that to which the receiver is connected.-Consult the dealer or an experienced radio/TV technician for help.NOTE 2: Any changes or modifications to this unit not expressly approved by the party responsible for compliance could void the user's authority to operate the equipment.。


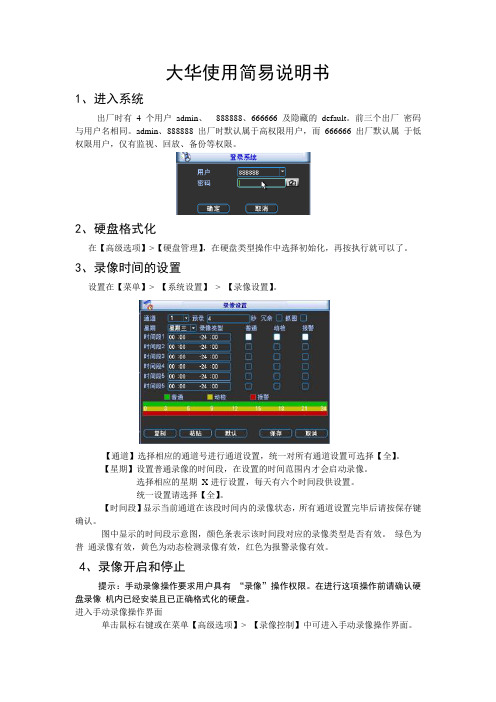
大华使用简易说明书1、进入系统出厂时有 4 个用户admin、888888、666666 及隐藏的default。
前三个出厂密码与用户名相同。
admin、888888 出厂时默认属于高权限用户,而666666 出厂默认属于低权限用户,仅有监视、回放、备份等权限。
2、硬盘格式化在【高级选项】>【硬盘管理】,在硬盘类型操作中选择初始化,再按执行就可以了。
3、录像时间的设置设置在【菜单】> 【系统设置】> 【录像设置】。
【通道】选择相应的通道号进行通道设置,统一对所有通道设置可选择【全】。
【星期】设置普通录像的时间段,在设置的时间范围内才会启动录像。
选择相应的星期X进行设置,每天有六个时间段供设置。
统一设置请选择【全】。
【时间段】显示当前通道在该段时间内的录像状态,所有通道设置完毕后请按保存键确认。
图中显示的时间段示意图,颜色条表示该时间段对应的录像类型是否有效。
绿色为普通录像有效,黄色为动态检测录像有效,红色为报警录像有效。
4、录像开启和停止提示:手动录像操作要求用户具有“录像”操作权限。
在进行这项操作前请确认硬盘录像机内已经安装且已正确格式化的硬盘。
进入手动录像操作界面单击鼠标右键或在菜单【高级选项】> 【录像控制】中可进入手动录像操作界面。
手动:优先级别最高,不管目前各通道处于什么状态,执行“手动”按钮之后,对应的通道全部都进行普通录像。
自动:录像由录像设置中设置的(普通、动态检测和报警)录像类型进行录像。
关闭:所有通道停止录像。
5、录像查询、回放录像查询1、进入录像查询界面:单击右键选择录像查询或从主菜单选择录像查询进入录像查询菜单。
2、回放操作:根据录像类型:全部、外部报警、动态检测、全部报警录像,通道、时间等进行多个条件查询录像文件,结果以列表形式显示,屏幕上列表显示查询时间后的128 条录像文件,可按/键上下查看录像文件或鼠标拖动滑钮查看。
选中所需录像文件,按ENTER键或双击鼠标左键,开始播放该录像文件。
⼤华秤使⽤说明书⽬录⼀、条形码打印计价秤概述 (2)1.1 开箱检查 (2)1.2 LED显⽰ (2)1.3 键盘 (2)1.4 打印机 (2)1.5 规格 (3)1.6 各键功能 (4)1.7 指⽰灯 (4)1.8 标签尺⼨ (4)⼆、条形码打印计价秤的操作指令集 (6)三、条形码打印计价秤调试⼿册 (8)3.1 如何把商品信息⼿⼯输⼊到电⼦秤⾥? (8)3.2 如何修改电⼦秤的系统参数? (9)3.3 如何设置标签的格式? (11)3.4 当更换不同尺⼨的标签时,如何校验标签纸? (19) 3.5 店名设置 (19)3.6 如何设置特殊信息? (20)3.7 如何设置PLU快捷键盘? (22)3.8 重量标定 (23)四、条形码打印计价秤使⽤指南 (25)4.1 开机 (25)4.2 ⼿动复位置零 (25)4.3 PLU的调⽤(称重状态) (25)4.4 PLU的调⽤(计数状态) (26)4.5 单价改变 (26)4.6 折扣 (27)4.7 去⽪ (28)4.8 PLU拷贝 (29)4.9 ⽇期 (30)4.10 ⾃动打印(计重⽅式) (31)4.11 ⾃动打印(计数⽅式) (32)4.12 累计和修正 (32)4.13切换标签纸和连续纸 (34)4.14报表打印功能 (34)4.15 常⽤标签格式调⽤ (34)4.16 IP地址设定 (35)五、条形码打印计价秤打印机操作指南 (36)5.1 BT-UC04824B打印机的简介 (36)5.2 打印机的使⽤ (37)5.3 打印机的⽇常维护 (41)5.4 打印机故障的处理 (42)六、注意事项 (44)⼀、条形码打印计价秤概述1.1 开箱检查1.外观不得有裂纹、擦伤。
2.附件有:电源线、产品保修卡、产品使⽤说明书、区位码字库册、上位机安装软件、RS232通讯线或TCP/IP⽹线(双机直连)。
3.本机不得私⾃打开铅封,否则不予保修和维修。
欢迎阅读一:键盘介绍:快捷键(1-71号白色按键):设置或调用商品,使商品快速调用打印PLU 键:当手工输入商品PLU (条码)后,按该键调出商品功能键:按该键可进入设置程序,设置秤的各项参数数字键0-9:在任何情况下输入数字倍数键:在商品计个的情况下输入多件商品清除键:清除错误信息确认键:确定,保存日期键:查看时间+A ,+B F 01F 02F 03F 04F 06F 07F 08三? ,1、 输入PLU 号123,在按下键盘的“PLU ”键。
2、 按两次键盘上的“去皮”键,此时电子秤屏幕第三个格中显示“F 02”,输入商品新的单价(每公斤的价格),按确定。
六:修改店名:待机状态,按“功能”键,输入“4001”按“确认”,进入第一条汉字文本内容设置(电子秤屏幕的第二个格中显示“ 1”)。
输入汉字区位码。
例如第一条汉字文本的内容为“大华”则输入“大”的汉字区位码前两为“20”按去皮在输入后两位“83”,依次类推。
大华与晋业进入晋业软件:一:电子秤的设置欢迎阅读在“零售管理”—“电子秤设置”。
进入“电子秤设定”的界面,在右边“电子秤类型”中选择“大华电子秤_5位单价或者大华电子秤_6位单价”,新增一个电子秤。
端口:4001。
电子秤名字(字母):可自己设置。
下传:要打上对勾。
本软件可以同时支持多台电子秤,此处以一台为例。
设置完成后单击保存。
二:商品资料的下载进入商品资料的界面,首先要选择您要下载的商品。
然后单击下图中的“下传”,软件会提示你要选择电子秤的类型请选择“大华电子秤”单击确定,软件会让你输入“条码店名标示符”请输入“99IP。
智慧空开使用说明书V1.0.0 浙江大华技术股份有限公司前言符号约定在本文档中可能出现下列标识,代表的含义如下。
标识说明表示有高度潜在危险,如果不能避免,会导致人员伤亡或严重伤害。
表示有中度或低度潜在危险,如果不能避免,可能导致人员轻微或中等伤害。
表示有潜在风险,如果忽视这些文本,可能导致设备损坏、数据丢失、设备性能降低或不可预知的结果。
表示静电敏感的设备。
表示高压危险。
表示强激光辐射。
表示危险运动部件,请远离运动风扇叶片。
表示设备部件机械伤人。
表示能帮助您解决某个问题或节省您的时间。
表示是正文的附加信息,是对正文的强调和补充。
修订记录版本号修订内容发布日期V1.0.0 首次发布。
2021.06使用安全须知下面是关于产品的正确使用方法、为预防危险、防止财产受到损失等内容,使用设备前请仔细阅读本说明书并在使用时严格遵守,阅读后请妥善保存说明书。
操作要求●仅可在额定输入输出范围内使用设备。
●请在允许的湿度和温度范围内运输、使用和存储产品。
●请勿将液体滴到或溅到设备上,并确保设备上没有放置装满液体的物品,防止液体流入设备。
●请勿随意拆卸设备,或强行插拔外接线端子,以避免数据接口损坏或通讯异常。
安装要求●在接线、拆装等操作时请一定要将电箱输入电源断开,切勿带电操作。
●请严格遵守当地各项电气安全标准,确保环境电压稳定并符合设备供电要求。
●高空作业人员须佩戴安全帽、使用安全带,做好防护措施,以确保人身安全。
●请勿将设备安装在潮湿、有灰尘或煤烟的场所。
●请保持设备的水平安装,或将设备安装在稳定场所,注意防止本产品坠落。
●设备仅限于室内安装,或使用具有防水和防雨功能的室外配电箱中安装,不能暴露安装在可能淋到雨或非常潮湿的地方。
●避免将设备安装在阳光直射地点、通风不良的地点,或如加热器或暖气等热源附近。
切勿堵塞设备的通风口。
忽视此项可能会导致产品分断保护性能下降或异常报警和分断。
●请使用原厂提供的智慧用电网关配套电源。


DH1718D(E)双路跟踪稳流稳压电源技术说明书(DH系列电源产品通过ISO9002认证)北京大华无线电仪器厂(国营第七六八厂)目录1.概述-------------------------------------------------------------------3 2.性能指标-------------------------------------------------------------------4 3.工作原理-------------------------------------------------------------------5 4.结构外观-------------------------------------------------------------------7 5.使用方法-------------------------------------------------------------------7 6.一般维修-------------------------------------------------------------------8 7.成套性-------------------------------------------------------------------8 8.储存-------------------------------------------------------------------9 9.质量保证-------------------------------------------------------------------92一、概述DH1718D(E数显)双路稳压稳流(CC/CV)跟踪电源是实验室通用电源。
具有恒压、恒流工作功能,且这两种模式可随负载变化而进行自动转换。
大华录像机简单操作说明鼠标操作 *本文档以右手使用鼠标习惯为例:除前面板键操作菜单外,用户可用鼠标进行菜单功能操作。
将 USB接口鼠标插入机器面板的 USB接口即可。
如果用户还没有登录系统则先弹出密码输入框;实时画面监视时,单击鼠标左键进入主菜单对某功能菜单选项图标鼠标左键单击进入该菜单内容执行控件上指示的操作改变复选框或动态检测块的状态点击数字框或密码框时弹出数字面板,直接点击面板上的数字即可完成数字的输入。
X 表示清零,√表示确定输入的数值,并关闭面板单击鼠标左键点击组合框时弹出下拉列表执行控件的特殊操作,例如双击录像文件列表的某一项,回放该段录像双击鼠标左键多画面时对某通道画面双击鼠标左键使该画面全屏;再次双击该单画面恢复到以前的多画面状态实时画面监视时,弹出快捷菜单:多画面模式,多画面模式与机器路数有关,如 4 路只显示单画面、四画面;及云台控制、图像颜色、录像查询、手动录像、主菜单等快捷方式。
其中云台控制和图像颜色是对光标所在的画面的通道进行设置,设置前如果是多画面模式,则会先自动切换到对应通道的单画面上单击鼠标右键对设置菜单内容不作保存并退出当前菜单数字框设置数值时转动鼠标滚轮增减数字框的数值切换组合框内的选项转动滚轮列表框上下翻页鼠标移动选中当前坐标下的控件或控件的某项进行移动框选动态检测的区域鼠标拖动框选区域设置区域覆盖开机与关机开机插上电源线,按下后面板的电源开关,电源指示灯亮,录像机开机,开机后视频输出默认为多画面输出模式,若开机启动时间在定时录像设定时间内,系统将自动启动定时录像功能,相应通道录像指示灯亮,系统正常工作。
进入系统菜单正常开机后,按 Enter 确认键(或单击鼠标左键)弹出 [登录对话框 ],用户在输入框中输入用户名及相关密码。
用户组根据用户自定义增加或删除组:出厂设置包括 USER\ADMIN两级组,组中的用户享有与组同等权限。
出厂自带四个用户 admin、888、666,其中前三个用户的用户名与密码相同。
录像回放操作本地单画面回放与多画面回放根据录像类型:全部、报警、动态检测、全部报警录像,通道、时间等进行多个条件查询录像文件,结果以列表形式显示,屏幕上列表显示查询时间后的 32 条录像文件,可按、键上下查看录像文件或鼠标拖动滑钮查看显示文件。
选中所需录像文件,按 ENTER键或鼠标双击左键,开始播放该录像文件。
提示:文件类型号的意义为:R—普通录像; A—外部报警录像; M —动态检测录像选择是单画面回放或多画面回放,在高级选项》回放设置中选择1 通道或2 通道回放。
选择2 通道回放则用户可以同时回放两个窗口的录像文件。
查询条件设置区:时间类型通道号设置区、录像查询类型选择设置录像文件回放控制区执行查询按钮录像回放窗口回放操作区回放录像(屏幕显示通道、日期、时间、播放速度、播放进度)对录像文件播放操作如控制速度、声音、循环播放(对符合条件查找到的录像文件进行自动循环播放)、全屏显示等。
隐藏 / 显示回放状态条提示:全屏显示时自动隐藏状态条,移动鼠标即可显示状态条。
回放时其余通道同步切换功能录像文件回放时,按下数字键,可切换成按下的数字键对应通道同时间的录像文件进行播放如何实现录像回放的快进及慢放操作按键顺序说明备注1、录像回放快进:快进键(或飞梭键外圈顺时针)回放状态下,按该键,可进行多种快放模式如快放 1,快放 2 等进速度循环切换快进键还可作为慢放键的反向切换键2、录像回放慢放:慢放键 ?回放状态下,连续按该键,可进行多种慢放模式如慢放2,慢放 1 速度循环切换慢放键还可作为快进键的反向切换键;实际播放速率与版本有关3、播放 / 暂停键 ?慢放播放时,按该键,可进行播放/ 暂停循环切换。
4、播放上一段、下一段在回放状态下有效,观看同一通道上下段录像可连续按键和键。
如何实现录像快进、快退、逐帧播放功能(飞梭键配合的录像操作特殊功能)飞梭键的特殊功能说明备注1、快进(飞梭键外圈顺时针)回放时,飞梭键外圈顺时针转一次以快放 1 快进播放录像文件,再转一次以快放 2 快进播放,呈依次类推快放速度。
快退或快进状态,按两次暂停 / 播放键恢复正常速度回放2、快退(飞梭键外圈逆时针)回放时,播放一段时间后,可进行快退,飞梭键外圈逆时针转一次,即是快退 1 快退播放录像文件,再逆转一次以快退 2 快退播放录像文件,呈依次类推速度。
HD1机器此功能为可扩展。
实际播放速率与版本有关3、手动逐帧播放回放状态时,按一次暂停/ 播放键,然后慢慢转飞梭键的内圈向右转(顺时针),可进行逐帧播放。
逆时针慢慢旋转飞梭键内圈进行I 帧回播。
CIF/HD1机器此功能为可扩展。
如何实现录像倒放及单帧回放按键顺序说明备注倒放(回放控制条面板““)正常播放录像文件时,用鼠标左键单击回放控制条面板倒放按扭““,录像文件进行倒放,复次单击倒放按扭““则暂停倒放录像文件。
手动单帧录像回放正常播放录像文件暂停时,用户可顺时针慢慢旋转飞梭键内圈进行单帧录像回放,逆时针慢慢旋转飞梭键内圈进行 I 帧回播。
倒放时或单帧录像回放按播放键可进入正常回放状态提示:1、以上操作时播放器回放控制条面板上显示文件的播放速度、通道、时间、播放进度等信息。
录像文件的备份操作硬盘录像机的备份可通过 CD-RW刻录光驱( CIF产品可扩展)、 USB存储设备、网络下载等方式实现录像文件的备份。
首先介绍 USB存储设备备份操作,网络下载备份参见网络客户端操作介绍。
备份菜单:设备检测备份设备可以是 CD-RW(CIF产品可扩展)、 USB等,文件备份设备中显示的是即时检测到的设备。
并且显示备份设备的总容量。
备份操作设备选择一个备份,如果用户是对所选设备进行文件清除,则选择清除按钮可以对选择的设备进行文件删除。
硬盘录像机的文件备份到设备操作:选择备份设备,选择要备份文件的通道,录像文件开始时间和结束时间,点击添加按钮进行核查文件。
符合条件的录像文件列出,并在类型前有打勾()标记,可以继续设置查找时间条件并点击添加,此时在已列出的录像文件后面,继续列出新添加的符合查找条件的录像文件。
用户可以选择备份按钮进行录像文件的备份。
对于打勾选中要备份的文件,系统根据备份设备的容量给出空间的提示:比如需要空间 XXMB,剩余空间 XX MB等,备份过程中页面有进度条提示。
备份成功系统将有相应成功提示。
提示:在录像文件备份过程中用户可以按 ESC键退出该页面,备份操作并不中止。
如果无备份设备,用户进行备份,系统将提示:无备份设备;未选择备份文件,或备份出错,系统都有相应提示,请用户根据提示操作。
取消备份:用户在备份时,可以手动取消备份操作。
执行备份操作时,备份按钮变成取消按钮,用户可以按取消按钮中止文件的备份。
USB存储设备在备份文件被中止时即保存到被中止的那一刻,即一个10 分钟的录像文件,在第五分钟时被中止备份,在备份设备上的文件即存到第五分钟的内容。
D1/HD1 产品用户如果选择备份设备为USB刻录光驱,在刻录时用户不能中止取消,否则刻录文件无效。
备份过程中退出菜单不会中断备份。
翻页提示:按上一段键和下一段键进行上一页、下一页翻页。
Fn 辅助:备份文件查出后,缺省的都是选中要备份的文件,在序号后有打勾标记。
通过 Fn 键选择或取消文件的打勾标记, Fn 键进行切换选择或不选择的逐个切换状态。
用户可以在计算机上查看备份的录像文件,录像文件名一般格式为:序号 +CH+通道号 +time+____年__月__日时分秒 .MPEG,其中“年__月__日”的格式跟普通设置中的日期格式相一致。
D1/HD1 产品选用 CD-RW备份时为能顺利刻录建议用户:1、光驱备份时,选择工作在限定码流模式下;2、为防止出错,云台控制请断开网络连接;5、云台控制操作及图像颜色控制 * 当前画面必须切换到所控摄像机的输入画面 * 在单画面时按遥控器上的“辅助”键或面板上的“Fn键”对屏幕上的选项可切换云台控制和图像颜色,确认云台与解码器连接正确,设置好解码器的地址,按照设备连接与使用章节中的介绍确认解码器的A、B 线与硬盘录像机接口的A、B 线连接正确,在菜单中进行相应的设置,详细设置在菜单 >系统设置 > 云台控制通道项选择相应的通道号,协议选择相应品牌型号的云台解码器协议(如:DH-CC为云台解码器协议 ),地址项设置为相应的云台解码器的地址。
波特率选择相应解码器所用的波特率,可对相应通道的云台及摄像机进行控制。
保存设置后,在单画面监控下,按 FN辅助键,设置云台控制。
在单画面下按 Fn 进入云台控制菜单,对云台的方向、镜头、光圈、灯光雨刷、预置点等做控制,设置时与方向键配合使用。
按键顺序说明按Fn 键屏幕显示1、辅助功能键 Fn 单画面实时监视状态下,首次按键进入屏幕显示。
显示辅助功能菜单包括“云台控制”和“图像颜色”。
选择“云台控制”:按 Fn 键进行方向控制(方向)、镜头控制(变倍、聚焦、光圈)、灯光雨刷(开关)、自动巡航(开关)、预置点等的循环切换的设置。
进行云台控制(方向)、镜头控制(变倍、聚焦、光圈)、灯光雨刷(开关)、自动巡航(开关)、预置点的设置。
2、方向键图像颜色控制:更改色调、亮度、对比度、饱和度、增益的设置。
3、和上一段和下一段功能键等同于 Fn键功能,云台控制时进行菜单项循环切换4、数字键配合在云台控制中,步长的设置通过1-9 数字键改变。
1 为 0 步长, 2 为步长, 3 为步长等, 9 为最大步长。
退出同一级菜单之前可以进行多个通道的菜单设置后,再进行统一保存。