ICP系列保险丝规格书
- 格式:pdf
- 大小:3.19 MB
- 文档页数:29

Eaton LGS363035GEaton Series G electronic molded case circuit breaker, LG-frame, LG, Complete breaker, Digitrip 310 RMS, Electronic LSG trip, Three-pole, 630A, 600 Vac, 85 kAIC at 240 Vac, 50 kAIC at 415/480 Vac, 25 kAIC at 600 Vac, Line and load, MetricGeneral specificationsEaton Series G electronic molded case circuit breakerLGS363035G 7821169944655.48 in 5.48 in 5.48 in 16 lb Eaton Selling Policy 25-000, one (1) year from the date of installation of theProduct or eighteen (18) months from thedate of shipment of the Product,whichever occurs first.CE Marked IEC RatedCSA CertifiedUL Listed LG breaker is HACR ratedProduct NameCatalog NumberUPCProduct Length/Depth Product Height Product Width Product Weight WarrantyCompliancesCertificationsCatalog NotesMetric25 kAIC at 600 Vac85 kAIC at 240 Vac50 kAIC at 415/480 Vac Complete breakerLGLGComplete breakerLine and load600 Vac630 AElectronic LSGThree-pole Application of Tap Rules to Molded Case Breaker Terminals Application of Multi-Wire Terminals for Molded Case Circuit BreakersMulti-wire lugs product aidCurrent limiting molded case circuit breaker module product aid Current limiting molded case circuit breaker module for series G, JG and CL310+ MCCB product family pocket folderStrandAble terminals product aidHigh performance operating handles for Series G circuit breakers product aidComprehensive circuit protection for control panel applicationsPlug-in adapters for molded case circuit breakers product aidCircuit breaker motor operators product aidMolded case circuit breakers providing higher levels of selective coordination product aidSeries G MCCB quick selectorMotor protection circuit breakers product aidPower metering and monitoring with Modbus RTU product aidLG 630A Molded-case circuit breakerBreaker service centersEaton's Volume 4—Circuit ProtectionMolded case circuit breakers catalogLG-frame Molded Case Circuit Breaker DrawingInstallation Instructions for Series G L-Frame Circuit BreakersL-Frame 310+ Molded-case circuit breakers 100A-600AEaton Specification Sheet - LGS363035GMOEM MCCB product selection guideNG and ND-Frame molded case circuit breakersSeries G, L-frame Time Current CurvesMounting hardware Interrupt ratingTypeFrameCircuit breaker type Circuit breaker frame type TerminalsVoltage rating Amperage RatingTrip TypeNumber of poles Application notesBrochuresCatalogsDrawingsInstallation instructions Specifications and datasheetsTime/current curvesEaton Corporation plc Eaton House30 Pembroke Road Dublin 4, Ireland © 2023 Eaton. All Rights Reserved. Eaton is a registered trademark.All other trademarks areproperty of their respectiveowners./socialmedia。

The package includes the following items:One PEX-P32A32 or PISO-P32A32U (-5V) PCI Board. One Software Utility CD (V6.2 or later) One Quick Start Guide (This Document)One CA-4037B CableTwo CA-4002 D-Sub connectorsStep 1: ☐ The PISO-DIO Series classic driver supports Windows 98/NT/2K and 32-bit XP/2003/Vista/7/8. Recommended to install this driver for have been used PISO-DIO series boards of regular user, please refer to :/pub/cd/iocard/pci/napdos/pci/piso-dio/manual/quickstart/classic/Check the Supplied ItemsInstalling the Windows DriverStep 2: Click the “N ext>” button to start the installation.Step 3: Check your DAQ Card is or not on supported list, then click the “N ext>” button.Step 4: Select the installed folder, the default path is C:\ICPDAS\UniDAQ , confirm and click the“Next >” button.Step 5: Check your DAQ Card on list, then click the “N ext>” button.Step 6: Click the “N ext>” button on the Select Additional Tasks window. Step 7: Click the “N ext>” button on the Download Information window.Step 8: Select “No, I will restart my computer later” and then click the “F inish” button.For detailed information about the driver installation, please refer to Chapter 2.1 “Getting the UniDAQ Driver DLL Installer package ” of the UniDAQ SDK user manual.Please make sure JP1 and JP2 jumper is kept in default setting before self-test, as follows:1. CON1: The Connector for DI <0…15> and DO<0…15>. Refer to Section 6 Pin Assignments.2. CON2: The Connector for DI <16…31> and DO<16…31>. Refer to Section 6 Pin Assignments.3. SW1: DIP Switch used to configure the Board ID. Refer to PISO-P32x32/x64 Series User Manual.4. JP1: Used to set the Internal or External Power for DI <0…15> on CON1, as above table.5. JP2: Used to set the Internal or External Power for DI <16…32> on CON2, as above table.Jumper Setting❶❷❸❹ ❺Step 1: Shut down and power off the computer. Step 2: Remove all the covers from the computer. Step 3: Select an unused PCI Express/PCI slot.Step 4: Carefully insert your card into the PCI Express/PCI slot and secure the board in place. Step 5: Replace the covers on the computer.Step 6: Reconnect the power supply and power on the computer.Step 7: Once the computer reboots, follow any messages that may be displayed to complete the Plug and Play installation procedure.Step 8: Open the “Device Manager” in the Control Panel and verify that the PEX/PISO-P32A32Series board is listed correctly.If your control device is an inductive load (ex: inductive relay), it is recommended to connect a diode at the Control Device side as a means of preventing damage from the counter EMF.To prevent the board damaged forever by overload, the GND pins (CON1: pin 1/20, CON2: pin 1/20) all must be connected with GND of External Power.Wiring NoteInstalling the HardwarePin AssignmentsExtension Cable (CA-4037B): DB-40-Pin conversion DB-37-PinPrepare for device:☑ DN-37 (optional) wiring terminal board.☑ Exterior power supply device. For example: DP-665 (optional)Self-test wiring as follows:Step 1: Connect the DN-37 to the CON1 connector on your board using the CA-3710 cable. Step 2: Keep set the JP1 and JP2 jumper to External Power (See Section 3 Jumper Setting). Step 3: Connect the DI(0-15) with DO(0-15). (DI0 connect to DO0 … DI15 connect to DO15)PISO-P32A32U-5V External Power Wiring:Self-TestThe PEX-P32A32GNDGNDExternal: DP-665 CON1Cable: CA-3710The PISO-P32A32U-5V wiring is illustrated in the figure below:GNDGND+5VExternal: DP-665 CON1Cable: CA-3710Step 5:Execute the UniDAQ Utility Program.1.In Windows 7, click the “Start”button,pointto“All Programs”,and then click the“ICPDAS”folder. Point to “UniDAQDevelopment Kits”and then click the“UniDAQ Utility”to execute the UniDAQUtility Program.2.Confirm that PEX/PISO-P32A32 Series boardhas been successfully installed in the Hostsystem. Note that the device numbers startfrom 0.3.Click the“TEST” button to start the test.Step 6:Check the results of the DIO function test.1.Click the “Digital Output” tab.2.Select “Port0” from the “Port Number” drop-down menu.3.Check the checkboxes for channels0, 2, 4 and 6.❶❸❷4. Click the “Digital Input ” tab.5. Select “Port0” from the “Port Number ” drop-down menu.6. The DI indicators will turn black when the corresponding DO channels 0, 2, 4 and6 are ON .PEX-P32A32 and PISO-P32A32U(-5V) Series Card Product Page:/root/product/solutions/pc_based_io_board/pci/piso-p32a32u.ht mlDN-37, CA-3710 and DP-665 page (optional):/products/DAQ/screw_terminal/dn_37.htm/products/Accessories/power_supply/dp-665.htm /products/Accessories/cable/cable_selection.htm Documentation and Software:CD:\NAPDOS\PCI\UniDAQ\/pub/cd/iocard/pci/napdos/pci/unidaq/Related Information❹❺Note:All the DI should become red because all the DO is OFF (uncheck).❻。
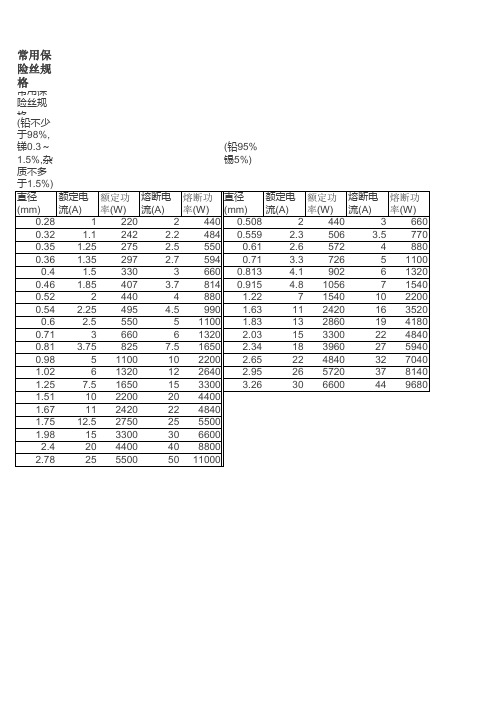
常用保险丝规格常用保险丝规格(铅不少于98%,锑0.3~1.5%,杂质不多于1.5%)(铅95% 锡5%)直径(mm)额定电流(A)额定功率(W)熔断电流(A)熔断功率(W)直径(mm)额定电流(A)额定功率(W)熔断电流(A)熔断功率(W)0.28122024400.508244036600.32 1.1242 2.24840.559 2.3506 3.57700.35 1.25275 2.55500.61 2.657248800.36 1.35297 2.75940.71 3.3726511000.4 1.533036600.813 4.1902613200.46 1.85407 3.78140.915 4.81056715400.5224404880 1.22715401022000.54 2.25495 4.5990 1.631124201635200.6 2.555051100 1.831328601941800.71366061320 2.031533002248400.81 3.758257.51650 2.341839602759400.9851100102200 2.652248403270401.02613201226402.952657203781401.257.51650153300 3.263066004496801.511022002044001.671124202248401.7512.527502555001.981533003066002.42044004088002.782555005011000在很多电子设备中,都离不开保险丝(FUSE)。
自从十九世纪九十年代爱迪生发明了把细导线封闭在台灯座里的第一个插塞式保险丝之后,保险 保险丝的各项额定值及其性能指标是根据实验室条件及验收规范测定的。
国际上有多家权威的测试和鉴定机构,如美国的保险商实验公司的 保险丝的选择涉及下列因素: 1. 正常工作电流。
Agilent 5100 和 5110 ICP-OES场地准备指南声明© Agilent Technologies, Inc.2014, 2016, 2017, 2019根据美国和国际版权法,未经Agilent Technologies, Inc. 事先许可和书面同意,不得以任何形式或通过任何方法(包括电子存储和检索以及翻译成其他语言)复制本手册的任何部分。
手册部件号G8010-97001版本第五版,2019 年 02 月Agilent Technologies Australia (M) Pty Ltd 679 Springvale RoadMulgrave, Victoria, 3170Australia 保证本文档所含资料“按原样”提供,在以后的版本中若有更改,恕不另行通知。
此外,在适用的法律所允许的最大范围内,Agilent 对与此手册相关的内容及其中所含的任何信息不作任何明示或默示的保证,包括但不限于为特定目的的适销性和适用性所作的默示保证。
Agilent 对提供、使用或应用本文档或其包含的任何信息所引起的错误或者偶发或间接损失概不负责。
如果Agilent 与用户之间单独签定的书面协议中所含的保证条款与本文档中相应材料的相应条款冲突,则应以单独协议中的保证条款为准。
技术许可证本文档中描述的硬件和/或软件是根据许可证提供的,其使用或复制必须符合此类许可证的有关条款。
限制性权利说明如果软件用于履行美国政府的原始合同或转包合同,则应按照DFAR252.227-7014(1995 年6 月)中定义的“商用计算机软件”或FAR 2.101(a) 中定义的“商品”或 FAR 52.227-19(1987 年 6月)或任何同等机构法规或合同条款中定义的“限制性计算机软件”对软件进行交付和许可使用。
本软件的使用、复制或公布受Agilent Technologies标准商用许可条款的限制,非国防部(DOD) 部门和美国政府机构所获权利不应超过 FAR 52.227-19(c)(1-2)(1987 年 6月)中定义的“限制性权利”。
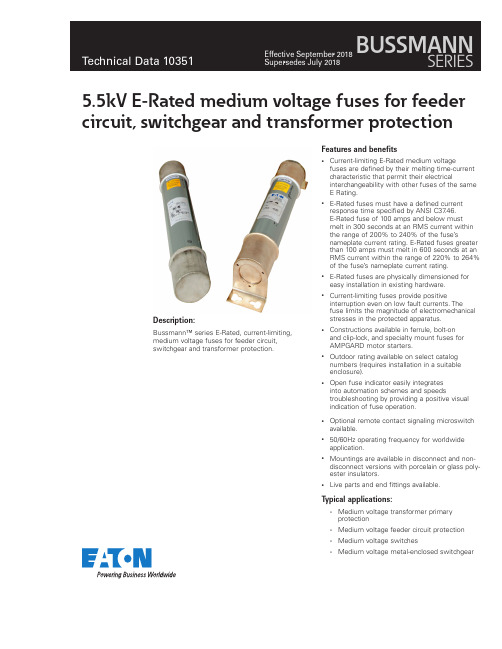
Description:Bussmann™ series E-Rated, current-limiting, medium voltage fuses for feeder circuit, switchgear and transformer protection.Features and benefits• Current-limiting E-Rated medium voltagefuses are defined by their melting time-current characteristic that permit their electrical interchangeability with other fuses of the same E Rating.• E-Rated fuses must have a defined current response time specified by ANSI C37.46.E-Rated fuse of 100 amps and below must melt in 300 seconds at an RMS current within the range of 200% to 240% of the fuse’s nameplate current rating. E-Rated fuses greater than 100 amps must melt in 600 seconds at an RMS current within the range of 220% to 264% of the fuse’s nameplate current rating.• E-Rated fuses are physically dimensioned for easy installation in existing hardware.• Current-limiting fuses provide positive interruption even on low fault currents. The fuse limits the magnitude of electromechanical stresses in the protected apparatus.• Constructions available in ferrule, bolt-onand clip-lock, and specialty mount fuses for AMPGARD motor starters.• Outdoor rating available on select catalog numbers (requires installation in a suitable enclosure).• Open fuse indicator easily integratesinto automation schemes and speeds troubleshooting by providing a positive visual indication of fuse operation.• Optional remote contact signaling microswitch available.• 50/60Hz operating frequency for worldwide application.• Mountings are available in disconnect and non-disconnect versions with porcelain or glass poly-ester insulators.• Live parts and end fittings available.T ypical applications:• Medium voltage transformer primaryprotection• Medium voltage feeder circuit protection • Medium voltage switches• Medium voltage metal-enclosed switchgear5.5kV E-Rated medium voltage fuses for feedercircuit, switchgear and transformer protection2Technical Data 10351Effective September 2018 5.5kV E-Rated medium voltage fuses forfeeder circuit, switchgear and transformer protectionE-Rated medium voltage ferrule fusesCatalog symbols:•General purpose:• 5CLE-_E-D (10-25A)• 5CLE-_E (10-1350A)• 5HLE-_E (10-450A)•JCY-_E (1-25A)•Full range (per ANSI C37.40)•MV055F_ (10-450A)Ratings*:• Volts — 5.5kV • Amps — 1 to 1350A•Interrupting ratings — 40 to 65 kA RMS Sym* See catalog number tables for voltages, ampacities and interrupting ratings by catalog number.Agency information:•E-Rated fuses meet the performance characteristics of ANSI C37.46•UL Listed, Guide JEEG, File E240398. See catalog numbers.Dimensions (see catalog number tables for values)Recommended CLE and HLE holders:10E-D–250E Single barrel 3.0 (76.2)12.0 (304.8)15.9 (403.9)Disconnect 605HLE-PDM-D 5HLE-GDM-D CLE-DL-D CLE-DF-D300E–450E Double barrelNon-disconnect 60 3.0 (76.2)12.0 (304.8)15.9 (403.9)5HLE-PNM-E 5HLE-GNM-E CLE-NL-E —Disconnect605HLE-PDM-E5HLE-GDM-ECLE-DL-ECLE-DF-E* See page 12 for illustrations and dimensions** End fittings supplied only when required.† Disconnect mountings provide a means for fuse extraction only. Do not use a disconnect mounting for load switching or fuse removal while energized.3Technical Data 10351Effective September 20185.5kV E-Rated medium voltage fuses forfeeder circuit, switchgear and transformer protectionCLE, HLE and JCY general purpose11.2 (284) 2 (51)9 (229)401Indoor/outdoor2JCY-2E 3JCY-3E 5JCY-5E 7JCY-7E 10JCY-10E 1017.9 (455) 3 (76)14 (356)635CLE-10E-D 1015.9 (404)12 (305)5HLE-10E 1511.2 (284) 2 (51)9 (229)40JCY-15E 1512.9 (328)11.5 (292)50Indoor 5CLE-15E*1517.9 (455) 3 (76)14 (356)63Indoor/outdoor5CLE-15E-D 1515.9 (404)12 (305)5HLE-15E 2011.2 (284) 2 (51)9 (229)40JCY-20E 2012.9 (328)11.5 (292)50Indoor 5CLE-20E*2017.9 (455) 3 (76)14 (356)63Indoor/outdoor5CLE-20E-D 2015.9 (404)12 (305)5HLE-20E 2511.2 (284) 2 (51)2 (51)9 (229)40JCY-25E 2512.9 (328)11.5 (292)50Indoor5CLE-25E*2517.9 (455) 3 (76)14 (356)63Indoor/outdoor5CLE-25E-D 2515.9 (404)12 (305)5HLE-25E 3017.9 (455)14 (356)5CLE-30E 3015.9 (404)12 (305)5HLE-30E 4017.9 (455)14 (356)655CLE-40E †4015.9 (404)12 (305)5HLE-40E †5017.9 (455)14 (356)5CLE-50E †5015.9 (404)12 (305)5HLE-50E †6517.9 (455)14 (356)5CLE-65E †6515.9 (404)12 (305)5HLE-65E †8017.9 (455)14 (356)5CLE-80E †8015.9 (404)12 (305)5HLE-80E †10017.9 (455)14 (356)5CLE-100E †10015.9 (404)12 (305)5HLE-100E †12517.9 (455)14 (356)5CLE-125E †12515.9 (404)12 (305)5HLE-125E †15017.9 (455)14 (356)5CLE-150E †15015.9 (404)12 (305)5HLE-150E †17517.9 (455)14 (356)5CLE-175E †17515.9 (404)12 (305)5HLE-175E †20017.9 (455)14 (356)5CLE-200E †20015.9 (404)12 (305)5HLE-200E †25017.9 (455)14 (356)5CLE-250E †25015.9 (404)12 (305)5HLE-250E †30017.9 (455)14 (356)25CLE-300E †30015.9 (404)12 (305)5HLE-300E †35017.9 (455)14 (356)5CLE-350E †35015.9 (404)12 (305)5HLE-350E †40017.9 (455)14 (356)5CLE-400E †40015.9 (404)12 (305)5HLE-400E †45017.9 (455)14 (356)5CLE-450E †45015.9 (404)12 (305)5HLE-450E †* Fuses conform to dimensional standards established by Westinghouse.† UL Listed, Guide JEEG, File E240398.4Technical Data 10351Effective September 2018 5.5kV E-Rated medium voltage fuses forfeeder circuit, switchgear and transformer protection5.5kV Time-current curves — minimum melt for JCY-_E fuses5Technical Data 10351Effective September 20185.5kV E-Rated medium voltage fuses forfeeder circuit, switchgear and transformer protection 5.5kV Time-current curves — total clear for JCY-_E fuses6Technical Data 10351Effective September 2018 5.5kV E-Rated medium voltage fuses forfeeder circuit, switchgear and transformer protectionFigure 2Figure 3Figure 1MV055 full range15.7 (399)2 (51)12 (305)501Indoor7MV055F1CAX7E 10MV055F1CAX10E 10 3 (76)MV055F1DAX10E 15 2 (51)MV055F1CAX15E 15 3 (76)MV055F1DAX15E 20 2 (51)MV055F1CAX20E 20 3 (76)MV055F1DAX20E 25 2 (51)MV055F1CAX25E 25 3 (76)MV055F1DAX25E 30 2 (51)MV055F1CAX30E 30 3 (76)MV055F1DAX30E 40 2 (51)MV055F1CAX40E 40 3 (76)MV055F1DAX40E 50 2 (51)MV055F1CAX50E 50 3 (76)MV055F1DAX50E 65 2 (51)MV055F1CAX65E 65 3 (76)MV055F1DAX65E 80MV055F1DAX80E 100MV055F1DAX100E 125MV055F1DAX125E 150MV055F1DAX150E 175MV055F1DAX175E 200MV055F1DAX200E 2502MV055F2DAX250E 300MV055F2DAX300E 350MV055F2DAX350E 400MV055F2DAX400E 450MV055F2DAX450ERecommended CLE, HLE and MV055 fuseclips1Enclosed fuseclip 3 (76)4.14 (105)2.45 (62)3.01 (76)1.19 (30)5.64 (143)1.51 (38)0.4 (10)A3354730*Open fuseclip2See dimensions drawing1A0065Spring loaded open fuseclip39078A67G04*For single barrel applications only. Not sold in pairs.7Technical Data 10351Effective September 20185.5kV E-Rated medium voltage fuses forfeeder circuit, switchgear and transformer protection 5.5kV Time-current curves — minimum melt for MV055_ 2 inch diameter fuses.1101001000100010100.0111000005A 07A65A50A40A 30A 25A 20A 15A10AT I M E I N S E C O N D SCURRENT IN AMPERESMV055_ (2 inch diameter)8Technical Data 10351Effective September 2018 5.5kV E-Rated medium voltage fuses forfeeder circuit, switchgear and transformer protection5.5kV Time-current curves — total clear for MV055_ 2 inch diameter fuses1.01100101000100010010.110000CURRENT IN AMPEREST I M E I N S E C O N D S07A 05A65A50A40A 30A25A 20A 15A 10A MV055_ (2 inch diameter)9Technical Data 10351Effective September 20185.5kV E-Rated medium voltage fuses forfeeder circuit, switchgear and transformer protection 5.5kV Time-current curves — minimum melt for MV055_ 3 inch diameter fusesT I M E I N S E C O N D SCURRENT IN AMPERES.1101001000.0111000001000010001010010A15A20A 25A 30A40A 50A65A 80A 100A125A 150A 175A 200A 250A 300A 350A 400A 450AMV055_ (3 inch diameter)10Technical Data 10351Effective September 2018 5.5kV E-Rated medium voltage fuses forfeeder circuit, switchgear and transformer protection5.5kV Time-current curves — total clear for MV055_ 3 inch diameter fusesT I M E I N S E C O N D SCURRENT IN AMPERES.1101001000.0111000001000010001001010A15A20A25A 30A40A50A65A80A100A125A 150A 175A 200A 250A 300A 350A 400A 450AMV055_ (3 inch diameter)11Technical Data 10351Effective September 20185.5kV E-Rated medium voltage fuses forfeeder circuit, switchgear and transformer protection 5.5kV Peak let-through for MV055_ 2 and 3 inch diameter fuses1AVAILABLE CURRENT IN KILOAMPERES (RMS Symmetrical)M A X I M U M L E T -T H R U (P e a k K i l o a m p e r e s )10010.1.1110015A 20A 25A 40A 50A 65A 80A 100A 07&10A 05A125A 175A 450A 400A 300A 150A350A30A 200A 250A ABMV055_ (2 and 3 inch diameter)12Technical Data 10351Effective September 2018 5.5kV E-Rated medium voltage fuses forfeeder circuit, switchgear and transformer protectionCLE and HLE Type mountings - in (mm)5CLE-PDM-C 12.74 (323.6) 6 (152.4)25.5 (647.7)0.75 (19)1.75 (44.4) 4.5 (114.3)9.75 (247.6)605CLE-GDM-D 15.24 (387.1) 6 (152.4)25 (635)0.62 (15.7)1.75 (44.4) 4.5 (114.3)11.72 (297.7)605CLE-PDM-D 15.24 (387.1) 6 (152.4)25 (635)0.62 (15.7)1.75 (44.4) 4.5 (114.3)11.72 (297.7)605HLE-GDM-D 16.25 (412.8) 6 (152.4)23 (584.2)0.62 (15.7)1.75 (44.4) 4.5 (114.3)11.72 (297.7)605CLE-PNM-E 15.24 (387.1) 6 (152.4)25 (635)0.62 (15.7)1.42 (36.1) 4.5 (114.3)12.48 (317)605HLE-GNM-E 16.25 (412.7) 6 (152.4)23 (584.2)0.62 (15.7)1.75 (44.4) 4.5 (114.3)12.48 (317)605HLE-PNM-E16.25 (412.7)6 (152.4)23 (584.2)0.62 (15.7)1.75 (44.4)4.5 (114.3)12.48 (317)60CLE and HLE T ype disconnect mounting †CLE and HLE Type non-disconnect mounting† Disconnect mountings provide a means for fuse extraction only. Do not use a disconnect mounting for load switching or fuse removal while energized.13Technical Data 10351Effective September 20185.5kV E-Rated medium voltage fuses forfeeder circuit, switchgear and transformer protection• • •• • Amps — 10 to 900A•Interrupting ratings — 31 to 65 kA RMS Sym•0.250.38X.XX (XX.X)HCL clip-lockIndicator to be (53.8)Indicator to be (53.8)CLE four barrel bolt-onNote: 1100E and 1350E fuses require two double barrel fuses (4 total barrels) customer to parallel.14Technical Data 10351Effective September 2018 5.5kV E-Rated medium voltage fuses forfeeder circuit, switchgear and transformer protectionAHLE for Eaton AMPGARD motor starting assemblies651155AHLE-15E 205AHLE-20E 255AHLE-25E 305AHLE-30E 405AHLE-40E †505AHLE-50E †655AHLE-65E †805AHLE-80E †1005AHLE-100E †1255AHLE-125E †1505AHLE-150E †1755AHLE-175E †2005AHLE-200E †2505AHLE-250E †30025AHLE-300E †3505AHLE-350E †4005AHLE-400E †4505AHLE-450E †† UL Listed, Guide JEEG, File E240398.HCL clip-lock versions16.8 (427)3 (76)N/A651Indoor155HCL-15E 205HCL-20E 255HCL-25E 305HCL-30E 405HCL-40E †505HCL-50E †655HCL-65E †805HCL-80E †1005HCL-100E †1255HCL-125E †1505HCL-150E †20022.8 (579)5HCL-200E †2505HCL-250E †30025HCL-300E †4005HCL-400E †4505HCL-450E †5005HCL-500E 6005HCL-600E† UL Listed, Guide JEEG, File E240398.15Technical Data 10351Effective September 20185.5kV E-Rated medium voltage fuses forfeeder circuit, switchgear and transformer protectionCLE, BHLE and BHCL bolt-on versions19.2 (488) 3 (76)17.9 (455)651Indoor155BHLE-15E 205BHLE-20E 255BHLE-25E 305BHLE-30E 405BHLE-40E †505BHLE-50E †655BHLE-65E †805BHLE-80E †1005BHLE-100E †1255BHLE-125E †1505BHLE-150E †1755BHLE-175E †2005BHLE-200E †20025.1 (637)23.7 (602)5BHCL-200E 25019.2 (488)17.9 (455)5BHLE-250E †25025.1 (637)23.7 (602)5BHCL-250E 30019.2 (488)17.9 (455)25BHLE-300E †30025.1 (637)23.7 (602)5BHCL-300E 35019.2 (488)17.9 (455)5BHLE-350E †4005BHLE-400E †40025.1 (637)23.7 (602)5BHCL-400E 45019.2 (488)17.9 (455)5BHLE-450E †45025.1 (637)23.7 (602)5BHCL-450E 5005BHCL-500E 6005BHCL-600E 60028.9 (734) 4 (102)18.4 (467)405CLE-600E 75025.1 (637) 3 (76)23.7 (602)6335BHCL-750E 75028.9 (734) 4 (102)18.4 (467)4025CLE-750E 90025.1 (637) 3 (76)23.7 (602)6335BHCL-900E 110019.8 (503)4 (102)18.4 (467)3145CLE-1100E 13505CLE-1350E† UL Listed, Guide JEEG, File E240398.16Technical Data 10351Effective September 2018 5.5kV E-Rated medium voltage fuses forfeeder circuit, switchgear and transformer protection5.5kV Time-current curves — minimum melt for 5CLE-_E and 5CLE-_-D5CLE-_Curve 70548501April 16, 1999Reference # 563532Curve 70545801April 16, 1999Reference # 705458Curve 70546001April 20, 1999Reference # 705460Curve 62908902April 1999Reference # 62908917Technical Data 10351Effective September 20185.5kV E-Rated medium voltage fuses forfeeder circuit, switchgear and transformer protection5.5kV Time-current curves — total clear for 5CLE-_E and 5CLE-_-D5CLE-_Curve 70548702April 16, 1999Reference # 563533Curve 70545901April 20, 1999Reference # 705459Curve 70546101April 20, 1999Reference # 705461Curve 62908903April 1999Reference # 62908918Technical Data 10351Effective September 2018 5.5kV E-Rated medium voltage fuses forfeeder circuit, switchgear and transformer protection5.5kV Peak let-through for 5CLE-_E and 5CLE-_-D5CLE-_Curve 70548701April 1999Reference # 705487Curve 70547601April 1999Reference # 705476Curve 62908904April 1999Reference # 62908919Technical Data 10351Effective September 20185.5kV E-Rated medium voltage fuses forfeeder circuit, switchgear and transformer protection5.5kV Time-current curves — minimum melt for 5HLE-_E, 5AHLE-_E and 5BHLE-_E5HLE-_, 5BHLE-_, 5AHLE-_Curve 70548507April 16, 1999Reference # 563532Curve 70545805April 16, 1999Reference # 705458Curve 70546005April 20, 1999Reference # 70546020Technical Data 10351Effective September 2018 5.5kV E-Rated medium voltage fuses forfeeder circuit, switchgear and transformer protection5.5kV Time-current curves — total clear for 5HLE-_E, 5AHLE-_E and 5BHLE-_E5HLE-_, 5BHLE-_, 5AHLE-_Curve 70548607April 16, 1999Reference # 563533Curve 70545905April 20, 1999Reference # 705459Curve 70546105April 20, 1999Reference # 7054615.5kV Peak let-through for 5HLE-_E, 5AHLE-_E and 5BHLE-_E5HLE-_, 5BHLE-_, 5AHLE-_Curve 70548703 April 1999Reference # 705487Curve 70547603April 1999Reference # 70547621 5.5kV Time-current curves — minimum melt for 5HCL-_E5HCL-_Curve 70548505Janaury 2001Curve 70545803January 2001Curve 70546003April 2001Curve 66703401 Janaury 20015.5kV Time-current curves — total clear for 5HCL-_E5HCL-_Curve 70548605Janaury 2001Curve 70545903Janaury 2001Curve 70516103Janaury 2001Curve 66703501Janaury 200123 Effective September 201824The only controlled copy of this Data Sheet is the electronic read-only version located on the Bussmann Network Drive. All other copies of this document are by definition uncontrolled. This bulletin is intended to clearly present comprehensive product data and provide technical information that will help the end user with design applications. Bussmann reserves the right, without notice, to change design or construction of any products and to discontinue or limit distribution of any products. Bussmann also reserves the right to change or update, without notice, any technical information contained in this bulletin. Once a product has been selected, it should be tested by the user in all possible applications.Eaton and Bussmann are valuable trademarks of Eaton in the U.S. and other countries. Y ou are not permitted to use the Eaton trademarks without prior written consent of Eaton.ANSI is a registered trademark of the American National Standards AssociationIEEE is a registered trademark of the Institute of Electrical and Electronics Engineers NEMA is a registered trademark of the National Electrical Mfgrs. AssociationNFPA is a registered trademark of the National Fire Protection AssociationUL is a registered trademark of the Underwriters Laboratories, Inc.Eaton1000 Eaton Boulevard Cleveland, OH Bussmann Division 114 Old State Road Ellisville, MO 63021United States/bussmannseries © 2018 EatonAll Rights Reserved Printed in USAPublication No. 10351 - BU-SB15151September 20185.5kV Peak let-through for 5HCL -_E5HCL-_Curve 70548702January 2001Curve 70547602January 2001Curve 66703701January 2001。

ICP‑CC488 控制主机提供 8 个可编程的有线或无线防盗防区。
远程编程实现了更高的便利性和适应性。
基本功能用户代码用户可以编程多达 8 个用户代码和 8 个无线遥控器代码。
只有拥有主码的用户才能添加或更改其他系统用户代码。
两个分区控制主机划分为两个分区。
用户可以从一个主键盘或多个分区键盘来对这两个分区进行操作。
远程编程用户可以在运行 MS‑DOS 并配有调制解调器的 PC 上使用 CC816 Alarm Link (A‑Link) 软件对防区进行远程编程。
此外,用户还可以使用现场以外的计算机来运行诊断、布防系统和旁通防区。
这可以减少现场维护的次数,提供快速的客户服务,从而节省时间和成本。
对于控制主机距离办公室数百公里(英里)的偏远地区,远程编程功能非常有用。
三种布防模式用户可以使用以下三种模式之一来布防系统:AWAY(离开)模式:布防整个系统。
STAY(留守)模式 1:布防所有防区,但不包括已由安装人员设为自动隔离的防区。
STAY(留守)模式 2:布防所有防区,但不包括已由主码用户设为自动隔离的防区。
远程布防此功能允许用户通过电话从远程位置来布防系统。
出于显而易见的安全原因,不能使用这种方法撤防系统。
要使用此功能,需用按键式电话。
另外,要使此功能工作,必须在安装期间进行编程设定。
日间报警日间报警在系统撤防后监视一组防区。
例如,商店前门安装有脚垫或电子射束探测器,顾客在进出商店时会触发此类装置。
每次触发脚垫或电子射束探测器时,键盘都发出蜂鸣声。
胁迫报警键盘胁持报警可以用作静音紧急报警,当系统向监控站或袖珍式寻呼机报告时,此报警非常有用。
键盘防恶意操作报警键盘防恶意操作功能限制用户尝试输入错误用户代码的次数。
当尝试次数超过限制后,系统将启动报警,并向安全监控站发送“拒绝访问”报告。
内置电话线故障监视器当系统检测到电话线与控制主机断开连接时,系统会记录电话线故障。
系统经过编程后,可在发生以下情况时发出有声报警:在布防控制主机后,电话线路被切断。

ET-87P8-MTCP Quick Start Guide Congratulations on purchasing ET-87P8-MTCP - a Modbus TCP I/O expansion unit toexpand I-87K series I/O modules and the most popular automation solution for remotemonitoring and control application. This Quick Start Guide will provide informationneeded to get started. Please also consult the User Manual for detailed information onthe setup and use of ET-87P8-MTCP.In addition to this guide, the package includes the following items:ET-87P8-MTCPSoftware Utility CD Screw Driver (1C016)● ET-87P8-MTCP Website/et_87p8_mtcp.html● ICP DAS Website1Mounting the Hardware The ET-87P8-MTCP installation must provide proper ventilation, spacing, and groundingto ensure the equipment will operate as specified. A minimum clearance of 50mmbetween the ET-87P8-MTCP and the top and bottom side of the enclosure panels mustbe provided. 2 Connecting to PC, Network and Setting up the Poweri. Connect PC to LAN1 port through a hub . The ET-87P8-MTCP is equipped with RJ-45Ethernet ports for connection to an Ethernet hub/switch and PC. You can also linkdirectly the ET-8KPn to PC with an Ethernet cableii. Connect the +24 V DC power supply to PWR1/PWR2 and GND terminals3 Installing the Modbus Utility The Modbus Utility can be obtained from companion CD or ICP DAS FTP site:CD:\Napdos\Modbus\Modbus_Utility\ftp:///pub/cd/8000cd/napdos/modbus/modbus_utility/4 Using the Modbus Utility to Assign a New IP Address UDP Search of the Modbus Utility can be used to configure the IP address. Before starting the configuration process, ensure that the LAN1 are used to connect to network and make the controller under the running firmware mode . The default IP addresses are as follows:192.168.255.1 255.255.0.0 IP AddressSubnet MaskGateway 192.168.0.1Step 1: Run the Modbus Utility, and then search the ET-87P8-MTCP i. Double-click the Modbus Utility shortcut on the desktopii. Select UDP Search from the Client Tools menuiii. Click the Search Servers button of the eSearch Utility dialog, waiting for the search to be doneStep 2: Configure IP Addressi. Select the“Name” fieldfrom the defaultIP address rowof ET-87P8-MTCPii. Click theConfiguration(UDP) button toopen the settingdialogiii.Configure the IPsettingsiv.Click the OKbutton to savethe configuration 5 Inserting and Wiring the I/O ModulesThere are various types of I/O expansion modules for interfacing manydifferent field devices to the ET-87P8-MTCP .For more information about I/Oexpansion module, please refer to:/products/PAC/xpac/remote_io_support_list.htm6 Using the Modbus Utility to Configure the ModuleThe Modbus Utility can be used to make the communication between theET-87P8-MTCP and PC/Laptop via the Modbus/TCP protocol.Step 1: Run the Modbus Utility and connect to ET-87P8-MTCPi. Double-click the Modbus Utility shortcut on the desktopii. Click the Modbus/TCP button in the middle of the SelectController dialogiii. Enter the IP address, and then click the Connect buttonStep 2: Match the I/O module and then get the I/O configuration informationi. Click the Refresh button to match the I/O modules to configuration of the controllerii. Select the About option from the Help menu to get the I/O configuration and firmware informationiii. Check the module status diagram, ensuring for the I/O modules to be matchedStep 3: Set I/O configuration, get the I/O values and then save the I/O configurationi. Configure the I/O settings, such as Range Code, Power-on and Safe valuesii. Select the Timer Interval from the Monitor menu to set the monitoring intervaliii. Click the Monitor icon to start retrieving I/O values. The I/O values will be displayed in the Mapping tablesiv. Select File option from the Save menu and select a location where the configuration file is about to be saved. This operation can save the controller configuration and I/O settings to an “ini” file, and the file can be loaded by Load function at the next time when using the same controller and I/O modules。
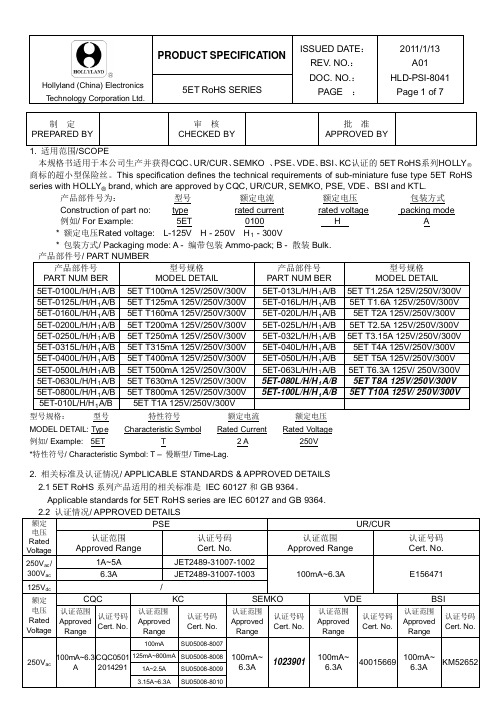
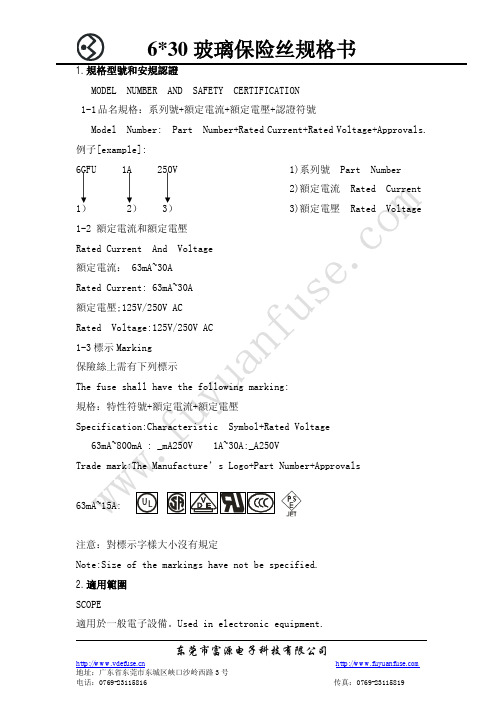
Hollyland (China) Electronics本规格书适用于本公司生产并获得CQC 、UR/CUR 、SEMKO 、PSE 、VDE 、BSI 、KC 认证的5ET RoHS 系列HOLLY 商标的超小型保险丝。
This specification defines the technical requirements of sub-miniature fuse type 5ET RoHS series with HOLLY ® 产品部件号为: brand, which are approved by CQC, UR/CUR, SEMKO, PSE, VDE 、BSI and KTL.型号 额定电流 额定电压 Construction of part no: type rated current rated voltage 5ET 0100 H A型号规格: 型号 特性符号 额定电流 MODEL DETAIL: 额定电压 Type Characteristic Symbol Rated Current 例如/ Example: Rated Voltage 5ET T 2 A *特性符号/ Characteristic Symbol: T – 慢断型/ Time-Lag.250V2. 相关标准及认证情况/ APPLICABLE STANDARDS & APPROVED DETAILS 2.1 5ET RoHS 系列产品适用的相关标准是 IEC 60127和GB 9364。
Applicable standards for 5ET RoHS series are IEC 60127 and GB 9364.Hollyland (China) Electronics3. 公司地址/ ADDRESS中国福建省厦门市湖里区枋湖路9-19号NO. 9-19, FANGHU ROAD, HULI, XIAMEN, FUJIAN, CHINA.4. 构造图/ CONSTRUCTION FIG . & DIMENSION4.2 方形塑料帽/ Square THERMOPLASTIC CAP 方形塑料帽无破裂、缺损或污染等现象。
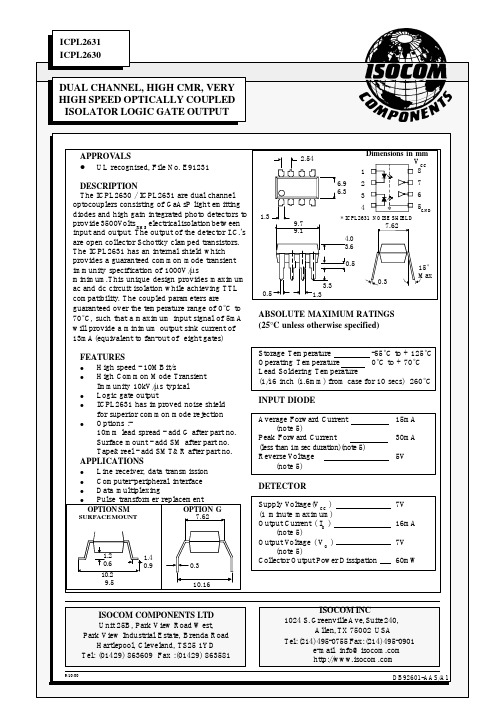
DB92601-AAS/A19/10/00ELECTRICAL CHARACTERISTICS ( T= 0°C to 70°C Unless otherwise noted )A *6.3mA is a guard banded value which allows for at least 20% CTR degradation.Initial input current threshold value is 5.0mA or lessSWITCHING SPECIFICATIONS AT T= 25°C ( V = 5V, I = 7.5mA Unless otherwise noted )NOTES:-1Bypassing of the power supply line is required, with a 0.01µF ceramic disc capacitor adjacent toeach isolator. The power supply bus for the isolator(s) should be seperate from the bus for any active loads. Otherwise a larger value of bypass capacitor (up to 0.1µF) may be needed to supress regenerative feedback via the power supply.2The t PHL propagation delay is measured from the 3.75 mA level Low to High transition of the inputcurrent pulse to the 1.5V level on the High to Low transition of the output voltage pulse.3The t PLH propagation delay is measured from the 3.75mA level High to Low transition of the inputcurrent pulse to the 1.5V level on the Low to High transition of the output voltage pulse.4Device considered a two terminal device; pins 1, 2, 3, and 4 shorted together, and pins 5, 6, 7and 8 shorted together.5Each channel.6Measured between pins 1 and 2 shorted together and pins 3 and 4 shorted together.7CM H is the maximum tolerable rate of rise of the common mode voltage to assure that the outputwill remain in a high logic state (ie V out > 2.0V).8CM Lis the maximum tolerable rate of fall of the common mode voltage to assure that the outputwill remain in a low logic state (ie Vout < 0.8V)DB92601-AAS/A19/10/00FIG.1 SWITCHING TEST CIRCUITI F V O1.5V1.5V 5Vt PHLt V OLV O5VDB92601-AAS/A19/10/00FIG. 2 TEST CIRCUIT FOR TRANSIENT IMMUNITY AND TYPICAL W A VEFORMSPULSE GEN.0V V CM V FF5V V OLV O V OSWITCH AT A: I F = 0mA SWITCH AT B: I F = 7.5mA10V10%90%10%90%t rt fV OO u t p u t v o l t a g e V O (V )Output Voltage vs.Forward Input Current1.0 1.2 1.4 1.6F o r w a r d c u r r e n t I F (m A )Forward Current vs. ForwardVoltageForward voltage V F (V)Low Level Output Voltage vs.Ambient TemperatureL o w l e v e lo u t p u t v o l t a g e V O L (V )Ambient temperature T A ( °C )0 10 20 30 40 50 60 70H i g h l e v e l o u t p u t c u r r e n t I O H( µA )0 1 2 3 4 5 6Forward input current I F(mA)High Level Output Current vs.Ambient Temperature 0.010.10.020.040.20.41241000.0010.0020.0040.010.020.040.10.20.41.001234567890.10.20.30.40.50.60.70.80 10 20 30 40 50 60 70Ambient temperature T A ( °C )。

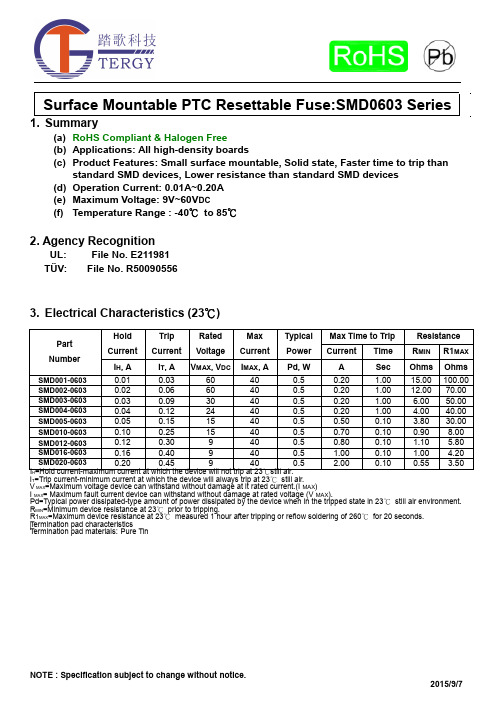
(a) RoHS Compliant & Halogen Free(b) Applications: All high-density boards(c) Product Features: Small surface mountable, Solid state, Faster time to trip thanstandard SMD devices, Lower resistance than standard SMD devices(d) Operation Current: 0.01A~0.20A(e) Maximum Voltage: 9V~60V DC(f) Temperature Range : -40℃to 85℃2. Agency RecognitionUL: File No. E211981TÜV: File No. R500905563. Electrical Characteristics (23℃)HI T=Trip current-minimum current at which the device will always trip at 23℃still air.V MAX=Maximum voltage device can withstand without damage at it rated current.(I MAX)I MAX= Maximum fault current device can withstand without damage at rated voltage (V MAX).Pd=Typical power dissipated-type amount of power dissipated by the device when in the tripped state in 23℃still air environment. R MIN=Minimum device resistance at 23℃prior to tripping.R1MAX=Maximum device resistance at 23℃measured 1 hour after tripping or reflow soldering of 260℃for 20 seconds. Termination pad characteristicsTermination pad materials:Pure Tin4. SMD Product Dimensions (Millimeters)5. Thermal Derating Curve6. Typical Time-To-Trip at 23℃7. Material SpecificationTerminal pad material: Pure TinSoldering characteristics: Meets EIA specification RS 186-9E, ANSI/J-std-002 Category 38. Part Numbering and Marking SystemPart Numbering System Part Marking SystemS M D □ □ □ – 0603Current RatingExampleWarning: -Operation beyond the specified maximum ratings or improper use may result in damage and possibleelectrical arcing and/or flame.-PPTC device are intended for occasional overcurrent protection. Application for repeated overcurrent condition and/or prolonged trip are not anticipated. 甲、 -Avoid contact of PPTC device with chemical solvent. Prolonged contact will damage the deviceperformance.AB=C=D=E=F=G=H=I= X=Y=Z=A=B=F=G==SMD001-0603SMD002-0603SMD003-0603SMD004-0603SMD005-0603SMD010-0603SMD012-0603SMD016-0603SMD020-0603SMD001-0603SMD002-0603SMD003-0603SMD004-0603SMD005-0603SMD010-0603SMD012-0603SMD016-0603SMD020-06039. Pad Layouts 、Solder Reflow and Rework RecommendationsThe dimension in the table below provide the recommended pad layout for each SMD 0603 deviceNote 1: All temperatures refer to of the package,measured on the package body surface.Reflow Profile。
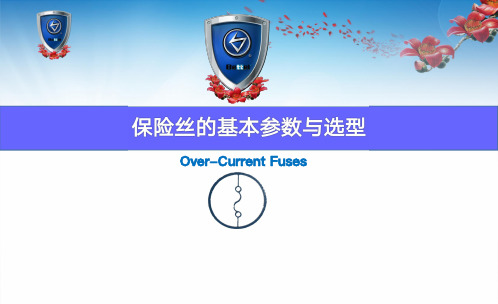
Over-Current Fuses保险丝的测试保险丝的基本参数保险丝的选型保险丝的构造与原理保险丝的应用趋势保险丝的应用领域1,按使用地区标准分:目前国际上比较认可的主要有:IEC欧规(GB国标等同)、UL美规、PSE日规,另外还有其他一些仅在有限范围内应用的,如BS1362英标插头标准。
2,按熔断特性标准分:主要有快熔断(F)和慢熔断(T)两大类,再细分还有特快熔断(FF);中速熔断(M)和特慢熔断(TT)等;3. 按分断能力分:主要有高分断能力(H);低分断能力(L)以及增强分断能力(E);4. 按外形尺寸分:主要有Φ6X30;Φ5X20;Φ3.6X10;Φ2X7;8.5X8.5X4等等5. 按结构型式分:有本体内焊接(俗称内焊)及本体外焊接(俗称外焊)构造种类管状方头瓷管贴片塑胶封装玻璃板端帽熔丝陶瓷片熔丝石英砂内芯塑胶外壳导线玻璃或陶瓷管熔丝内帽外帽导线熔丝瓷管内铜帽 锡外铜帽温度(°C )负载电流时的温度InI >In 熔点1. 额定电流---In2. 额定电压--Un保险丝的标称电压即是保险丝的额定电压,是保险丝安全断开后能够承受的最大电压值。
正确选择保险丝的额定电压应该大于电路的工作电压,如:250AC的保险丝可以用于125VAC电路中3. 环境温度周边环境温度会影响保险丝的正常工作。
环境温度越高, 保险丝的工作时产生的热量越大, 其熔断加快。
UL 标准和 IEC标准下保险丝的各项参数是在环境温度25 ℃测试的。
若周边环境温度较高,选用保险丝时需考虑保险丝的温度折减率。
4. 电压降/冷电阻保险丝的电压降:通以直流额定电流,使保险丝达到热平衡后所测量的数值。
保险丝的冷电阻:在小于额定电流10%的条件下测得的数值。
5. 熔断特性—I-T曲线保险丝在通过不同电流熔断的时间范围。
932 IEC熔断测试标准932-1A的I-T曲线6.分断能力(BC)在额定的电压下, 保险丝能够承受的最大故障电流。

I ndustrial C omputer P roducts D ata A cquisition S ystemET-7000 Series (Ethernet I/O)PET-7000 Series (PoE I/O)WarrantyAll products manufactured by ICP DAS are under warranty regarding defective materials for a period of one year, beginning from the date of delivery to theoriginal purchaser.WarningICP DAS assumes no liability for any damage resulting from the use of thisproduct. ICP DAS reserves the right to change this manual at any time without notice. The information furnished by ICP DAS is believed to be accurate andreliable. However, no responsibility is assumed by ICP DAS for its use, not forany infringements of patents or other rights of third parties resulting from itsuse.CopyrightCopyright @ 2013 by ICP DAS CO., LTD. All rights are reserved.TrademarkThe names used for identification only may be registered trademarks of theirrespective companies.Contact USET-7000/PET-7000 Register Table, version 1.0.1Table of ContentsTable of Contents (1)Preface (1)About this Manual (1)Contents in this Manual (1)ET-7002/PET-7002 (3)ET-7005/PET-7005 (7)ET-7015/PET-7015 (11)ET-7016/PET-7016 (14)ET-7017/PET-7017 (21)ET-7017-10/PET-7017-10 (25)ET-7018Z/PET-7018Z (29)ET-7019/PET-7019 (34)ET-7019Z/PET-7019Z (38)ET-7026/PET-7026 (43)ET-7042/PET-7042 (49)ET-7044/PET-7044 (51)ET-7050/PET-7050 (54)ET-7051/PET-7051 (57)ET-7052/PET-7052 (60)ET-7053/PET-7053 (63)ET-7060/PET-7060 (66)ET-7065 (69)ET-7066 (72)ET-7067/PET-7067 (74)Appendix (76)A. Analog Input Type and Data Format Table (76)B. Analog Output Type and Data Format Table (78)PrefaceAbout this ManualThis manual is intended to be used as a reference for users who need to communicate with the ET-7000/PET-7000 over a Modbus network.This manual assumes that the user has some knowledge of commissioning and programming of Modbus devices, including some knowledge of the Modbus protocol and knowledge about your ET-7000/PET-7000 module.This manual can be obtained from the companion CD:For ET-7000 series module -CD:\NAPDOS\ET7000\Document\For PET-7000 series module -CD:\NAPDOS\PET-7000\Document\or from the ICP DAS FTP site at:For ET-7000 series module -/pub/cd/6000cd/napdos/et7000/document/For PET-7000 series module -/pub/cd/6000cd/napdos/pet7000/document/Contents in this ManualEach chapter contains the following information for each ET-7000/PET-7000 module:⑥I/O Specifications⑥P in Assignments⑥W ire Connections⑥M odbus Register TableThe table below describes the properties of each field in a Modbus register table.ET-7002/PET-7002I/O SpecificationsPin AssignmentsWire ConnectionsVoltage InputOpen or <4 V DCModbus Register Table Coils (0xxxx)Discrete Inputs (1xxxx)Input Register (3xxxx)Holding Register (4xxxx)ET-7005/PET-7005I/O SpecificationsPin AssignmentsWire ConnectionsModbus Register Table Coils (0xxxx)Discrete Inputs (1xxxx)Input Register (3xxxx)Holding Register (4xxxx)ET-7015/PET-7015I/O SpecificationsPin AssignmentsWire ConnectionsTips & Warnings⑥ Use 26-12 AWG wire for signal connections ⑥ Strip the wire to a length of 7±0.5mm ⑥ Use a crimp terminal for wiring⑥ Avoid high-voltage cables and power equipment as much as possible ⑥ Use shielded wire and connect the shielding to the Ax terminal of the channelModbus Register Table Coils (0xxxx)Input Register (3xxxx)Holding Register (4xxxx)ET-7016/PET-7016 I/O SpecificationsExcitation VoltagePin AssignmentsModbus Register Table Coils (0xxxx)Discrete Inputs (1xxxx)ET-7017/PET-7017I/O SpecificationsPin AssignmentsWire ConnectionsModbus Register Table Coils (0xxxx)Discrete Inputs (1xxxx)Input Register (3xxxx)ET-7017-10/PET-7017-10I/O SpecificationsPin AssignmentsWire ConnectionsModbus Register Table Coils (0xxxx)Discrete Inputs (1xxxx)Input Register (3xxxx)Holding Register (4xxxx)ET-7018Z/PET-7018Z I/O SpecificationsPin AssignmentsWire ConnectionsModbus Register Table Coils (0xxxx)Discrete Inputs (1xxxx)Input Register (3xxxx)Holding Register (4xxxx)ET-7019/PET-7019I/O SpecificationsPin AssignmentsWire ConnectionsModbus Register Table Coils (0xxxx)Discrete Inputs (1xxxx)Input Register (3xxxx)Holding Register (4xxxx)ET-7019Z/PET-7019Z I/O SpecificationsPin AssignmentsWire ConnectionsModbus Register Table Coils (0xxxx)Discrete Inputs (1xxxx)Input Register (3xxxx)Holding Register (4xxxx)ET-7026/PET-7026I/O SpecificationsPin AssignmentsWire ConnectionsModbus Register Table Coils (0xxxx)Discrete Inputs (1xxxx)。